2010 MERCEDES-BENZ CLS COUPE wheel size
[x] Cancel search: wheel sizePage 20 of 337
Towing away
Fitting the towing ey e.................... 296
Removing the towing eye. ..............297
Transmission position dis-
play ............................................. 136, 137
Transmission positions ....................137
Trip computer (on-board com-
puter) ................................................. .198
Trip meter Calling up ....................................... 198
Resetting (on-board computer) ......199
Turn signal (display message) .........221
Turn signal lamps ................................ 99
TV Operating (on-board computer) .....201
see Separate operating instructions
Two-way radio
Frequencies ................................... 317
Installatio n..................................... 317
Transmission output (maximum) .... 317
Type identification plate
see Vehicle identification plate
Tyre grip ............................................. 151
Tyre pressure Calling up (on-board computer) .....307
Display message ............................ 232
Not reached (TIREFIT) ....................283
Pressure loss warning ....................306
Reached (TIREFIT) ..........................283
Recommended ............................... 305
Tyre pressure monitor
Function/notes ............................. 307
Restarting ...................................... 308
Warning lamp ................................. 246
Tyres
Checking ........................................ 302
Directio nofrotation ...................... 310
Flat tyre ......................................... 281
MOExtended tyres (tyre swith run-
flat characteristics) ........................289
Replacing ....................................... 309
Storing ........................................... 310
Tyr esize (data) .............................. 310
Tyr etread ...................................... 303
Tyres and wheels (important
safety information) ...........................302 U
Unladen weight ................................. 323
Unlocking Emergency unlocking .......................75
From inside the vehicle (central
unlocking button) ............................. 74 V
Vanity mirror Sun visor ........................................ 257
Variable Speedtronic ........................163
Vehicle Emergency unlocking .......................75
Equipment ....................................... 19
Individual settings (on-board com-
puter) ............................................. 205
Leaving parked up .........................149
Lowering ........................................ 288
Raising ........................................... 285
Towing away .................................. 295
Tow-starting ................................... 295
Transporting .................................. 298
Vehicle data
see Technical data
Vehicle dimensions ...........................323
Vehicle electronics ...........................316
Vehicle identification number see VIN
Vehicle identification plate ..............318
Vehicle level .............................. 167, 169
Vehicle level (display message) .......226
Vehicle tool kit .................................. 279
Vehicle weights ................................. 323
Vents see Air vents .................................. 124
Video (DVD) ........................................ 201
Video DVD (on-board computer) ......201
VIN ...................................................... 318 W
Warning and indicator lamps LIM (cruise control) ........................ 152
LIM (DISTRONIC PLUS) ..................155
LIM (variable SPEEDTRONIC) .........163
PASSENGER AIRBAG OFF ................48
Warning triangle ................................ 278 Index
17
Page 21 of 337
Washer fluid (display message)
.......236
see Washer fluid (display message)
Wheel bol ttightening torque ...........288
Wheel chock ...................................... 285
Wheels Changing/replacing .......................309
Changing awheel .......................... 284
Checking ........................................ 302
Cleaning ......................................... 272
Fitting awheel ............................... 287
Removing awheel .......................... 286
Storing ........................................... 310
Tightening torque ........................... 288
Whee lsize/tyre size ...................... 310
Windowbag
Display message ............................ 218
Operation ........................................ .39
Windows
see Side windows
Windows (cleaning instructions) .....273
Windscreen Demisting ...................................... 116
Windscreen washe rsystem ............. 269
Windscreen wipers Replacing the wiper blades ............107
Switching on/off ........................... 106
Troubleshooting ............................. 107
Winte rdriving ............................ 151, 303
Winter tyres Limiting the speed (on-board com-
puter) ............................................. 209
M+S tyres ...................................... 303
Wiper blades
Cleaning ......................................... 273
Replacing ....................................... 10718
Index
Page 62 of 337
If ESP
®
intervenes, the ÷warning lamp
flashes in the instrument cluster. G
Risk of accident
If the ÷ warning lamp in the instrument
cluster flashes, proceed as follows:
R do not deactivate ESP ®
under any circum-
stances.
R only depress the accelerator pedal as far as
necessary when pulling away.
R adapt yourd riving style to suitt he prevail-
ing road and weather conditions.
Otherwise, the vehicle could go into a skid.
ESP ®
cannot reduce the risk of an accident if
you drive too fast. ESP ®
cannot override the
laws of physics.
! Switch the ignition off when:
R the parking brake is being tested using a
dynamometer
R the vehicle is being towed with the front/
rear axle raised
Application of the brakes by ESP ®
may oth-
erwise destroy the brake system.
! Do not tow vehicles with 4MATIC with the
front or rear axle raised.
i Only use wheels with the recommended
tyre sizes. Only then will ESP ®
function
properly.
ETS/4ETS (Electronic Traction System) Traction control is part of ESP
®
.
Traction control brakes the drive wheels indi-
vidually if they spin. This enables you to pull
away and accelerate on slippery surfaces, for
example if the road surface is slippery on one
side. On vehicles with 4MATIC, more drive
torque is also transferred to the wheel or
wheels with traction.
Traction control remains active if you deacti-
vate ESP ®
. G
Risk of accident
Traction control cannot reduce the risk of an
accident if you drive too fast. Traction control
cannot override the laws of physics.
Deactivating/activating ESP ®
(except
AMG vehicles) ESP
®
is activated automatically when the
engine is started.
It may be best to deactivate ESP ®
in the fol-
lowing situations:
R when using snow chains
R in deep snow
R on sand or gravel G
Risk of accident
Activate ESP ®
as soon as the situations
described above no longer apply.E SP®
will
otherwise not be able to stabilise the vehicle
if the vehicle starts to skid or a wheel starts
to spin.
If you deactivate ESP ®
:
R ESP ®
no longer improves driving stability.
R the engine's torque is no longer limited and
the drive wheels can spin. The spinning of
the wheels results in a cutting action, which
provides bette rgrip.
R traction control is still activated.
R ESP ®
still provides support when you
brake.
If ESP ®
is deactivated and one or more wheels
start to spin, the ÷ESP®
warning lamp in
the instrument cluster flashes. In such situa-
tions, ESP ®
will not stabilise the vehicle.
X To deactivate:(Y page 204).
The å ESP®
OFF warning lamp in the
instrument cluster lights up. G
Risk of accident
ESP ®
is deactivated if the åwarning lamp
in the instrument cluster lights up continu-
ously when the engine is running. Driving safety systems
59Safety
Z
Page 96 of 337
Exterior mirrors
Adjusting the exterior mirrors G
Ris
kofa ccident
The exterior mirrors reduce the size of the
image .Objects are actually closer than they
appear. You could misjudge the distance from
vehicles driving behind and cause an acci-
dent, e.g. when changing lane. For this rea-
son, make sure of the actual distance from the
vehicle driving behind by glancing over your
shoulder.
The convex exterior mirrors provide a larger
field of vision.
The exterior mirrors are automatically heated
if the rear window heating is switched on and
the outside temperature is low. X
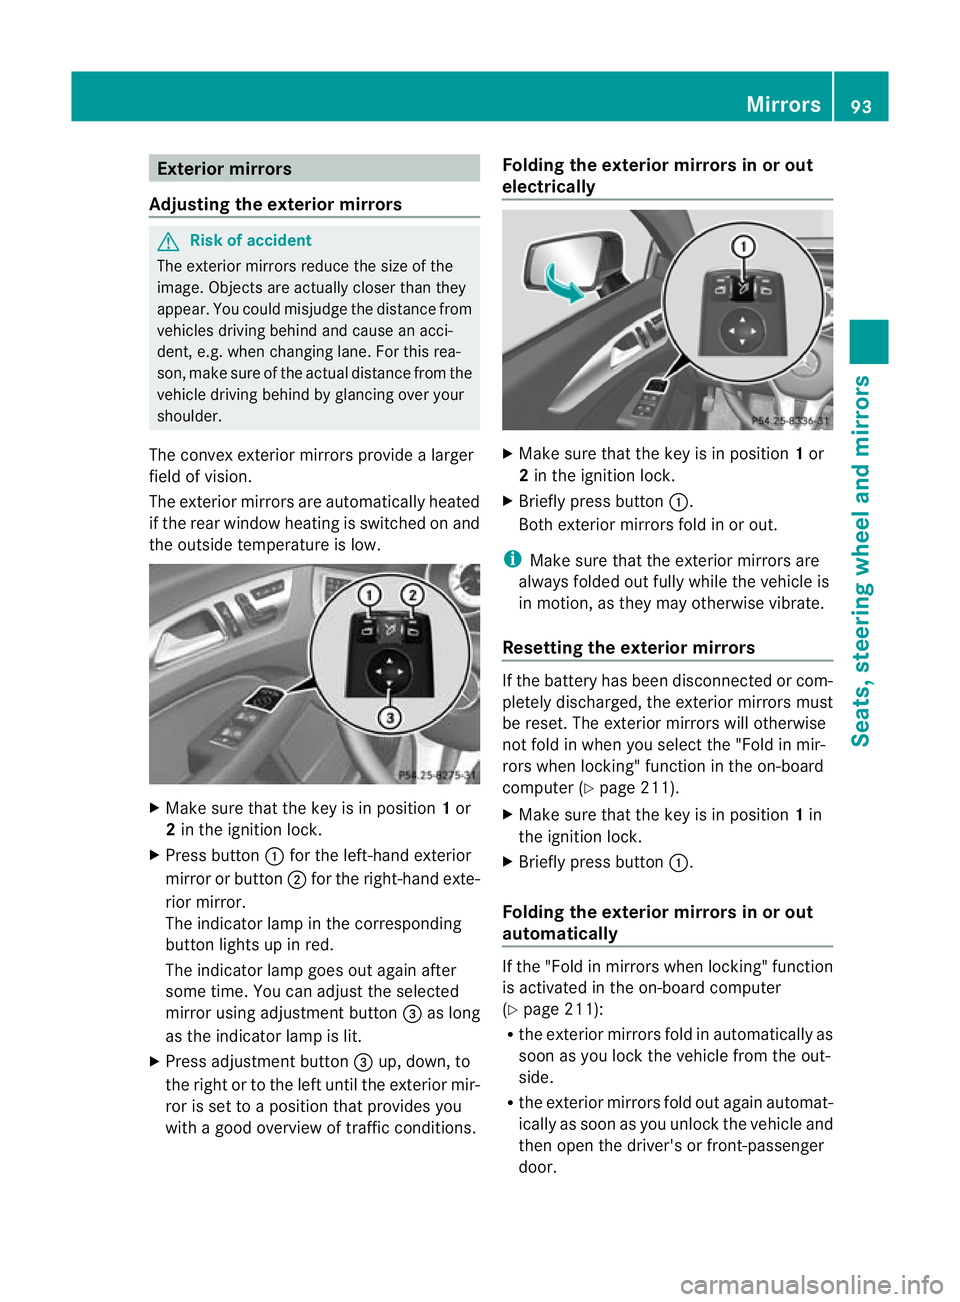
Make sure that the key is in position 1or
2 in the ignition lock.
X Press button :for the left-hand exterior
mirror or button ;for the right-hand exte-
rior mirror.
The indicator lamp in the corresponding
butto nlights up in red.
The indicator lamp goes out again after
some time. You can adjust the selected
mirror using adjustment button =as long
as the indicator lamp is lit.
X Press adjustmen tbutton =up, down, to
the right or to the left until the exterio rmir-
ror is set to a position that provides you
with a good overview of traffic conditions. Folding the exterior mirrors in or out
electrically
X
Make sure that the key is in position 1or
2 in the ignition lock.
X Briefly press button :.
Both exterior mirrors fold in or out.
i Make sure that the exterior mirrors are
always folded out fully while the vehicle is
in motion, as they may otherwise vibrate.
Resetting the exterior mirrors If the battery has been disconnected or com-
pletely discharged, the exterior mirrors must
be reset
.The exterior mirrors will otherwise
not fold in when you select the "Fold in mir-
rors when locking" function in the on-board
computer (Y page 211).
X Make sure that the key is in position 1in
the ignition lock.
X Briefly press button :.
Folding the exterior mirrors in or out
automatically If the "Fold in mirrors when locking" function
is activated in the on-board computer
(Y
page 211):
R the exterior mirrors fold in automatically as
soon as you lock the vehicle from the out-
side.
R the exterior mirrors fold out again automat-
ically as soon as you unlock the vehicle and
then open the driver's or front-passenger
door. Mirrors
93Seats, steering wheel and mirrors Z
Page 203 of 337
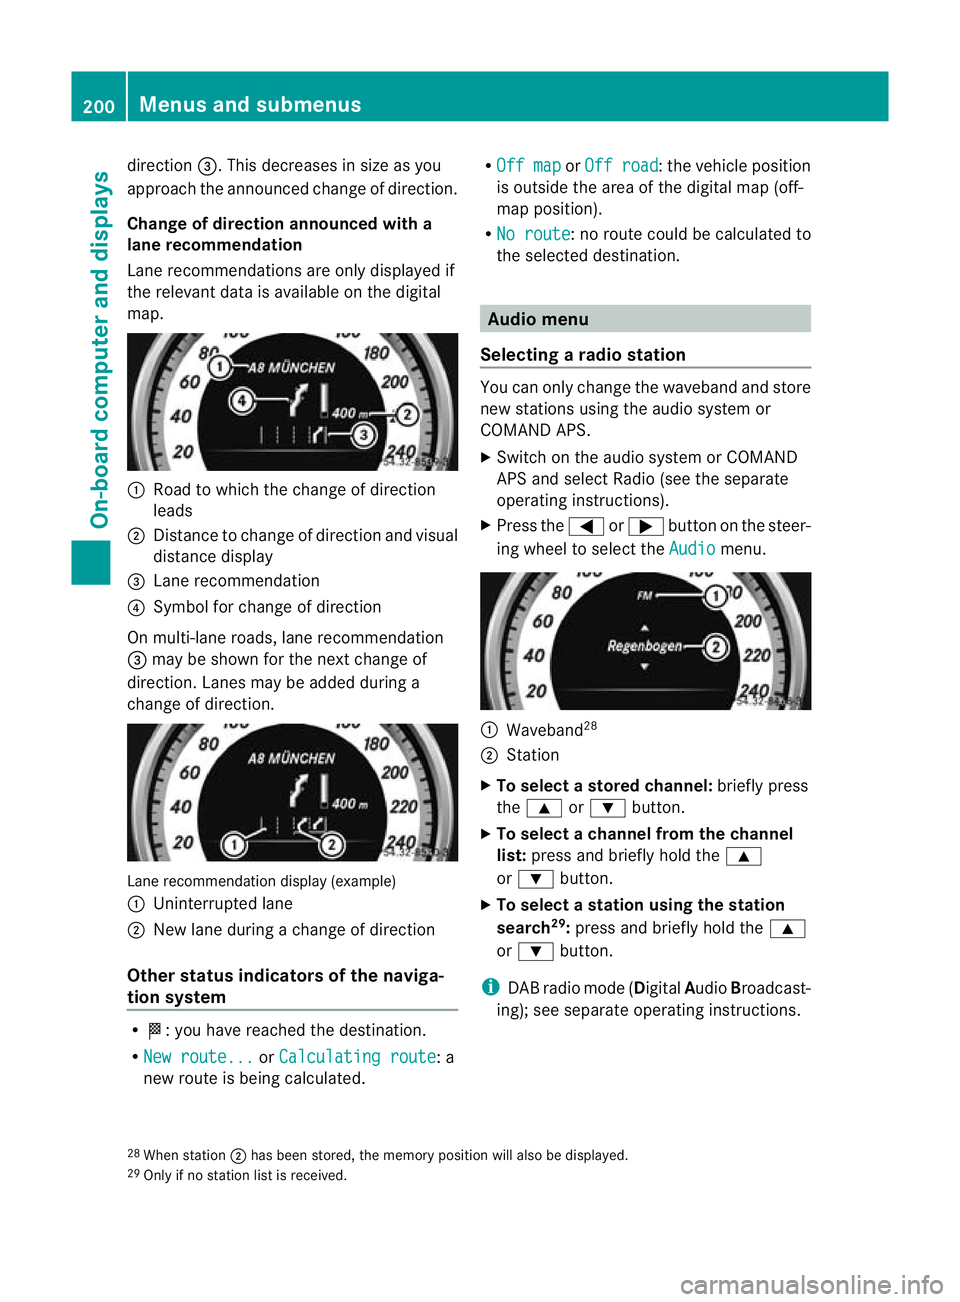
direction
=.This decreases in size as you
approach the announced change of direction.
Change of direction announced with a
lane recommendation
Lane recommendations are only displayed if
the relevant data is available on the digital
map. :
Road to which the change of direction
leads
; Distance to change of direction and visual
distance display
= Lane recommendation
? Symbol for change of direction
On multi-lane roads, lane recommendation
= may be shown for the next change of
direction. Lanes may be added during a
change of direction. Lane recommendation display (example)
:
Uninterrupted lane
; New lane during a change of direction
Other status indicators of the naviga-
tion system R
O:y ou have reached the destination.
R New route... or
Calculating route : a
new route is being calculated. R
Off map or
Off road :t
he vehicle position
is outside the area of the digital map (off-
map position).
R No route :n
o route could be calculated to
the selected destination. Audio menu
Selecting aradio station You can only change the waveband and store
new stations using the audio system or
COMAND APS.
X
Switch on the audio system or COMAND
APS and select Radio (see the separate
operating instructions).
X Press the =or; button on the steer-
ing wheel to select the Audio menu.
:
Waveband 28
; Station
X To selectas toredchannel: briefly press
the 9 or: button.
X To selectac hannel from the channel
list: press and briefly hold the 9
or : button.
X To selectas tation using the station
search 29
:press and briefly hold the 9
or : button.
i DAB radio mode ( DigitalAudioBroadcast-
ing); see separate operating instructions.
28 Whe nstation ;has been stored, the memory position will also be displayed.
29 Only if no statio nlist is received. 200
Menus and submenusOn-board computer and displays
Page 287 of 337
X
Correct the tyre pressure if it is still at least
130 kPa (1.3 bar/20 psi) (for the values,
see the fuel fille rflap).
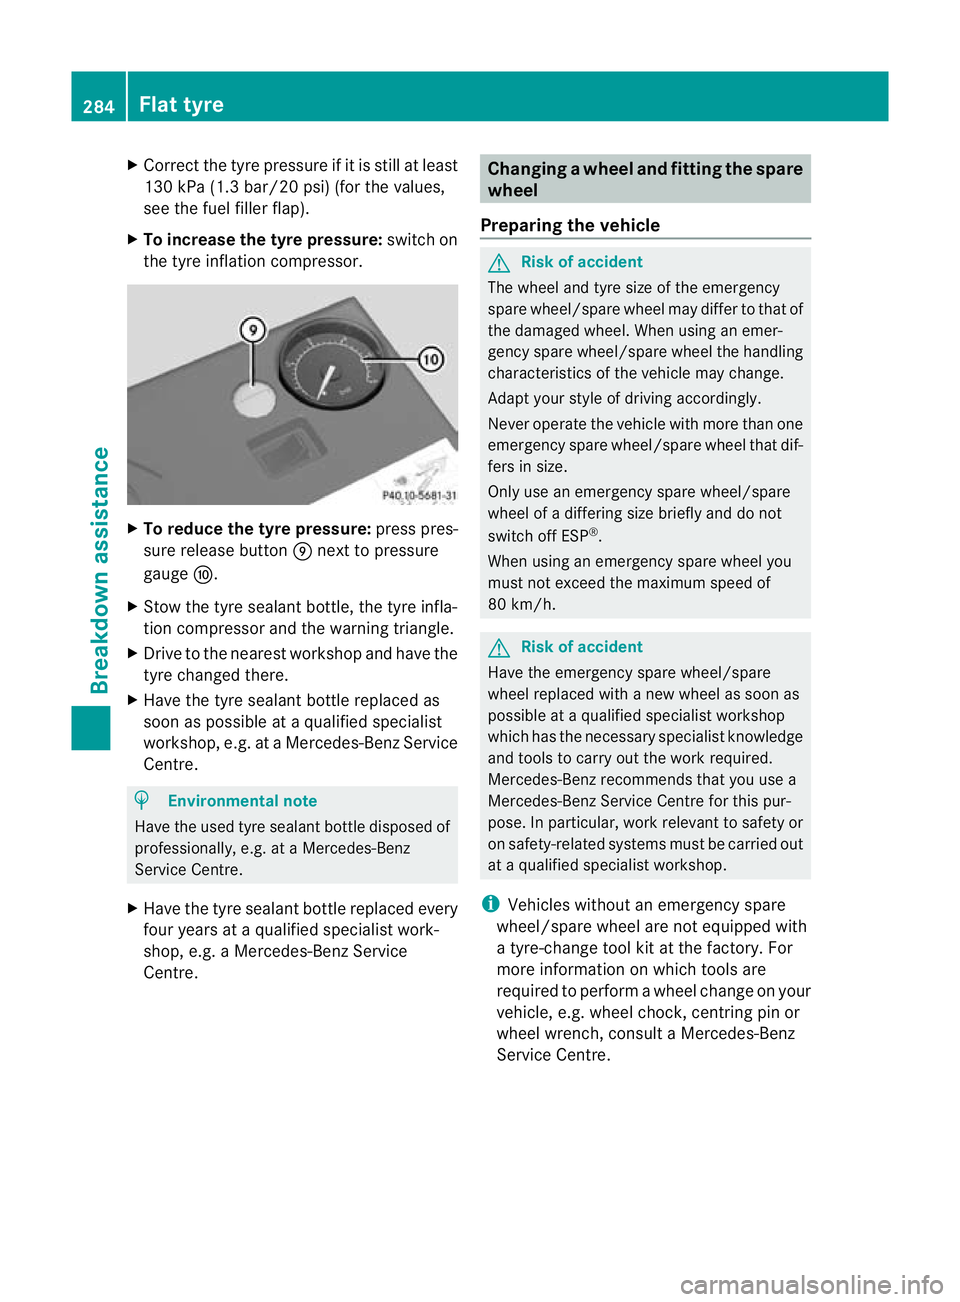
X To increase the tyre pressure: switch on
the tyre inflation compressor. X
To reduce the tyre pressure: press pres-
sure release button Enext to pressure
gauge F.
X Stow the tyre sealant bottle, the tyre infla-
tion compressor and the warning triangle.
X Drive to the nearest workshop and have the
tyre changed there.
X Have the tyre sealant bottle replaced as
soon as possible at a qualified specialist
workshop, e.g. at a Mercedes-Ben zService
Centre. H
Environmental note
Have the used tyre sealant bottle disposed of
professionally, e.g. at aMercedes-Benz
Service Centre.
X Have the tyre sealant bottle replaced every
four years at a qualified specialist work-
shop, e.g. a Mercedes-Benz Service
Centre. Changing
awheel and fitting the spare
wheel
Preparing the vehicle G
Risk of accident
The wheel and tyre size of the emergency
spare wheel/spare wheel may diffe rto that of
the damaged wheel. When using an emer-
gency spare wheel/spare wheel the handling
characteristics of the vehicle may change.
Adapt your style of driving accordingly.
Never operate the vehicle with more than one
emergency spare wheel/spare wheel that dif-
fers in size.
Only use an emergency spare wheel/spare
wheel of a differing size briefly and do not
switch off ESP ®
.
When using an emergency spare wheel you
must not exceed the maximum speed of
80 km/h. G
Risk of accident
Have the emergency spare wheel/spare
wheel replaced with a new wheel as soon as
possible at a qualified specialist workshop
which has the necessary specialist knowledge
and tools to carry out the work required.
Mercedes-Benz recommends that you use a
Mercedes-Benz Service Centre for this pur-
pose. In particular, work relevant to safety or
on safety-related systems must be carried out
at a qualified specialist workshop.
i Vehicles without an emergency spare
wheel/spare wheel are not equipped with
a tyre-change tool kit at the factory. For
more information on which tools are
required to perform a wheel change on your
vehicle, e.g. wheel chock, centring pin or
wheel wrench, consult a Mercedes-Benz
Service Centre. 284
Flat tyreBreakdown assistance
Page 293 of 337
R
you see smoke and smell rubber.
R ESP ®
is intervening constantly.
R there are tears in the sidewalls of the tyre.
After driving in run-flat mode, you must have
the wheel(s) checked for damage at a quali-
fied specialist workshop which has the nec-
essary specialist knowledge and tools to carry
out the wor krequired. The faulty tyre must be
replaced in every case.
Mercedes-Benz recommends that you use a
Mercedes-Benz Service Centre for this pur-
pose. In particular, work relevant to safety or
on safety-related systems must be carried out
at a qualified specialist workshop.
i When replacing one or all tyres, make
sure that you only use tyres marked
MOExtended and of the specified size for
the vehicle.
i Vehicles with MOExtended tyres are not
equipped with a TIREFIT kit at the factory.
It is therefore recommended that you addi-
tionally equip your vehicle with a TIREFIT kit
if you fit tyres that do not feature run-flat
properties, e.g. winter tyres. A TIREFIT kit
can be obtained from a Mercedes-Benz
Service Centre. Battery
Important safety notes
In order for the battery to achieve the maxi-
mum possible service life, it must always be
sufficiently charged.
Have the battery charge checked more fre-
quently if you use the vehicle mainly for short
trips or if you leave it standing idle for a
lengthy period.
To preven tdamage from corrosion, only
replace the battery with one that has a central
ventilation cover.
Only replace a battery with a battery that has
been recommended by Mercedes-Benz. Consult a Mercedes-Ben
zService Centre if
you wish to leave your vehicle parked up for
a long period of time. G
Risk of injury
Comply with safety precautions and take pro-
tective measures when handling batteries. Risk of explosion
Fire, naked flames and
smoking are prohibited
when handling the battery.
Avoid creating sparks.
Battery acid is caustic.
Avoid contact with the skin,
eyes or clothing.
Wear suitable protective
clothing, in particular
gloves, an apron and a face
mask.
Immediately rinse acid
splashes off with clean
water. Consult a doctor if
necessary.
Wear eye protection.
Keep children away.
Observe this Owner's Man-
ual.
H
Environmental note Batteries contain pollutants.
It is against the law to dis-
pose of them with the house-
hold rubbish. They must be
collected separately and290
BatteryBreakdown assistance
Page 306 of 337
Tyre tread
G
Ris
kofa ccident
Bear in mind that:
R tyre grip decreases rapidly on wet roads
when the tread depth is less than 3mm.
Thus, you should replace tyres that have
insufficient tread.
R winter tyres should be replaced when the
tread depth is 4mmorless as they no lon-
ger provide adequate grip.
R the tread on a tyre may not wear evenly.
Thus, you should regularly check the tread
depth and the condition of the tread across
the entire width of all tyres. If necessary,
turn the fron twheels to full lock in order to
inspect the tyre tread more easily.
Otherwise, you could lose control of the vehi-
cle and cause an accident due to the reduced
grip of the tyres on the road. Notes on selecting, fitting and replac-
ing tyres
R Only fit tyres and wheels of the same type
and make.
R Only fit tyres of the correct size onto the
wheels.
R After fittingn ew tyres, run them in at mod-
erate speeds for the first 100 km, as they
only reach their full performance after this
distance.
R Do not drive with tyres which have too little
tread depth, as this significantly reduces
the traction on wet roads (aquaplaning).
R Replace the tyres after six years at the lat-
est, regardless of wear. This also applies to
the emergency spare wheel/spare wheel. MOExtended tyres (tyres with run-flat
characteristics)
MOExtended tyres (tyres with run-flat char-
acteristics) allow you to continue driving the vehicle even when one or more tyres lose all
air pressure.
MOExtended tyres may only be used in con-
junction with the activated tyre pressure loss
warning system or with the activated tyre
pressure monitor and on wheels specifically
tested by Mercedes-Benz.
i Vehicles with MOExtended tyres are not
equipped with a TIREFIT kit at the factory.
It is therefore recommended that you addi-
tionally equip your vehicle with the TIREFIT
kit if you fit tyres that do not feature run-
flat properties, e.g. winter tyres. You can
obtain a TIREFIT kit from a Mercedes-Benz
Service Centre, for example.
You will find notes on driving with a flat tyre
in the "Breakdown assistance" section
(Y page 289). Winter operation
Please bear the following in mind
Have your vehicle winterproofed at a qualified
specialist workshop, e.g. at a Mercedes-Benz
Service Centre, at the onset of winter.
Observe the notes in the "Changing a wheel"
section (Y page 309). Driving with summer tyres
At temperatures below +7 †, summer tyres
lose elasticity and therefore traction and
braking power –change the tyres on your
vehicle to M+S tyres. Using summer tyres at
very cold temperatures could cause tears to
form, thereby damaging them permanently.
Mercedes-Ben zcannot accept responsibility
for this type of damage. M+S tyres
At temperatures below +7 †, use winter tyres
or all-season tyres. Both types of tyre are
identified by the M+S marking. Winter operation
303Wheels and tyres Z