2010 MERCEDES-BENZ CLS COUPE emergency towing
[x] Cancel search: emergency towingPage 12 of 337
EBD (Electronic Brake-force Distri-
bution) Display message ............................ 220
Function/notes ................................ 61
ECO start/stop function
General information .......................131
Switching on/off (AMG vehicles) ...133
Switching on/off (except AMG
vehicles) ........................................ 133
Electrical fuses
see Fuses
Electronic Brake-force Distribution
see EBD
Electronic Stability Program
see ESP ®
Electronic Traction System see ETS/4ETS
Emergency key element
Function/notes ................................ 69
Emergency locking
Vehicle ............................................. 75
Emergency release
Fuel filler fla p................................. 145
Emergency running mode
Automatic transmission .................142
Emergency spare wheel
Inflating the collapsible spare
wheel ............................................. 288
Notes/data .................................... 313
Storage location ............................ 280
Stowing .......................................... 280
Emergency unlocking
Boot ................................................. 77
Vehicle ............................................. 75
Engine
Running irregularl y......................... 134
Starting problems ..........................134
Starting the engine with the key ....130
Starting with KEYLESS GO .............130
Stopping ........................................ 148
Warning lamp (engine diagnos-
tics) ............................................... 244
Engine electronics .............................316
Malfunction ................................... .134
Engine number .................................. 319Engine oil
Additives ........................................ 321
Checking the oil level ..................... 267
Display message ............................ 225
Filling capacity ............................... 321
Notes about oil grades ................... 320
Temperature (on-board computer) .212
Topping up ..................................... 268
Viscosity ........................................ 321
Environmental protection
Note ................................................ .19
Returning an end-of-life vehicle .......19
Error messages
see Display messages
ESP ®
(Electronic Stability Pro-
gram) Activating/deactivating (AMG
vehicles) .......................................... 60
Activating/deactivating (except
AMG vehicles) .................................. 59
Activating/deactivating (on-
board computer) ............................ 204
ETS/4ETS ........................................ 59
Important safety guidelines .............58
Warning lamp ................................. 242
ETS/4ETS (Electronic Traction Sys-
tem) ...................................................... 59
Exhaus ttail pipe (cleaning instruc-
tions) .................................................. 274
Exterior mirrors Adjusting ......................................... 93
Anti-dazzle mode (automatic) ..........94
Folding in/ou t(automatically) .........93
Folding in/ou t(electrically) .............93
Folding in whe nlocking (on-board
computer) ...................................... 211
Out of position ................................. 94
Parking position ............................... 94
Resetting ......................................... 93
Storing settings (memory func-
tion) ................................................. 95 F
Fatigue Assist see ATTENTION ASSIST
Fire extinguisher ............................... 278
First-aid kit ......................................... 278 Index
9
Page 20 of 337
Towing away
Fitting the towing ey e.................... 296
Removing the towing eye. ..............297
Transmission position dis-
play ............................................. 136, 137
Transmission positions ....................137
Trip computer (on-board com-
puter) ................................................. .198
Trip meter Calling up ....................................... 198
Resetting (on-board computer) ......199
Turn signal (display message) .........221
Turn signal lamps ................................ 99
TV Operating (on-board computer) .....201
see Separate operating instructions
Two-way radio
Frequencies ................................... 317
Installatio n..................................... 317
Transmission output (maximum) .... 317
Type identification plate
see Vehicle identification plate
Tyre grip ............................................. 151
Tyre pressure Calling up (on-board computer) .....307
Display message ............................ 232
Not reached (TIREFIT) ....................283
Pressure loss warning ....................306
Reached (TIREFIT) ..........................283
Recommended ............................... 305
Tyre pressure monitor
Function/notes ............................. 307
Restarting ...................................... 308
Warning lamp ................................. 246
Tyres
Checking ........................................ 302
Directio nofrotation ...................... 310
Flat tyre ......................................... 281
MOExtended tyres (tyre swith run-
flat characteristics) ........................289
Replacing ....................................... 309
Storing ........................................... 310
Tyr esize (data) .............................. 310
Tyr etread ...................................... 303
Tyres and wheels (important
safety information) ...........................302 U
Unladen weight ................................. 323
Unlocking Emergency unlocking .......................75
From inside the vehicle (central
unlocking button) ............................. 74 V
Vanity mirror Sun visor ........................................ 257
Variable Speedtronic ........................163
Vehicle Emergency unlocking .......................75
Equipment ....................................... 19
Individual settings (on-board com-
puter) ............................................. 205
Leaving parked up .........................149
Lowering ........................................ 288
Raising ........................................... 285
Towing away .................................. 295
Tow-starting ................................... 295
Transporting .................................. 298
Vehicle data
see Technical data
Vehicle dimensions ...........................323
Vehicle electronics ...........................316
Vehicle identification number see VIN
Vehicle identification plate ..............318
Vehicle level .............................. 167, 169
Vehicle level (display message) .......226
Vehicle tool kit .................................. 279
Vehicle weights ................................. 323
Vents see Air vents .................................. 124
Video (DVD) ........................................ 201
Video DVD (on-board computer) ......201
VIN ...................................................... 318 W
Warning and indicator lamps LIM (cruise control) ........................ 152
LIM (DISTRONIC PLUS) ..................155
LIM (variable SPEEDTRONIC) .........163
PASSENGER AIRBAG OFF ................48
Warning triangle ................................ 278 Index
17
Page 252 of 337
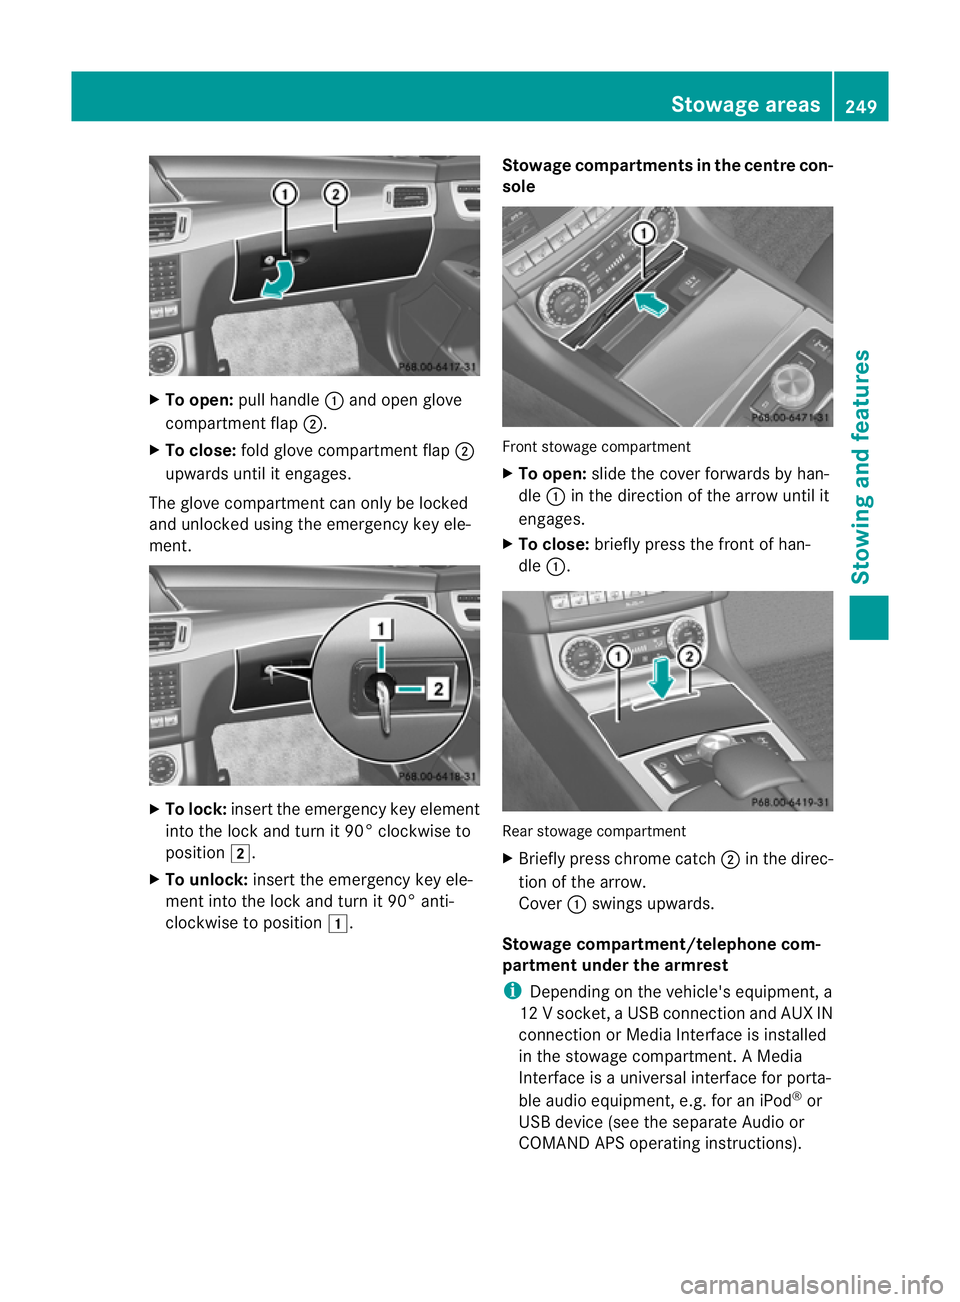
X
To open: pull handle :and open glove
compartment flap ;.
X To close: fold glove compartment flap ;
upwards until it engages.
The glove compartment can only be locked
and unlocked using the emergency key ele-
ment. X
To lock: insert the emergency key element
into the lock and turn it 90° clockwise to
position 2.
X To unlock: insert the emergency key ele-
ment into the lock and turn it 90° anti-
clockwise to position 1. Stowage compartments in the centre con-
sole Front stowage compartment
X
To open: slide the cove rforwards by han-
dle :in the direction of the arrow until it
engages.
X To close: briefly press the front of han-
dle :. Rear stowage compartment
X
Briefly press chrome catch ;in the direc-
tion of the arrow.
Cover :swings upwards.
Stowage compartment/telephone com-
partment under the armrest
i Depending on the vehicle's equipment, a
12 V socket ,aUSB connection and AUX IN
connection or Media Interface is installed
in the stowage compartment. AMedia
Interface is a universal interface for porta-
ble audio equipment, e.g. for an iPod ®
or
USB device (see the separate Audio or
COMAND APS operating instructions). Stowage areas
249Stowing and features Z
Page 282 of 337
X
Pull handle :upward and fold cover ;
forward.
X Remove the fire extinguisher from the
stowage compartment.
! Keep the stowage compartment closed
while the vehicle is in motion .Itmay oth-
erwise be damaged.
i Have the fire extinguisher refilled after
each use and checked every one or two
years .Itmay otherwise fail in an emer-
gency.
Observe the legal requirements in all coun-
tries concerned. Vehicle tool kit
The vehicle tool kit can be found in the stow-
age well unde rthe boot floor.
i Vehicles with a TIREFIT kit are not equip-
ped with the tools needed to change a
wheel when they leave the factory, e.g. a
jack or wheel wrench. Country-specific dif-
ferences are possible. Some tools for
changing a wheel are specific to the vehi-
cle. To obtain tools approved for your vehi-
cle, visit a qualified specialist workshop,
e.g. a Mercedes-Benz Service Centre.
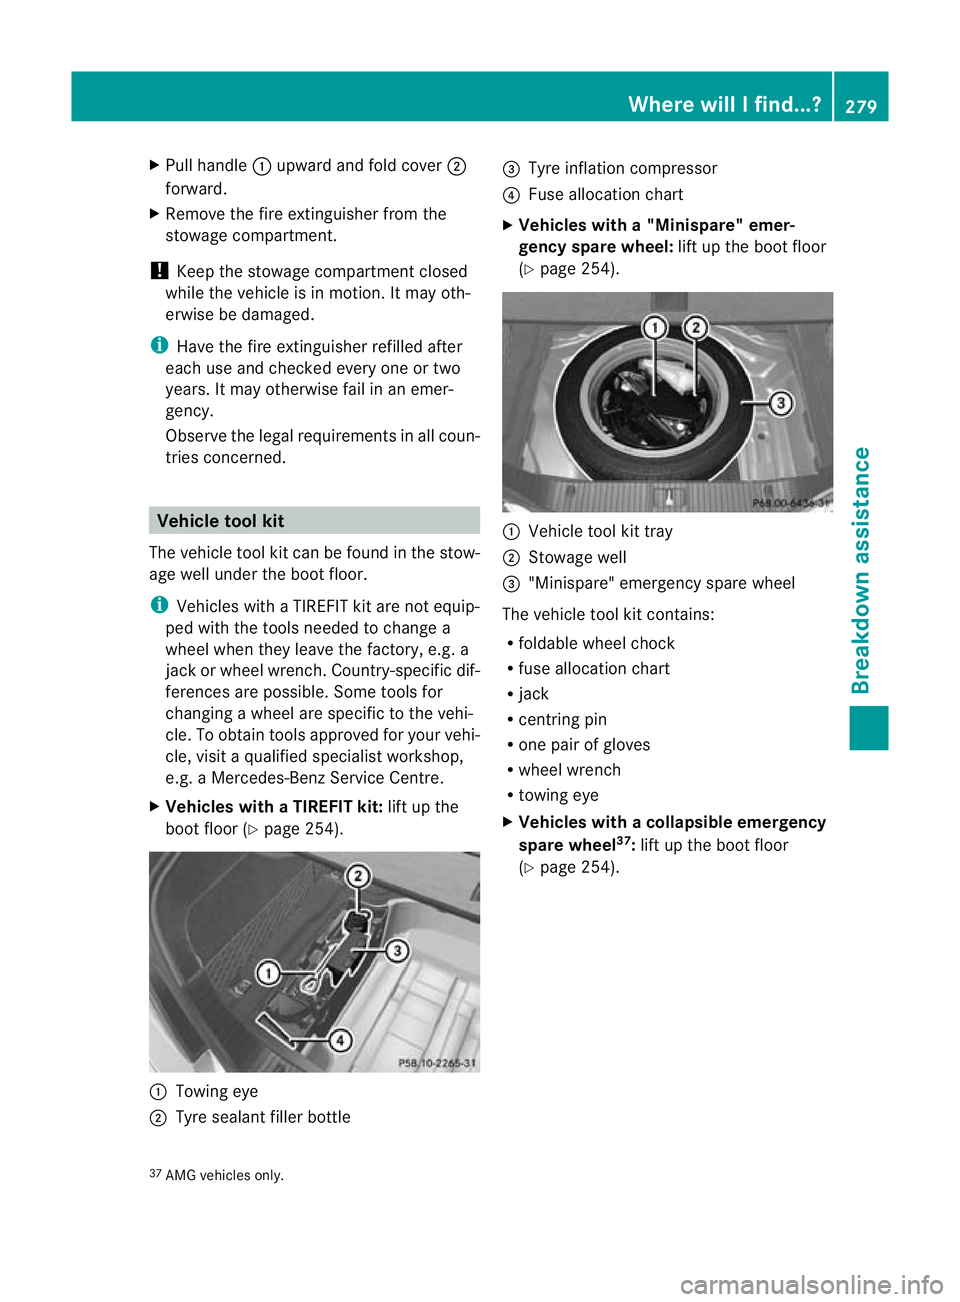
X Vehicles with a TIREFIT kit: lift up the
boot floor (Y page 254). :
Towing eye
; Tyre sealant filler bottle =
Tyre inflation compressor
? Fuse allocation chart
X Vehicles with a "Minispare" emer-
gency spare wheel: lift up the boot floor
(Y page 254). :
Vehicle tool kit tray
; Stowage well
= "Minispare" emergency spare wheel
The vehicle tool kit contains:
R foldable wheel chock
R fuse allocation chart
R jack
R centring pin
R one pair of gloves
R wheel wrench
R towing eye
X Vehicles with acollapsible emergency
spare wheel 37
:lift up the boot floor
(Y page 254).
37 AMG vehicles only. Where will I find...?
279Breakdown assistance
Page 283 of 337

:
Towing eye
; One pair of gloves
= Jack
? Folding wheel chock
A Centring pin
B Sheet for faulty wheel
C Tyre inflation compressor
D Wheel wrench
E Fuse allocation chart "Minispare" emergency spare wheel/
collapsible emergency spare wheel
Removing the "Minispare" emergency
spare wheel/collapsible emergency
spare wheel The emergency spare wheel can be found in
the stowage well under the boot floor.
Removing the "Minispare" emergency
spare wheel
X
Lift the boot floor upwards (Y page 254). X
Turn stowage tray ;anti-clockwise and
remove together with vehicle tool kit
tray :.
X Remove "Minispare" emergenc yspare
wheel =.
Removing the collapsible emergency
spare wheel: AMG vehicles X
Reach into cutout :in the tool holder and
lift it up.
X Remove collapsible emergency spare
wheel ;.
For further information on changing a wheel
and fitting the spare wheel, see
(Y page 284).
Stowing aused collapsible emergency
spare wheel Take the following steps to store a used col-
lapsible emergency spare wheel; otherwise,
it does not fit in the spare wheel well.
Mercedes-Benz recommends that you have
this work carried out at a qualified specialist
workshop, e.g. a Mercedes-Benz Service
Centre.
! Only place the collapsible emergency
spare wheel in the vehicle when it is dry.
Otherwise, moisture may get into the vehi-
cle.
X Unscrew the valve cap from the valve.
i Fully deflating the tyre can take a few
minutes. 280
Where will I find...?Breakdown assistance
Page 292 of 337
X
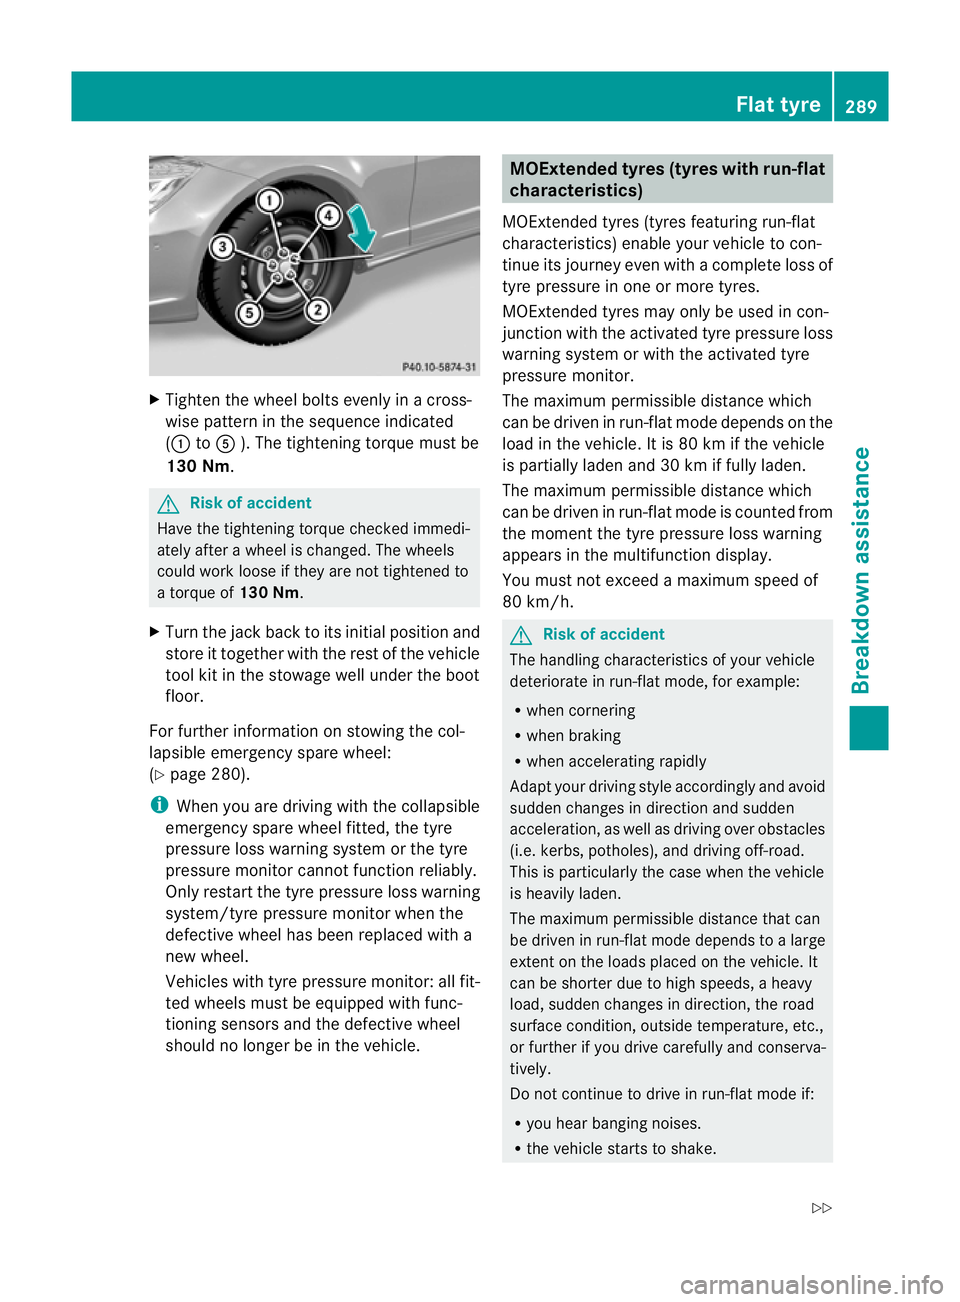
Tighten the wheel bolts evenly in a cross-
wise pattern in the sequence indicated
(: toA ). The tightening torque must be
130 Nm. G
Risk of accident
Have the tightening torque checked immedi-
ately after a wheel is changed. The wheels
could work loose if they are not tightened to
a torque of 130 Nm.
X Turn the jack back to its initial position and
store it together with the rest of the vehicle
tool kit in the stowage well under the boot
floor.
For further information on stowing the col-
lapsible emergency spare wheel:
(Y page 280).
i When you are driving with the collapsible
emergency spare wheel fitted, the tyre
pressure loss warning system or the tyre
pressure monitor cannot function reliably.
Only restart the tyre pressure loss warning
system/tyre pressure monitor when the
defective wheel has been replaced with a
new wheel.
Vehicles with tyre pressure monitor: all fit-
ted wheels must be equipped with func-
tioning sensors and the defective wheel
should no longer be in the vehicle. MOExtended tyres (tyres with run-flat
characteristics)
MOExtended tyres (tyres featuring run-flat
characteristics) enable your vehicle to con-
tinue its journey even with a complete loss of
tyre pressure in one or more tyres.
MOExtended tyres may only be used in con-
junction with the activated tyre pressure loss
warning system or with the activated tyre
pressure monitor.
The maximum permissible distance which
can be driven in run-flat mode depends on the
load in the vehicle. It is 80 km if the vehicle
is partially laden and 30 km if fully laden.
The maximum permissible distance which
can be driven in run-flat mode is counted from
the moment the tyre pressure loss warning
appears in the multifunction display.
You must not exceed a maximum speed of
80 km/h. G
Risk of accident
The handling characteristics of your vehicle
deteriorate in run-flat mode, for example:
R when cornering
R when braking
R when accelerating rapidly
Adapt your driving style accordingly and avoid
sudden changes in direction and sudden
acceleration, as well as driving over obstacles
(i.e. kerbs, potholes), and driving off-road.
This is particularly the case when the vehicle
is heavily laden.
The maximum permissible distance that can
be driven in run-flat mode depends to a large
exten tonthe loads placed on the vehicle. It
can be shorter due to high speeds, a heavy
load, sudden changes in direction, the road
surface condition, outside temperature, etc.,
or further if you drive carefully and conserva-
tively.
Do not continue to drive in run-flat mode if:
R you hear banging noises.
R the vehicle starts to shake. Flat tyre
289Breakdown assistance
Z
Page 308 of 337

achieving an increased driving force (cut-
ting action). Tyre pressure
Tyre pressure specifications
You will find a table of tyre pressures for var-
ious operating conditions on the inside of
your vehicle's fuel fille rflap.
The applicable value for the emergency spare
wheel is stated on the spare wheel and in the
technical data section.
For trailer towing, adjust the tyre pressure of
the rear tyres to the maximum tyre pressure
value stated on the table inside the fuel filler
flap.
The load conditions "partially laden" and "fully
laden" are defined in the table for different
numbers of passengers and amounts of lug-
gage. The actual number of seats may vary –
for more information please refer to the vehi-
cle's registration documents.
If no other data is stated, the tyre pressures
specified on the fuel filler flap apply for all
tyres approved for this vehicle. If a tyre size precedes a tyre pressure, the tyre
pressure information followin gis only valid
for that tyre size. Instead of the complete tyre size, the rim
diameter alone, for example
R16,may be lis-
ted. Rim diameter
:is part of the tyre size and
can be found on the tyre sidewall. G
Risk of accident
Tyre pressure that is either too high or too low
has a negative effect on the vehicle's driving
safety, which could lead you to cause an acci-
dent. Therefore, you should regularly check
the pressure of all the tyres, particularly prior
to long trips, and correct the pressure as nec-
essary.
To test tyre pressure, use a suitable pressure
gauge.T he outer appearance of a tyre does
not permit any reliable conclusion about the
tyre pressure. On vehicles fitted with the elec-
tronic tyre pressure monitor, the tyre pres-
sure can be checked using the on-board com-
puter. G
Risk of accident
Do not fit anything else to the tyre valve other
than the standard valve cap. In particular, ret- Tyre pressure
305Wheels and tyres
Z