2010 MERCEDES-BENZ CLS COUPE fuel reserve
[x] Cancel search: fuel reservePage 13 of 337
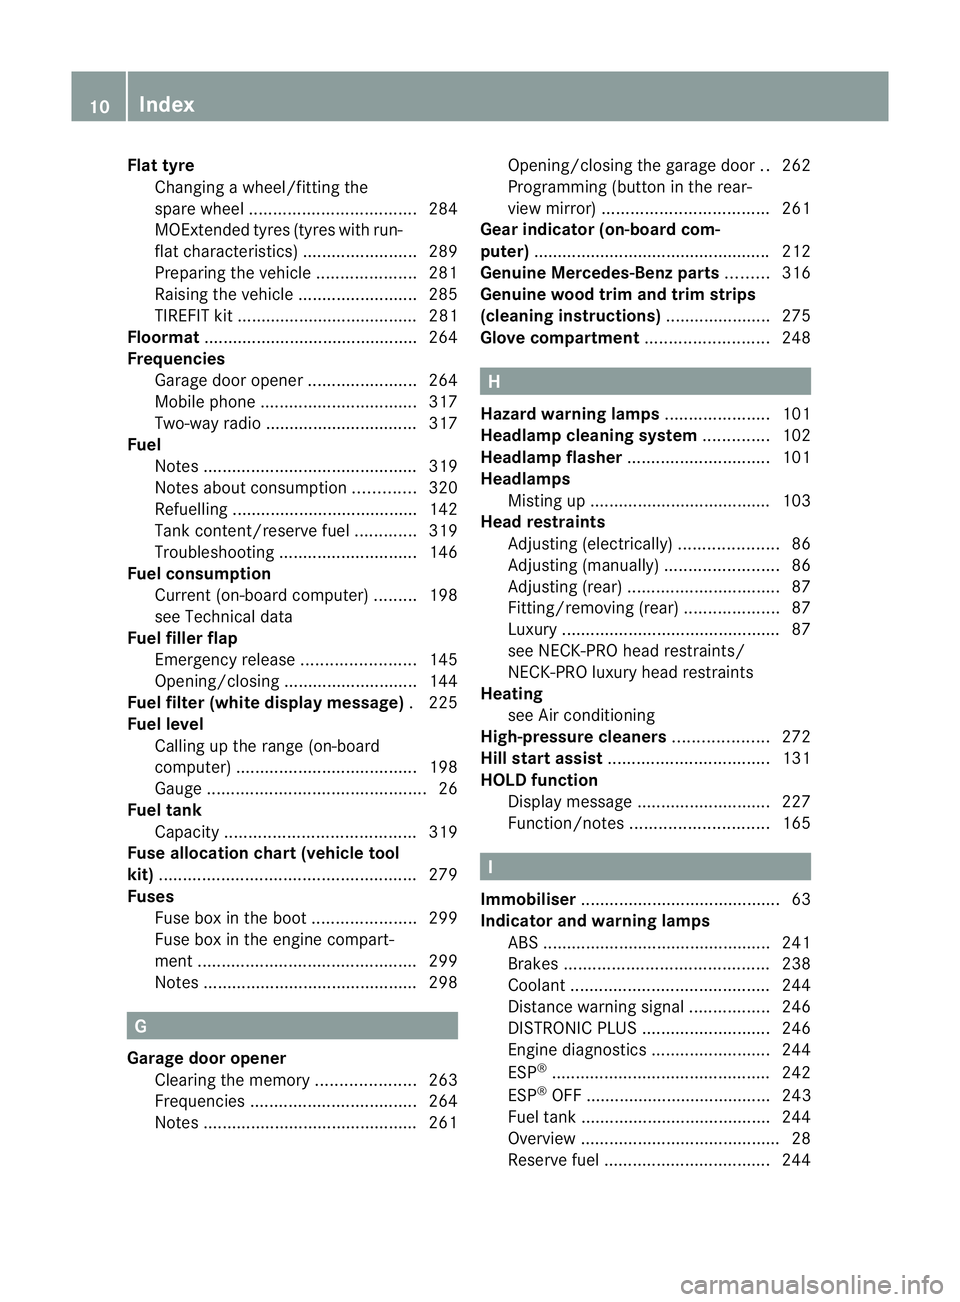
Flat tyre
Changing a wheel/fitting the
spar ewheel ................................... 284
MOExtended tyres (tyre swith run-
flat characteristics) ........................289
Preparing the vehicle .....................281
Raising the vehicle .........................285
TIREFIT kit ...................................... 281
Floormat ............................................ .264
Frequencies Garage door opene r....................... 264
Mobile phone ................................. 317
Two-way radio ................................ 317
Fuel
Notes ............................................. 319
Notes about consumption .............320
Refuelling ...................................... .142
Tank content/reserve fuel .............319
Troubleshooting ............................. 146
Fuel consumption
Current (on-board computer) .........198
see Technical data
Fuel filler flap
Emergency release ........................145
Opening/closing ............................ 144
Fuel filte r(white display message) .225
Fuel level Calling up the range (on-board
computer) ...................................... 198
Gauge .............................................. 26
Fuel tank
Capacity ........................................ 319
Fuse allocation chart (vehicle tool
kit) ...................................................... 279
Fuses Fuse box in the boot ......................299
Fuse box in the engine compart-
ment .............................................. 299
Notes ............................................. 298G
Garage door opener Clearing the memory .....................263
Frequencies ................................... 264
Notes ............................................. 261Opening/closing the garage door
..262
Programming (button in the rear-
view mirror) ................................... 261
Gear indicator (on-board com-
puter) ................................................. .212
Genuine Mercedes-Benz parts .........316
Genuine wood trim and trim strips
(cleaning instructions) ......................275
Glove compartment ..........................248 H
Hazard warning lamps ......................101
Headlamp cleaning system ..............102
Headlamp flasher .............................. 101
Headlamps Misting up ...................................... 103
Head restraints
Adjusting (electrically). ....................86
Adjusting (manually )........................ 86
Adjusting (rear) ................................ 87
Fitting/removing (rear) ....................87
Luxury .............................................. 87
see NECK-PRO head restraints/
NECK-PRO luxury head restraints
Heating
see Air conditioning
High-pressure cleaners ....................272
Hill start assist .................................. 131
HOLD function Display message ............................ 227
Function/notes ............................. 165 I
Immobiliser .......................................... 63
Indicator and warning lamps ABS ................................................ 241
Brakes ........................................... 238
Coolant .......................................... 244
Distance warning signa l................. 246
DISTRONI CPLUS ........................... 246
Engine diagnostics .........................244
ESP ®
.............................................. 242
ESP ®
OFF ....................................... 243
Fuel tank ........................................ 244
Overview .......................................... 28
Reserve fuel ................................... 24410
Index
Page 17 of 337
PRE-SAFE
®
system
Display message ............................ 216
Operation ........................................ .40
Program selector ...............................1 39
Program selector button ..................138
Pulling away Automatic transmission .................131 R
RACE START (AMG vehicles) .............166
RACETIMER (on-board computer) ....212
Radar sensor system Country overview ........................... 327
Display message ............................ 227
Radar system sensors
Switching on/off (on-board com-
puter) ............................................. 210
Radio
Changing a statio n(on-board
computer) ...................................... 200
see separate operating instructions
Rain closing feature
Sliding sunroo f................................. 81
Range (on-board computer) .............198
Rear compartment Setting the airv ents...................... 124
Setting the temperature ................115
Rear-compartment seat belt sta-
tus indicator ........................................ 44
Rear foglamp (display message) ...... 222
Rear-view mirror Anti-dazzle mode (automatic) ..........94
Dipping (manual) .............................. 92
Rear window blind ............................257
Rear window heating Malfunction ................................... .117
Switching on/off ........................... 117
Refuelling ........................................... 142
Remote control Auxiliary heating ............................ 120
Changing the batteries (auxiliary
heating) ......................................... 121
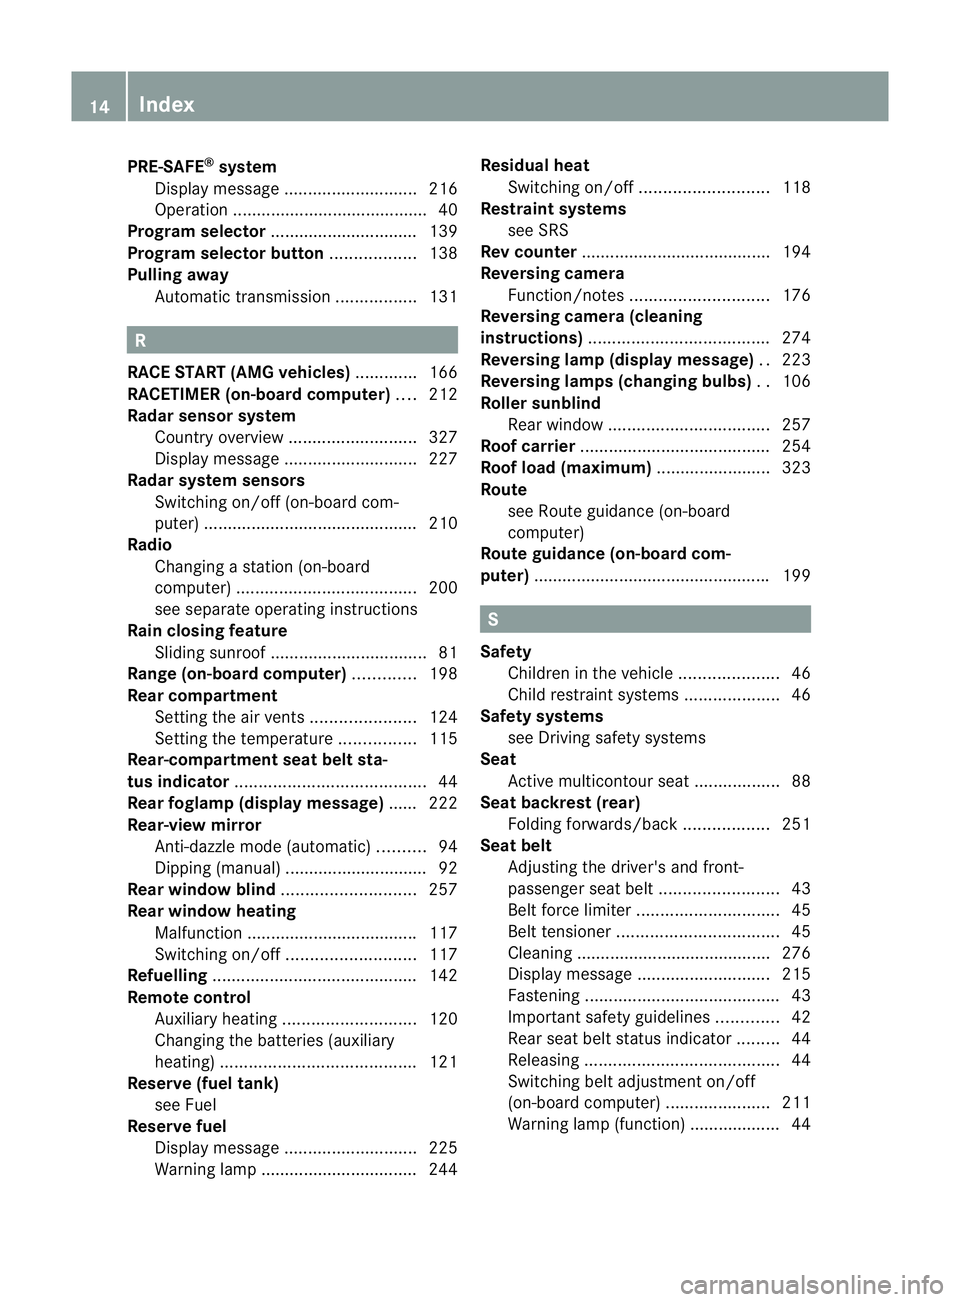
Reserve (fuel tank)
see Fuel
Reserve fuel
Display message ............................ 225
Warning lamp ................................. 244 Residual heat
Switching on/off ........................... 118
Restraint systems
see SRS
Rev counter ........................................ 194
Reversing camera Function/notes ............................. 176
Reversing camera (cleaning
instructions) ...................................... 274
Reversing lamp (display message) ..223
Reversing lamps (changing bulbs) ..106
Roller sunblind Rea rwindow .................................. 257
Roof carrier ........................................ 254
Roof load (maximum) ........................323
Route see Route guidance (on-board
computer)
Route guidance (on-board com-
puter) ................................................. .199 S
Safety Childre ninthe vehicle ..................... 46
Child restraint systems ....................46
Safety systems
see Driving safety systems
Seat
Active multicontour sea t.................. 88
Seat backrest (rear)
Folding forwards/back ..................251
Seat belt
Adjusting the driver's and front-
passenger sea tbelt ......................... 43
Belt force limiter .............................. 45
Belt tensioner .................................. 45
Cleaning ......................................... 276
Display message ............................ 215
Fastening ......................................... 43
Important safety guidelines .............42
Rea rseat belt status indicator .........44
Releasing ......................................... 44
Switching belt adjustment on/off
(on-board computer) ......................211
Warning lamp (function) ................... 44 14
Index
Page 31 of 337
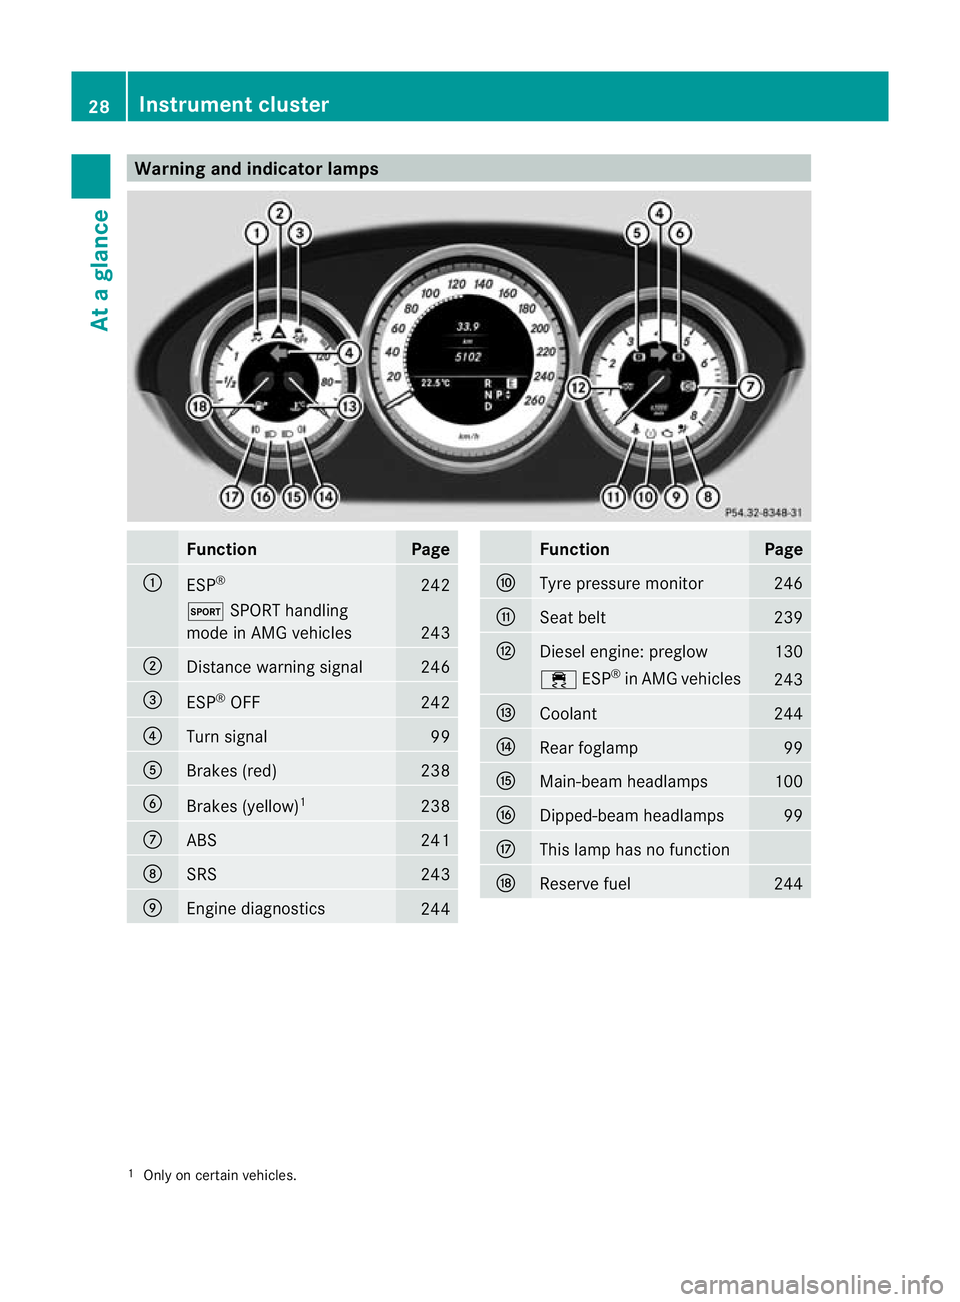
Warning and indicator lamps
Function Page
:
ESP
® 242
M
SPORT handling
mode in AMG vehicles 243
;
Distance warning signal 246
=
ESP
®
OFF 242
?
Turn signal 99
A
Brakes (red) 238
B
Brakes (yellow)
1 238
C
ABS 241
D
SRS 243
E
Engine diagnostics
244 Function Page
F
Tyre pressure monitor 246
G
Seat belt 239
H
Diesel engine: preglow 130
÷
ESP®
in AMG vehicles 243
I
Coolant 244
J
Rea
rfoglamp 99
K
Main-beam headlamps 100
L
Dipped-beam headlamps 99
M
This lamp has no function
N
Reserve fuel 244
1
Only on certain vehicles. 28
Instrument clusterAt a glance
Page 122 of 337

X
Turn the key to position 0in the ignition
lock or remove it.
X To switch on: press theÌbutton.
The indicator lamp in the Ìbutton lights
up.
X To deactivate: press theÌbutton.
The indicator lamp in the Ìbutton goes
out.
i Residual heat is deactivated automati-
cally:
R after about 30 minutes
R when the ignition is switched on
R if the battery voltage drops
R if the coolant temperature is too low Auxiliary heating
Important safety notes G
Risk of poisoning
Exhaust fumes are produced when the auxili-
ary heating is in operation. Inhaling these
exhaust fumes can be poisonous. You should
therefore switch off the auxiliary heating in
confined spaces without an extraction sys-
tem, e.g. a garage. G
Risk of fire
When operating the auxiliary heating, parts of
the vehicle may become very hot, and highly
inflammable material such as fuels could be
ignited. Operating the auxiliary heating is thus
prohibited at filling station sorwhen your vehi-
cle is being refuelled. You must therefore
switch off the auxiliary heating at filling sta-
tions.
! Operating the auxiliary heating/ventila-
tion draws on the vehicle battery. After you
have heated or ventilated the vehicle a
maximum of two times, drive for a longer
distance.
i Switch on the auxiliary heating regularly,
e.g. for about ten minutes every month. The auxiliary heating heats the air in the vehi-
cle interior to the set temperature without
using the heat of the running engine. The aux-
iliary heating is operated directly using the
vehicle's fuel. For this reason, the tank con-
tent must be at least at reserve fuel level to
ensure that the auxiliary heating functions.
The auxiliary heating/ventilation automati-
cally adjusts to changes in temperature and
weather conditions. For this reason, the aux-
iliary heating could switch from ventilation
mode to heating mode or from heating mode
to ventilation mode.
The auxiliary heating switches off automati-
cally after 50 minutes. This time limit can be
altered. To do this, visit a qualified specialist
workshop, e.g. a Mercedes-Ben
zService
Centre.
You cannot use the auxiliary ventilation to
cool the vehicle interior to a temperature
lower than the outside temperature.
Before switching on X
Turn the key to position 2in the ignition
lock.
X Set the temperature.
The auxiliary heating/ventilation can be acti-
vated even when the climate control is being
controlled manually. Optimum comfort can
be attained when the system is set to auto-
matic mode. Set the temperature to 22 †.
The auxiliary heating/ventilation can be acti-
vated or deactivated using the remote control
or the button on the centre console.
The on-board computer can be used to spec-
ify up to three departure times, one of which
may be preselected (Y page 210). Operating the climate control system
119Climate control Z
Page 137 of 337
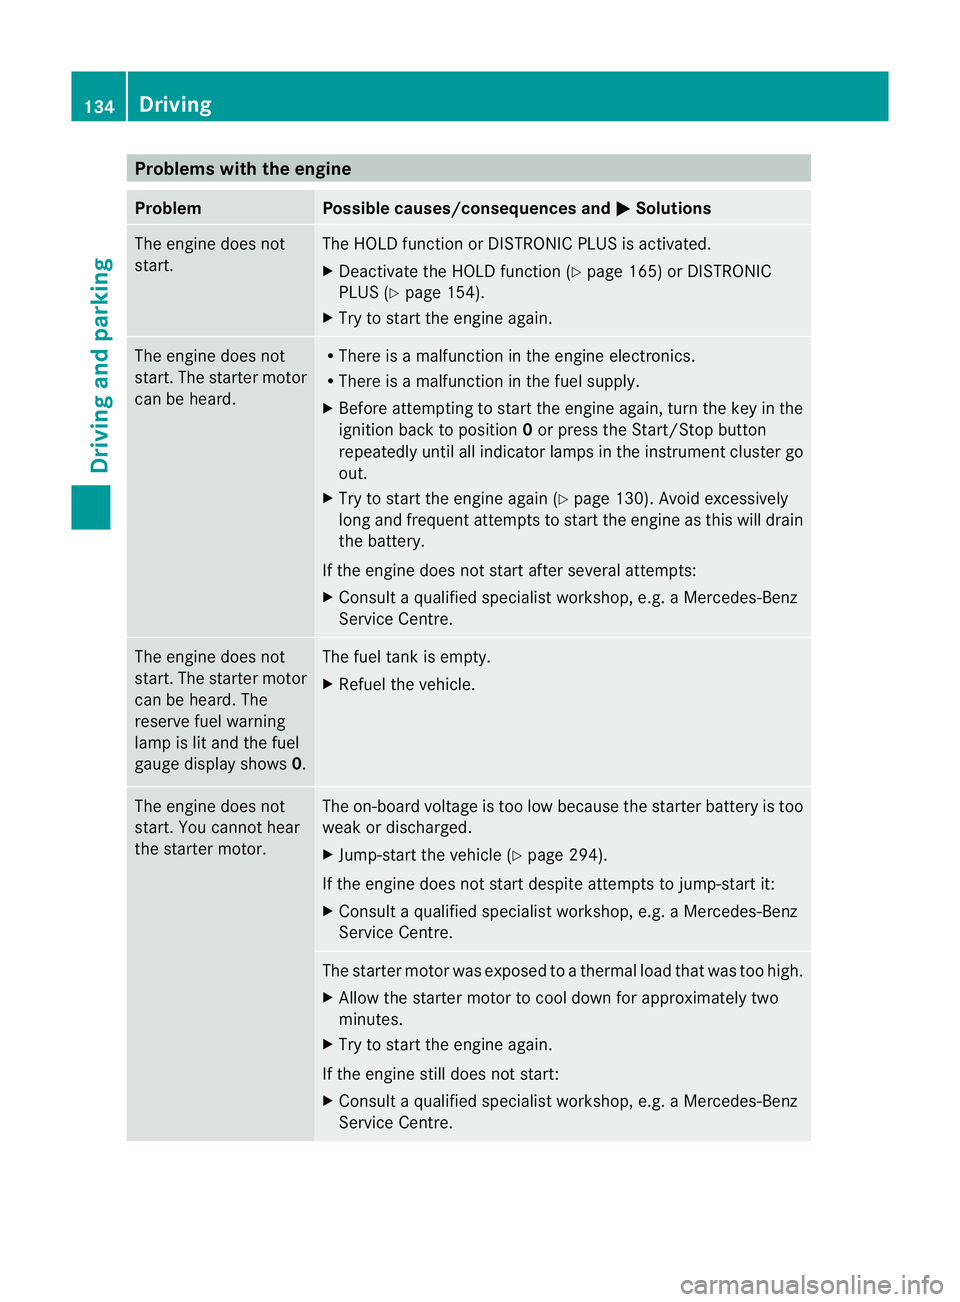
Problems with the engine
Problem Possible causes/consequences and
M Solutions
The engine does not
start. The HOLD function or DISTRONIC PLUS is activated.
X
Deactivate the HOLD function (Y page 165) or DISTRONIC
PLUS (Y page 154).
X Try to start the engine again. The engine does not
start. The starter motor
can be heard. R
There is a malfunction in the engine electronics.
R There is a malfunction in the fuel supply.
X Before attempting to start the engine again, turn the key in the
ignition back to position 0or press the Start/Stop button
repeatedly until all indicator lamps in the instrumen tcluster go
out.
X Try to start the engine again (Y page 130). Avoid excessively
long and frequent attempts to start the engine as this will drain
the battery.
If the engine does not start after several attempts:
X Consult a qualified specialist workshop, e.g. a Mercedes-Benz
Service Centre. The engine does not
start
.The starter motor
can be heard. The
reserve fuel warning
lamp is lit and the fuel
gauge display shows 0. The fuel tank is empty.
X
Refuel the vehicle. The engine does not
start. You cannot hear
the starter motor. The on-board voltage is too low because the starter battery is too
weak or discharged.
X
Jump-start the vehicle (Y page 294).
If the engine does not start despite attempts to jump-start it:
X Consult a qualified specialist workshop, e.g. a Mercedes-Benz
Service Centre. The starter motor was exposed to a thermal load that was too high.
X
Allow the starter motor to cool down for approximately two
minutes.
X Try to start the engine again.
If the engine still does not start:
X Consult a qualified specialist workshop, e.g. a Mercedes-Benz
Service Centre. 134
DrivingDriving and parking
Page 228 of 337
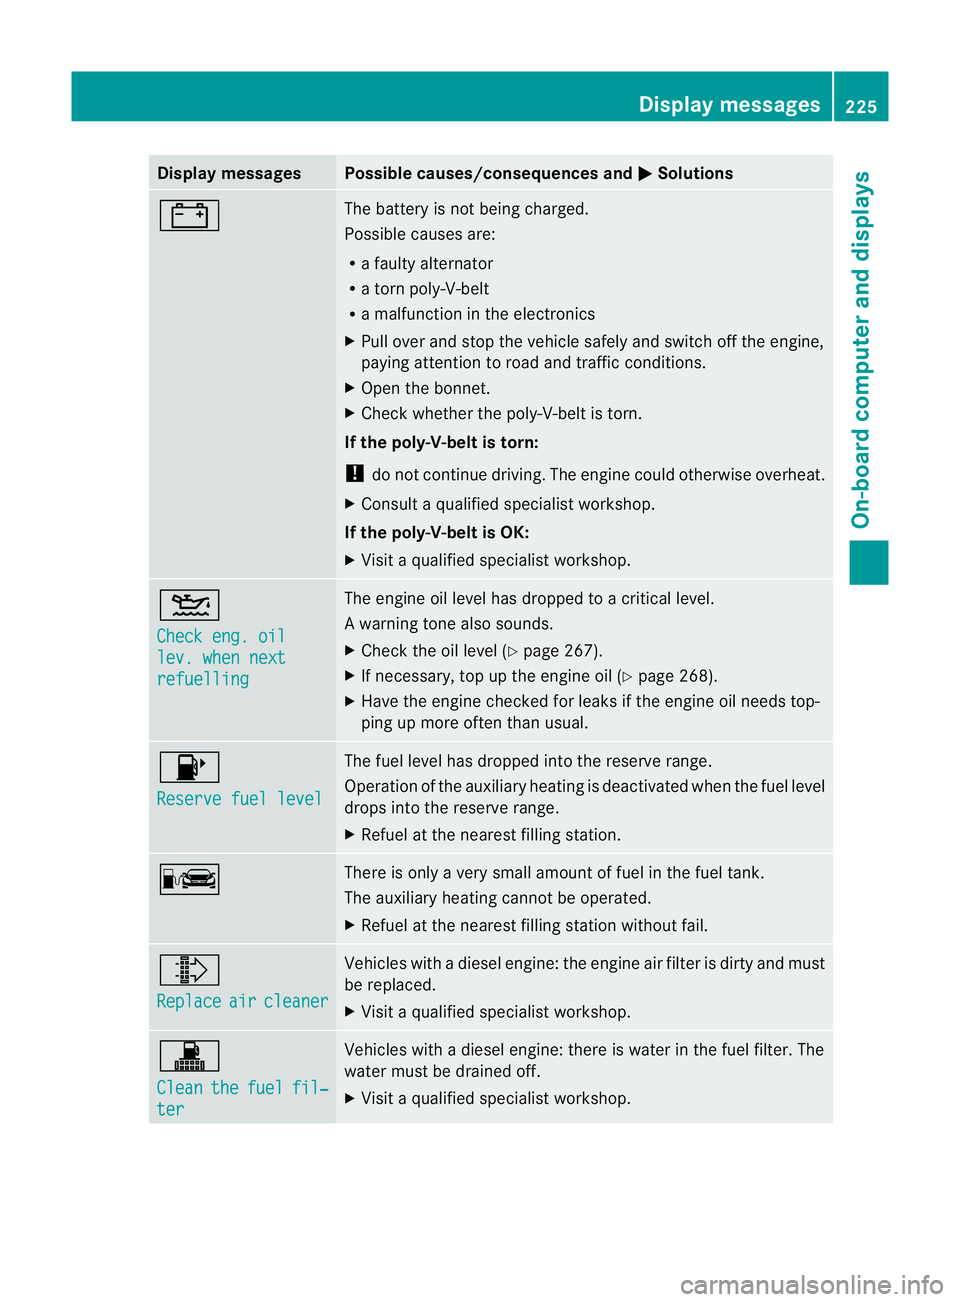
Display messages Possible causes/consequences and
M Solutions
# The battery is no
tbeing charged.
Possible causes are:
R a faulty alternator
R a torn poly-V-belt
R a malfunction in the electronics
X Pull over and stop the vehicle safely and switch off the engine,
paying attention to road and traffic conditions.
X Open the bonnet.
X Check whether the poly-V-belt is torn.
If the poly-V-belt is torn:
! do not continue driving. The engine could otherwise overheat.
X Consult a qualified specialist workshop.
If the poly-V-belt is OK:
X Visit a qualified specialist workshop. 4
Check eng. oil
lev. when next
refuelling The engine oil level has dropped to a critical level.
Aw
arning tone also sounds.
X Chec kthe oil level (Y page 267).
X If necessary, top up the engine oil (Y page 268).
X Have the engine checked for leaks if the engine oil needs top-
ping up more often than usual. 8
Reserve fuel level The fuel level has dropped into the reserve range.
Operation of the auxiliary heating is deactivated when the fuel level
drops into the reserve range.
X
Refuel at the nearest filling station. C There is only a very small amount of fuel in the fuel tank.
The auxiliary heating cannot be operated.
X
Refuel at the nearest filling station without fail. ¸
Replace
air cleaner Vehicles with a diesel engine: the engine air filter is dirty and must
be replaced.
X
Visit a qualified specialist workshop. !
Clean
the fuel fil‐
ter Vehicles with a diesel engine: there is water in the fuel filter. The
water must be drained off.
X
Visit a qualified specialist workshop. Display messages
225On-board computer and displays Z
Page 247 of 337
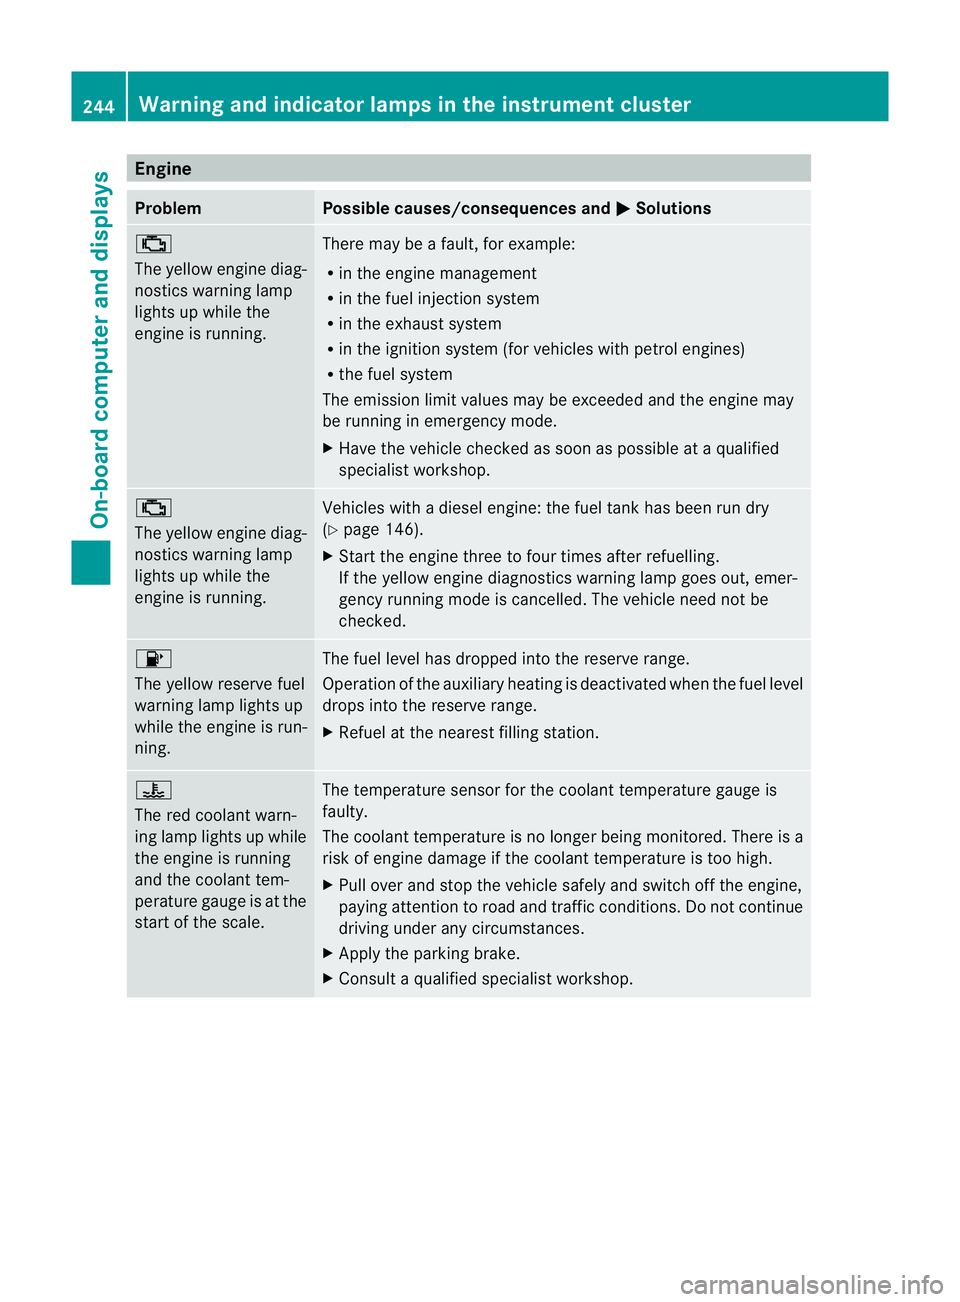
Engine
Problem Possible causes/consequences and
M Solutions
;
The yellow engine diag-
nostics warning lamp
lights up while the
engine is running.
There may be a fault, for example:
R
in the engine management
R in the fuel injection system
R in the exhaust system
R in the ignition system (for vehicles with petrol engines)
R the fuel system
The emission limit values may be exceeded and the engin emay
be running in emergency mode.
X Have the vehicle checked as soon as possible at a qualified
specialist workshop. ;
The yellow engine diag-
nostics warning lamp
lights up while the
engine is running.
Vehicles with a diesel engine: the fuel tan
khas been run dry
(Y page 146).
X Start the engine three to four times after refuelling.
If the yellow engine diagnostics warning lamp goes out, emer-
gency running mode is cancelled. The vehicle need no tbe
checked. 8
The yellow reserve fuel
warning lamp lights up
while the engine is run-
ning.
The fuel level has dropped into the reserve range.
Operation of the auxiliary heating is deactivated when the fuel level
drops into the reserve range.
X
Refuel at the nearest filling station. ?
The red coolant warn-
ing lamp lights up while
the engine is running
and the coolant tem-
perature gauge is at the
star
toft he scale. The temperature sensor for the coolant temperature gauge is
faulty.
The coolant temperature is no longer being monitored. There is a
risk of engine damage if the coolant temperature is too high.
X
Pull over and stop the vehicle safely and switch off the engine,
paying attention to road and traffic conditions. Do not continue
driving under any circumstances.
X Apply the parking brake.
X Consult a qualified specialist workshop. 244
Warning and indicator lamps in the instrument clusterOn-board computer and displays
Page 275 of 337
High-pressure cleaning equipment
G
Risk of accident
Do not use high-pressure cleaners with circu-
lar-jet nozzles (dirt grinders) to clea nyour
vehicle, in particular the tyres. You could oth-
erwise damage the tyres and cause an acci-
dent.
! Always maintain a distance of at least
30 cm between the vehicle and the high-
pressure cleaner nozzle. Information about
the correc tdistance is available fro mthe
equipment manufacturer.
Move the high-pressure cleaner nozzle
around when cleaning your vehicle.
Do not aim directly at any of the following:
R tyres
R door gaps, roof gaps, joints etc.
R electrical components
R battery
R connectors
R lights
R seals
R trim elements
R ventilation slots
Damaged seals or electrical components
can lead to leaks or failures.
Cleaning the wheels !
Do not use acidic wheel cleaning products
to remove brake dust. This could damage
wheel bolts and brake components.
! Do not park up the vehicle for an extended
period straight after cleaning it, particularly
after having cleaned the wheels with wheel
cleaner. Wheel cleaners could cause
increased corrosion of the brake discs and
brake pads/linings. For this reason, you
should drive for a few minutes after clean-
ing. Braking heats the brake discs and
brake pads, thus drying them. The vehicle
can then be parked up. Cleaning the paintwork Scratches, corrosive deposits, areas affected
by corrosion and damage caused by inade-
quate care cannot always be completely
repaired. In such cases, visit a qualified spe-
cialist workshop, e.g. a Mercedes-Benz
Service Centre.
X Remove impurities immediately, where
possible, whilst avoiding rubbing too hard.
X Soak insect remains with insect remover
and rinse off the treated areas afterwards.
X Soak bird droppings with water and rinse
off the treated areas afterwards.
X Remove coolant, brake fluid, tree resin,
oils, fuels and greases by rubbing gently
with a cloth soaked in petroleum ether or
lighter fluid.
X Use tar remover to remove tar stains.
X Use silicone remover to remove wax.
! Do not affix:
R stickers
R films
R magnetic plates or similar items
to painted surfaces. You could otherwise
damage the paintwork.
Care and treatment of matt paintwork If your vehicle has a clear matt finish, observe
the following instructions in order to avoid
damage to the paintwork due to incorrect
care.
These notes also apply to light alloy wheels
with a clear matt finish.
! Never polish the vehicle or the light alloy
wheels. Polishing makes the paintwork
shiny.
! Never use paint cleaner, buffing or pol-
ishing products, or gloss preserver, e.g.
wax. These products are only suitable for
high-gloss surfaces. Their use on vehicles
with matt finish leads to considerable sur-
face damage (shiny, spotted areas). 272
CareMaintenance and care