2010 MERCEDES-BENZ CLS COUPE buttons
[x] Cancel search: buttonsPage 19 of 337
Starting the engine
Important safety notes ..................130
Station
see Radio
Steering (display message) ..............235
Steering wheel Adjusting (electrically). ....................91
Adjusting (manually). .......................91
Buttons (on-board computer) ......... 195
Important safety instructions ...........90
Memory function (storing set-
tings) ................................................ 91
Steering wheel heating ....................91
Storing settings (memory func-
tion) ................................................. 95
Steering wheel gearshift paddles ....139
Steering wheel heating Malfunction indicator lamp ..............92
Stowage compartments
Armrest (under) ............................. 249
Centre console .............................. 249
Centre console (rea rcompart-
ment). ............................................ 250
Cuph older..................................... 255
Glove compartment .......................248
Rea r............................................... 250
Under driver's seat/front-
passenger sea t.............................. 250
Stowage space
Important safety information .........248
Stowage well
Boot floo r(underneath) ................. 254
Submenu (on-board computer)
Convenience .................................. 211
Factory setting ............................... 212
Heating .......................................... 210
Instrument cluster .........................205
Lights ............................................ .207
Standard displa y............................ 198
Time/Date ..................................... 206
Vehicle .......................................... .209
Summer opening
see Convenience opening feature
Summer tyres .................................... 303
Sun visor ............................................ 256
Supplemental Restraint System see SRS Surround lighting (on-board com-
puter)
................................................. .208
Suspension tuning ....................168, 169
Switching off the alarm (ATA) ............63 T
Tail lamp (display message) .............222
Technical data CLS 250 CDI BlueEFFICIENCY .......324
CLS 350 BlueEFFICIENCY ..............323
CLS 350 CDI 4MATIC BlueEFFI-
CIENC Y.......................................... 325
CLS 350 CDI BlueEFFICIENCY .......325
CLS 500 4MATIC BlueEFFI-
CIENC Y.......................................... 323
CLS 500 BlueEFFICIENCY ..............323
CLS 63 AMG .................................. 324
Notes ............................................. 316
Tyres/wheels ................................. 310
Telephone
Accepting acall............................. 202
Menu (on-board computer) ............201
Number from the phone book ....... .202
Redialling ....................................... 203
Rejecting/ending acall................. 202
Telephone compartment ..................249
Temperature Coolant .......................................... 194
Coolant (on-board computer) ......... 212
Engine oil (on-board computer) ...... 212
Outside temperature ..................... .195
Setting ........................................... 115
TEMPOMAT
Function/notes ............................. 152
Through-loading feature ...................251
Tilt/sliding sunroof see Sliding sunroof
Time (on-board computer) ................206
Timer (on-board computer) ..............212
TIREFIT kit .......................................... 281
Top Tether ............................................ 50
Total distance recorder ....................198
Tow-away protection ..........................64
Towing Important safety notes ..................29516
Index
Page 34 of 337
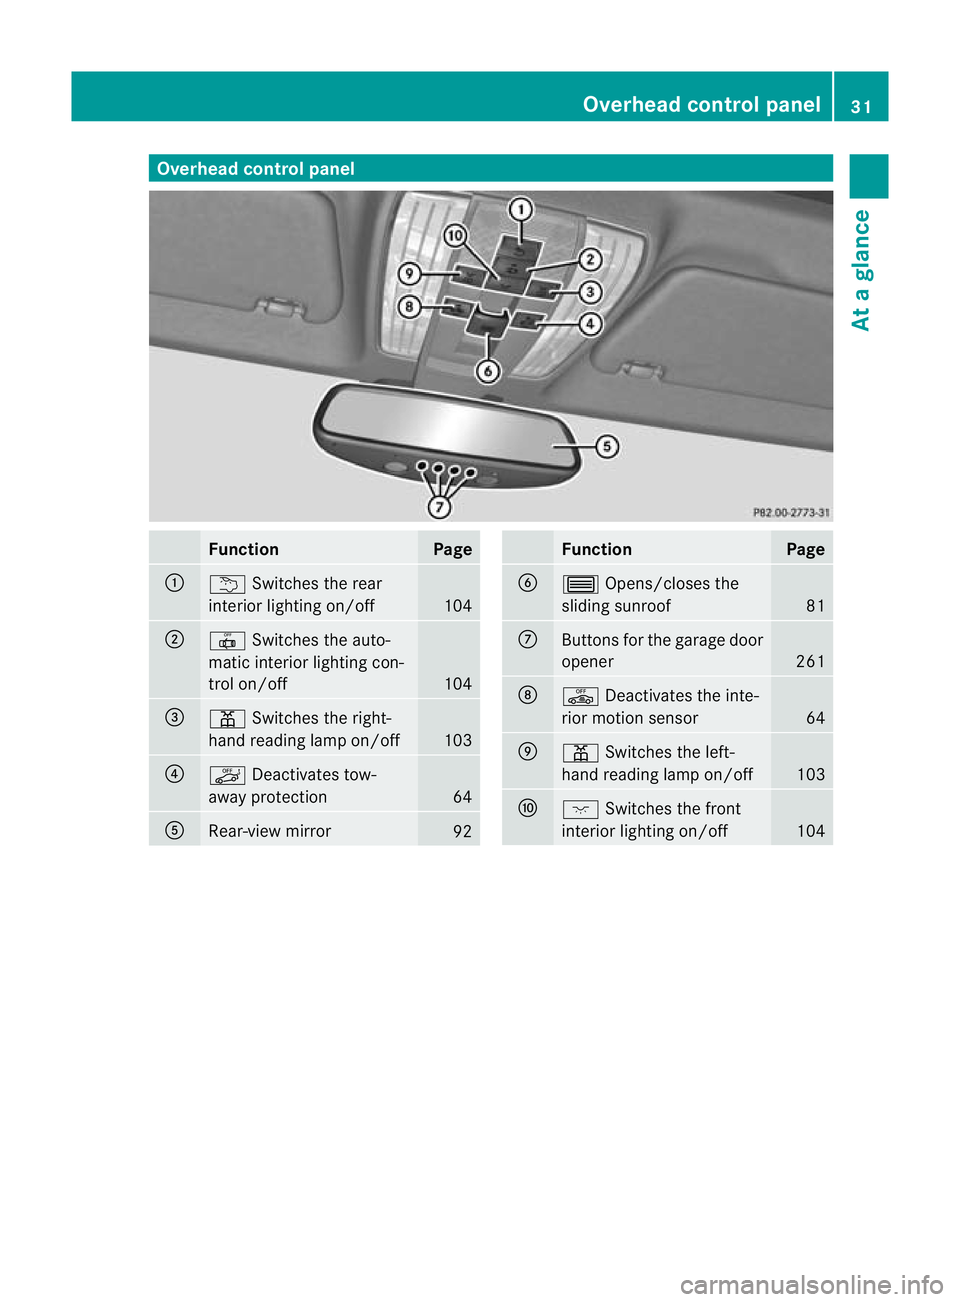
Overhea
dcontrol panel Function Page
:
u
Switches the rear
interio rlighting on/off 104
;
|
Switches the auto-
matic interior lighting con-
trol on/off 104
=
p
Switches the right-
hand reading lamp on/off 103
?
ë
Deactivates tow-
away protection 64
A
Rear-view mirror
92 Function Page
B
3
Opens/closes the
sliding sunroof 81
C
Buttons for the garage door
opener
261
D
ê
Deactivates the inte-
rior motion sensor 64
E
p
Switches the left-
hand reading lamp on/off 103
F
c
Switches the front
interior lighting on/off 104Overhead control panel
31At a glance
Page 68 of 337

the vehicle is locked
.This occurs if someone
reaches into the vehicle interior, for example.
To activate:
X Make sure that:
R
the side windows are closed.
R the sliding sunroof is closed.
R there are no objects, e.g. mascots, hang-
ing on the rear-view mirror or on the grab
handles on the roof trim.
This will prevent false alarms.
X Make sure that all the doors and the tail-
gate are closed.
X Lock the vehicle with the key or KEYLESS-
GO.
To deactivate:
X Unlock the vehicle with the key or KEY-
LESS-GO.
The interior motion sensor is deactivated
automatically.
To prevent a false alarm, deactivate the inte-
rior motion sensor if you lock your vehicle
and:
R people or animals remain in the vehicle.
R the side windows remain open.
R the sliding sunroof remains open.
Deactivating:
X Remove the key from the ignition lock. X
Press button :.
Indicator lamp ;flashes briefly. X
Lock the vehicle with the key. On vehicles
with KEYLESS-GO, the locking buttons on
the door handle/boot lid can also be used.
The interior motion sensor remains deacti-
vated until:
R the vehicle is unlocked again.
R a door is opened and closed again.
R the vehicle is locked again.
i United Kingdom only: if the vehicle has
been locked with the key, the doors cannot
be opened from the inside (Y page 74).
Deactivate the interior motion sensor
before locking the vehicle with the key. The
doors can then be opened from the inside
after the vehicle has been locked from the
outside with the key. Observe the "Impor-
tant safety notes" (Y page 73). Anti-theft systems
65Safety Z
Page 72 of 337
If you do not open
adoor or the boot lid within
approximately 40 seconds of unlocking the
vehicle:
R the vehicle is locked again.
R the anti-theft system is primed again.
X To lock centrally: press the&button. KEYLESS-GO
You can start, lock or unlock the vehicle using
KEYLESS-GO. To do this, you only need carry
the key with you. When you touch the surface
of the sensors on the vehicle's outside door
handles, KEYLESS-GO establishes a radio
connection between the vehicle and the key.
The distance from the door handle with which
you wish to lock or unlock the vehicle must
not be greater than 1 m.
When the engine is started and whilst you are
driving, KEYLESS-GO also checks whether a
valid key is in the vehicle by periodically
establishing radio contact. X
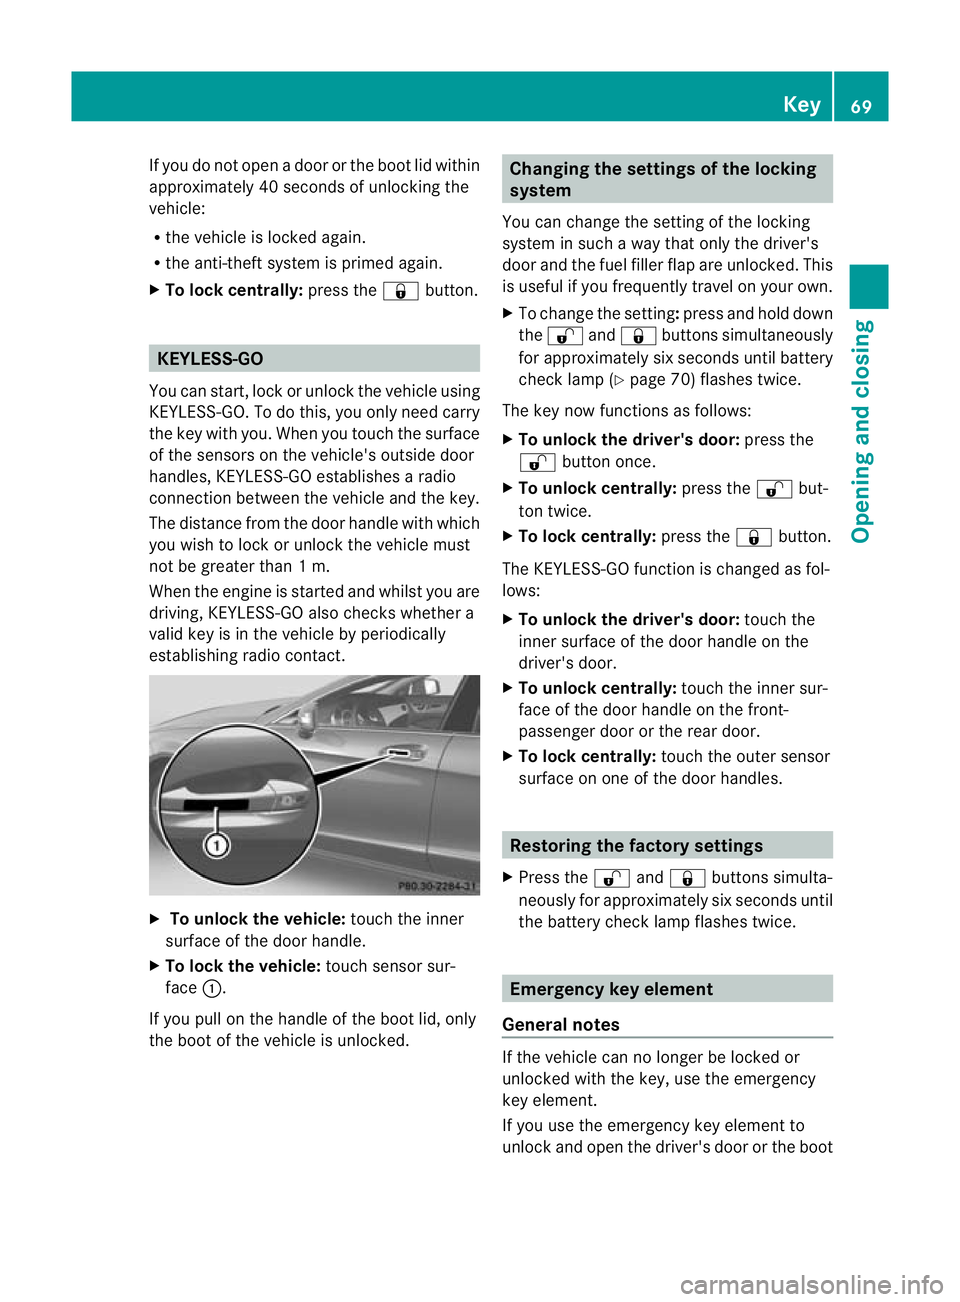
To unlock the vehicle: touch the inner
surface of the door handle.
X To lock the vehicle: touch sensor sur-
face :.
If you pull on the handle of the boot lid, only
the boot of the vehicle is unlocked. Changing the settings of the locking
system
You can change the setting of the locking
system in such a way that only the driver's
door and the fuel filler flap are unlocked. This
is useful if you frequently travel on your own.
X To change the setting: press and hold down
the % and& buttons simultaneously
for approximately six seconds until battery
check lamp (Y page 70) flashes twice.
The key now functions as follows:
X To unlock the driver's door: press the
% button once.
X To unlock centrally: press the%but-
ton twice.
X To lock centrally: press the&button.
The KEYLESS-GO function is changed as fol-
lows:
X To unlock the driver's door: touch the
inner surface of the door handle on the
driver's door.
X To unlock centrally: touch the inner sur-
face of the door handle on the front-
passenger door or the rear door.
X To lock centrally: touch the outer sensor
surface on one of the door handles. Restoring the factory settings
X Press the %and& buttons simulta-
neously for approximately six seconds until
the battery check lamp flashes twice. Emergency key element
General notes If the vehicle can no longer be locked or
unlocked with the key, use the emergency
key element.
If you use the emergenc
ykey element to
unlock and open the driver's door or the boot Key
69Opening and closing Z
Page 74 of 337
i
When checking the key battery within the
signal area of the vehicle, pressing the
& or% button locks or unlocks the
vehicle, respectively.
Changing the battery You require a CR 2025 3 V cell battery.
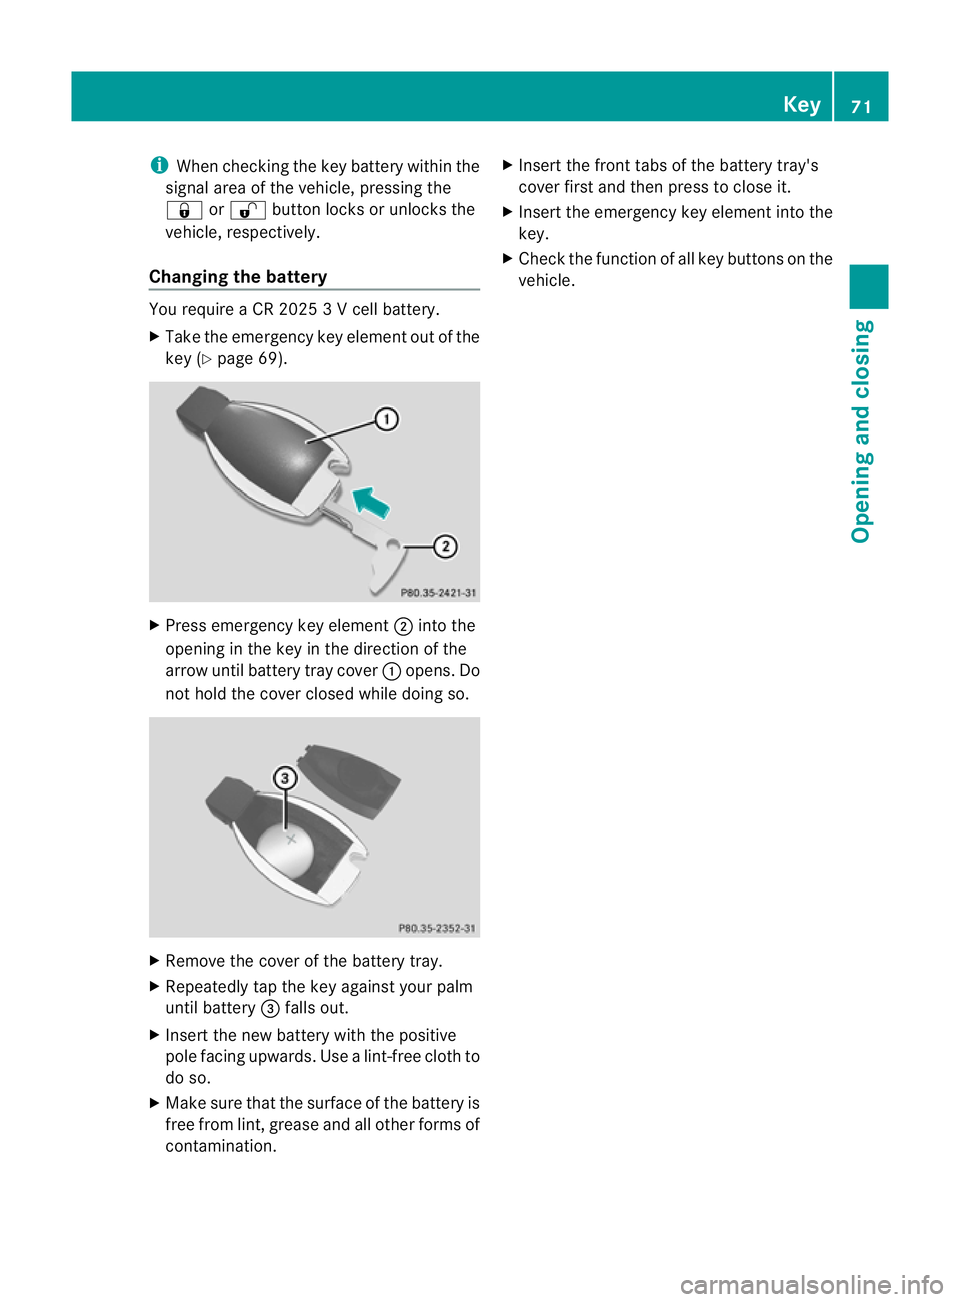
X Take the emergency key element out of the
key (Y page 69). X
Press emergency key element ;into the
opening in the key in the direction of the
arrow until battery tray cover :opens. Do
not hold the cover closed while doing so. X
Remove the cover of the battery tray.
X Repeatedly tap the key against your palm
until battery =falls out.
X Inser tthe new battery with the positive
pole facing upwards. Use alint-free cloth to
do so.
X Make sure that the surface of the battery is
free fro mlint, grease and all other forms of
contamination. X
Insert the front tabs of the battery tray's
cover first and then press to close it.
X Insert the emergency key elemen tinto the
key.
X Check the functio nofall key buttons on the
vehicle. Key
71Opening and closing Z
Page 93 of 337
The system automatically switches down
from level
2to level 1after approximately ten
minutes.
The system automatically switches off
approximately 20 minutes after it is set to
level 1.
X Make sure that the key is in position 1or
2 in the ignition lock.
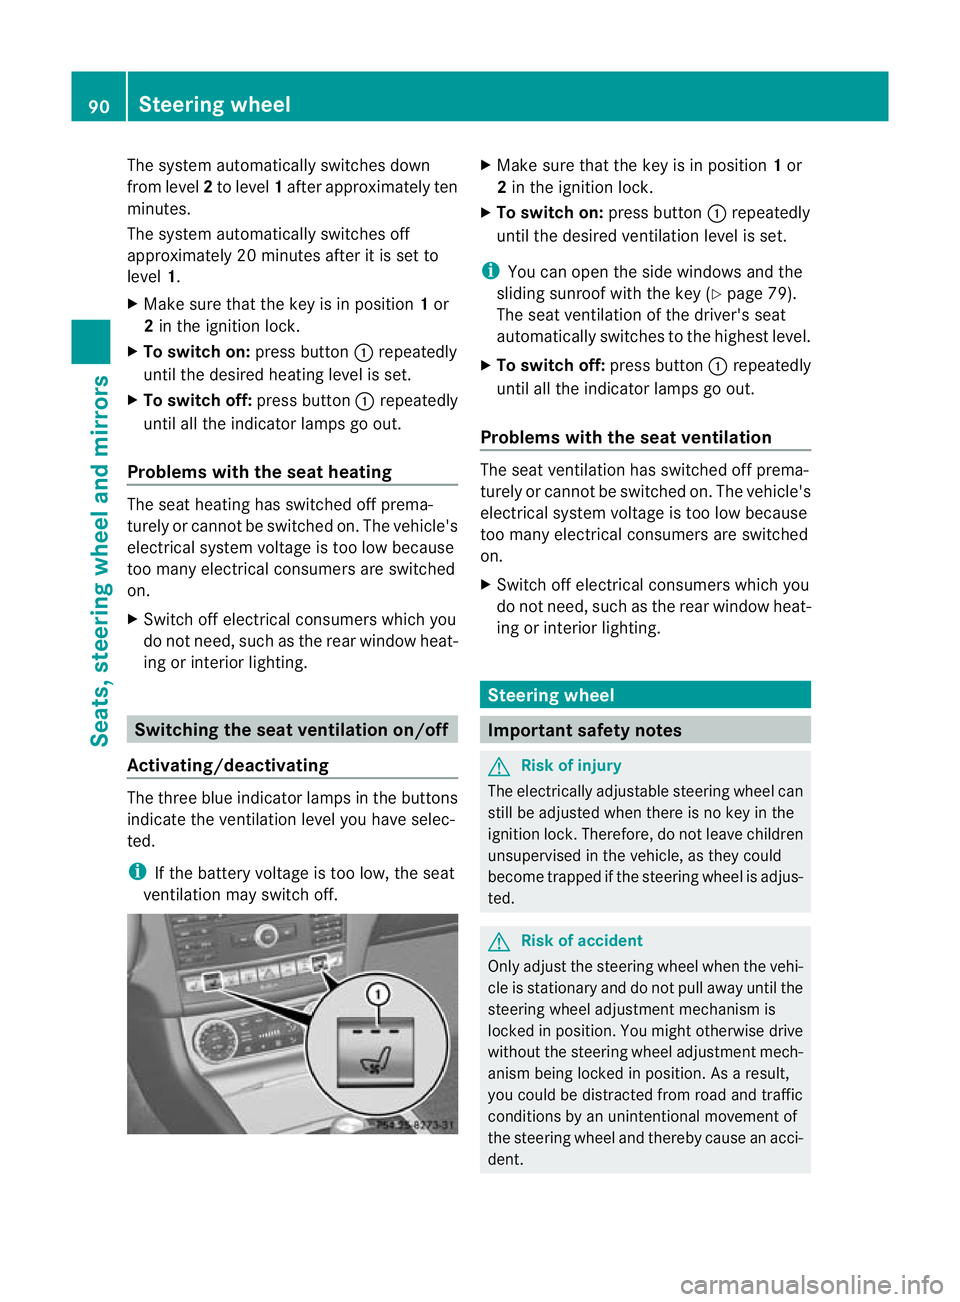
X To switch on: press button:repeatedly
until the desired heating level is set.
X To switch off: press button:repeatedly
until all the indicator lamps go out.
Problems with the seat heating The seat heating has switched off prema-
turely or cannot be switched on. The vehicle's
electrical system voltage is too low because
too many electrical consumers are switched
on.
X
Switch off electrical consumers which you
do not need, such as the rear window heat-
ing or interior lighting. Switching the seat ventilation on/off
Activating/deactivating The three blue indicator lamps in the buttons
indicate the ventilation level you have selec-
ted.
i
If the battery voltage is too low, the seat
ventilation may switch off. X
Make sure that the key is in position 1or
2 in the ignition lock.
X To switch on: press button:repeatedly
until the desired ventilation level is set.
i You can open the side windows and the
sliding sunroof with the key (Y page 79).
The seat ventilation of the driver's seat
automatically switches to the highest level.
X To switch off: press button:repeatedly
until all the indicator lamps go out.
Problems with the seat ventilation The seat ventilation has switched off prema-
turely or cannot be switched on. The vehicle's
electrical system voltage is too low because
too many electrical consumers are switched
on.
X Switch off electrical consumers which you
do not need, such as the rear window heat-
ing or interior lighting. Steering wheel
Important safety notes
G
Risk of injury
The electrically adjustable steering wheel can
still be adjusted when there is no key in the
ignition lock. Therefore, do not leave children
unsupervised in the vehicle, as they could
become trapped if the steering wheel is adjus-
ted. G
Risk of accident
Only adjust the steering wheel when the vehi-
cle is stationary and do not pull away until the
steering wheel adjustmen tmechanism is
locked in position .You might otherwise drive
without the steering wheel adjustmen tmech-
anism being locked in position .As a result,
you could be distracted from road and traffic
conditions by an unintentional movement of
the steering wheel and thereby cause an acci-
dent. 90
Steering wheelSeats, steering wheel and mirrors
Page 95 of 337
Problems with the steering wheel heat-
ing
If the steering wheel heating indicator lamp
on the lower left lever of the steering column
is flashing, the steering wheel heating has
switched off automatically. The vehicle's
electrical system voltage is too low because
too many electrical consumers are switched
on.
X
Switch off electrical consumers which you
do not need, such as the rear window heat-
ing or interior lighting.
Once the battery is sufficiently charged, the
steering wheel heating will switch back on
automatically. EASY-ENTRY/EXIT system
G
Risk of injury
Make sure that nobody can become trapped
when you activate the EASY-ENTRY/EXIT fea-
ture.
If there is a risk of someone becoming trap-
ped, stop the adjustment procedure. To halt
the procedure:
R move the switch for steering wheel adjust-
ment in the opposite direction to that in
which the steering wheel is moving.
R press one of the memory function position
buttons.
Never leave children unsupervised in the vehi-
cle. They could open the driver's door and
thereby unintentionally activate the EASY-
ENTRY/EXIT feature and become trapped.
The EASY-ENTRY/EXIT feature makes getting
in and out of your vehicle easier.
The steering wheel swings upwards when
you:
R remove the key from the ignition lock
R open the driver's door and KEYLESS-GO is
in position 1
R open the driver's door and the key is in
position 0or 1in the ignition lock i
The steering wheel only moves upwards if
it has not already reached the upper end
stop.
If you insert the key into the ignition lock with
the driver's door closed, the steering wheel is
automatically moved to the previously set
position.
The last position of the steering wheel is
stored after each manual setting or when you
store the setting with the memory function
(Y page 95).
You can activate and deactivate the EASY-
ENTRY/EXIT feature in the on-board com-
puter (Y page 211).
i If the crash-responsive EASY-EXIT feature
is triggered in an accident, the steering col-
umn will move upwards when the driver's
door is opened. This occurs irrespective of
the position of the key in the ignition lock.
This makes it easier to exit the vehicle and
rescue the occupants.
The crash-responsive EASY-EXIT feature is
only operational after an accident if the
EASY-EXIT/ENTRY feature is activated in
the on-board computer. Mirrors
Rear-view mirror
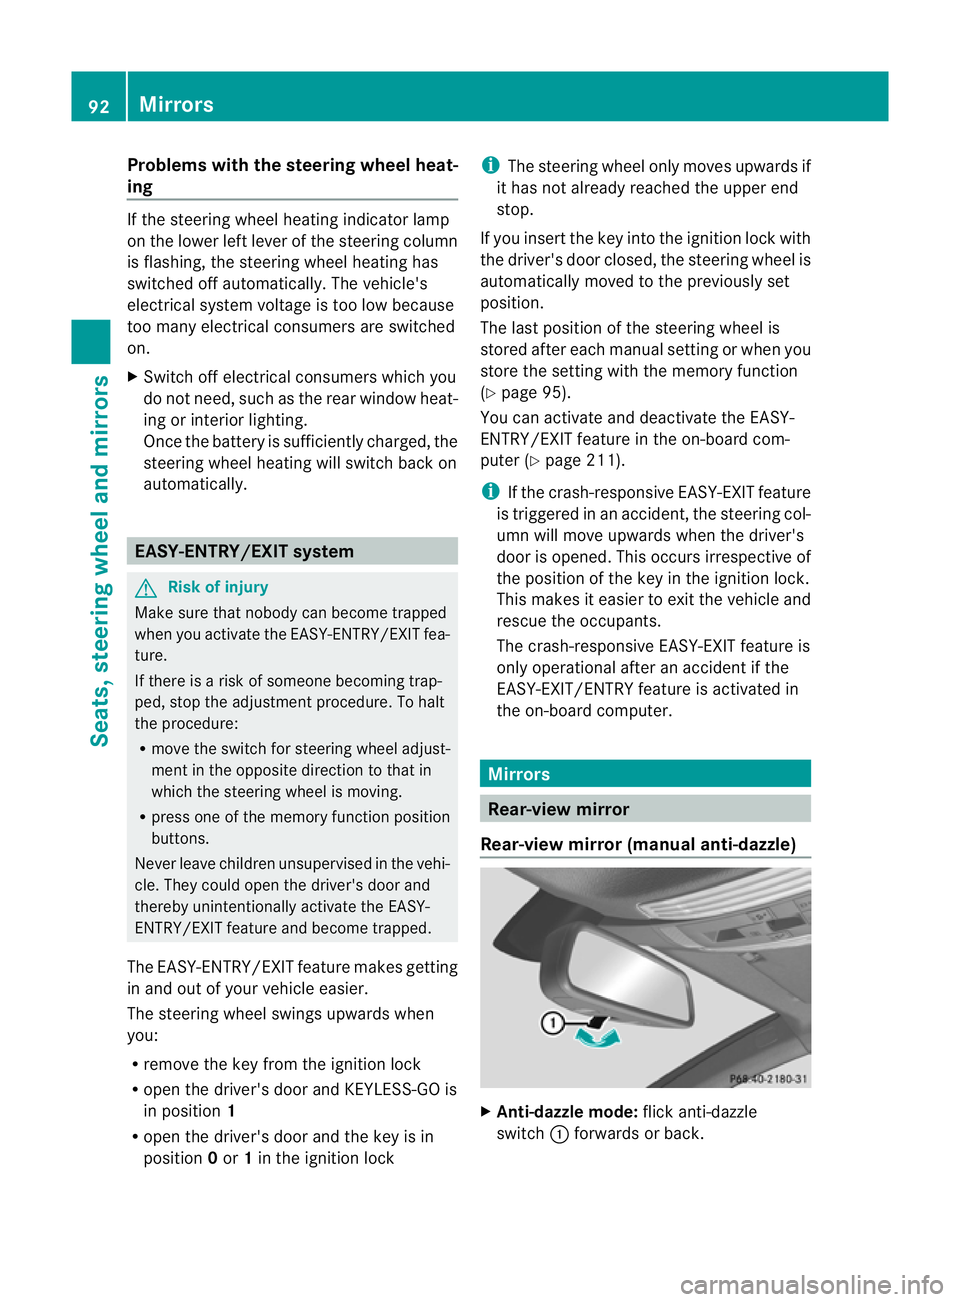
Rear-view mirror (manual anti-dazzle) X
Anti-dazzle mode: flick anti-dazzle
switch :forwards or back. 92
MirrorsSeats, steering wheel and mirrors
Page 98 of 337
exterior mirror such that the rear
wheel and kerb are visible.
X Press memory button M? and one of
the arrows on adjustment button =
within three seconds.
The parking position is stored if the
exterior mirror does not move.
If the mirror moves out of position, repeat
the steps.
Calling up astore dparking position set-
ting X
With the key in position 2in the ignition
lock and the exterior mirror on the front-
passenge rside activated, engage reverse
gear.
The exterior mirror on the front-passenger
side moves to the stored parking position.
The exterior mirror on the front-passenger
side moves back to its original position:
R as soon as you exceed a speed of
10 km/h
R about ten seconds after you have disen-
gaged reverse gear
R if you press button :for the exterior mir-
ror on the driver's side Memory functions
Storing settings
With the memory function, you can store up
to three different settings, e.g. for three dif-
ferent people.
The following settings are stored as a single
memory preset:
R position of the seat, backrest and head
restraint
R active multicontour seat :seat cushion
length, seat backrest side bolsters, contour
of the backrest, dynamic function level set-
ting R
driver's side: steering wheel position
R driver's side: position of the exterior mir-
rors on the driver's and front-passenger
sides G
Risk of injury
The memory function can still be used when
the key has been removed. For this reason,
children should never be left unsupervised in
the vehicle. They could otherwise become
trapped when adjusting the seat or the steer-
ing wheel. G
Risk of accident
Only use the memory function on the driver's
side when the vehicle is stationary. Other-
wise, you could be distracted from the traffic
conditions by the steering wheel and seat
moving of their own accord, and as a result
cause an accident. X
Adjust the seat (Y page 86).
X On the driver's side, adjust the steering
wheel (Y page 91) and the exterior mirrors
(Y page 93).
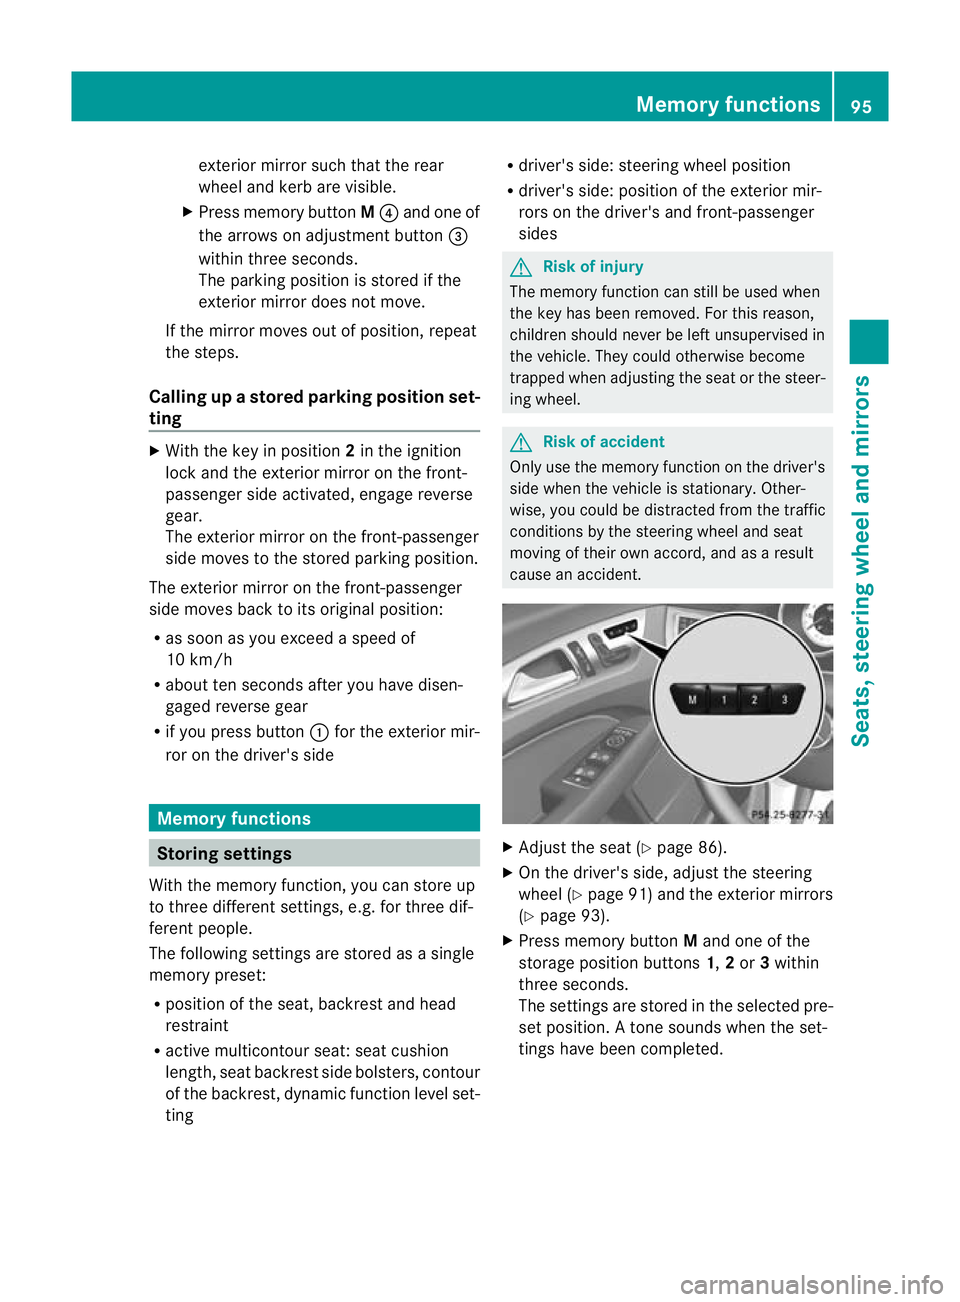
X Press memory button Mand one of the
storage position buttons 1,2or 3within
three seconds.
The settings are stored in the selected pre-
set position .Atone sounds when the set-
tings have been completed. Memory functions
95Seats, steering wheel and mirrors Z