2010 MERCEDES-BENZ CLS COUPE light
[x] Cancel search: lightPage 67 of 337
X
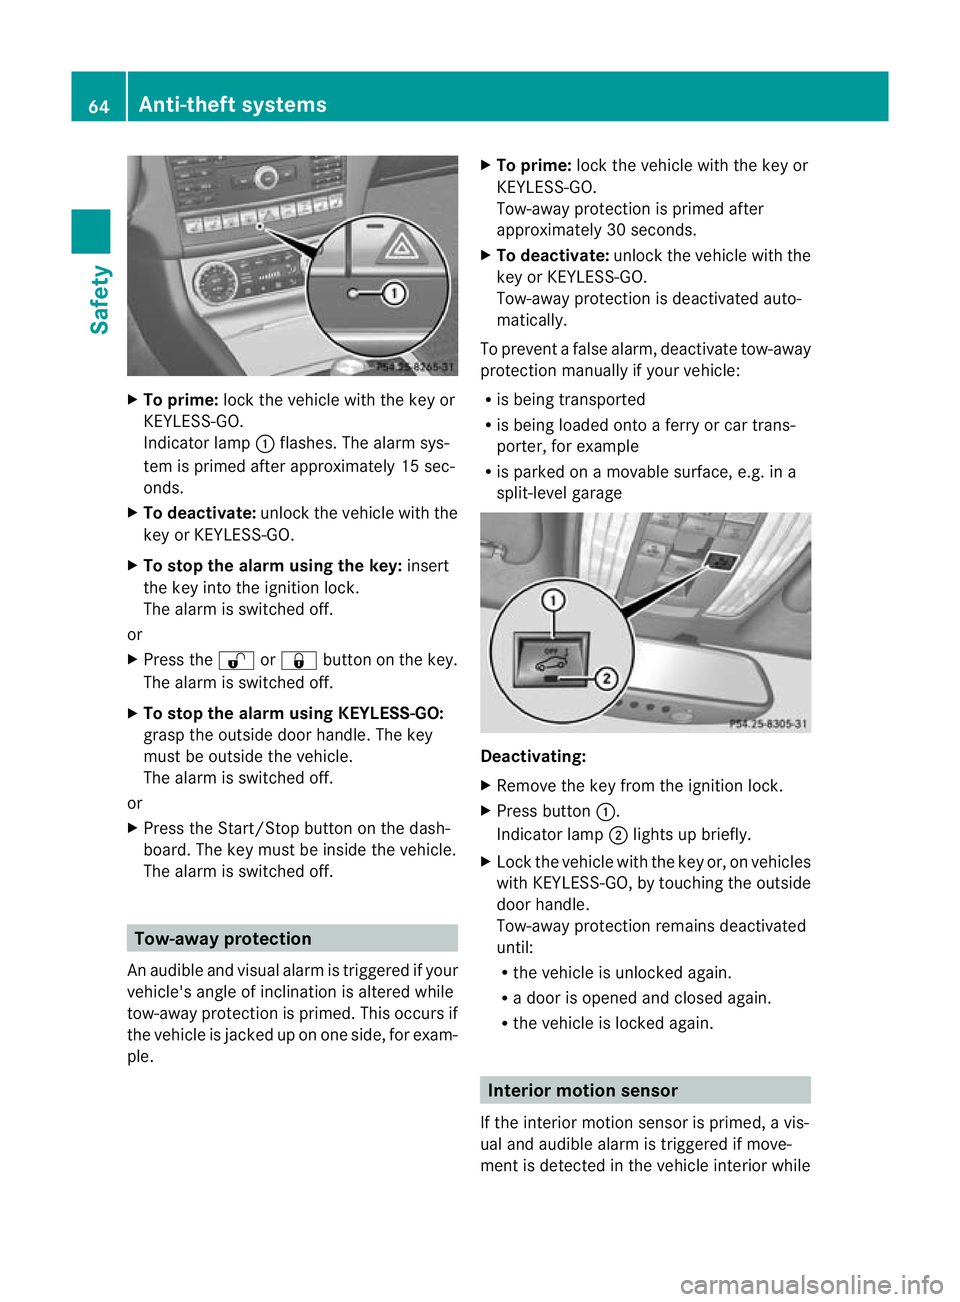
To prime: lock the vehicle with the key or
KEYLESS-GO.
Indicato rlamp :flashes. The alarm sys-
te mi s primed after approximately 15 sec-
onds.
X To deactivate: unlock the vehicle with the
key or KEYLESS-GO.
X To stop the alarm using the key: insert
the key into the ignition lock.
The alarm is switched off.
or
X Press the %or& button on the key.
The alarm is switched off.
X To stop the alarm using KEYLESS-GO:
grasp the outside door handle. The key
must be outside the vehicle.
The alarm is switched off.
or
X Press the Start/Stop button on the dash-
board. The key must be inside the vehicle.
The alarm is switched off. Tow-away protection
An audible and visual alarm is triggered if your
vehicle's angle of inclination is altered while
tow-away protection is primed. This occurs if
the vehicle is jacked up on one side, for exam-
ple. X
To prime: lock the vehicle with the key or
KEYLESS-GO.
Tow-away protection is primed after
approximately 30 seconds.
X To deactivate: unlock the vehicle with the
key or KEYLESS-GO.
Tow-away protection is deactivated auto-
matically.
To prevent a false alarm, deactivate tow-away
protection manually if your vehicle:
R is being transported
R is being loaded onto a ferry or car trans-
porter, for example
R is parked on a movable surface, e.g. in a
split-level garage Deactivating:
X
Remove the key from the ignition lock.
X Press button :.
Indicator lamp ;lights up briefly.
X Lock the vehicle with the key or, on vehicles
with KEYLESS-GO, by touching the outside
door handle.
Tow-away protection remains deactivated
until:
R the vehicle is unlocked again.
R a door is opened and closed again.
R the vehicle is locked again. Interior motion sensor
If the interior motion sensor is primed, a vis-
ual and audible alarm is triggered if move-
ment is detected in the vehicle interior while 64
Anti-theft systemsSafety
Page 71 of 337
Vehicle equipment
i This manual describes all the standard
and optional equipment of your vehicle
available at the time of publicatio nofthe
Owner's Manual. Country-specific differen-
ces are possible. Please note that your
vehicle may not be equipped with all fea-
tures described. This also applies to safety-
relevant systems and functions. Key
Key functions
Locking and unlocking centrally The key centrally locks/unlocks:
R
the doors
R the boot lid
R the fuel filler flap G
Risk of injury
Only for the United Kingdom: if the vehicle
has been locked with the key, the double lock
function is activated as standard. It is then not
possible to open the doors from inside the
vehicle.
Therefore, do not leave any people behind in
the vehicle, particularly children, elderly peo-
ple or people requiring special assistance, if
the vehicle has been locked with the key. As
a result, they may not be able to free them-
selves in the event of an emergency. They
could be seriously or even fatally injured by
prolonged exposure to extremely high or low
temperatures, for example. In this case, res-
cuing people from outside the vehicle is diffi-
cult.
Deactivate the interior motion sensor before
you lock the vehicle with the key. The doors
can then be opened from the inside after the
vehicle has been locked from the outside with
the key. If the vehicle has been locked with KEYLESS-
GO, the doors can be opened from inside the
vehicle. G
Risk of accident
If children are left unsupervised in the vehicle,
they could:
R open a door from inside the vehicle at any
time, even if it has been locked
R start the vehicle using akey which has been
left in the vehicle
R release the parking brake
They could thereby endanger themselves and
others. Never leave children unsupervised in
the vehicle. Always take the key with you
when leaving the vehicle, even if you are only
leaving it for a short time. :
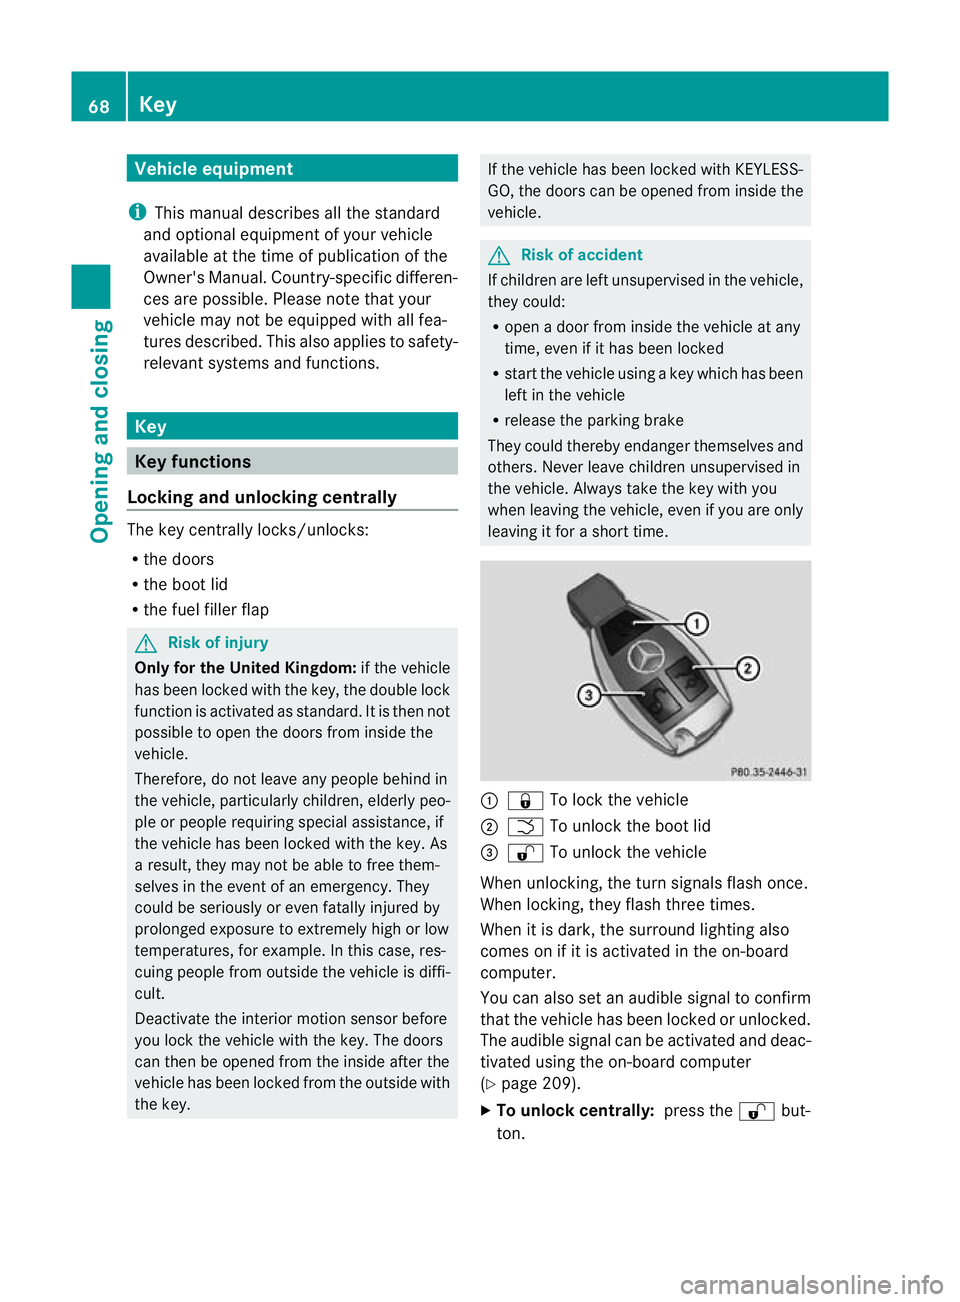
& To lock the vehicle
; F To unlock the boot lid
= % To unlock the vehicle
When unlocking, the turn signals flash once.
When locking, they flash three times.
When it is dark, the surround lighting also
comes on if it is activated in the on-board
computer.
You can also set an audible signal to confirm
that the vehicle has been locked or unlocked.
The audible signal can be activated and deac-
tivated using the on-board computer
(Y page 209).
X To unlock centrally: press the%but-
ton. 68
KeyOpening and closing
Page 73 of 337

lid, the anti-theft alarm system will be trig-
gered (Y
page 63).
There are several ways to tur noff the alarm:
X To deactivate the alarm with the key:
press the %or& button on the key.
or
X Insert the key into the ignition lock.
or
X To deactivate the alarm with KEYLESS-
GO: press the Start/Stop button in the igni-
tion lock. The key must be in the vehicle.
or
X Lock or unlock the vehicle using KEYLESS-
GO. The key must be outside the vehicle.
If you unlock the vehicle using the emergency
key element, the fuel filler flap will not be
unlocked automatically.
X To unlock the fuel filler flap: insert the
key in the ignition lock.
Removing the emergency key element X
Push release catch :in the direction of
the arrow and at the same time, remove
emergency key element ;from the key. Battery of the key
Important safety notes It is advisable to have batteries replaced at a
qualified specialist workshop, e.g. at a
Mercedes-Benz Service Centre. G
Risk of poisoning
Batteries are toxic and contain caustic sub-
stances. For this reason, keep batteries out of
the reach of children.
If a battery has been swallowed, visi tadoctor
immediately. H
Environmental note Batteries contain pollutants.
It is against the law to dis-
pose of them with the house-
hold rubbish. They must be
collected separately and
recycled in an environmen-
tally responsible manner. Dispose of batteries in an
environmentally responsible
manner. Take discharged
batteries to a qualified spe-
cialist workshop, e.g. a
Mercedes-Benz Service
Centre, or to a special col-
lection point for old batter-
ies.
Checking the battery X
Press the &or% button.
The key battery is working properly if the
battery charge indicator lamp :lights up
briefly.
If battery charge indicator lamp :does not
light up briefly during the test, the key battery
is discharged.
X Replace the key battery (Y page 71).70
KeyOpening and closing
Page 76 of 337
Problem Possible causes/consequences and
M Solutions
The engine cannot be
started using the key. The on-board voltage is too low.
X
Switch off non-essential consumers, e.g. seat heating or interior
lighting, and try to start the engine again.
If this does not work:
X Check the starter battery and charge it if necessary
(Y page 290).
or
X Jump-start the vehicle (Y page 294).
or
X Consult a qualified specialist workshop. The engine cannot be
started using KEYLESS-
GO. The key is in the
vehicle. Ad
oor is open. Therefore, the key cannot be detected as easily.
X Close the door and try to start the vehicle again. There is interference from a powerful source of radio waves.
X Start your vehicle with the key in the ignition lock. Doors
Important safety notes
G
Risk of injury
Only for the United Kingdom: if the vehicle
has been locked with the key, the double lock
function is activated as standard. It is then not
possible to open the doors from inside the
vehicle.
Therefore, do not leave any people behind in
the vehicle, particularly children, elderly peo-
ple or people requiring special assistance, if
the vehicle has been locked with the key. As
a result, they may not be able to free them-
selves in the event of an emergency. They
could be seriously or even fatally injured by
prolonged exposure to extremely high or low
temperatures, for example. In this case, res-
cuing people from outside the vehicle is diffi-
cult.
Deactivate the interior motion sensor before
you lock the vehicle with the key. The doors
can then be opened from the inside after the vehicle has been locked from the outside with
the key.
If the vehicle has been locked with KEYLESS-
GO, the doors can be opened from inside the
vehicle.
G
Risk of accident
If children are left unsupervised in the vehicle,
they could:
R open a door from inside the vehicle at any
time, even if it has been locked
R start the vehicle using akey which has been
left in the vehicle
R release the parking brake
They could thereby endanger themselves and
others. Never leave children unsupervised in
the vehicle. Always take the key with you
when leaving the vehicle, even if you are only
leaving it for a short time. Doors
73Opening and closing Z
Page 83 of 337
X
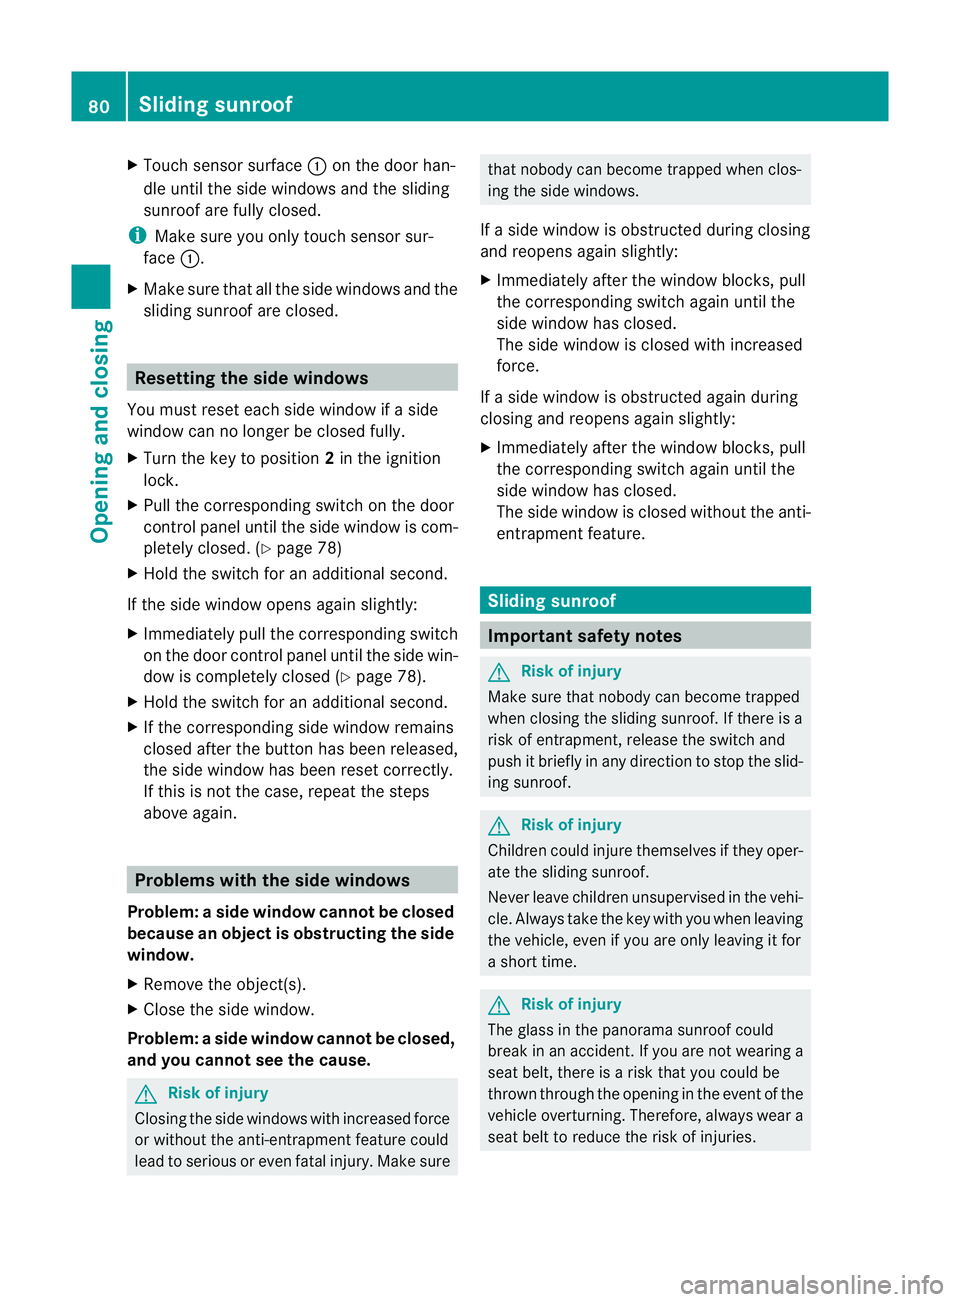
Touch sensor surface :on the door han-
dle until the side windows and the sliding
sunroof are fully closed.
i Make sure you only touch sensor sur-
face :.
X Make sure that all the side windows and the
sliding sunroof are closed. Resetting the side windows
You must reset each side window if a side
window can no longer be closed fully.
X Turn the key to position 2in the ignition
lock.
X Pull the corresponding switch on the door
control panel until the side window is com-
pletely closed. (Y page 78)
X Hold the switch for an additional second.
If the side window opens again slightly:
X Immediately pull the corresponding switch
on the door control panel until the side win-
dow is completely closed (Y page 78).
X Hold the switch for an additional second.
X If the corresponding side window remains
closed after the button has been released,
the side window has been reset correctly.
If this is not the case, repeat the steps
above again. Problems with the side windows
Problem: aside window cannot be closed
because an object is obstructing the side
window.
X Remove the object(s).
X Close the side window.
Problem :aside window cannot be closed,
and you cannot see the cause. G
Risk of injury
Closing the side windows with increased force
or without the anti-entrapment feature could
lead to serious or even fatal injury. Make sure that nobody can become trapped when clos-
ing the side windows.
If a side window is obstructed during closing
and reopens again slightly:
X Immediately afte rthe window blocks, pull
the corresponding switch again until the
side window has closed.
The side window is closed with increased
force.
If a side window is obstructed again during
closing and reopens again slightly:
X Immediately after the window blocks, pull
the corresponding switch again until the
side window has closed.
The side window is closed without the anti-
entrapment feature. Sliding sunroof
Important safety notes
G
Risk of injury
Make sure that nobody can become trapped
when closing the sliding sunroof. If there is a
risk of entrapment, release the switch and
push it briefly in any direction to stop the slid-
ing sunroof. G
Risk of injury
Children could injure themselves if they oper-
ate the sliding sunroof.
Never leave children unsupervised in the vehi-
cle. Always take the key with you when leaving
the vehicle, even if you are only leaving it for
a short time. G
Risk of injury
The glass in the panorama sunroof could
break in an accident. If you are not wearing a
seat belt, there is a risk that you could be
thrown through the opening in the event of the
vehicle overturning. Therefore, always wear a
seat belt to reduce the risk of injuries. 80
Sliding sunroofOpening and closing
Page 84 of 337
!
Only open the panorama sliding sunroof
if it is free of snow and ice. Otherwise, mal-
functions may occur.
Do not allow anything to protrude from the
sliding sunroof. Otherwise, the seals could
be damaged.
i Resonance noises can occur in addition
to the usual airflow noises when the sliding
sunroof is open. They are caused by minor
pressure fluctuations in the vehicle interior.
Change the position of the sliding sunroof
or open a side window slightly to reduce or
eliminate these noises. Operating the sliding sunroof
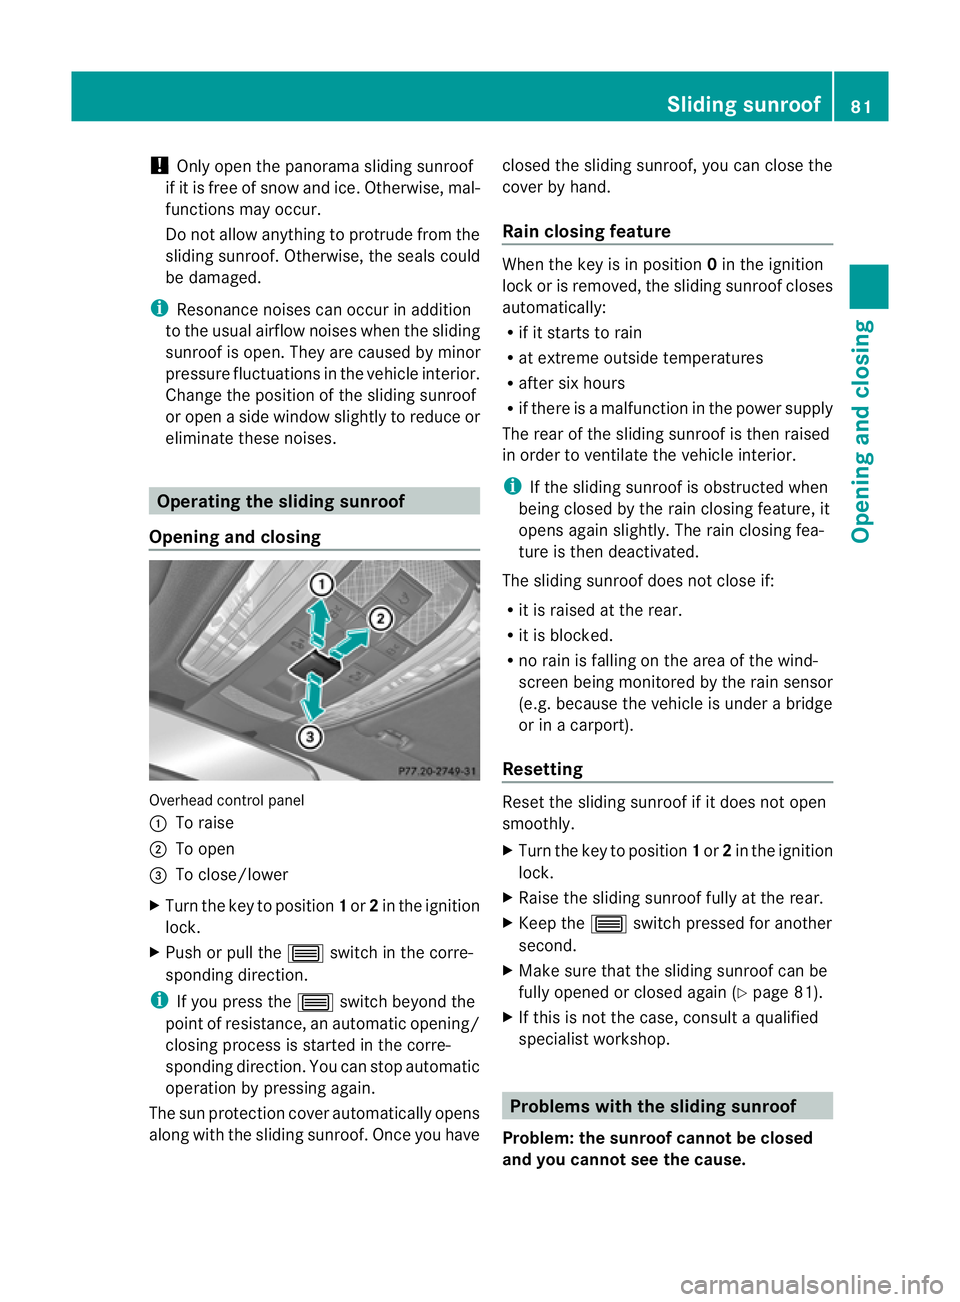
Opening and closing Overhead control panel
:
To raise
; To open
= To close/lower
X Turn the key to position 1or 2in the ignition
lock.
X Push or pull the 3switch in the corre-
sponding direction.
i If you press the 3switch beyond the
point of resistance, an automatic opening/
closing process is started in the corre-
sponding direction. You can stop automatic
operation by pressing again.
The sun protection cover automatically opens
along with the sliding sunroof. Once you have closed the sliding sunroof, you can close the
cover by hand.
Rain closing feature When the key is in position
0in the ignition
lock or is removed, the sliding sunroof closes
automatically:
R if it starts to rain
R at extreme outside temperatures
R after six hours
R if there is a malfunction in the power supply
The rear of the sliding sunroof is then raised
in order to ventilate the vehicle interior.
i If the sliding sunroof is obstructed when
being closed by the rain closing feature, it
opens agains lightly. The rain closing fea-
ture is the ndeactivated.
The sliding sunroof does not close if:
R it is raised at the rear.
R it is blocked.
R no rain is falling on the area of the wind-
screen being monitored by the rain sensor
(e.g. because the vehicle is under a bridge
or in a carport).
Resetting Reset the sliding sunroof if it does not open
smoothly.
X
Turn the key to position 1or 2in the ignition
lock.
X Raise the sliding sunroof fully at the rear.
X Keep the 3switch pressed for another
second.
X Make sure that the sliding sunroof can be
fully opened or closed again (Y page 81).
X If this is not the case, consult a qualified
specialist workshop. Problems with the sliding sunroof
Problem: the sunroof cannot be closed
and you cannot see the cause. Sliding sunroof
81Opening and closing Z
Page 85 of 337
G
Risk of injury
You could be severely or eve nfatally injured
when closing the sliding sunroo fwith
increased closing force or if the anti-entrap-
men tfeature is deactivated. Make sure that
nobody can become trapped when closing the
sliding sunroof.
If the sliding sunroof is obstructed during
closing and reopens again slightly:
X Immediately after the sliding sunroof
blocks, pull the 3switch in the over-
head control panel down to the point of
resistance and hold it until the sliding sun-
roof is closed.
The sliding sunroof is closed with increased
force.
If the sliding sunroof is obstructed again dur-
ing closing and reopens again slightly:
X Immediately after the sliding sunroof
blocks, pull the 3switch in the over-
head control panel down to the point of
resistance and hold it until the sliding sun-
roof is closed.
The sliding sunroof is closed without the
anti-entrapment feature. 82
Sliding sunroofOpening and closing
Page 87 of 337
Vehicle equipment
i This manual describes all the standard
and optional equipment of your vehicle
available at the time of publicatio nofthe
Owner's Manual. Country-specific differen-
ces are possible. Please note that your
vehicle may not be equipped with all fea-
tures described. This also applies to safety-
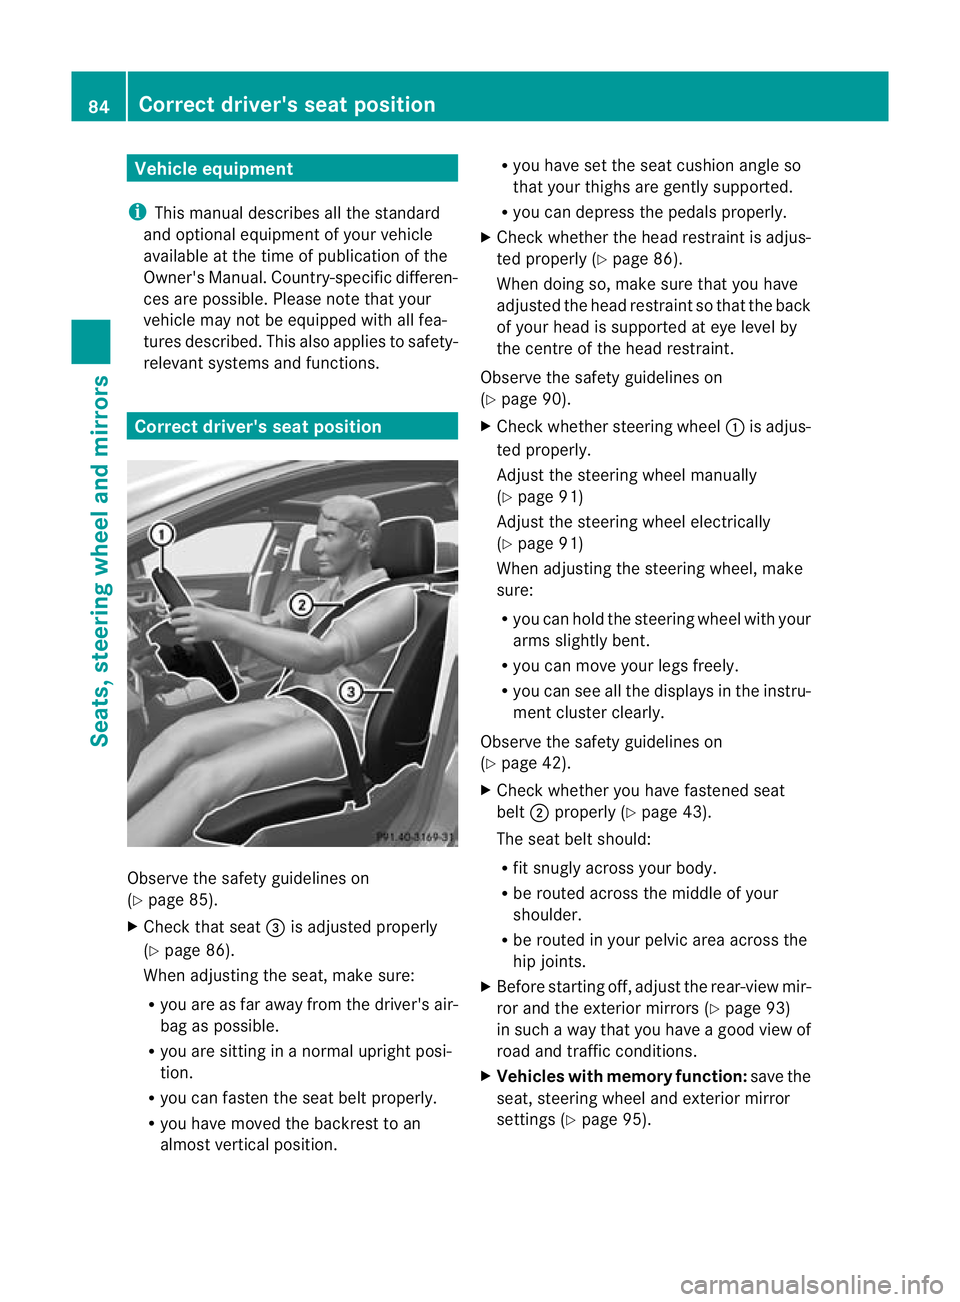
relevant systems and functions. Correct driver's seat position
Observe the safety guidelines on
(Y
page 85).
X Check that seat =is adjusted properly
(Y page 86).
When adjusting the seat, make sure:
R you are as far away from the driver's air-
bag as possible.
R you are sitting in a normal upright posi-
tion.
R you can fasten the seat belt properly.
R you have moved the backrest to an
almost vertical position. R
you have set the seat cushion angle so
that your thighs are gently supported.
R you can depress the pedals properly.
X Check whether the head restraint is adjus-
ted properly (Y page 86).
When doing so, make sure that you have
adjusted the head restraint so that the back
of your head is supported at eye level by
the centre of the head restraint.
Observe the safety guidelines on
(Y page 90).
X Check whether steering wheel :is adjus-
ted properly.
Adjust the steering wheel manually
(Y page 91)
Adjust the steering wheel electrically
(Y page 91)
When adjusting the steering wheel, make
sure:
R you can hold the steering wheel with your
arms slightly bent.
R you can move your legs freely.
R you can see all the displays in the instru-
ment cluster clearly.
Observe the safety guidelines on
(Y page 42).
X Check whether you have fastened seat
belt ;properly (Y page 43).
The seat belt should:
R fit snugly across your body.
R be routed across the middle of your
shoulder.
R be routed in your pelvic area across the
hip joints.
X Before starting off, adjust the rear-view mir-
ror and the exterior mirrors (Y page 93)
in such a way that you have a good view of
road and traffic conditions.
X Vehicles with memory function: save the
seat, steering wheel and exterior mirror
settings (Y page 95). 84
Correct driver's seat positionSeats, steering wheel and mirrors