2010 MERCEDES-BENZ CLS COUPE light
[x] Cancel search: lightPage 276 of 337
Always have paintwork repairs performed
at a qualified specialis tworkshop, e.g. a
Mercedes-Benz Service Centre.
! Do not use wash programs with a hot wax
treatment under any circumstances.
i Use only insect remover and car shampoo
from the range of recommended and
approved Mercedes-Benz care products.
Cleaning the windows G
Risk of injury
Switch off the windscreen wipers and remove
the key from the ignition lock before cleaning
the windscreen or the wiper blades. On vehi-
cles with KEYLESS-GO, press the Start/Stop
button repeatedly until all indicator lamps in
the instrument cluster have gone off. The
windscreen wipers could otherwise move and
injure you.
X Clean the inside and outside of the win-
dows with a damp cloth and a cleaning
agent that is recommended and approved
by Mercedes-Benz.
! Do not use dry cloths, abrasive products,
solvents or cleaning agents containing sol-
vents to clean the inside of the windows.
Do not use hard object sto clean the insides
of the windows, e.g. an ice scraper or ring.
There is otherwise a risk of damaging the
windows.
! Clean the water drainage channels of the
windscreen and the rear window at regular
intervals. Deposits such as leaves, petals
and pollen may under certain circumstan-
ces prevent water from draining away.T his
can lead to corrosion damage and damage
to electronic components.
Cleaning the wiper blades G
Risk of injury
Switch off the windscreen wipers and remove
the key from the ignition lock before cleaning
the windscreen or the wiper blades. On vehi- cles with KEYLESS-GO, press the Start/Stop
button repeatedly until all indicator lamps in
the instrument cluster have gone off. The
windscreen wipers could otherwise move and
injure you.
! Do not pull on the wiper blade. Otherwise,
the wiper blade could be damaged.
! Do not clean wiper blades too often and
do not rub them too hard. Otherwise, the
graphite coating could be damaged. This
could cause wiper noise.
X Fold the wiper arms away from the wind-
screen.
X Cleant he wiper blades carefully using a
damp cloth.
X Fold the windscreen wipers back again
before switching on the ignition.
! Hold the wiper arm securely when folding
back. The windscreen could be damaged if
the wiper arm hits against it suddenly.
Cleaning the exterior lighting X
Cleant he plastic lenses of the exterior
lighting using a wet sponge and a mild
cleaning agent, e.g. Mercedes-Ben zcar
shampoo or cleaning cloths.
! Only use cleaning agents or cleaning
cloths that are suitable for plastic lenses.
Unsuitable cleaning agents or cleaning
cloths could scratch or damage the plastic
lenses of the exterior lighting. Care
273Maintenance and care Z
Page 279 of 337
R
clean cloth covers with a microfibre cloth
moistened with a solution containing 1%
detergent (e.g. washing-up liquid). Rub
carefully and always wipe entire sea tsec-
tions to avoid leaving visible lines. Leave
the seat to dry afterwards. Cleaning
results depend on the type of dirt and
how long it has been there.
R clean Alcantara® covers with a damp
cloth. Make sure you wipe entire seat
sections to avoid leaving visible lines.
i Note that regular care is essential to
ensure that the appearance and comfort of
the covers is retained over time.
Cleaning the seat belts X
Use clean, lukewarm water and soap solu-
tion.
! Do not clean the seat belts using chemical
cleaning agents .Do not dry the seatbelts
at temperatures above 80 †orby exposing
them to direc tsunlight. 276
CareMaintenance and care
Page 285 of 337
X
Do not remove any foreign objects which
have penetrated the tyre, e.g .screws or
nails.
X Remove the tyre sealant bottle, the accom-
panying "max. 80 km/h" sticker and the
tyre inflation compressor from the stowage
well underneath the boo tfloor
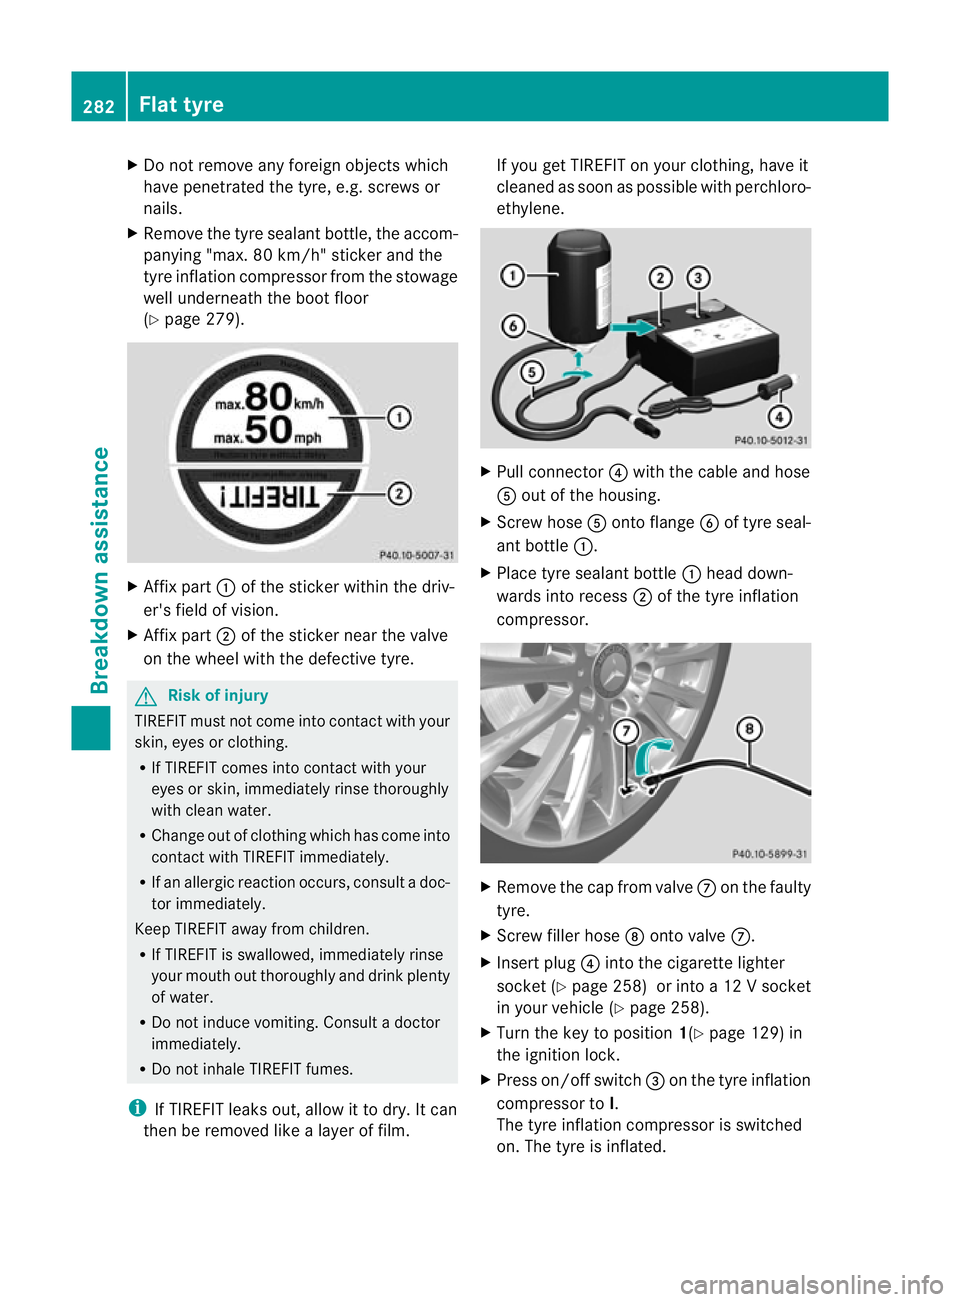
(Y page 279). X
Affix part :of the sticker within the driv-
er's field of vision.
X Affix part ;of the sticker near the valve
on the wheel with the defective tyre. G
Risk of injury
TIREFIT must not com einto contact with your
skin, eyes or clothing.
R If TIREFIT comes into contact with your
eyes or skin, immediately rinse thoroughly
with clean water.
R Change ou tofclothing which has come into
contact with TIREFIT immediately.
R If an allergic reaction occurs, consult a doc-
tor immediately.
Keep TIREFIT away fro mchildren.
R If TIREFIT is swallowed, immediately rinse
your mouth out thoroughly and drink plenty
of water.
R Do not induce vomiting. Consult a doctor
immediately.
R Do not inhale TIREFIT fumes.
i If TIREFIT leaks out, allow it to dry. It can
then be removed like a layer of film. If you get TIREFIT on your clothing, have it
cleaned as soon as possible with perchloro-
ethylene.
X
Pull connector ?with the cable and hose
A out of the housing.
X Screw hose Aonto flange Bof tyre seal-
ant bottle :.
X Place tyre sealant bottle :head down-
wards into recess ;of the tyre inflation
compressor. X
Remove the cap from valve Con the faulty
tyre.
X Screw filler hose Donto valve C.
X Insert plug ?into the cigarette lighter
socket (Y page 258) or into a12 V socket
in you rvehicle (Y page 258).
X Turn the key to position 1(Ypage 129) in
the ignition lock.
X Press on/off switch =on the tyre inflation
compressor to I.
The tyre inflation compressor is switched
on. The tyre is inflated. 282
Flat tyreBreakdown assistance
Page 288 of 337
X
Prepare the vehicle as described
(Y page 281).
X Remove the following items from the stow-
age well under the boot floor:
R the emergency spare wheel
R the tyre inflation compressor 38
R the vehicle tool kit
R the folding wheel chock
R the jack
X Secure the vehicle to prevent it from rolling
away.
Securing the vehicle to prevent it from
rolling away If your vehicle is equipped with a wheel chock,
it can be found in the vehicle tool kit
(Y page 279).
The folding wheel chock is an additional
securing measure to prevent the vehicle from
rolling away, for example when changing a
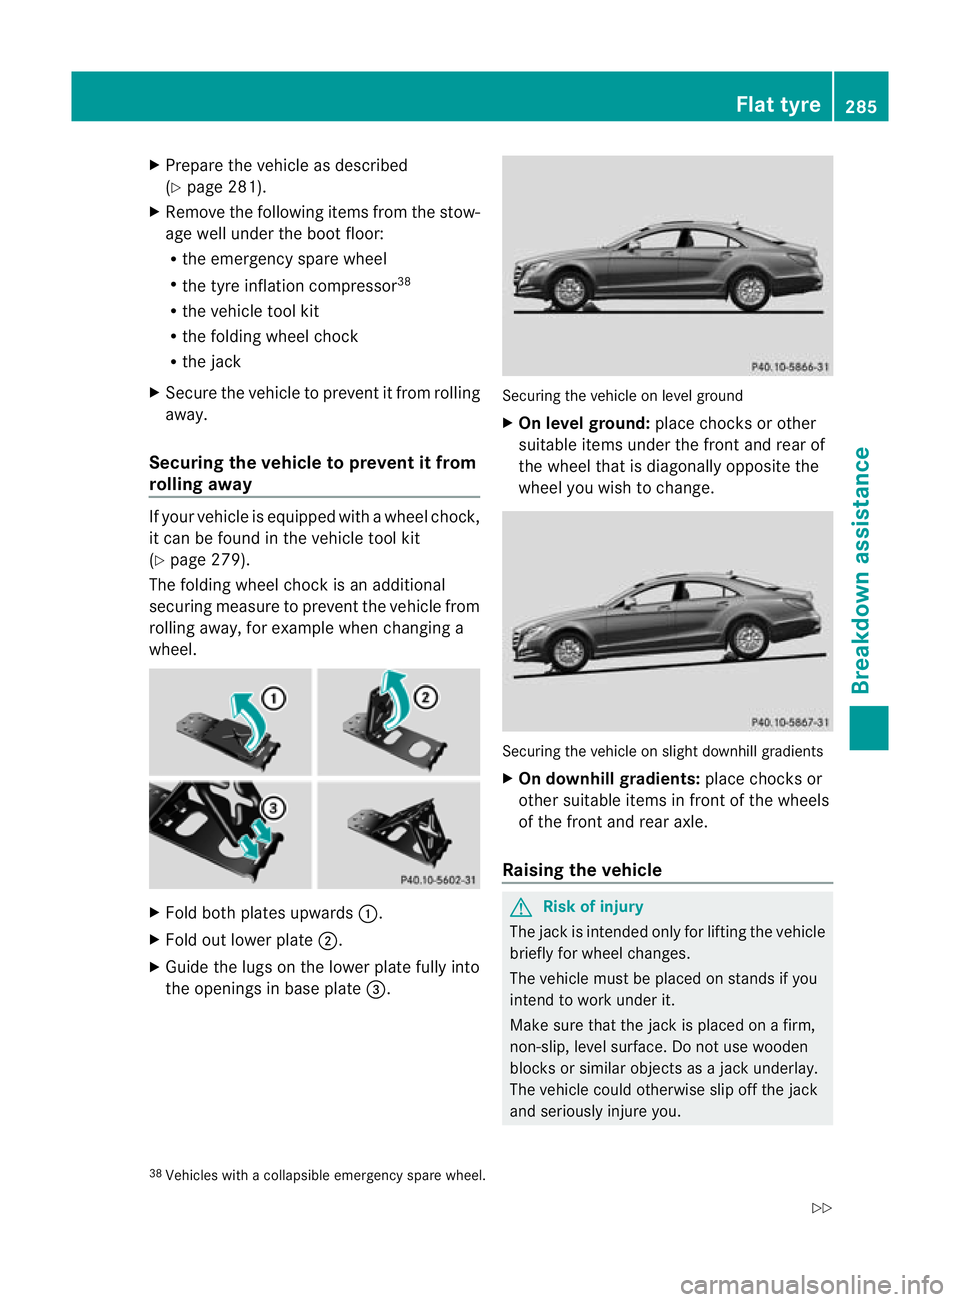
wheel. X
Fold both plates upwards :.
X Fold out lower plate ;.
X Guide the lugs on the lower plate fully into
the openings in base plate =. Securing the vehicle on level ground
X
On level ground: place chocks or other
suitable items under the fronta nd rearof
the wheel tha tis diagonally opposite the
wheel you wish to change. Securing the vehicle on slight downhill gradients
X
On downhill gradients: place chocks or
other suitable items in front of the wheels
of the front and rear axle.
Raising the vehicle G
Risk of injury
The jack is intended only for lifting the vehicle
briefly for wheel changes.
The vehicle must be placed on stands if you
intend to work under it.
Make sure that the jack is placed on a firm,
non-slip, level surface. Do not use wooden
blocks or similar objects as a jack underlay.
The vehicle could otherwise slip off the jack
and seriously injure you.
38 Vehicles with a collapsible emergency spare wheel. Flat tyre
285Breakdown assistance
Z
Page 291 of 337

gency spare wheel (Y
page 288) and then
lower the vehicle ( Ypage 288).
or
X Vehicles with a "Minispare" emer-
gency spare wheel: lower the vehicle
(Y page 288)
Inflating the collapsible emergency
spare wheel G
Risk of accident
Inflate the collapsible emergency spare wheel
before lowering the vehicle. You could other-
wise damage the wheel rim. X
Pull plug ?and the air hose out of the
housing.
X Remove the cap from the valve on the col-
lapsible emergency spare wheel.
X Screw union nut :on the air hose onto the
valve.
X Make sure on/offs witchAof the tyre
inflatio ncompressor is set to 0.
X Insert plug ?into the socket of the ciga-
rette lighter (Y page 258) or into a 12 V
power socket (Y page 258) in your vehicle.
X Make sure that the key is in position
1(Y page 129) in the ignition lock.
X Press on/offs witchAon the tyre inflation
compressor to I.
The tyre inflatio ncompressor is switched
on. The tyre is inflated. The tyre pressure is
read at pressure gauge =.!
Do not operate the tyre inflation com-
pressor for longer than eight minutes at a
time without a break. It may otherwise
overheat.
The tyre inflation compressor can be oper-
ated again once it has cooled down.
X Pump the tyre to the specified tyre pres-
sure.
The specified tyre pressure is printed on
the yellow label of the emergency spare
wheel.
X When the specified tyre pressure has been
reached, press on/offs witchAon the
electric air pump to 0.
The tyre inflatio ncompressor is switched
off.
X Turn the key to position 0in the ignition
lock.
X If the tyre pressure is higher than the speci-
fied pressure, press pressure release but-
ton ;until the correct tyre pressure has
been reached.
X Unscrew union nut :on the air hose from
the valve.
X Screw the valve cap ontot he collapsible
emergency spare wheel valve again.
X Stow plug ?and the air hose in the lower
section of the pump housing.
X Stow the tyre inflation compressor in the
designated place in the vehicle.
Lowering the vehicle G
Risk of accident
Inflate the collapsible emergency spare wheel
before lowering the vehicle. You could other-
wise damage the wheel rim.
X Turn the crank of the jack anti-clockwise
until the vehicle is once again standing
firmly on the ground.
X Place the jack to one side. 288
Flat tyreBreakdown assistance
Page 311 of 337
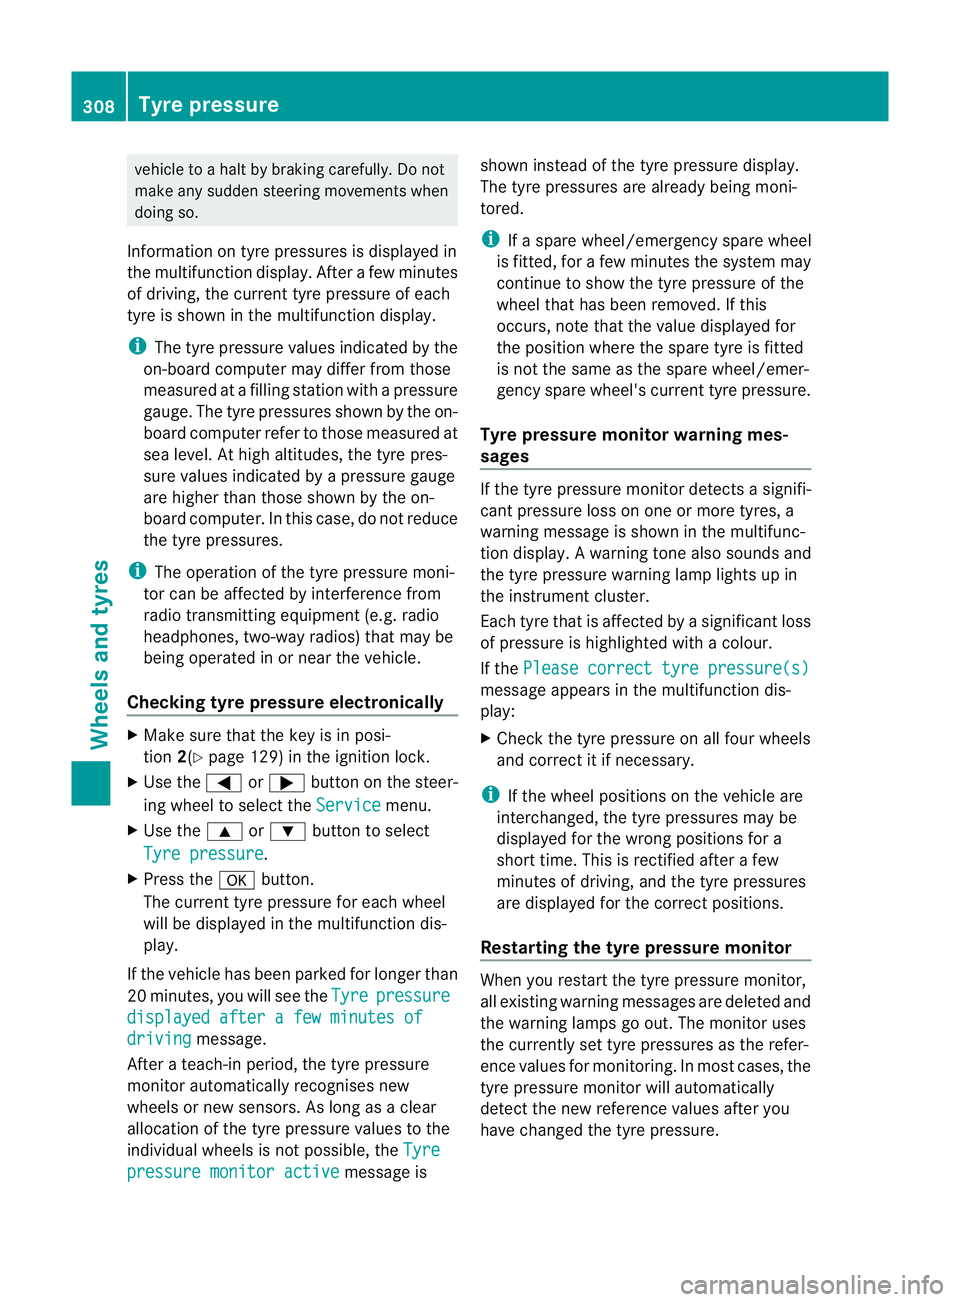
vehicle to a haltb
y braking carefully. Do not
make any sudden steering movements when
doing so.
Information on tyre pressures is displayed in
the multifunction display. Afte rafew minutes
of driving, the current tyre pressure of each
tyre is show ninthe multifunction display.
i The tyre pressure values indicated by the
on-board computer may differ from those
measured at a filling station with a pressure
gauge. The tyre pressures shown by the on-
board computer refer to those measured at
sea level. At high altitudes, the tyre pres-
sure values indicated by a pressure gauge
are higher than those shown by the on-
board computer. In this case, do not reduce
the tyre pressures.
i The operation of the tyre pressure moni-
tor can be affected by interference from
radio transmitting equipment (e.g. radio
headphones, two-way radios) that may be
being operated in or near the vehicle.
Checking tyre pressure electronically X
Make sure that the key is in posi-
tion 2(Ypage 129) in the ignition lock.
X Use the =or; button on the steer-
ing wheel to select the Service menu.
X Use the 9or: button to select
Tyre pressure .
X Press the abutton.
The current tyre pressure for each wheel
will be displayed in the multifunction dis-
play.
If the vehicle has been parked for longer than
20 minutes, you will see the Tyre pressure
displayed after a few minutes of
driving message.
After a teach-in period, the tyre pressure
monitor automatically recognises new
wheels or new sensors. As long as a clear
allocation of the tyre pressure values to the
individual wheels is not possible, the Tyrepressure monitor active message isshown instead of the tyre pressure display.
The tyre pressures are already being moni-
tored.
i
If a spare wheel/emergency spare wheel
is fitted, for a few minutes the system may
continue to show the tyre pressure of the
wheel that has been removed. If this
occurs, note that the value displayed for
the position where the spare tyre is fitted
is not the same as the spare wheel/emer-
gency spare wheel's current tyre pressure.
Tyre pressure monitor warning mes-
sages If the tyre pressure monitor detects a signifi-
cant pressure loss on one or more tyres, a
warning message is shown in the multifunc-
tion display.
Awarning tone also sounds and
the tyre pressure warning lamp lights up in
the instrument cluster.
Each tyre that is affected by a significant loss
of pressure is highlighted with a colour.
If the Please correct tyre pressure(s) message appears in the multifunction dis-
play:
X
Chec kthe tyre pressure on all four wheels
and correct it if necessary.
i If the wheel positions on the vehicle are
interchanged, the tyre pressures may be
displayed for the wrong positions for a
short time. This is rectified after a few
minutes of driving, and the tyre pressures
are displayed for the correct positions.
Restarting the tyre pressure monitor When you restart the tyre pressure monitor,
all existing warning messages are deleted and
the warning lamps go out. The monitor uses
the currently set tyre pressures as the refer-
ence values for monitoring. In most cases, the
tyre pressure monitor will automatically
detect the new referencev alues after you
have changed the tyre pressure. 308
Tyre pressureWheels and tyres
Page 315 of 337
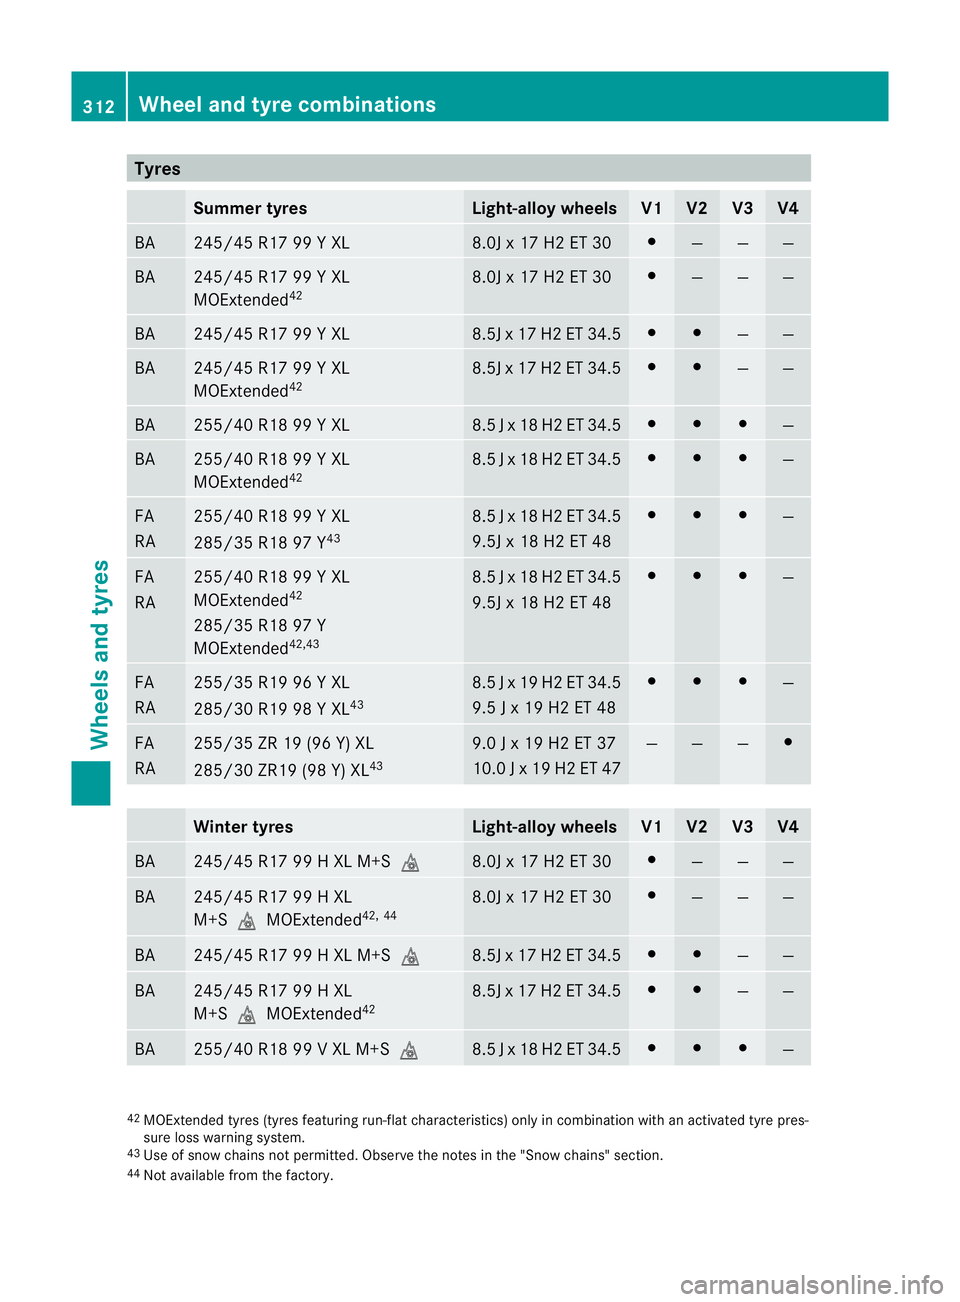
Tyres
Summer tyres Light-alloy wheels V1 V2 V3 V4
BA 245/45 R17 99 Y XL 8.0J x 17 H2 ET 30 #
— — —
BA 245/45 R17 99 Y XL
MOExtended
42 8.0J x 17 H2 ET 30 #
— — —
BA 245/45 R17 99 Y XL 8.5J x 17 H2 ET 34.5 # #
— —
BA 245/45 R17 99 Y XL
MOExtended
42 8.5J x 17 H2 ET 34.5 # #
— —
BA 255/40 R18 99 Y XL 8.5
Jx18 H2 ET 34.5 # # #
—
BA 255/40 R18 99 Y XL
MOExtended
42 8.5
Jx18 H2 ET 34.5 # # #
—
FA
RA 255/40 R18 99 Y XL
285/35 R18 97 Y
43 8.5
Jx18 H2 ET 34.5
9.5J x 18 H2 ET 48 # # #
—
FA
RA 255/40 R18 99 Y XL
MOExtended
42
285/35 R18 97 Y
MOExtended 42,43 8.5
Jx18 H2 ET 34.5
9.5J x 18 H2 ET 48 # # #
—
FA
RA 255/35 R19 96 Y XL
285/30 R19 98 Y XL
43 8.5
Jx19 H2 ET 34.5
9.5 J x 19 H2 ET 48 # # #
—
FA
RA 255/35 ZR 19 (96 Y) XL
285/30 ZR19 (98 Y) XL
43 9.0 J x 19 H2 ET 37
10.0 Jx19 H2 ET 47 — — — #
Winter tyres Light-allo
ywheels V1 V2 V3 V4
BA 245/45 R17 99 H XL M+Si 8.0J x 17 H2 ET 30 #
— — —
BA 245/45 R17 99 H XL
M+SiMOExtended
42, 44 8.0J x 17 H2 ET 30 #
— — —
BA 245/45 R17 99 H XL M+Si 8.5J x 17 H2 ET 34.5 # #
— —
BA 245/45 R17 99 H XL
M+SiMOExtended
42 8.5J x 17 H2 ET 34.5 # #
— —
BA 255/40 R18 99 V XL M+S
i 8.5
Jx18 H2 ET 34.5 # # #
—
42
MOExtended tyres (tyres featuring run-fla tcharacteristics) only in combination with an activated tyre pres-
sure loss warning system.
43 Use of snow chains not permitted. Observe the notes in the "Snow chains" section.
44 Not available from the factory. 312
Wheel and tyre combinationsWheels and tyres
Page 316 of 337
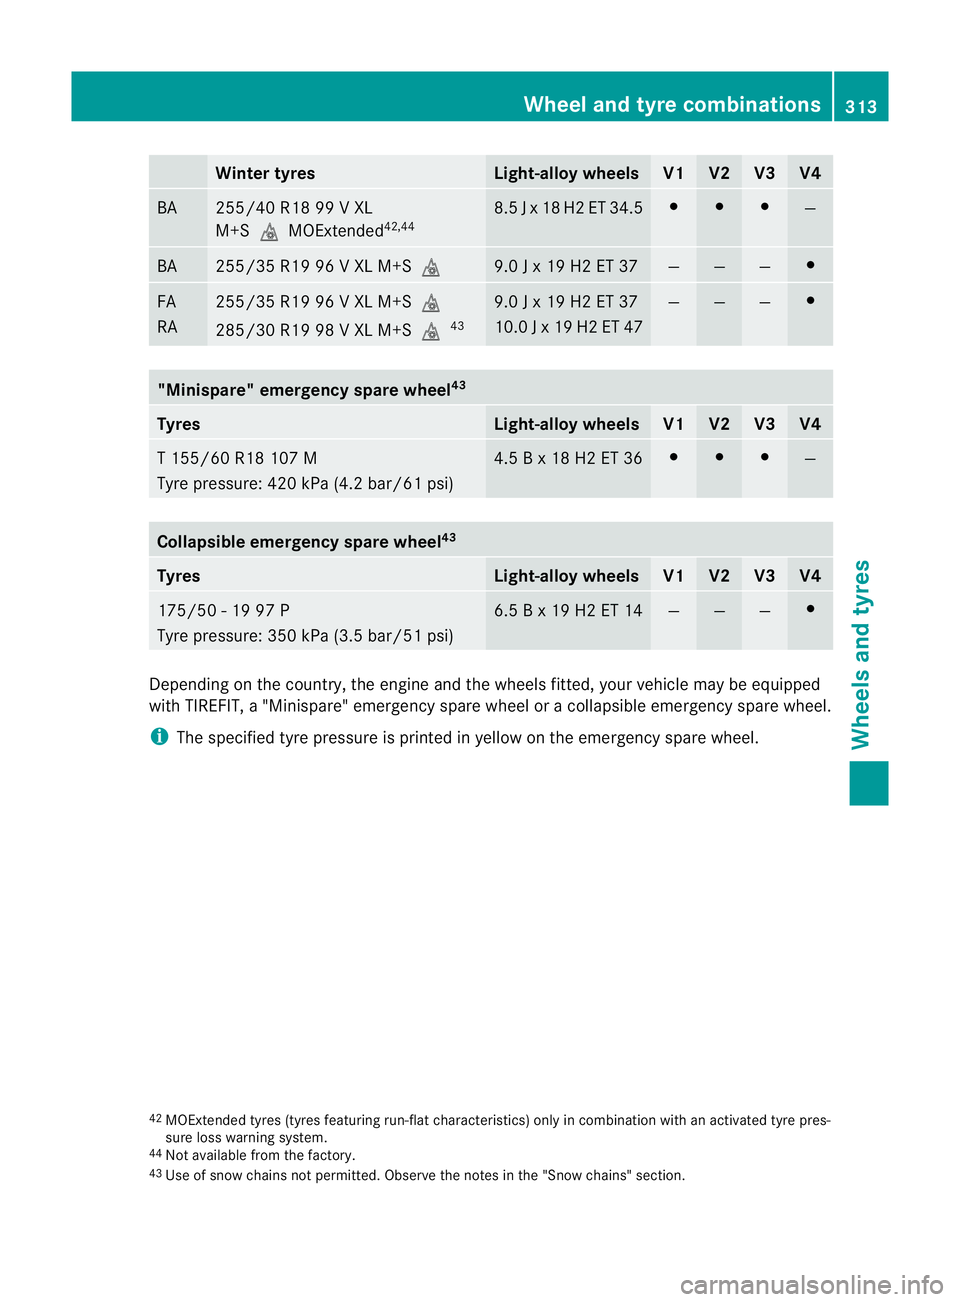
Winter tyres Light-alloy wheels V1 V2 V3 V4
BA 255/40 R18 99 V XL
M+SiMOExtended
42,44 8.5
Jx18 H2 ET 34.5 # # #
—
BA 255/35 R19 96 V XL M+S
i 9.0 J x 19 H2 ET 37 — — — #
FA
RA 255/35 R19 96 V XL M+S
i
285/30 R19 98 V XL M+S i43 9.0 J x 19 H2 ET 37
10.0
Jx19 H2 ET 47 — — — #
"Minispare" emergency spare wheel
43Tyres Light-allo
ywheels V1 V2 V3 V4
T 155/60 R18 107 M
Tyre pressure: 420 kPa (4.2 bar/61 psi) 4.5 B x 18 H2 ET 36 # # #
—
Collapsible emergency spare wheel
43Tyres Light-alloy wheels V1 V2 V3 V4
175/50 - 19 97 P
Tyre pressure: 350 kPa (3.5 bar/51 psi) 6.5 B x 19 H2 ET 14 — — — #
Depending on the country, the engine and the wheels fitted, you
rvehicle may be equipped
with TIREFIT, a "Minispare" emergency spare wheel or a collapsible emergency spare wheel.
i The specified tyre pressure is printed in yellow on the emergency spare wheel.
42 MOExtended tyres (tyres featuring run-flat characteristics) only in combination with an activated tyre pres-
sure loss warning system.
44 Not available from the factory.
43 Use of snow chains not permitted. Observe the notes in the "Snow chains" section. Wheel and tyre combinations
313Wheels and tyres Z