2010 MERCEDES-BENZ CLS COUPE spare wheel
[x] Cancel search: spare wheelPage 10 of 337

Climate control
Activating/deactivating rear win-
dow heating ................................... 117
Activating/deactivating the auxil-
iary heating/ventilatio n................. 120
Convenience opening/closing (air
recirculation) ................................. 118
Demisting the windows .................. 117
Important safety information .........110
Indicator lamp ................................ 114
Problems with "cooling with air
dehumidification" ........................... 114
Problems with the rear window
heating .......................................... 117
Setting the climate mode (AIR
FLOW) ............................................ 114
Switching the ZONE function on/
off .................................................. 116
Clock( on-board computer) ...............206
Cockpit ................................................. 24
Collapsible spare wheel see Emergency spare wheel
Combination switch ............................99
Constant headlamp mode see Daytime driving lights
Consumption statistics (on-board
computer) .......................................... 198
Convenience box ............................... 252
Convenience closing feature ..............79
Convenience opening/closing Air-recirculation mode ...................118
Convenience opening feature ............79
Coolan t(engine)
Checkin gthe level ......................... 268
Display message ............................ 224
Notes ............................................. 322
Temperature (on-board computer) .212
Temperature gauge ........................ 194
Warning lamp ................................. 244
Cooling
see Climate control
Cornering light function (display
message) ............................................ 221
Crash-responsive emergency light-
ing ....................................................... 104Cruise control
Cruise control leve r....................... 152
Display message ............................ 231
Cup holder ......................................... 255
Centre console .............................. 255
Rea rcompartmen t......................... 255
Current fuel consumption (on-
board computer) ............................... 198 D
Dashboard see Cockpit
Data, technical .................................. 316
Date (on-board computer) ................206
Daytime driving lights Display message ............................ 223
Switching on/off (on-board com-
puter) ............................................. 207
Delaye dswitch-off
Exterio rlighting (on-board com-
puter )............................................. 208
Interior lighting (on-board com-
puter) ............................................. 209
Diesel particle filter ..........................149
Digital speedometer .........................198
Dipped-beam headlamps Display message ............................ 221
Setting for driving on the right/
left (on-board computer) ................207
DIREC TSELECT lever
see Automatic transmission
Display (cleaning instructions) ........274
Display messages ASSYST PLUS service interval dis-
play................................................ 269
Brakes ........................................... 219
Calling up (on-board computer) .....215
Clearing (on-board computer) ........215
Driving systems ............................. 226
Engine ............................................ 224
Key ................................................ 236
KEYLESS-GO .................................. 236
Lamp s............................................ 221
Safety systems .............................. 215
Tyres .............................................. 232
Vehicle .......................................... .234 Index
7
Page 12 of 337
EBD (Electronic Brake-force Distri-
bution) Display message ............................ 220
Function/notes ................................ 61
ECO start/stop function
General information .......................131
Switching on/off (AMG vehicles) ...133
Switching on/off (except AMG
vehicles) ........................................ 133
Electrical fuses
see Fuses
Electronic Brake-force Distribution
see EBD
Electronic Stability Program
see ESP ®
Electronic Traction System see ETS/4ETS
Emergency key element
Function/notes ................................ 69
Emergency locking
Vehicle ............................................. 75
Emergency release
Fuel filler fla p................................. 145
Emergency running mode
Automatic transmission .................142
Emergency spare wheel
Inflating the collapsible spare
wheel ............................................. 288
Notes/data .................................... 313
Storage location ............................ 280
Stowing .......................................... 280
Emergency unlocking
Boot ................................................. 77
Vehicle ............................................. 75
Engine
Running irregularl y......................... 134
Starting problems ..........................134
Starting the engine with the key ....130
Starting with KEYLESS GO .............130
Stopping ........................................ 148
Warning lamp (engine diagnos-
tics) ............................................... 244
Engine electronics .............................316
Malfunction ................................... .134
Engine number .................................. 319Engine oil
Additives ........................................ 321
Checking the oil level ..................... 267
Display message ............................ 225
Filling capacity ............................... 321
Notes about oil grades ................... 320
Temperature (on-board computer) .212
Topping up ..................................... 268
Viscosity ........................................ 321
Environmental protection
Note ................................................ .19
Returning an end-of-life vehicle .......19
Error messages
see Display messages
ESP ®
(Electronic Stability Pro-
gram) Activating/deactivating (AMG
vehicles) .......................................... 60
Activating/deactivating (except
AMG vehicles) .................................. 59
Activating/deactivating (on-
board computer) ............................ 204
ETS/4ETS ........................................ 59
Important safety guidelines .............58
Warning lamp ................................. 242
ETS/4ETS (Electronic Traction Sys-
tem) ...................................................... 59
Exhaus ttail pipe (cleaning instruc-
tions) .................................................. 274
Exterior mirrors Adjusting ......................................... 93
Anti-dazzle mode (automatic) ..........94
Folding in/ou t(automatically) .........93
Folding in/ou t(electrically) .............93
Folding in whe nlocking (on-board
computer) ...................................... 211
Out of position ................................. 94
Parking position ............................... 94
Resetting ......................................... 93
Storing settings (memory func-
tion) ................................................. 95 F
Fatigue Assist see ATTENTION ASSIST
Fire extinguisher ............................... 278
First-aid kit ......................................... 278 Index
9
Page 18 of 337

Seat belts
Adjusting the height .........................44
Warning lamp ................................. 239
Seats
Adjusting (electrically) .....................86
Adjusting lumba rsuppor t................ 89
Adjusting the 4-way lumba rsup-
por t.................................................. 89
Adjusting the head restraint ............86
Cleaning the cover .........................275
Correct driver's seat position ........... 84
Important safety instructions ...........85
Multicontour sea t............................ 87
Storing settings (memory func-
tion) ................................................. 95
Switching sea theating on/off .........89
Switching the sea tventilation on/
off .................................................... 90
Seat ventilation
Malfunction indicator lamp ..............90
Sensors (cleaning instructions) .......274
Service indicator see ASSYST PLUS service interval
display
Service menu (on-board computer) .205
Service products Brake fluid ..................................... 322
Coolant (engine) ............................ 322
Engine oil ....................................... 320
Fuel ................................................ 319
Important safety notes ..................319
Notes ............................................. 319
Settings
Factory (on-board computer) .........212
On-board computer .......................205
Shift ranges ....................................... 140
Showing the distance display (on-
board computer) ............................... 203
Sidebag ................................................ 38
Side window Important safety notes ....................78
Side windows
Convenience closing ........................79
Convenience opening ......................79
Opening/closing .............................. 78
resetting .......................................... 80
Troubleshooting ............................... 80Sliding sunroof
Important safety information ...........80
Opening/closing .............................. 81
Rain closing feature .........................81
Resetting ......................................... 81
Troubleshooting ............................... 81
Snow chains ...................................... 304
Socket ................................................ 258
Cockpi t.......................................... 258
Rea rcompartmen t......................... 259
Spare wheel
Notes/data .................................... 313
Storage location ............................ 280
Storing ........................................... 280
see Emergency spare wheel
Spee dLimit Assist
Activating/deactivating message
function (on-board computer )........ 203
Displaying (on-board computer) ..... 203
Display message ............................ 227
Function/notes ............................. 178
Spee dlimiter
SPEEDTRONIC ............................... 162
Speedometer
Digital speedometer (on-board
computer) ...................................... 198
Segments ...................................... 195
Setting the unit (on-board com-
puter) ............................................. 205
Speedtronic
Display message ............................ 231
Permanent ..................................... 164
Variabl e......................................... 163
SPEEDTRONIC
Function/notes ............................. 162
SPORT handling mode
Activating/deactivating (AMG
vehicles) .......................................... 60
Warning lamp ................................. 243
SRS (Supplemental Restraint Sys-
tem)
Display message ............................ 218
Introduction ..................................... 35
Warning lamp ................................. 243
Warning lamp (function) ................... 35
Standard display (on-board com-
puter) ................................................. .198 Index
15
Page 177 of 337
procedure is calculated, e. g. overhanging
loads, tail sections or loading ramps of goods
vehicles. In some circumstances, Active Park-
ing Assist may therefore guide you into the
parking space too early. This may lead to a
collision. For this reason, you should avoid
using Active Parking Assist in such situations.
G
Risk of accident
The front of the vehicle will veer out in the
direction of the oncoming traffic during the
parking operation .Insome cases the vehicle
will also take you onto sections of the oncom-
ing lane during the parking procedure.
You are responsible for safety at all times and
must pay attention to any road users
approaching or passing. Stop the vehicle if
necessary or cancel the Active Parking Assist
parking procedure. G
Risk of injury
Make sure that no persons or animals are in
the manoeuvring range. Otherwise, they
could be injured.
Use Active Parking Assist for parking spaces:
R that are parallel to the direction of travel
R that are on straight roads, not bends
R that are on the same level as the road, e.g.
not on the pavement
Parking tips:
R on narrow roads, drive as closely as possi-
ble past the parking space.
R parking spaces that are littered, overgrown
or partially occupied by trailer drawbars
might be identified incorrectly or not at all.
R snowfall or heavy rain may lead to a parking
space being measured inaccurately.
R pay attention to the PARKTRONIC
(Y page 171) warning messages during the
parking procedure.
R you can intervene in the steering procedure
to correct it at any time. Active Parking
Assist will then be cancelled. R
when transporting a load which protrudes
from your vehicle, you should not use
Active Parking Assist.
R never use Active Parking Assist when snow
chains or an emergency spare wheel are
fitted.
R make sure that the tyre pressures are
always correct. This has adirec tinfluence
on the parking characteristics of the vehi-
cle.
R the way your vehicle is positioned in the
parking space after parking is dependent
on various factors .These include the posi-
tion and shape of the vehicles parked in
front and behind it and the conditions of the
location. In some cases, Active Parking
Assist may guide you too far into a parking
space, or not far enough into it. In some
cases, it may also lead you across or onto
the kerb. If necessary, you should abort the
parking procedure with Active Parking
Assist.
R you can also engage forward gear prema-
turely. The vehicle redirects and does not
drive as far into the parking space. Should
a gear be changed too early to achieve a
sensible parking position, the parking pro-
cedure will be aborted.
! If unavoidable, you should drive over
obstacles such as kerbs slowly and not at
a sharp angle. Otherwise, you may damage
the wheels or tyres.
Detecting parking spaces Active Parking Assist is switched on automat-
ically when driving forwards. The system is
operational at speeds of up to approximately
35 km/h. While in operation, the system inde-
pendently locates and measures parking
spaces on both sides of the vehicle. When
driving at speeds below 35 km/h, you will see
the parking symbol as a status indicator in the
instrumentc luster.Active Parking Assist only
displays parking spaces on the front-
passenger side as standard .Parking spaces
on the driver's side are displayed as soon as 174
Driving systemsDriving and parking
Page 282 of 337
X
Pull handle :upward and fold cover ;
forward.
X Remove the fire extinguisher from the
stowage compartment.
! Keep the stowage compartment closed
while the vehicle is in motion .Itmay oth-
erwise be damaged.
i Have the fire extinguisher refilled after
each use and checked every one or two
years .Itmay otherwise fail in an emer-
gency.
Observe the legal requirements in all coun-
tries concerned. Vehicle tool kit
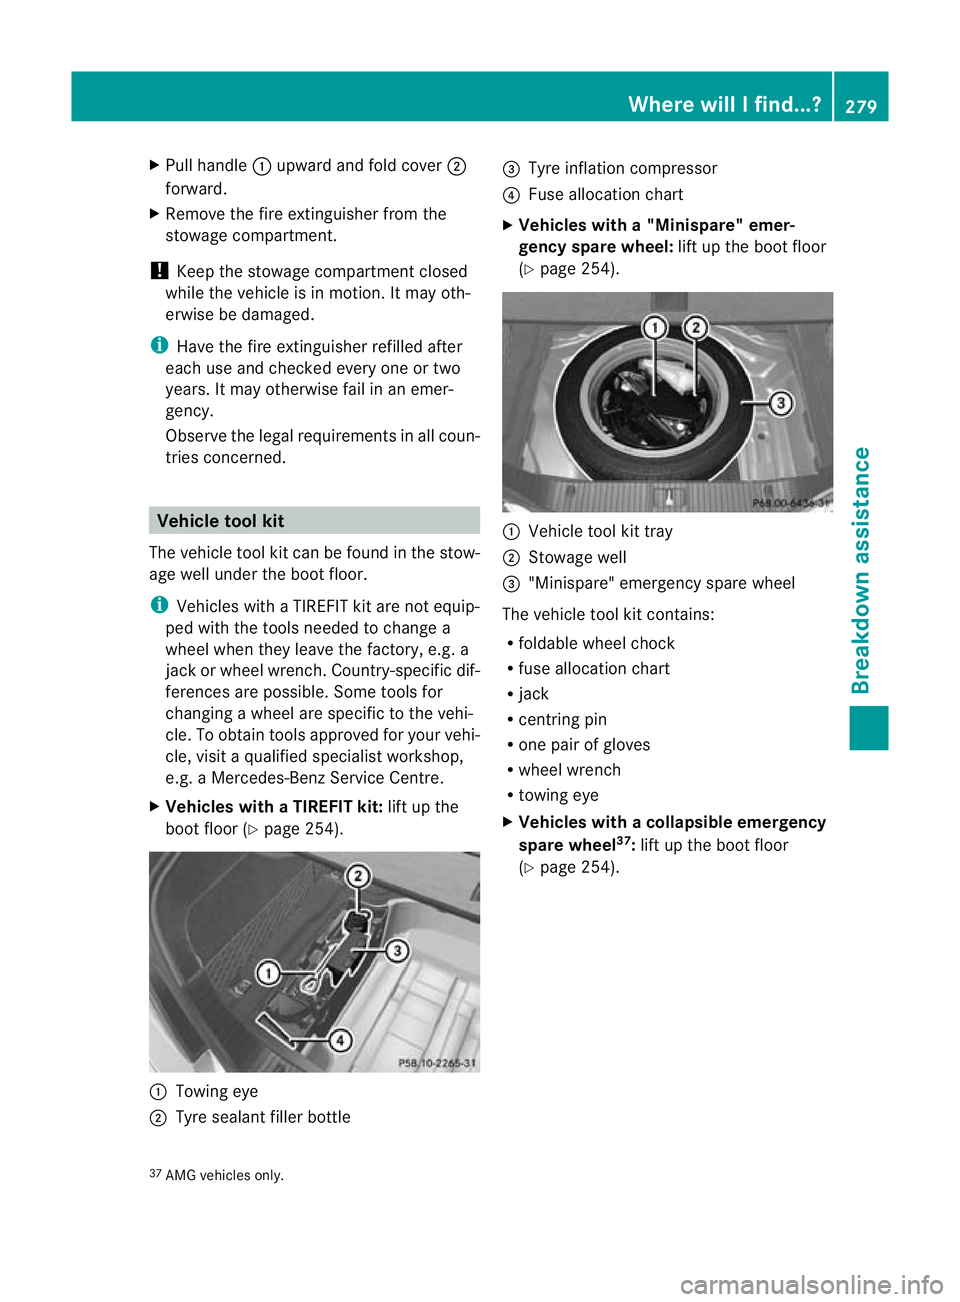
The vehicle tool kit can be found in the stow-
age well unde rthe boot floor.
i Vehicles with a TIREFIT kit are not equip-
ped with the tools needed to change a
wheel when they leave the factory, e.g. a
jack or wheel wrench. Country-specific dif-
ferences are possible. Some tools for
changing a wheel are specific to the vehi-
cle. To obtain tools approved for your vehi-
cle, visit a qualified specialist workshop,
e.g. a Mercedes-Benz Service Centre.
X Vehicles with a TIREFIT kit: lift up the
boot floor (Y page 254). :
Towing eye
; Tyre sealant filler bottle =
Tyre inflation compressor
? Fuse allocation chart
X Vehicles with a "Minispare" emer-
gency spare wheel: lift up the boot floor
(Y page 254). :
Vehicle tool kit tray
; Stowage well
= "Minispare" emergency spare wheel
The vehicle tool kit contains:
R foldable wheel chock
R fuse allocation chart
R jack
R centring pin
R one pair of gloves
R wheel wrench
R towing eye
X Vehicles with acollapsible emergency
spare wheel 37
:lift up the boot floor
(Y page 254).
37 AMG vehicles only. Where will I find...?
279Breakdown assistance
Page 283 of 337

:
Towing eye
; One pair of gloves
= Jack
? Folding wheel chock
A Centring pin
B Sheet for faulty wheel
C Tyre inflation compressor
D Wheel wrench
E Fuse allocation chart "Minispare" emergency spare wheel/
collapsible emergency spare wheel
Removing the "Minispare" emergency
spare wheel/collapsible emergency
spare wheel The emergency spare wheel can be found in
the stowage well under the boot floor.
Removing the "Minispare" emergency
spare wheel
X
Lift the boot floor upwards (Y page 254). X
Turn stowage tray ;anti-clockwise and
remove together with vehicle tool kit
tray :.
X Remove "Minispare" emergenc yspare
wheel =.
Removing the collapsible emergency
spare wheel: AMG vehicles X
Reach into cutout :in the tool holder and
lift it up.
X Remove collapsible emergency spare
wheel ;.
For further information on changing a wheel
and fitting the spare wheel, see
(Y page 284).
Stowing aused collapsible emergency
spare wheel Take the following steps to store a used col-
lapsible emergency spare wheel; otherwise,
it does not fit in the spare wheel well.
Mercedes-Benz recommends that you have
this work carried out at a qualified specialist
workshop, e.g. a Mercedes-Benz Service
Centre.
! Only place the collapsible emergency
spare wheel in the vehicle when it is dry.
Otherwise, moisture may get into the vehi-
cle.
X Unscrew the valve cap from the valve.
i Fully deflating the tyre can take a few
minutes. 280
Where will I find...?Breakdown assistance
Page 284 of 337
X
Screw the valve insert back into the valve.
X Screw the valve cap back on. Flat tyre
Preparing the vehicle
Your vehicle may be equipped with:
R a TIREFIT kit
R an emergency spare wheel
R MOExtended tyres (tyres with run-fla tchar-
acteristics) (Y page 289)
i Vehicle preparation is not necessary on
vehicles with MOExtended tyres.
i Vehicles with MOExtended tyres are not
equipped with a TIREFIT kit at the factory.
It is therefore recommended that you addi-
tionally equip your vehicle with a TIREFIT kit
if you fit tyres that do not feature run-flat
properties, e.g. winter tyres. You can obtain
aT IREFIT kit from aMercedes-Benz Service
Centre, for example.
X Vehicles with AIRMATIC: make sure that
"normal" level is selected (Y page 167).
X Stop the vehicle as far away as possible
from traffic on solid, non-slippery and level
ground.
X Switch on the hazard warning lamps.
X Bring the fron twheels into the straight-
ahead position.
X Move the DIRECT SELECT lever to P.
X Switch off the engine.
X Vehicles without KEYLESS-GO: remove
the key from the ignition lock.
X Vehicles with KEYLESS-GO: open the
driver's door.
The on-board electronics have status 0,
which is the same as the key having been
removed.
X Vehicles with KEYLESS-GO: remove the
Start/Stop button from the ignition lock
(Y page 129). X
All occupants must get out of the vehicle.
Make sure that they are not endangered as
they do so.
X Make sure that no one is near the danger
area whilst a wheel is being changed. Any-
one who is not directly assisting in the
wheel change should, for example, stand
behind the barrier.
X Get out of the vehicle. Pay attention to traf-
fic conditions when doing so.
X Close the driver's door.
X Place the warning triangle (Y page 278) a
suitable distance away.O bserve legal
requirements. TIREFIT kit
Using the TIREFIT kit You can use the TIREFIT kit to seal small
punctures, particularly those in the tyre tread.
You can use TIREFIT at outside temperatures
down to -20 †.
G
Risk of accident
In the following situations, your safety is at
particular risk as tyre sealant is unable to pro-
vide sufficient breakdown assistance:
R there are cuts or punctures in the tyre
greater than 4 mm.
R the wheel rim is damaged.
R you have driven at very low tyre pressures
or on a flat tyre.
Do not drive any further. Consult a qualified
specialist workshop which has the necessary
specialist knowledge and tools to carry out
the work required.
Mercedes-Benz recommends that you use a
Mercedes-Benz Service Centre for this pur-
pose. In particular, work relevant to safety or
on safety-related system smust be carried out
at a qualified specialist workshop. Flat tyre
281Breakdown assistance Z
Page 287 of 337
X
Correct the tyre pressure if it is still at least
130 kPa (1.3 bar/20 psi) (for the values,
see the fuel fille rflap).
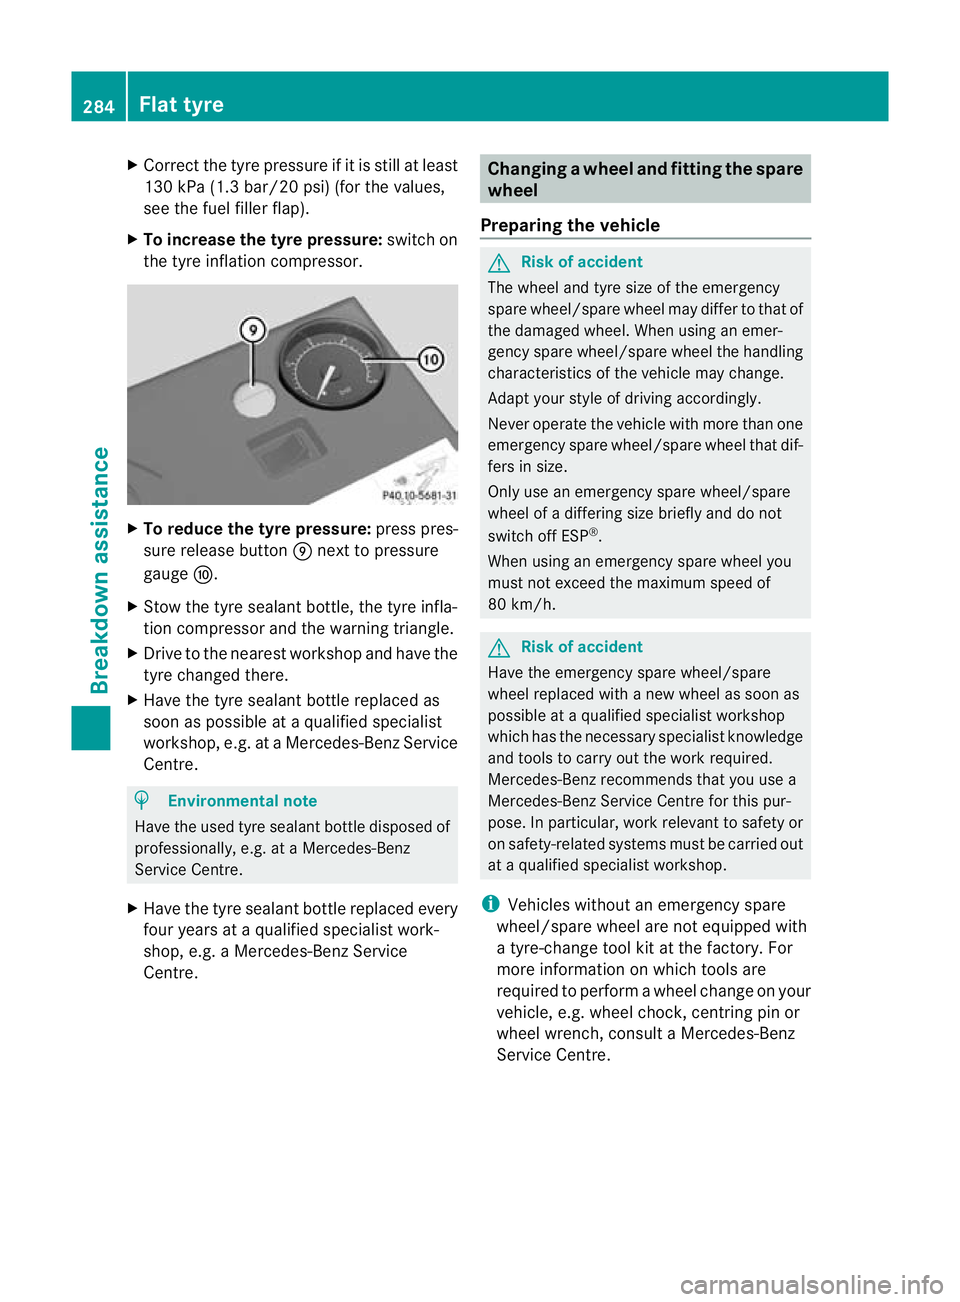
X To increase the tyre pressure: switch on
the tyre inflation compressor. X
To reduce the tyre pressure: press pres-
sure release button Enext to pressure
gauge F.
X Stow the tyre sealant bottle, the tyre infla-
tion compressor and the warning triangle.
X Drive to the nearest workshop and have the
tyre changed there.
X Have the tyre sealant bottle replaced as
soon as possible at a qualified specialist
workshop, e.g. at a Mercedes-Ben zService
Centre. H
Environmental note
Have the used tyre sealant bottle disposed of
professionally, e.g. at aMercedes-Benz
Service Centre.
X Have the tyre sealant bottle replaced every
four years at a qualified specialist work-
shop, e.g. a Mercedes-Benz Service
Centre. Changing
awheel and fitting the spare
wheel
Preparing the vehicle G
Risk of accident
The wheel and tyre size of the emergency
spare wheel/spare wheel may diffe rto that of
the damaged wheel. When using an emer-
gency spare wheel/spare wheel the handling
characteristics of the vehicle may change.
Adapt your style of driving accordingly.
Never operate the vehicle with more than one
emergency spare wheel/spare wheel that dif-
fers in size.
Only use an emergency spare wheel/spare
wheel of a differing size briefly and do not
switch off ESP ®
.
When using an emergency spare wheel you
must not exceed the maximum speed of
80 km/h. G
Risk of accident
Have the emergency spare wheel/spare
wheel replaced with a new wheel as soon as
possible at a qualified specialist workshop
which has the necessary specialist knowledge
and tools to carry out the work required.
Mercedes-Benz recommends that you use a
Mercedes-Benz Service Centre for this pur-
pose. In particular, work relevant to safety or
on safety-related systems must be carried out
at a qualified specialist workshop.
i Vehicles without an emergency spare
wheel/spare wheel are not equipped with
a tyre-change tool kit at the factory. For
more information on which tools are
required to perform a wheel change on your
vehicle, e.g. wheel chock, centring pin or
wheel wrench, consult a Mercedes-Benz
Service Centre. 284
Flat tyreBreakdown assistance