2010 MERCEDES-BENZ CLS COUPE tire type
[x] Cancel search: tire typePage 20 of 337
Towing away
Fitting the towing ey e.................... 296
Removing the towing eye. ..............297
Transmission position dis-
play ............................................. 136, 137
Transmission positions ....................137
Trip computer (on-board com-
puter) ................................................. .198
Trip meter Calling up ....................................... 198
Resetting (on-board computer) ......199
Turn signal (display message) .........221
Turn signal lamps ................................ 99
TV Operating (on-board computer) .....201
see Separate operating instructions
Two-way radio
Frequencies ................................... 317
Installatio n..................................... 317
Transmission output (maximum) .... 317
Type identification plate
see Vehicle identification plate
Tyre grip ............................................. 151
Tyre pressure Calling up (on-board computer) .....307
Display message ............................ 232
Not reached (TIREFIT) ....................283
Pressure loss warning ....................306
Reached (TIREFIT) ..........................283
Recommended ............................... 305
Tyre pressure monitor
Function/notes ............................. 307
Restarting ...................................... 308
Warning lamp ................................. 246
Tyres
Checking ........................................ 302
Directio nofrotation ...................... 310
Flat tyre ......................................... 281
MOExtended tyres (tyre swith run-
flat characteristics) ........................289
Replacing ....................................... 309
Storing ........................................... 310
Tyr esize (data) .............................. 310
Tyr etread ...................................... 303
Tyres and wheels (important
safety information) ...........................302 U
Unladen weight ................................. 323
Unlocking Emergency unlocking .......................75
From inside the vehicle (central
unlocking button) ............................. 74 V
Vanity mirror Sun visor ........................................ 257
Variable Speedtronic ........................163
Vehicle Emergency unlocking .......................75
Equipment ....................................... 19
Individual settings (on-board com-
puter) ............................................. 205
Leaving parked up .........................149
Lowering ........................................ 288
Raising ........................................... 285
Towing away .................................. 295
Tow-starting ................................... 295
Transporting .................................. 298
Vehicle data
see Technical data
Vehicle dimensions ...........................323
Vehicle electronics ...........................316
Vehicle identification number see VIN
Vehicle identification plate ..............318
Vehicle level .............................. 167, 169
Vehicle level (display message) .......226
Vehicle tool kit .................................. 279
Vehicle weights ................................. 323
Vents see Air vents .................................. 124
Video (DVD) ........................................ 201
Video DVD (on-board computer) ......201
VIN ...................................................... 318 W
Warning and indicator lamps LIM (cruise control) ........................ 152
LIM (DISTRONIC PLUS) ..................155
LIM (variable SPEEDTRONIC) .........163
PASSENGER AIRBAG OFF ................48
Warning triangle ................................ 278 Index
17
Page 180 of 337
View through the camera
The area behind the vehicle is displayed as a
mirror image, as in the rear-view mirror. G
Ris
kofa ccident
The reversing camera is only an aid and may
display obstacles in a distorted or incorrect
manner, or may no teven display them at all.
The reversing camera does not relieve you of
the responsibility to pay attention. The cam-
era cannot show objects:
R very near to the rear bumper
R below the rear bumper
R in the area immediately above the boot lid
handle
You are always responsible for safety and
must continue to pay attention to youri mme-
diate surroundings when parking and
manoeuvring. This applies to the areas
behind, in front of and next to the vehicle. You
could otherwise endange ryourself and oth-
ers. G
Risk of accident
Under the following circumstances, the
reversing camera will not function, or function
in a limited manner:
R if the boot lid is open
R in heavy rain, snow or fog
R at night or in very dark places
R if the camera is exposed to very bright light
R if the area is lit by fluorescent light (the dis-
play may flicker)
R if there is a sudden change in temperature,
e.g. when driving into a heated garage in
winter
R if the camera lens is dirty or obstructed
R if the rear of your vehicle is damaged. In this
event, have the camera position and setting
checked at a qualified specialist workshop.
Mercedes-Benz recommends that you use
a Mercedes-Benz Service Centre for this
purpose.
Do not use the reversing camera in these
types of situation. You could otherwise injure others or damage objects and your vehicle
while you are parking.
Activating the reversing camera X
Make sure that the key is in position 2in
the ignition lock.
X Make sure that the "Reversing camera"
function is selected in COMAND APS (see
the separate operating instructions for
COMAND APS).
X Engage reverse gear.
The area behind the vehicle is shown in the
COMAND APS display. ATTENTION ASSIST
Important safety notes ATTENTION ASSIST helps you during long,
monotonous journeys such as on motorways
and trunk roads. It is active in the 80 km/h
to 180 km/h range.
If ATTENTION ASSIST detects typical indica-
tors of fatigue or increasing lapses in con-
centration on the part of the driver, it sug-
gests taking a break.
G
Risk of accident
ATTENTION ASSIST is only an aid and may
detect your tiredness or lapses in concentra-
tion too late or not at all. It is not asubstitute
for a well rested and attentive driver.
Fatigue may cause you to recognise hazard-
ous situations too late, misjudge a situation
or react slower. For this reason, make sure
you feel rested before you begin driving and
during your journey. Always take breaks in
good time and regularly, especially during
long journeys. Otherwise, you may fail to rec-
ognise dangers in time, cause an acciden tand
injure yoursel fand others. Driving systems
177Driving and parking Z
Page 279 of 337
R
clean cloth covers with a microfibre cloth
moistened with a solution containing 1%
detergent (e.g. washing-up liquid). Rub
carefully and always wipe entire sea tsec-
tions to avoid leaving visible lines. Leave
the seat to dry afterwards. Cleaning
results depend on the type of dirt and
how long it has been there.
R clean Alcantara® covers with a damp
cloth. Make sure you wipe entire seat
sections to avoid leaving visible lines.
i Note that regular care is essential to
ensure that the appearance and comfort of
the covers is retained over time.
Cleaning the seat belts X
Use clean, lukewarm water and soap solu-
tion.
! Do not clean the seat belts using chemical
cleaning agents .Do not dry the seatbelts
at temperatures above 80 †orby exposing
them to direc tsunlight. 276
CareMaintenance and care
Page 306 of 337
Tyre tread
G
Ris
kofa ccident
Bear in mind that:
R tyre grip decreases rapidly on wet roads
when the tread depth is less than 3mm.
Thus, you should replace tyres that have
insufficient tread.
R winter tyres should be replaced when the
tread depth is 4mmorless as they no lon-
ger provide adequate grip.
R the tread on a tyre may not wear evenly.
Thus, you should regularly check the tread
depth and the condition of the tread across
the entire width of all tyres. If necessary,
turn the fron twheels to full lock in order to
inspect the tyre tread more easily.
Otherwise, you could lose control of the vehi-
cle and cause an accident due to the reduced
grip of the tyres on the road. Notes on selecting, fitting and replac-
ing tyres
R Only fit tyres and wheels of the same type
and make.
R Only fit tyres of the correct size onto the
wheels.
R After fittingn ew tyres, run them in at mod-
erate speeds for the first 100 km, as they
only reach their full performance after this
distance.
R Do not drive with tyres which have too little
tread depth, as this significantly reduces
the traction on wet roads (aquaplaning).
R Replace the tyres after six years at the lat-
est, regardless of wear. This also applies to
the emergency spare wheel/spare wheel. MOExtended tyres (tyres with run-flat
characteristics)
MOExtended tyres (tyres with run-flat char-
acteristics) allow you to continue driving the vehicle even when one or more tyres lose all
air pressure.
MOExtended tyres may only be used in con-
junction with the activated tyre pressure loss
warning system or with the activated tyre
pressure monitor and on wheels specifically
tested by Mercedes-Benz.
i Vehicles with MOExtended tyres are not
equipped with a TIREFIT kit at the factory.
It is therefore recommended that you addi-
tionally equip your vehicle with the TIREFIT
kit if you fit tyres that do not feature run-
flat properties, e.g. winter tyres. You can
obtain a TIREFIT kit from a Mercedes-Benz
Service Centre, for example.
You will find notes on driving with a flat tyre
in the "Breakdown assistance" section
(Y page 289). Winter operation
Please bear the following in mind
Have your vehicle winterproofed at a qualified
specialist workshop, e.g. at a Mercedes-Benz
Service Centre, at the onset of winter.
Observe the notes in the "Changing a wheel"
section (Y page 309). Driving with summer tyres
At temperatures below +7 †, summer tyres
lose elasticity and therefore traction and
braking power –change the tyres on your
vehicle to M+S tyres. Using summer tyres at
very cold temperatures could cause tears to
form, thereby damaging them permanently.
Mercedes-Ben zcannot accept responsibility
for this type of damage. M+S tyres
At temperatures below +7 †, use winter tyres
or all-season tyres. Both types of tyre are
identified by the M+S marking. Winter operation
303Wheels and tyres Z
Page 314 of 337
i
You will find a table of tyre pressures on
the inside of your vehicle's fuel filler flap.
For further information on tyre pressure,
see (Y page 305).
i Notes on the vehicle equipmen t–always
fit the vehicle:
R with tyres of the same size on a given axle
(left/right)
R with the same type of tyres at a given
time (summer tyres, winter tyres,
MOExtended tyres)
i Vehicles with MOExtended tyres are not
equipped with a TIREFIT kit at the factory.
It is therefore recommended that you addi-
tionally equip your vehicle with a TIREFIT kit
if you fit tyres that do not feature run-flat
properties, e.g. winter tyres. You can obtain
aT IREFIT kit from aMercedes-Benz Service
Centre, for example.
i Overview of abbreviations used in the fol-
lowing tyre tables:
R BA: both axles
R FA: front axle
R RA: rear axle
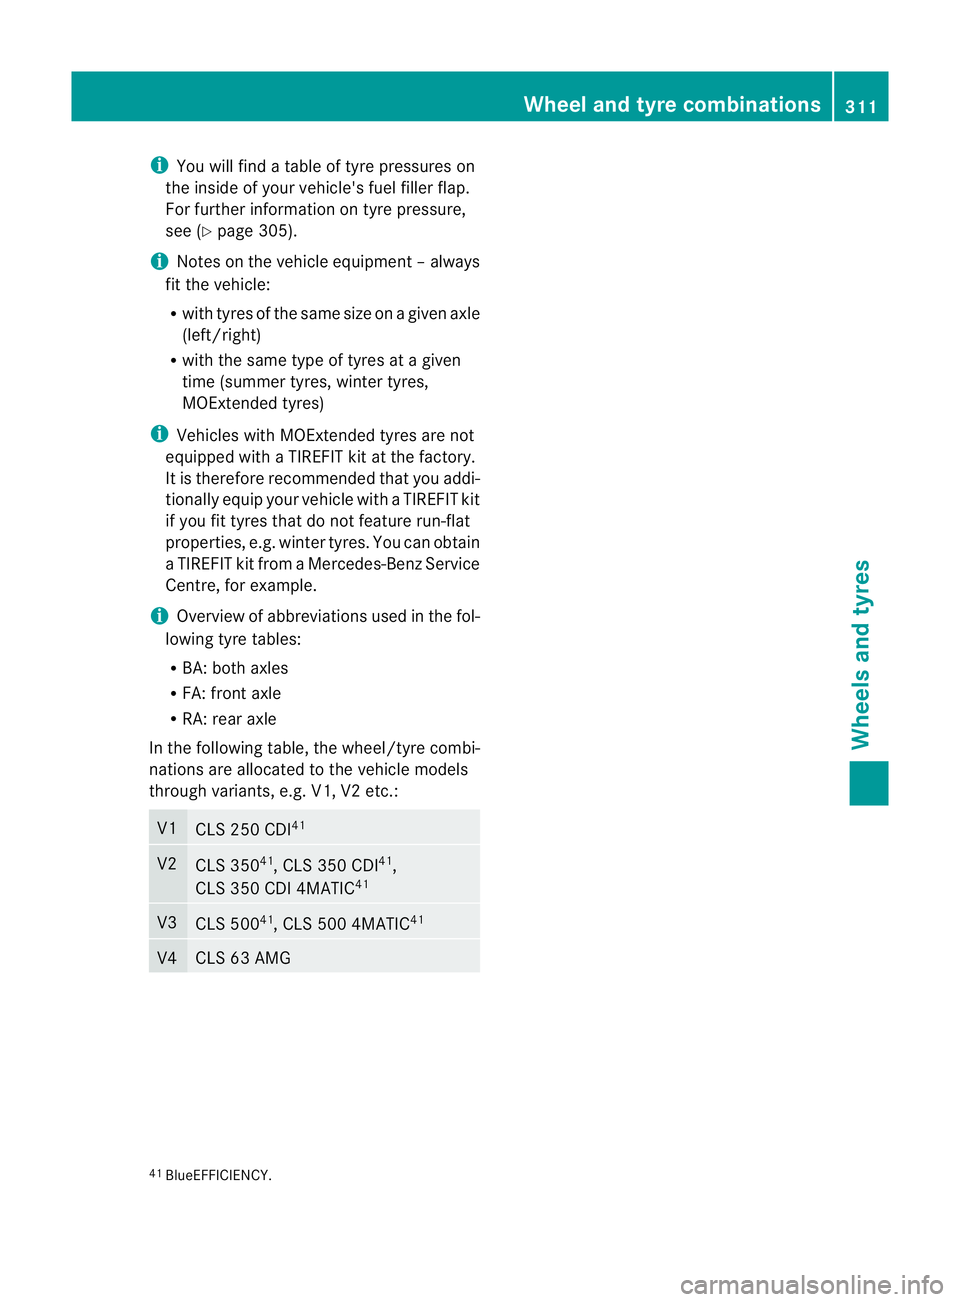
In the following table, the wheel/tyre combi-
nations are allocated to the vehicle models
through variants, e.g. V1, V2 etc.: V1
CLS 250 CDI
41 V2
CLS 350
41
, CLS 350 CDI 41
,
CLS 350 CDI 4MATIC 41V3
CLS 500
41
, CLS 500 4MATIC 41 V4 CLS 63 AMG
41
BlueEFFICIENCY. Wheel and tyre combinations
311Wheels and tyres Z