2010 MERCEDES-BENZ CLS COUPE light
[x] Cancel search: lightPage 258 of 337
X
Only secure the roof carrier to the anchor-
age points under covers :.
X Observe the manufacturer's installation
instructions. Features
Cup holder
Points to observe before use G
Risk of injury
Keep the cup holder closed while the vehicle
is in motion. Otherwise, vehicle occupants
could be injured by objects being thrown
around if you:
R brake sharply
R change direction suddenly
R are involved in an accident
Only use the cup holders for containers of a
suitable size and which have lids. Otherwise,
the drinks could spill.
Cup holders should not be used for hot drinks.
Otherwise, you may scald yourself.
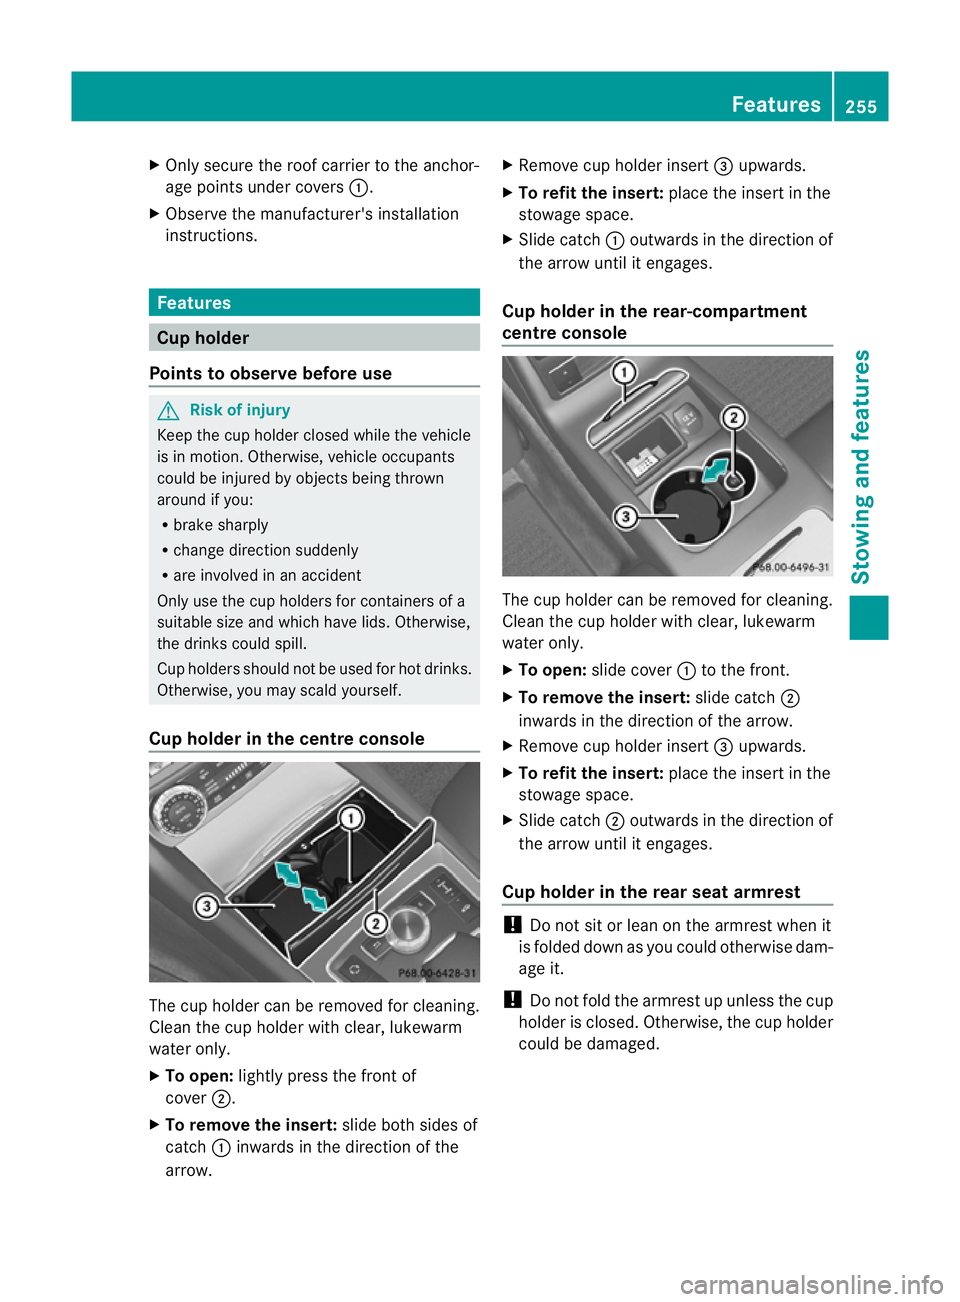
Cup holder in the centre console The cup holder can be removed for cleaning.
Cleant he cup holder with clear, lukewarm
water only.
X To open: lightly press the front of
cover ;.
X To remove the insert: slide both sides of
catch :inwards in the direction of the
arrow. X
Remove cup holder insert =upwards.
X To refit the insert: place the insert in the
stowage space.
X Slide catch :outwards in the direction of
the arrow until it engages.
Cup holder in the rear-compartment
centre console The cup holder can be removed for cleaning.
Cleant
he cup holder with clear, lukewarm
water only.
X To open: slide cover :to the front.
X To remove the insert: slide catch;
inwards in the direction of the arrow.
X Remove cup holder insert =upwards.
X To refit the insert: place the insert in the
stowage space.
X Slide catch ;outwards in the direction of
the arrow until it engages.
Cup holder in the rear seat armrest !
Do not sit or lean on the armrest when it
is folded down as you could otherwise dam-
age it.
! Do not fold the armrest up unless the cup
holder is closed. Otherwise, the cup holder
could be damaged. Features
255Stowing and features Z
Page 259 of 337
X
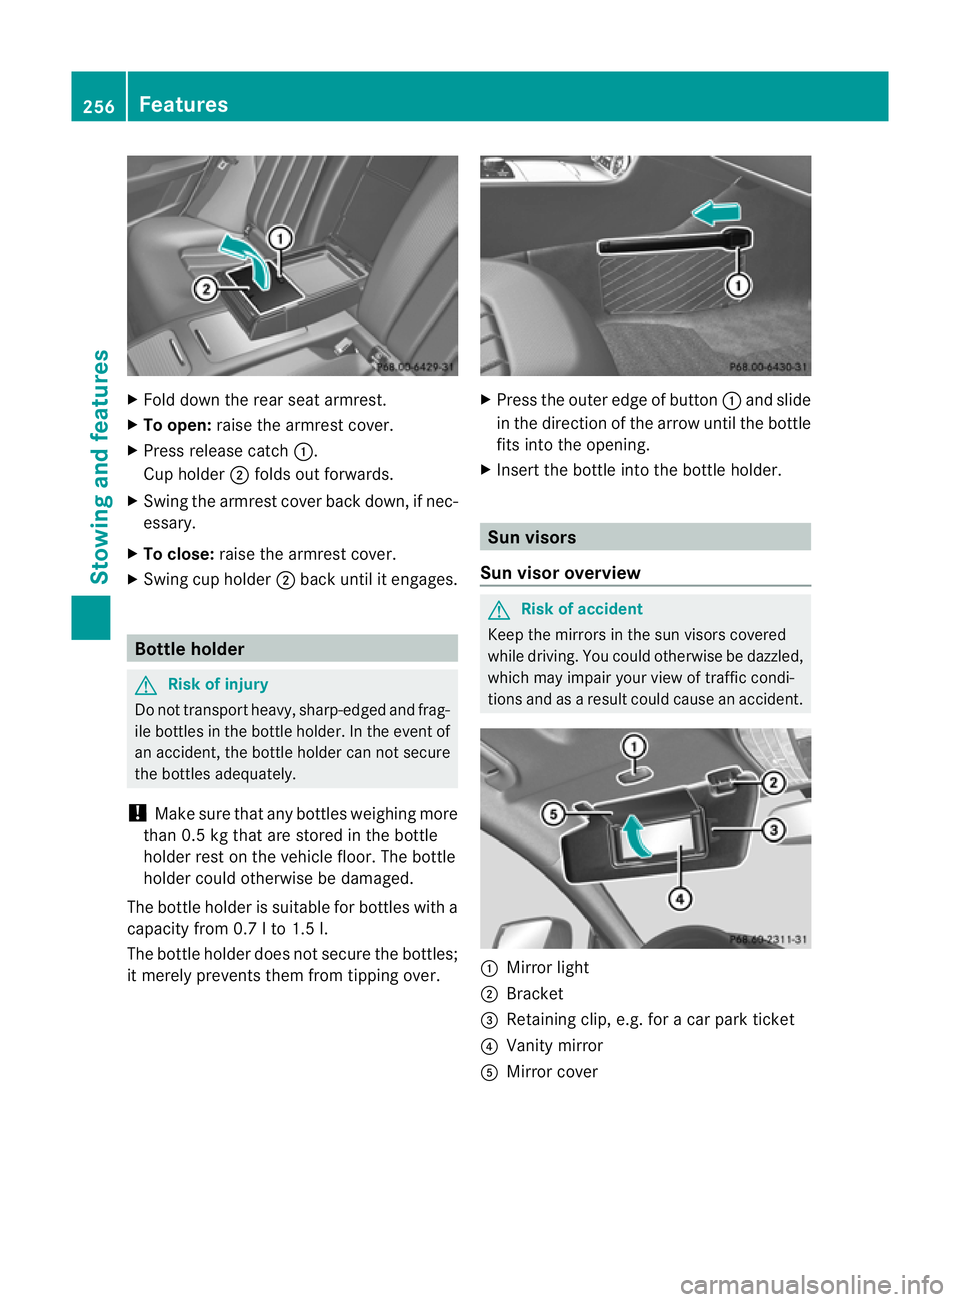
Fold dow nthe rear seat armrest.
X To open: raise the armrest cover.
X Press release catch :.
Cup holder ;folds out forwards.
X Swing the armrest cover back down, if nec-
essary.
X To close: raise the armrest cover.
X Swing cup holder ;back until it engages. Bottle holder
G
Risk of injury
Do not transport heavy, sharp-edged and frag-
ile bottles in the bottle holder. In the event of
an accident, the bottle holder can not secure
the bottles adequately.
! Make sure that any bottles weighing more
than 0.5 kg that are stored in the bottle
holder rest on the vehicle floor. The bottle
holder could otherwise be damaged.
The bottle holder is suitable for bottles with a
capacity from 0.7 l to 1.5 l.
The bottle holder does not secure the bottles;
it merely prevents them from tipping over. X
Press the outer edge of button :and slide
in the direction of the arrow until the bottle
fits into the opening.
X Insert the bottle into the bottle holder. Sun visors
Sun visor overview G
Risk of accident
Keep the mirrors in the sun visors covered
while driving. You could otherwise be dazzled,
which may impair your view of traffic condi-
tions and as a result could cause an accident. :
Mirror light
; Bracket
= Retaining clip, e.g. for a car park ticket
? Vanity mirror
A Mirror cover 256
FeaturesStowing and features
Page 260 of 337
Vanity mirror in the sun visor
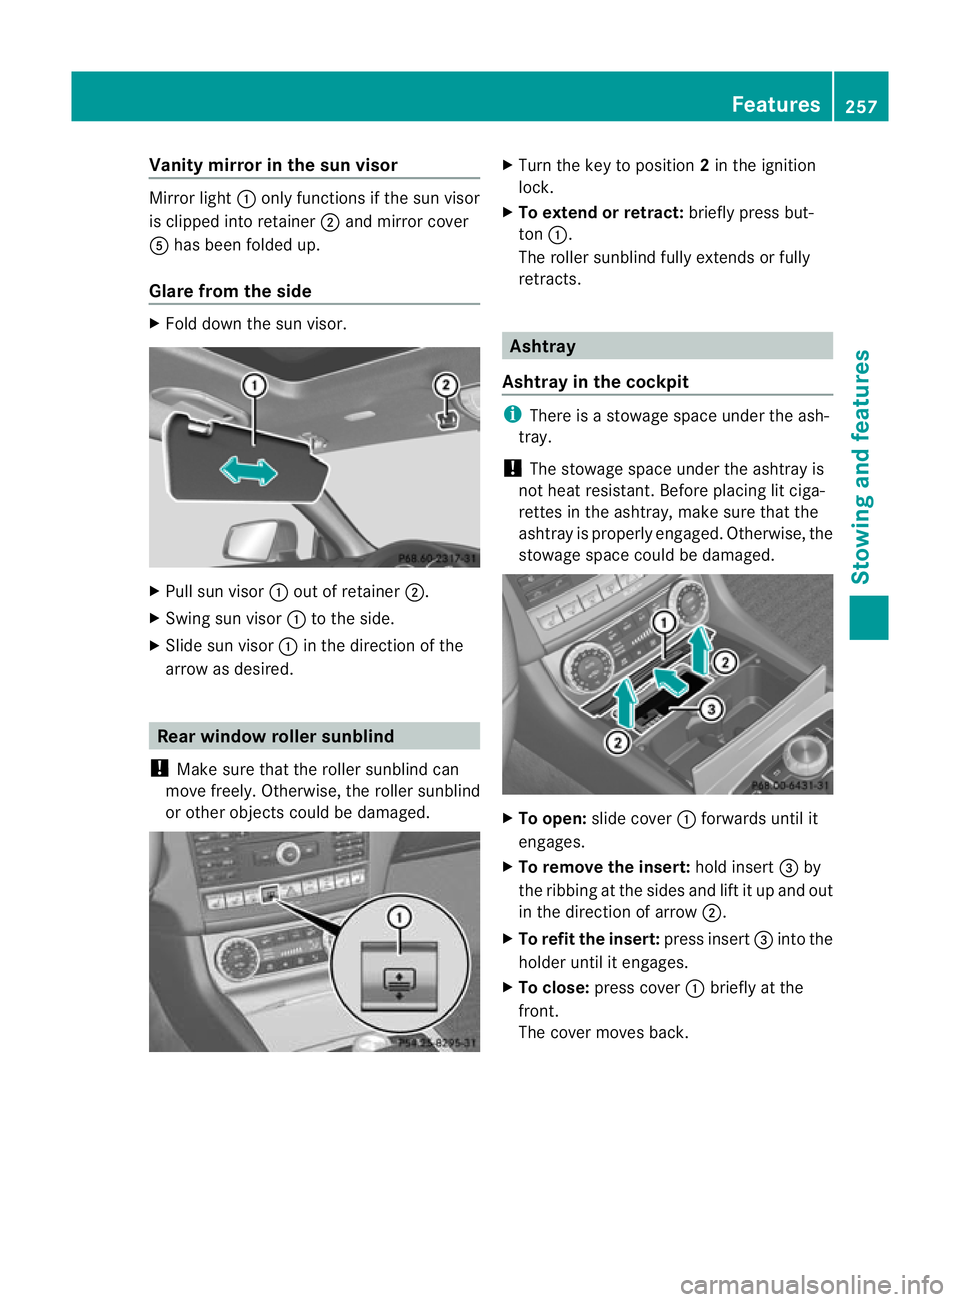
Mirror light
:only functions if the sun visor
is clipped into retainer ;and mirror cover
A has been folded up.
Glare from the side X
Fold down the su nvisor. X
Pull sun visor :out of retainer ;.
X Swing sun visor :to the side.
X Slide sun visor :in the direction of the
arrow as desired. Rea
rwindow roller sunblind
! Make sure that the roller sunblind can
move freely. Otherwise, the roller sunblind
or other objects could be damaged. X
Turn the key to position 2in the ignition
lock.
X To extend or retract: briefly press but-
ton :.
The roller sunblind fully extends or fully
retracts. Ashtray
Ashtray in the cockpit i
There is a stowage space under the ash-
tray.
! The stowage space under the ashtray is
not heat resistant .Before placing lit ciga-
rettes in the ashtray, make sure that the
ashtray is properly engaged. Otherwise, the
stowage space could be damaged. X
To open: slide cover :forwards until it
engages.
X To remove the insert: hold insert=by
the ribbing at the sides and lift it up and out
in the direction of arrow ;.
X To refit the insert: press insert=into the
holder until it engages.
X To close: press cover :briefly at the
front.
The cover moves back. Features
257Stowing and features Z
Page 261 of 337
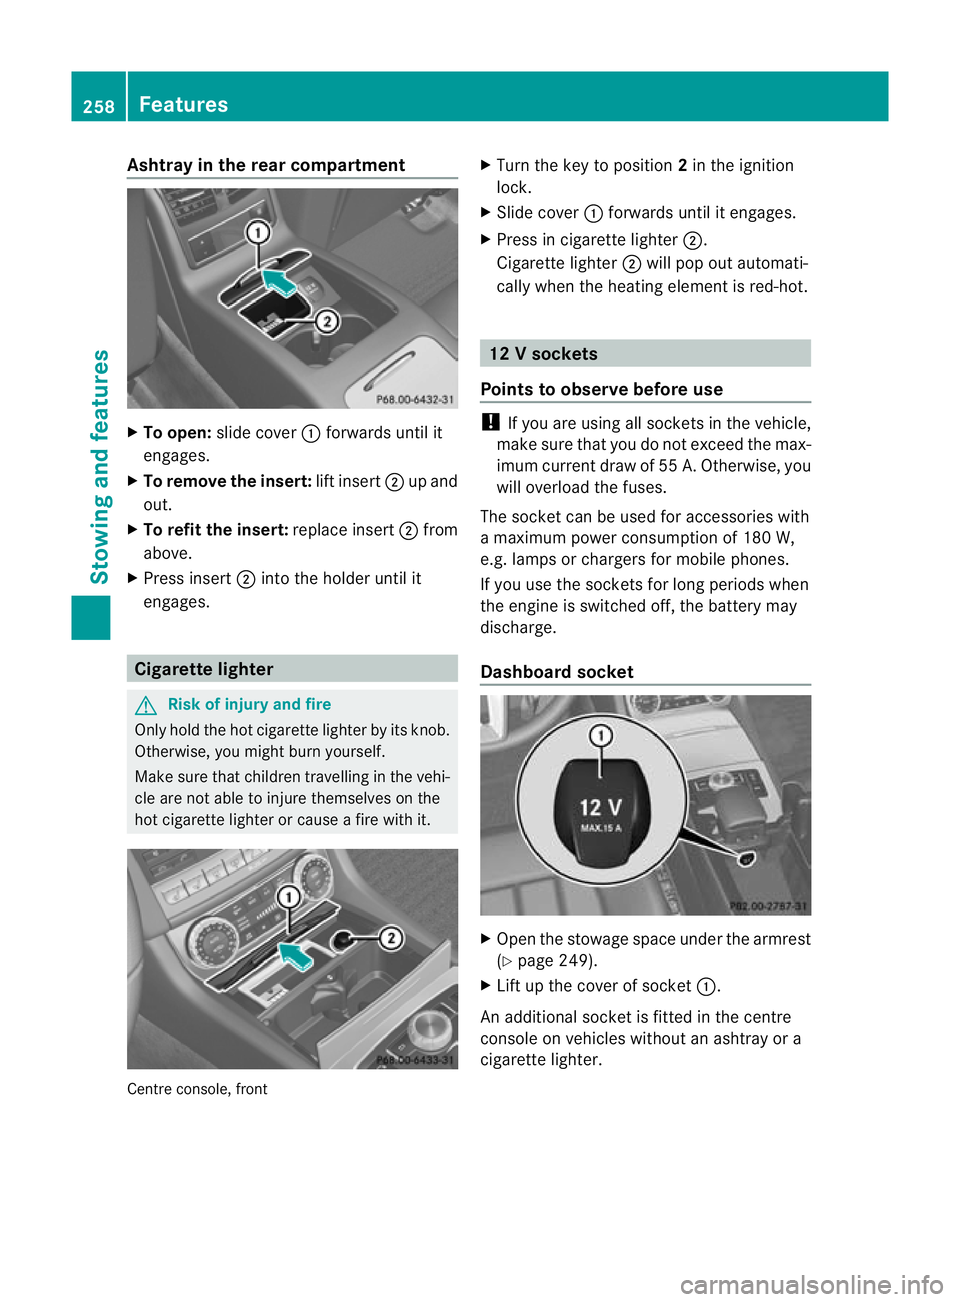
Ashtray in the rear compartment
X
To open: slide cover :forwards until it
engages.
X To remove the insert: lift insert;up and
out.
X To refit the insert: replace insert;from
above.
X Press insert ;into the holder until it
engages. Cigarette lighter
G
Risk of injury and fire
Only hold the hot cigarette lighte rby its knob.
Otherwise, you might burn yourself.
Make sure that children travelling in the vehi-
cle are no table to injure themselves on the
hot cigarette lighter or cause a fire with it. Centre console, front X
Turn the key to position 2in the ignition
lock.
X Slide cover :forwards until it engages.
X Press in cigarette lighter ;.
Cigarette lighter ;will pop out automati-
cally when the heating element is red-hot. 12
Vsockets
Points to observe before use !
If you are using all sockets in the vehicle,
make sure that you do no texceed the max-
imu mcurren tdraw of 55 A. Otherwise, you
will overload the fuses.
The socket can be used for accessories with
a maximum power consumption of 180 W,
e.g. lamps or chargers for mobile phones.
If you use the sockets for long periods when
the engine is switched off, the battery may
discharge.
Dashboard socket X
Open the stowage space under the armrest
(Y page 249).
X Lift up the cover of socket :.
An additional socket is fitted in the centre
console on vehicles without an ashtray or a
cigarette lighter. 258
FeaturesStowing and features
Page 265 of 337
once a second after 20 seconds have
elapsed.
X Keep the transmitter button depressed.
X Point transmitter button Bof garage door
remote control Atowards the transmitter
buttons on the rear-view mirror at a dis-
tance of 5 to 20 cm.
i The required distance between garage
door remote control Aand the integrated
door opener depends on the garage door
drive system. You might require several
attempts. You should test every position for
at least 20 seconds before trying another
position.
X Press and hold transmitter button Bon
garage door remote control Auntil the
indicator lamp :starts to flash rapidly.
The programming has been successful if
indicator lamp :flashes rapidly.
X Release transmitter button ;,=or? on
the integrated garage door opener and
transmitter button Bon garage door
remote control A.
If indicator lamp :goes out after approx-
imately 20 seconds and has not flashed rap-
idly:
X Repeat the programming procedure for the
transmitter button. This time, change the
distance between the garage door remote
control and the rear-view mirror.
i If the garage door system works with a
rolling code, you must synchronise the
remote control integrated in the rear-view
mirror with the garage door system
receiver after programming.
You will find further information in the
garage door opening system's operating
instructions, e.g. the sections on "Synchro-
nising the transmitter" or "Registering a
new transmitter". You can also call the hot-
line mentioned above. Problems when programming
If you experience problems when program-
ming the garage door opener integrated in the
rear-view mirror, note the following:
R
check the transmitter frequency of garage
door remote control A(this can usually be
found on the rear of the remote control).
R change the batteries in garage door remote
control A.This increases the likelihood
that garage door remote control Awill
send a strong and precise signal to the
integrated remote control in the rear-view
mirror.
R when programming, hold garage door
remote control Aat different distances
and angles from the transmitter button that
you are programming. Try various angles at
distances from 5 to 30 cm or the same
angle but varying distances.
R If there is another remote control for the
same garage door drive, perform the pro-
gramming steps again using the other
remote control. Before performing these
steps, make sure that new batteries have
been fitted in the garage door remote con-
trol.
R Align the aerial cable of the garage door
opener unit. This can improve signal recep-
tion/transmission.
Opening or closing the garage door Once programmed, the integrated remote
control will assume the function of the garage
door system's remote control. Please also
read the operating instructions for the garage
door system.
X
Turn the key to position 2in the ignition
lock.
X Press transmitter button ;,=or? in the
overhead control panel that you have pro-
grammed to operate the garage door.
Garage door system with a fixed code: indi-
cator lamp :lights up green. 262
FeaturesStowing and features
Page 266 of 337
Garage door system with a rolling code:
indicator lamp :flashes green.
i The transmitte rwill transmit a signal for
as long as the transmitter button is
pressed. The transmission is halted after a
maximum of 10 seconds, and indicator
lamp :flashes yellow. Press the transmit-
ter button again, if necessary.
Clearing the memory of the integrated
garage door opener in the rear-view mir-
ror X
Turn the key to position 2in the ignition
lock.
X Press the transmitter buttons ;and ?.
The indicator lamp lights up yellow.
X Press and hold transmitter buttons ;
and ?until the indicator lamp turns green.
i Make sure that you clear the memory of
the integrated garage door opener before
selling the vehicle. Features
263Stowing and features Z
Page 270 of 337
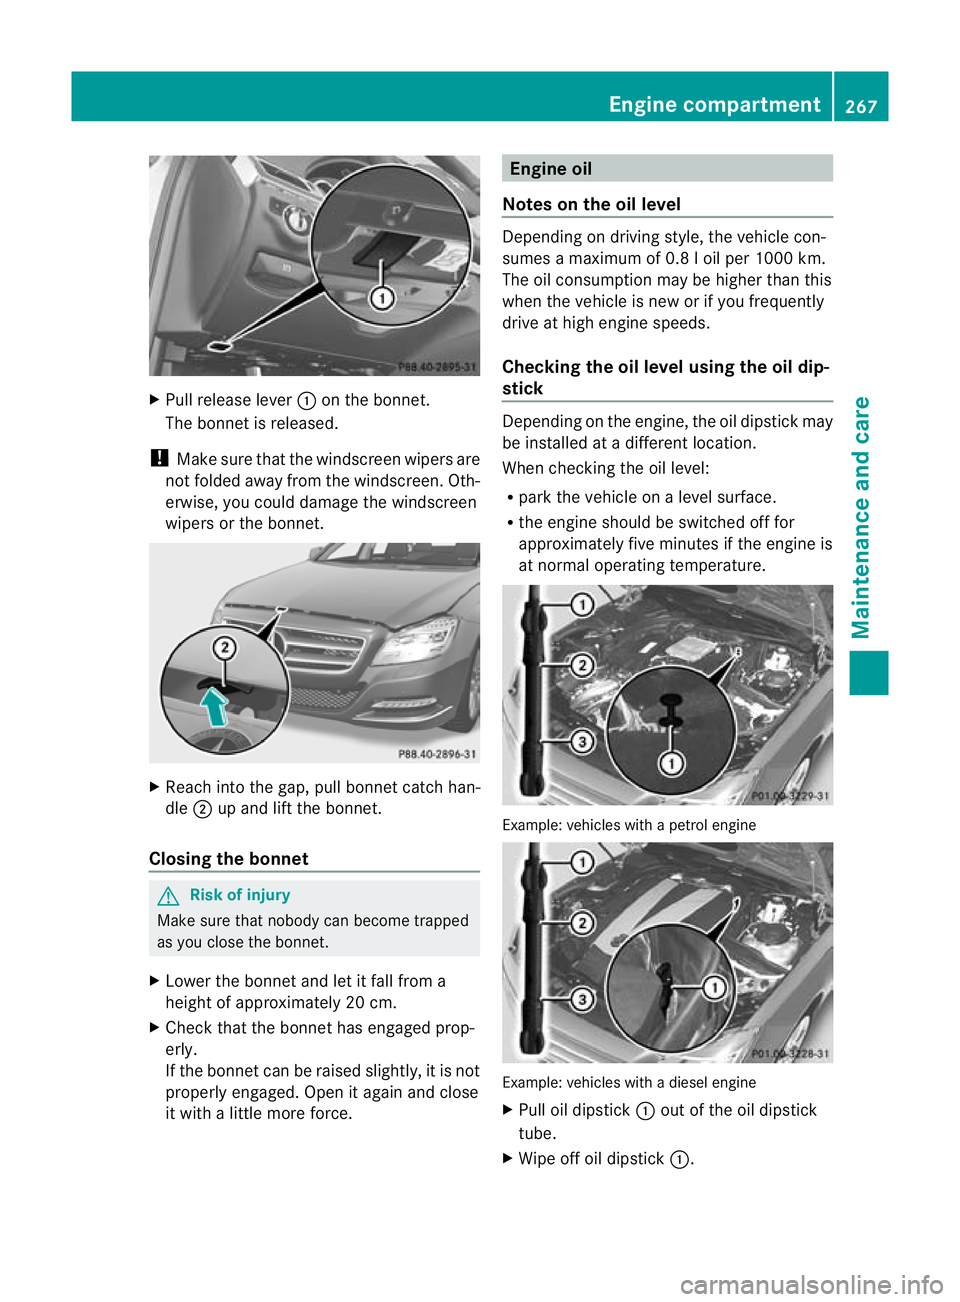
X
Pull release lever :on the bonnet.
The bonnet is released.
! Make sure that the windscreen wipers are
not folded away from the windscreen .Oth-
erwise, you could damage the windscreen
wipers or the bonnet. X
Reach into the gap, pull bonnet catch han-
dle ;up and lift the bonnet.
Closing the bonnet G
Risk of injury
Make sure tha tnobody can become trapped
as you close the bonnet.
X Lower the bonnet and let it fall from a
height of approximately 20 cm.
X Check that the bonnet has engaged prop-
erly.
If the bonnet can be raised slightly, it is not
properly engaged. Open it again and close
it with a little more force. Engine oil
Notes on the oil level Depending on driving style, the vehicle con-
sumes a maximum of 0.8 l oil per 1000 km.
The oil consumption may be higher than this
when the vehicle is new or if you frequently
drive at high engine speeds.
Checking the oil level using the oil dip-
stick
Depending on the engine, the oil dipstick may
be installed at a different location.
When checking the oil level:
R
park the vehicle on a level surface.
R the engine should be switched off for
approximately five minutes if the engine is
at normal operating temperature. Example: vehicles with a petrol engine
Example: vehicles with a diesel engine
X
Pull oil dipstick :out of the oil dipstick
tube.
X Wipe off oil dipstick :. Engine compartment
267Maintenance and care Z
Page 275 of 337
High-pressure cleaning equipment
G
Risk of accident
Do not use high-pressure cleaners with circu-
lar-jet nozzles (dirt grinders) to clea nyour
vehicle, in particular the tyres. You could oth-
erwise damage the tyres and cause an acci-
dent.
! Always maintain a distance of at least
30 cm between the vehicle and the high-
pressure cleaner nozzle. Information about
the correc tdistance is available fro mthe
equipment manufacturer.
Move the high-pressure cleaner nozzle
around when cleaning your vehicle.
Do not aim directly at any of the following:
R tyres
R door gaps, roof gaps, joints etc.
R electrical components
R battery
R connectors
R lights
R seals
R trim elements
R ventilation slots
Damaged seals or electrical components
can lead to leaks or failures.
Cleaning the wheels !
Do not use acidic wheel cleaning products
to remove brake dust. This could damage
wheel bolts and brake components.
! Do not park up the vehicle for an extended
period straight after cleaning it, particularly
after having cleaned the wheels with wheel
cleaner. Wheel cleaners could cause
increased corrosion of the brake discs and
brake pads/linings. For this reason, you
should drive for a few minutes after clean-
ing. Braking heats the brake discs and
brake pads, thus drying them. The vehicle
can then be parked up. Cleaning the paintwork Scratches, corrosive deposits, areas affected
by corrosion and damage caused by inade-
quate care cannot always be completely
repaired. In such cases, visit a qualified spe-
cialist workshop, e.g. a Mercedes-Benz
Service Centre.
X Remove impurities immediately, where
possible, whilst avoiding rubbing too hard.
X Soak insect remains with insect remover
and rinse off the treated areas afterwards.
X Soak bird droppings with water and rinse
off the treated areas afterwards.
X Remove coolant, brake fluid, tree resin,
oils, fuels and greases by rubbing gently
with a cloth soaked in petroleum ether or
lighter fluid.
X Use tar remover to remove tar stains.
X Use silicone remover to remove wax.
! Do not affix:
R stickers
R films
R magnetic plates or similar items
to painted surfaces. You could otherwise
damage the paintwork.
Care and treatment of matt paintwork If your vehicle has a clear matt finish, observe
the following instructions in order to avoid
damage to the paintwork due to incorrect
care.
These notes also apply to light alloy wheels
with a clear matt finish.
! Never polish the vehicle or the light alloy
wheels. Polishing makes the paintwork
shiny.
! Never use paint cleaner, buffing or pol-
ishing products, or gloss preserver, e.g.
wax. These products are only suitable for
high-gloss surfaces. Their use on vehicles
with matt finish leads to considerable sur-
face damage (shiny, spotted areas). 272
CareMaintenance and care