2010 MERCEDES-BENZ CLS COUPE ESP
[x] Cancel search: ESPPage 103 of 337
=
Headlamp flasher
? Turn signal, left
X To indicate briefly: press the combination
switch briefly to the pressure point in the
directio nofarrow;or?.
The corresponding turn signal flashes three
times.
X To indicate: press the combination switch
beyond the pressure point in the direction
of arrow ;or?.
Main-beam headlamps X
To switch on the main-beam head-
lamps: turn the key in the ignition lock to
position 2or start the engine.
X Turn the light switch to Lorc.
X Press the combination switch beyond the
pressure point in the direction of
arrow :.
In the cposition, the main-beam head-
lamps are only switched on when it is dark
and the engine is running.
The K indicator lamp in the instrument
cluster lights up when the main-beam head-
lamps are switched on.
X To switch off the main-beam head-
lamps: move the combination switch back
to its normal position.
The K indicator lamp in the instrument
cluster goes out.
Adaptive Highbeam Assist G
Risk of accident
Adaptive Highbeam Assist is only an aid
designed to assist driving. The drive ris
responsible for adjusting the vehicle's lighting
to the prevailing light, visio nand traffic con-
ditions. The system may be impaired or deactivated:
R if there is poor visibility, e.g .due to snow,
rain, fog or spray
R if the area of the windscree naround the
optical sensor is dirty, misted up or covered
up, e.g. by a sticker
The system may not recognise the following
road users:
R road users that have no lighting, e.g. pedes-
trians
R road users that have poor lighting, e.g.
cyclists
R road users whose lighting is not clearly visi-
ble, e.g. road users behind a crash barrier
R on rare occasions: road users that have
lights that may be recognised too late or not
at all
The automatic main-bea mheadlamps will not
be deactivated, or they may be activated
despite road users travelling in fron tofor
approaching the vehicle.
Thus, you could cause an acciden tand injure
yoursel fand others. Alway sobserve traffic
conditions and, if necessary, dip the lights
manually.
You can use this function to set the head-
lamps to change between dipped beam and
main beam automatically. The system recog-
nises vehicles with their lights on, either
approaching from the opposite direction or
travelling in fron tofyour vehicle, and conse-
quently switches the headlamps from main
beam to dipped beam.
The system automatically adapts the dipped-
beam headlamp range depending on the dis-
tance to the other vehicle. Once the system
no longer detects any other vehicles, it reac-
tivates the main-beam headlamps.
The system's optical sensor is located behind
the windscreen near the overhead control
panel. 100
Exterior lightingLights and windscreen wipers
Page 107 of 337
Rear-compartmen
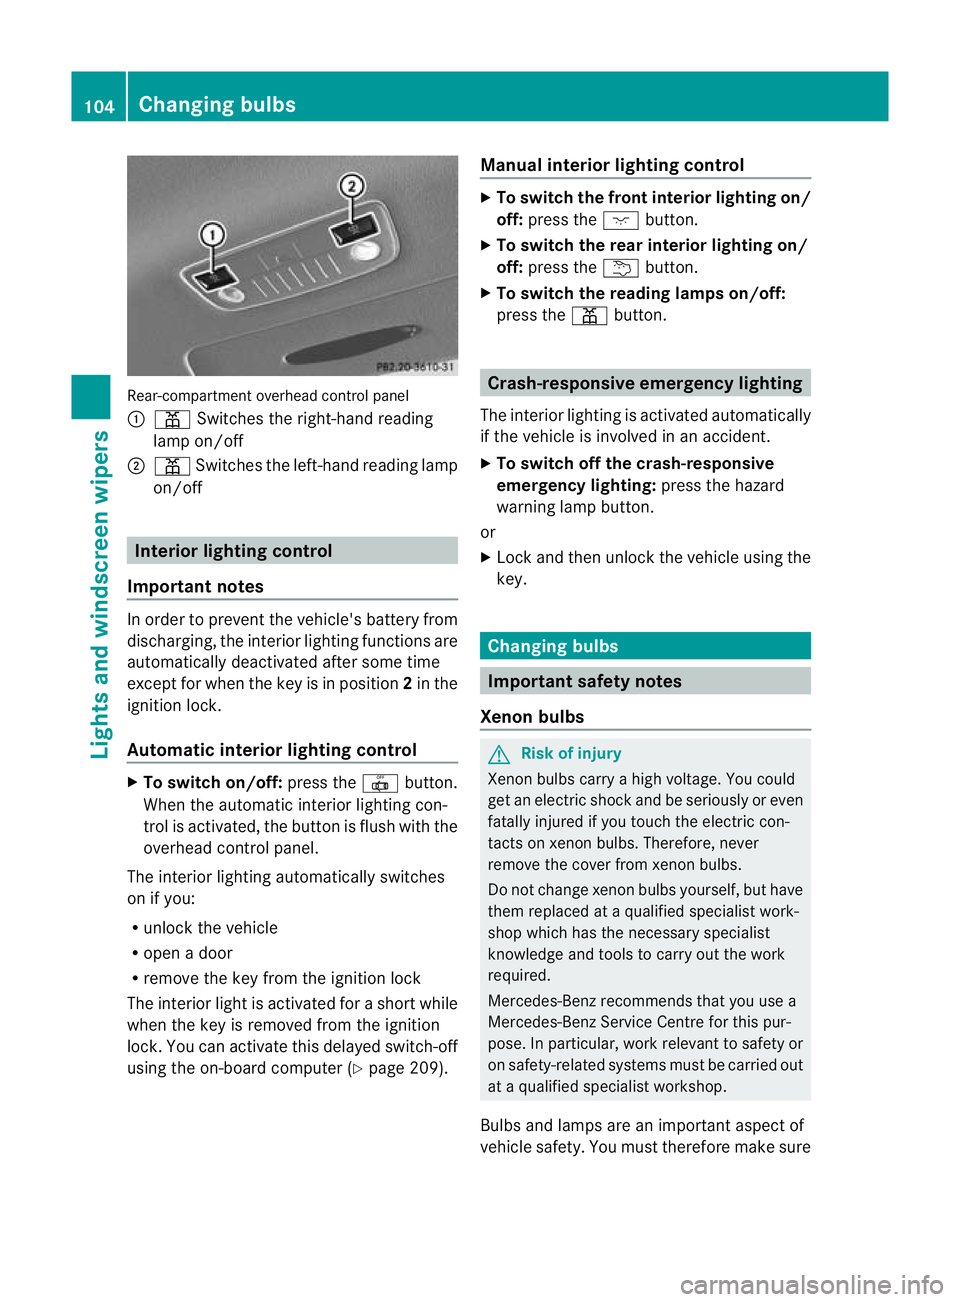
toverhead control panel
: p Switches the right-hand reading
lamp on/off
; p Switches the left-hand reading lamp
on/off Interior lighting control
Important notes In order to prevent the vehicle's battery from
discharging, the interior lighting functions are
automatically deactivated after some time
except for when the key is in position
2in the
ignitio nlock.
Automatic interior lighting control X
To switch on/off: press the|button.
When the automatic interior lighting con-
trol is activated, the button is flush with the
overhead control panel.
The interior lighting automatically switches
on if you:
R unlock the vehicle
R open a door
R remove the key from the ignition lock
The interior light is activated for a short while
when the key is removed from the ignition
lock. You can activate this delayed switch-off
using the on-board computer (Y page 209).Manual interior lighting control X
To switch the front interior lighting on/
off: press the cbutton.
X To switch the rear interior lighting on/
off: press the ubutton.
X To switch the reading lamps on/off:
press the pbutton. Crash-responsive emergency lighting
The interior lighting is activated automatically
if the vehicle is involved in an accident.
X To switch off the crash-responsive
emergency lighting: press the hazard
warning lamp button.
or
X Lock and then unlock the vehicle using the
key. Changing bulbs
Important safety notes
Xenon bulbs G
Risk of injury
Xenon bulbs carry a high voltage. You could
get an electric shock and be seriously or even
fatally injured if you touch the electric con-
tacts on xenon bulbs. Therefore, never
remove the cover from xenon bulbs.
Do not change xenon bulbs yourself, but have
them replaced at a qualified specialist work-
shop which has the necessary specialist
knowledge and tools to carry out the work
required.
Mercedes-Benz recommends that you use a
Mercedes-Benz Service Centre for this pur-
pose. In particular, work relevant to safety or
on safety-related systems must be carried out
at a qualified specialist workshop.
Bulbs and lamps are an important aspect of
vehicle safety. You must therefore make sure 104
Changing bulbsLights and windscreen wipers
Page 108 of 337
that these function correctly at all times.
Have the headlamp setting checked regularly.
LED bulbs In additio
nto xenon bulbs, you also cannot
replace LED bulbs. Have LED bulbs replaced
at a qualified specialist workshop.
Mercedes-Benz recommends that you use a
Mercedes-Benz Service Centre for this pur-
pose. In particular, work relevant to safety or
on safety-related systems must be carried out
at a qualified specialist workshop.
Bulbs and lamps are an important aspect of
vehicle safety. You must therefore make sure
that these function correctly at all times.
Have the headlamp setting checked regularly.
Other bulbs G
Risk of injury
Bulbs and lights can become very hot. For this
reason, allow them to cool down before
changing them. Otherwise, you could burn
yourself when you touch them.
Keep bulbs out of the reach of children. Oth-
erwise, they could damage them, for example,
and injure themselves.
Never use a bulb which has been dropped.
Such a bulb may explode and injure you.
Halogen bulbs are pressurised and could
explode when you change them, especially if
they are very hot. You should therefore wear
eye protection and gloves when you are
changing them.
There are bulbs other than the xenon and LED
bulbs that you cannot replace. Replace only
the bulbs listed (Y page 105). Have the bulbs
that you cannot replace yourself changed at
a qualified specialist workshop.
Mercedes-Benz recommends that you use a
Mercedes-Benz Service Centre for this pur-
pose. In particular, work relevant to safety or
on safety-related systems must be carried out
at a qualified specialist workshop. If you require assistance changing bulbs, con-
sult a qualified specialist workshop.
Do not touch the glass tube of new bulbs with
your bare hands. Even minor contamination
can burn into the glass surface and reduce
the service life of the bulbs. Always use a lint-
free cloth or only touch the base of the bulb
when fitting.
Only use bulbs of the correc
ttype.
If the new bulb still does no tlight up, consult
a qualified specialist workshop.
Bulbs and lamps are an importan taspect of
vehicle safety. You must therefore make sure
that these function correctly at all times.
Have the headlamp setting checked regularly. Overview:c
hanging bulbs/bulb types
You can change the following bulbs. The bulb
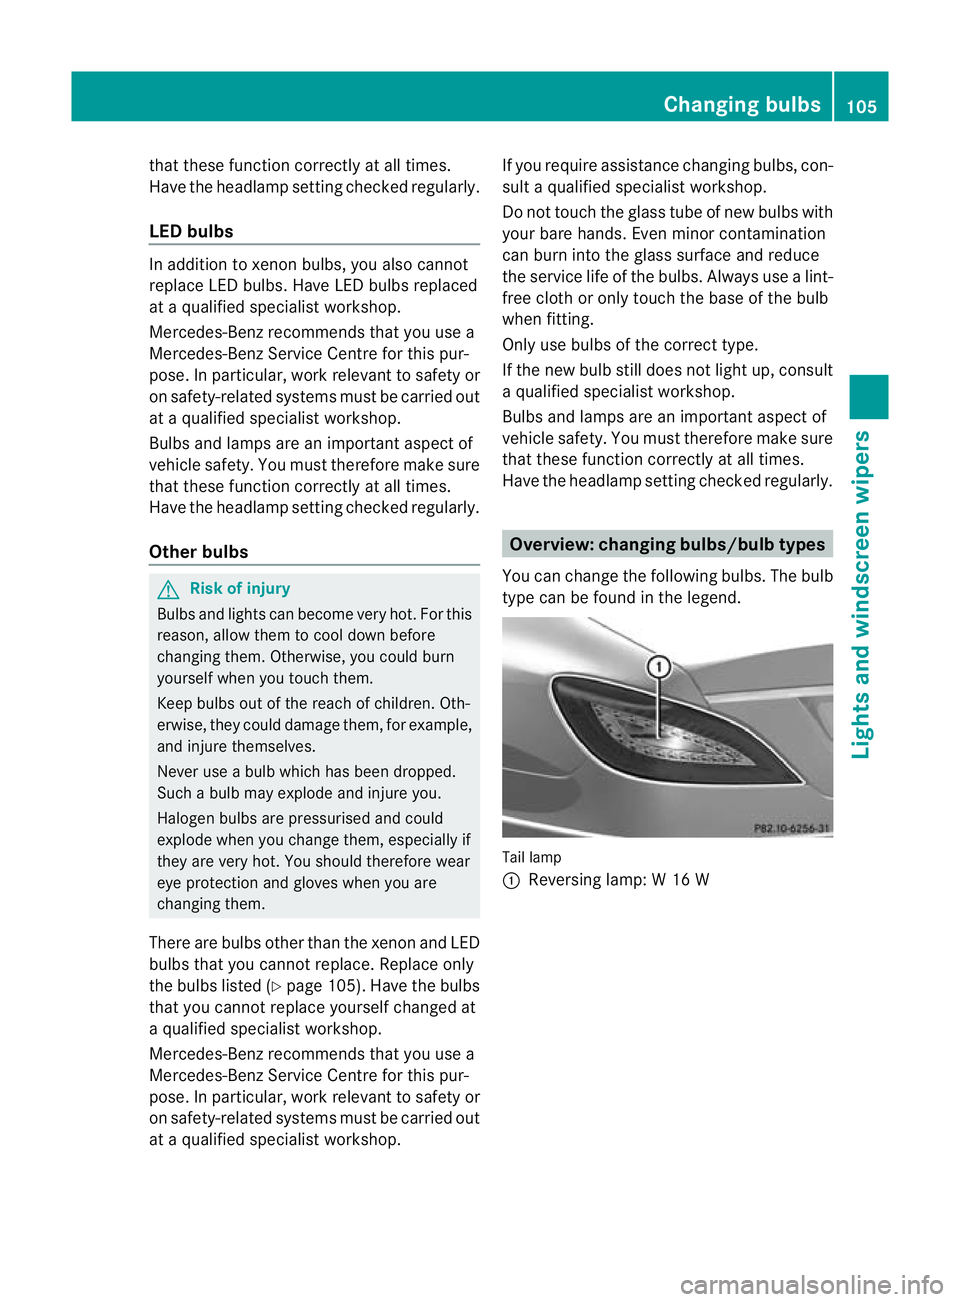
type can be found in the legend. Tail lamp
:
Reversing lamp: W 16 W Changing bulbs
105Lights and windscreen wipers Z
Page 117 of 337
Activating/deactivating
X
Turn the key to position 2in the ignition
lock.
X To activate: press theÃbutton.
The indicator lamp in the Ãbuttonlights
up. Airflow and air distribution are set to
automatic mode.
or
X Press the ^button.
The indicator lamp in the ^button goes
out. The previously selected settings come
into effect again.
X To deactivate: press the^button.
The indicator lamp in the ^button lights
up. Switching cooling with air dehumidi-
fication on/off
Important information The cooling with air dehumidification function
is only available when the engine is running.
The air inside the vehicle is cooled and dehu-
midified according to the temperature selec-
ted.
G
Risk of accident
If the "cooling with air dehumidification" func-
tion is deactivated, the air inside the vehicle
will not be cooled (during warm weather) or
dehumidified. The windows could mist up
more quickly. This may prevent you from
observing the traffic conditions, thereby caus-
ing an accident.
Condensatio nmay drip from the underside of
the vehicle when THERMOTRONIC is in cool-
ing mode. This is normal and no tasign that
there is a malfunction.
i The cooling with air dehumidification
function uses refrigerant R134a. This cool-
ant does not contain chlorofluorocarbons,
and therefore does not damage the ozone
layer. Activating/deactivating X
To switch on: press the¿button.
The indicator lamp in the ¿button lights
up.
X To deactivate: press the¿button.
The indicator lamp in the ¿button goes
out. The cooling with air dehumidification
function has a delayed switch-off feature.
Problems with the cooling with air
dehumidification function When you press the
¿button, the indica-
tor lamp in the button flashes three times or
remains off. You can no longer switch on the
cooling with air dehumidification function.
X Consult a qualified specialist workshop. Setting climate control to automatic
In automatic mode, the set temperature is
maintained automatically at a constant level.
The system automatically regulates the tem-
perature of the dispensed air, the airflow and
the air distribution.
Automatic mode will achieve optimal opera-
tion if cooling with air dehumidification is also
activated. If desired, cooling with air dehu-
midification can be deactivated. Adjusts the climate control settings
This function is only available with
THERMOTRONIC luxury 3-zone automatic cli-
mate control.
The climate mode setting is especially effec-
tive at high temperatures.
You can select the following climate mode
settings in automatic mode:
FOCUS High airflow; slightly cooler setting
MEDIUM Mediuma irflow; standard setting
DIFFUSE Low airflow; slightly warmer air with less of a draught 114
Operating the climate control systemClimate control
Page 132 of 337
the vehicle could skid. Thi
scould cause you
to lose control of your vehicle and cause an
accident.
! Warm up the engine quickly. Do not use
the engine's full performance until it has
reached operating temperature.
Only set the automatic transmission to the
respective drive positions when the vehicle
is stationary.
Where possible, avoid spinning the drive
wheels when pulling away on slippery
roads. Otherwise, you could damage the
drive train.
! AMG vehicles: at low engine oil tempera-
tures (below +20 †), the maximum engine
speed is restricted in order to protect the
engine. To protect the engine and maintain
smooth engine operation, avoid driving at
full throttle when the engine is cold. Key positions
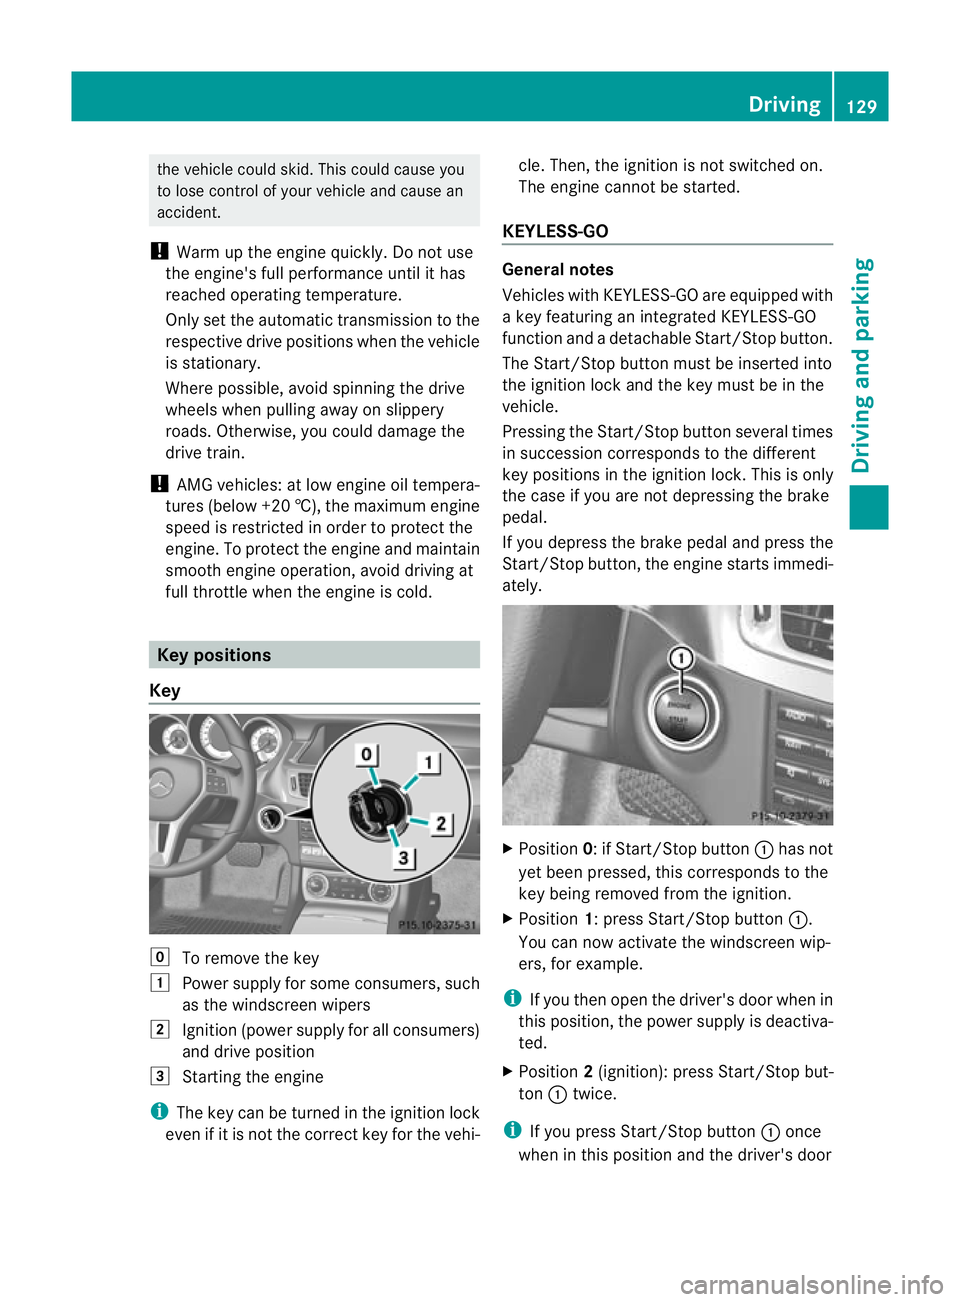
Key g
To remove the key
1 Power supply for some consumers, such
as the windscreen wipers
2 Ignition (power supply for all consumers)
and drive position
3 Starting the engine
i The key can be turned in the ignition lock
even if it is not the correc tkey for the vehi- cle. Then, the ignition is not switched on.
The engine cannot be started.
KEYLESS-GO General notes
Vehicles with KEYLESS-GO are equipped with
a key featuring an integrated KEYLESS-GO
function and a detachable Start/Stop button.
The Start/Stop button must be inserted into
the ignition lock and the key must be in the
vehicle.
Pressing the Start/Stop button several times
in succession corresponds to the different
key positions in the ignition lock. This is only
the case if you are not depressing the brake
pedal.
If you depress the brake pedal and press the
Start/Stop button, the engine starts immedi-
ately.
X
Position 0: if Start/Stop button :has not
yet been pressed, this corresponds to the
key being removed from the ignition.
X Position 1: press Start/Stop button :.
You can now activate the windscreen wip-
ers, for example.
i If you then open the driver's door when in
this position, the power supply is deactiva-
ted.
X Position 2(ignition): press Start/Stop but-
ton :twice.
i If you press Start/Stop button :once
when in this position and the driver's door Driving
129Driving and parking Z
Page 134 of 337
be in the vehicle and the Start/Stop button
must be inserted in the ignition lock .This
mode for starting the engine operates inde-
pendently of the ECO start/stop automatic
engine start function.
X Depress the brake pedal and keep it
depressed.
X To startap etrol engine: press the Start/
Stop button (Y page 129) once.
The engine starts.
X To start adiesel engine: press the Start/
Stop button (Y page 129) once.
Preglow is activated and the engine starts. Pulling away
Automatic transmission i
It is only possible to shift the transmission
from position Pto the desired position if
you depress the brake pedal. Only then is
the parking lock released.
X Depress the brake pedal and keep it
depressed.
X Shif tthe transmission to position Dor R.
X Release the parking brake (Y page 148).
X Release the brake pedal.
X Carefully depress the accelerator pedal.
i The vehicle locks centrally once you have
pulled away.T he locking knobs in the doors
drop down.
You can open the doors from the inside at
any time.
You can also deactivate the automatic lock-
ing feature (Y page 209).
i Upshifts take place at higher engine
speeds after a cold start. This helps the
catalytic converter to reach its operating
temperature more quickly.
Hill starta ssist Hill start assist helps you when pulling away
forwards or in reverse on an uphill gradient. It holds the vehicle for a short time after you
have removed your foot from the brake pedal.
This gives you enough time to move your foot
from the brake pedal to the accelerator pedal
and depress it before the vehicle begins to
roll. G
Risk of accident
Never leave the vehicle when it is held by hill
start assist. After approximately one second,
hill start assist will no longer brake your vehi-
cle and it could roll away.
X Take your foot off the brake pedal.
i Once you have taken your foot off the
brake pedal, the vehicle is held for around
one second.
X Pull away.
Hill start assist will not function if:
R you are pulling away on a level road or a
downhill gradient.
R the transmission is in position N.
R the parking brake is applied.
R ESP ®
is malfunctioning. ECO start/stop function
General notes The ECO start/stop function is only available
for the CLS 350 BlueEFFICIENCY and
CLS 63 AMG models.
AMG vehicles:
the ECO start/stop function
is only available in the Cdrive program.
The ECO start/stop function switches the
engine off automatically when the vehicle
stops moving.
The engine starts automatically when you pull
away again. The ECO start/stop function
thereby helps you to reduce the fuel con-
sumption and emissions of your vehicle. Driving
131Driving and parking Z
Page 137 of 337
Problems with the engine
Problem Possible causes/consequences and
M Solutions
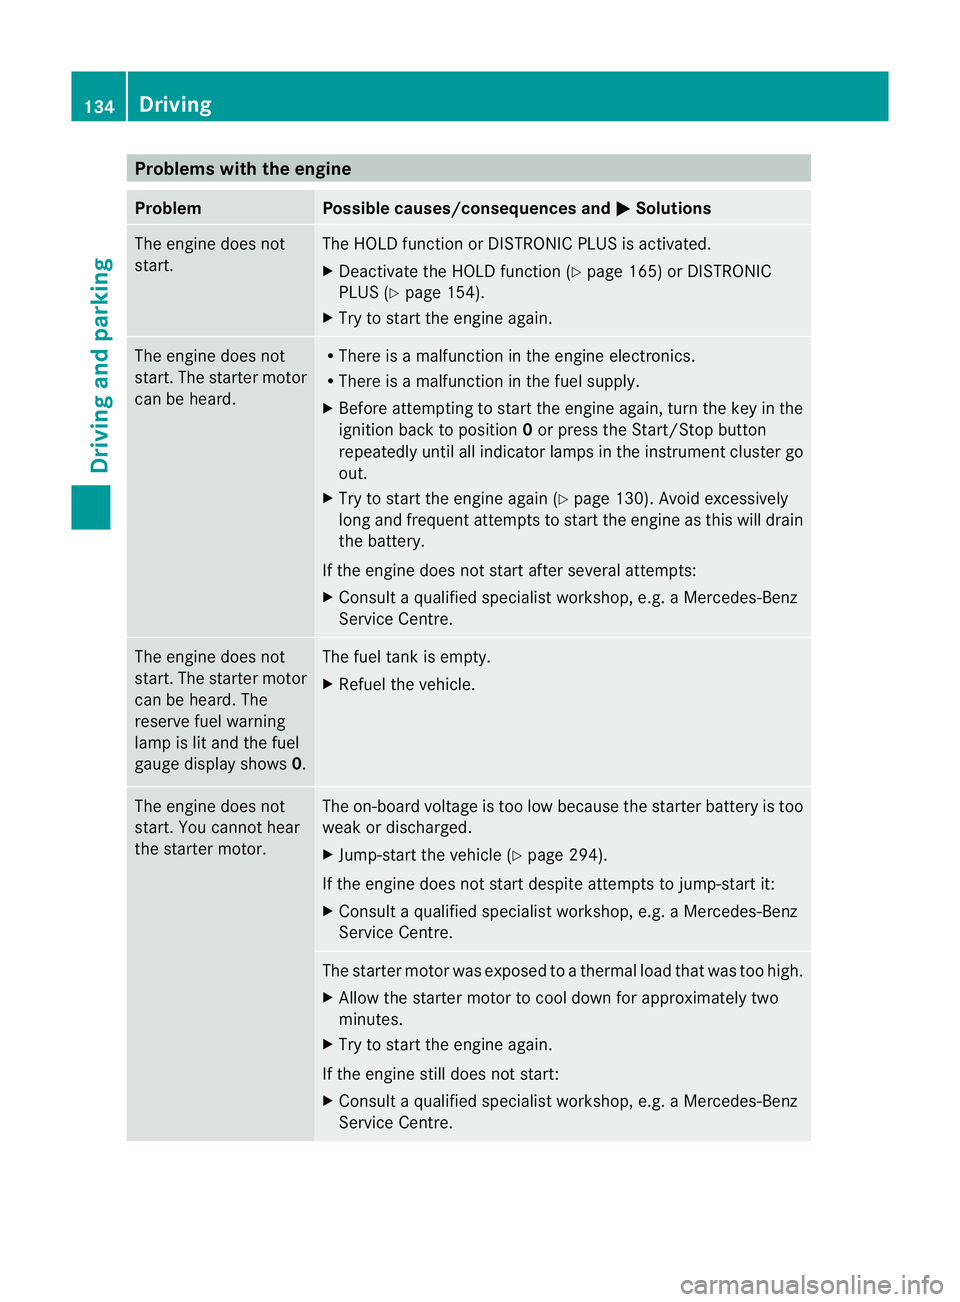
The engine does not
start. The HOLD function or DISTRONIC PLUS is activated.
X
Deactivate the HOLD function (Y page 165) or DISTRONIC
PLUS (Y page 154).
X Try to start the engine again. The engine does not
start. The starter motor
can be heard. R
There is a malfunction in the engine electronics.
R There is a malfunction in the fuel supply.
X Before attempting to start the engine again, turn the key in the
ignition back to position 0or press the Start/Stop button
repeatedly until all indicator lamps in the instrumen tcluster go
out.
X Try to start the engine again (Y page 130). Avoid excessively
long and frequent attempts to start the engine as this will drain
the battery.
If the engine does not start after several attempts:
X Consult a qualified specialist workshop, e.g. a Mercedes-Benz
Service Centre. The engine does not
start
.The starter motor
can be heard. The
reserve fuel warning
lamp is lit and the fuel
gauge display shows 0. The fuel tank is empty.
X
Refuel the vehicle. The engine does not
start. You cannot hear
the starter motor. The on-board voltage is too low because the starter battery is too
weak or discharged.
X
Jump-start the vehicle (Y page 294).
If the engine does not start despite attempts to jump-start it:
X Consult a qualified specialist workshop, e.g. a Mercedes-Benz
Service Centre. The starter motor was exposed to a thermal load that was too high.
X
Allow the starter motor to cool down for approximately two
minutes.
X Try to start the engine again.
If the engine still does not start:
X Consult a qualified specialist workshop, e.g. a Mercedes-Benz
Service Centre. 134
DrivingDriving and parking
Page 141 of 337
A
Neutral
Do not shift the transmission to
N
while driving. Otherwise, the auto-
matic transmission could be dam-
aged.
If ESP ®
is deactivated or faulty:
only shift the transmission to posi-
tion Nif the vehicle is in dange rof
skidding, e.g. on icy roads.
If you switch off the engine using
the key or the Start/Stop button,
the automatic transmission shifts
to neutral Nautomatically.
! Rolling in neutral Ncan lead to
damage to the transmission. 7
Drive
The automatic transmission
changes gear automatically. All
forward gears are available.
Changing gears
The automatic transmission shifts to the indi-
vidual gears automatically when it is in trans-
mission position D.This automatic gearshift-
ing behaviouri s determined by:
R a shift range restriction, if selected
R the selected drive program (Y page 138)
R the position of the accelerator pedal
R the road speed Driving tips
Accelerator pedal position Your style of driving influences how the auto-
matic transmission shifts gear:
R little throttle: early upshifts
R more throttle: late upshifts AMG vehicles When shifting down, the double-clutch func-
tion is active regardless of the currently selec-
ted drive program. The double-clutch function
reduces load change reactions and is condu-
cive to a sporty driving style. The sound gen-
erated by the double-clutch function depends
on the drive program selected.
Kickdown
Use kickdown for maximum acceleration.
X
Depress the accelerator pedal beyond the
pressure point.
The transmission shifts to a lower gear
depending on the engine speed.
X Ease off the accelerator pedal once the
desired speed is reached.
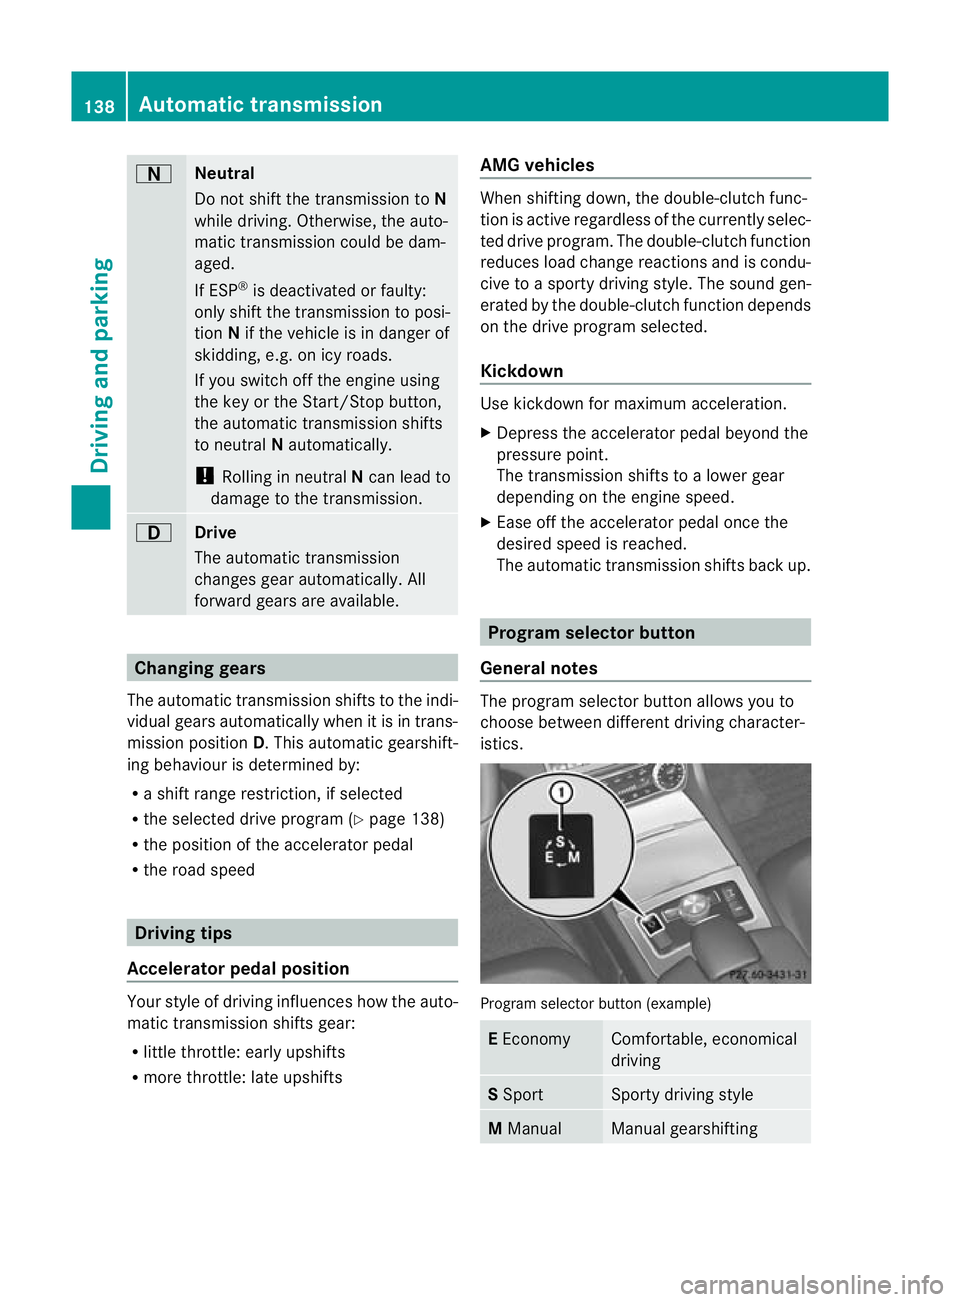
The automatic transmission shifts back up. Program selector button
General notes The program selector button allows you to
choose between different driving character-
istics.
Program selector button (example)
E
Economy Comfortable, economical
driving
S
Sport Sporty driving style
M
Manual Manual gearshifting138
Automatic transmissionDriving and parking