2010 KIA Sportage ESP
[x] Cancel search: ESPPage 13 of 371
Knowing your vehicle
43
1
2
3
4
5
6
7
8
9
Operational distance may vary
depending upon the area the trans-
mitter is used in. For example, if the
vehicle is parked near police sta-
tions, government and public offices,
broadcasting stations, military instal-
lations, airports, or transmitting tow-
ers, etc.
This device complies with
Industry Canada Standard RSS-
210.Operation is subject to the fol-
lowing two conditions:
1. This device may not cause inter- ference, and
2. This device must accept any inter- ference, including interference that
may cause undesired operation of
the device.
Battery replacement
Transmitter uses a 3 volt lithium bat-
tery which will normally last for sev-
eral years. When replacement is nec-
essary, use the following procedure.
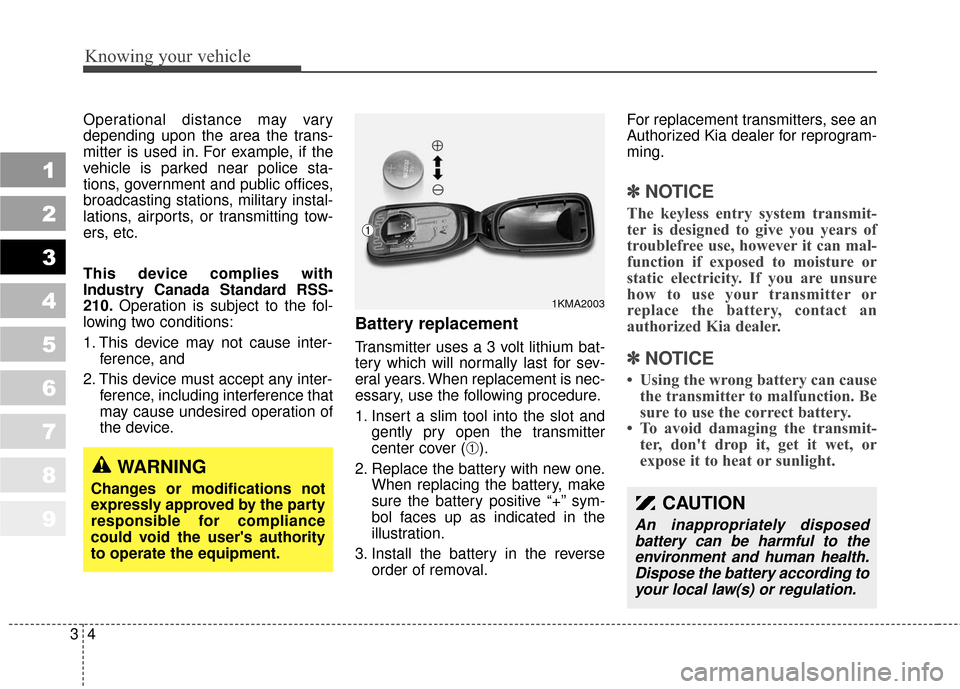
1. Insert a slim tool into the slot andgently pry open the transmitter
center cover (
➀).
2. Replace the battery with new one. When replacing the battery, make
sure the battery positive “+” sym-
bol faces up as indicated in the
illustration.
3. Install the battery in the reverse order of removal. For replacement transmitters, see an
Authorized Kia dealer for reprogram-
ming.
✽ ✽
NOTICE
The keyless entry system transmit-
ter is designed to give you years of
troublefree use, however it can mal-
function if exposed to moisture or
static electricity. If you are unsure
how to use your transmitter or
replace the battery, contact an
authorized Kia dealer.
✽ ✽NOTICE
• Using the wrong battery can cause
the transmitter to malfunction. Be
sure to use the correct battery.
• To avoid damaging the transmit- ter, don't drop it, get it wet, or
expose it to heat or sunlight.
1KMA2003
➀
WARNING
Changes or modifications not
expressly approved by the party
responsible for compliance
could void the user's authority
to operate the equipment.
CAUTION
An inappropriately disposed
battery can be harmful to theenvironment and human health.Dispose the battery according toyour local law(s) or regulation.
Page 17 of 371
Knowing your vehicle
83
1
2
3
4
5
6
7
8
9
4. If all of the digits have been inputsuccessfully, you have to start the
engine within 30 seconds. If you
attempt to start the engine after 30
seconds, the engine will not start
and you will have to input your
password again.
After performing the limp home pro-
cedure, you have to see an autho-
rized Kia dealer immediately to
inspect and repair your ignition key
or immobilizer system.
✽ ✽ NOTICE
If you cannot start your engine in
spite of limp home procedure, have
your vehicle towed by an authorized
Kia dealer for inspection and neces-
sary repairs.
✽ ✽NOTICE
The transponder in your ignition
key is an important part of the
immobilizer system. It is designed to
give years of troublefree service,
however you should avoid exposure
to moisture, static electricity and
rough handling. Immobilizer sys-
tem malfunction could occur.
✽ ✽NOTICE
Do not change, alter or adjust the
immobilizer system because it could
cause the immobilizer system to
malfunction and should only be ser-
viced by an authorized Kia dealer.
Malfunctions caused by improper
alterations, adjustments or modifi-
cations to the immobilizer system
are not covered by your vehicle
manufacturer warranty.
This device complies with
Industry Canada Standard RSS-
210. Operation is subject to the fol-
lowing two conditions:
1. This device may not cause inter- ference, and
2. This device must accept any inter- ference, including interference that
may cause undesired operation of
the device.
WARNING
Changes or modifications not
expressly approved by the party
responsible for compliance
could void the user's authority
to operate the equipment.
Page 27 of 371

Knowing your vehicle
18
3
1
2
3
4
5
6
7
8
9
Window opening and closing
The driver’s door has a master power
window switch that controls all the
windows in the vehicle. To open or
close a window, press down (
➄) or
pull up (
➄) the front portion of the
corresponding switch. Automatic power window down
(driver’s window, if equipped)
Depressing the power window switch
momentarily to the second detent
position (
\b) completely lowers the
driver’s window even when the
switch is released. To stop the win-
dow at the desired position while the
window is in operation, momentarily
pull the switch in the direction oppo-
site of the window’s movement.
If the battery has been discharged or
disconnected, the automatic power
window system must be reset as fol-
lows:
1. Turn the ignition key to ON posi- tion.
2. Close driver’s window and contin- ue pulling up on driver’s power win-
dow switch for at least 2~3 sec-
onds after the window is complete-
ly closed. Power window lock switch
The driver can disable the power
window switches on a passenger
door by depressing the power win-
dow lock switch located on the dri-
ver’s door to LOCK (pressed).
When the power window lock
switch is ON, the driver’s master
control cannot operate the pas-
senger door power windows
either.
1KMA2013
1KMB2012
1KMB2015
Page 30 of 371
321
Knowing your vehicle
1
2
3
4
5
6
7
8
9
Front seat adjustment
Adjusting the seat forward andbackward
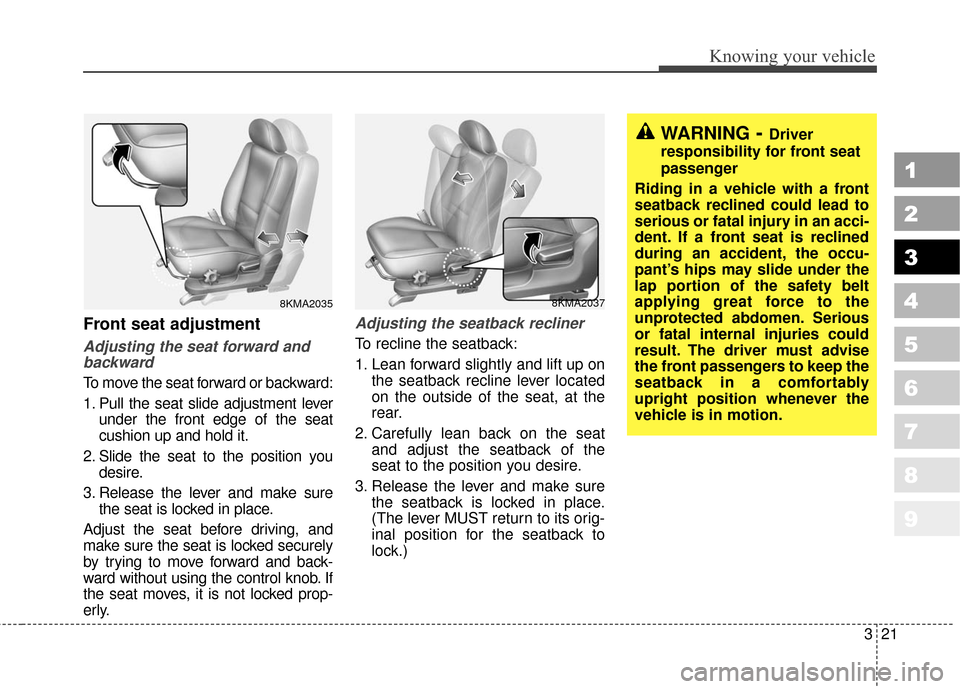
To move the seat forward or backward:
1. Pull the seat slide adjustment lever
under the front edge of the seat
cushion up and hold it.
2. Slide the seat to the position you desire.
3. Release the lever and make sure the seat is locked in place.
Adjust the seat before driving, and
make sure the seat is locked securely
by trying to move forward and back-
ward without using the control knob. If
the seat moves, it is not locked prop-
erly.
Adjusting the seatback recliner
To recline the seatback:
1. Lean forward slightly and lift up on the seatback recline lever located
on the outside of the seat, at the
rear.
2. Carefully lean back on the seat and adjust the seatback of the
seat to the position you desire.
3. Release the lever and make sure the seatback is locked in place.
(The lever MUST return to its orig-
inal position for the seatback to
lock.)
8KMA20358KMA2037
WARNING- Driver
responsibility for front seat
passenger
Riding in a vehicle with a front
seatback reclined could lead to
serious or fatal injury in an acci-
dent. If a front seat is reclined
during an accident, the occu-
pant’s hips may slide under the
lap portion of the safety belt
applying great force to the
unprotected abdomen. Serious
or fatal internal injuries could
result. The driver must advise
the front passengers to keep the
seatback in a comfortably
upright position whenever the
vehicle is in motion.
Page 42 of 371
333
Knowing your vehicle
1
2
3
4
5
6
7
8
9
WARNING- Replacing
used pre-tensioners
Pre-tensioners are designed to operate once. After activa-
tion, pre-tensioner seat belts
must be replaced. All seat
belts, of any type, should
always be replaced after they
have been worn during a colli-
sion.
Do not attempt to replace the pre-tensioners yourself. This
must be done by an autho-
rized Kia dealer.CAUTION - Hot parts
The pre-tensioner assemblymechanism become hot duringactivation. Do not touch the pre-tensioner seat belt assembly forseveral minutes after they havebeen activated.
WARNING- Damaging
the pre-tensioners
Do not hit or strike the pre- tensioner assemblies, espe-
cially with a tool or heavy
object.
Do not attempt to service or repair the pre-tensioners.
WARNING
If the vehicle or pre-tensioner
seat belt must be discarded, con-
tact an authorized Kia dealer.
Page 84 of 371

375
1
2
3
4
5
6
7
8
9
Knowing your vehicle
How does the airbag system
operate
Airbags only operate when theignition switch is turned to the ON
or START positions.
Airbags inflate instantly in the event of serious frontal or side col-
lision in order to help protect the
occupants from physical injury.
The airbag Electronic Control Unit
(ECU) is a small computer which
calculates the immediate impact
information and sends out a
deployment signal based on the
ECU's calculation of the likely
severity of the developing collision.
There is no single vehicle speed at which the airbags will inflate. Airbag deployment depends on a
number of factors including vehicle
speed, angles of impact and the
density and stiffness of the vehi-
cles or objects which your vehicle
hits in the collision. However, fac-
tors are not limited to those men-
tioned above.
The front airbags will completely inflate and deflate in an instant.
It is impossible for you to see the
airbags inflate during an accident.
It is much more likely that you will
simply see the deflated airbags
hanging out of their storage com-
partments after the collision. In order to help provide protection
in a severe collision, the airbags
must inflate rapidly. The speed of
airbag inflation has been deter-
mined by the Canadian Motor
Vehicle Safety Standard (CMVSS)
to reduce the likelihood of serious
or life-threatening injuries and is
thus a mandatory part of the airbag
design.
However, airbag inflation can also
cause injuries which normally can
include facial abrasions, bruises
and broken bones, and sometimes
more serious injuries because that
inflation speed also causes the
airbags to expand with a great deal
force.
There are even circumstances under which contact with the
steering wheel airbag can cause
fatal injuries, especially if the
occupant is positioned exces-
sively close to the steering
wheel.
Page 92 of 371

383
1
2
3
4
5
6
7
8
9
Knowing your vehicle
(Continued)Use only portable plastic fuel
containers designed to carry
and store gasoline.
Do not use cellular phones while refueling. Electric cur-
rent and/or electronic interfer-
ence from cellular phones can
potentially ignite fuel vapors
causing a fire.
When refueling, always shut the engine off. Sparks pro-
duced by electrical compo-
nents related to the engine
can ignite fuel vapors causing
a fire. Once refueling is com-
plete, check to make sure the
filler cap and filler door are
securely closed, before start-
ing the engine.
(Continued)(Continued)
DO NOT use matches or alighter and DO NOT SMOKE or
leave a lit cigarette in your
vehicle while at a gas station
especially during refueling.
Automotive fuel is highly flam-
mable and can, when ignited,
result in fire.
If a fire breaks out during refu- eling, leave the vicinity of the
vehicle, and immediately con-
tact the manager of the gas
station and then contact the
local fire department.CAUTION
Make sure to refuel your vehi- cle according to the “Fuelrequirements” suggested insection 5.
Check to make sure the fuel filler cap is securely closedafter refueling. A loose fuelfiller cap may cause the"Check Engine" (MalfunctionIndicator) light in the instru-ment panel to illuminateunnecessarily.
If the fuel filler cap requires replacement, use only a gen-uine Kia cap or the equivalentspecified for your vehicle. Anincorrect fuel filler cap canresult in a serious malfunctionof the fuel system or emissioncontrol system.
Do not spill fuel on the exteri- or surfaces of the vehicle. Anytype of fuel spilled on paintedsurfaces may damage thepaint.
Page 94 of 371
385
1
2
3
4
5
6
7
8
9
Knowing your vehicle
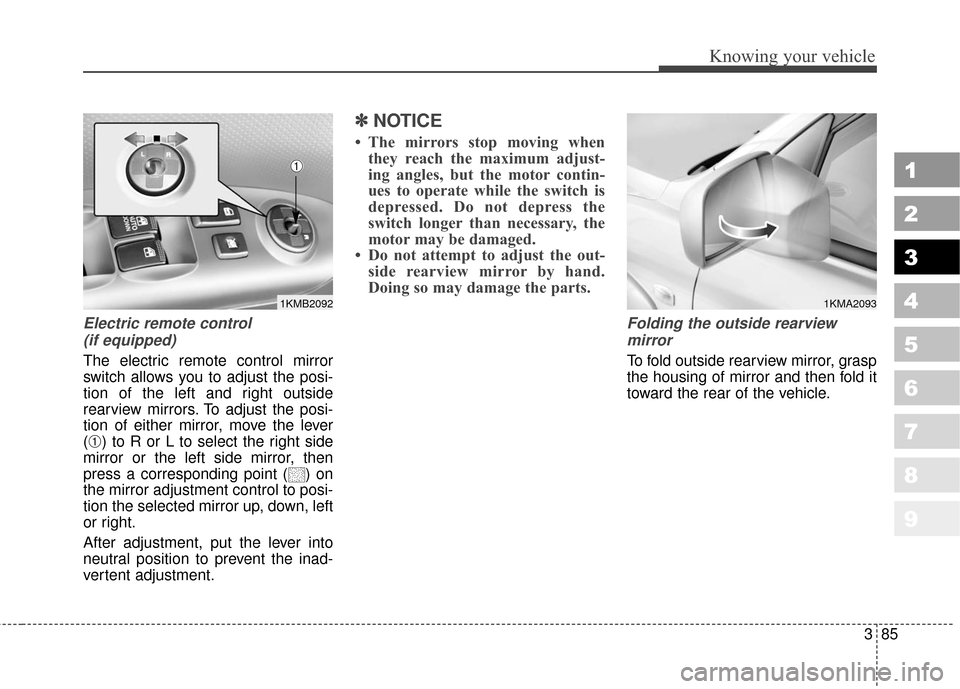
Electric remote control (if equipped)
The electric remote control mirror
switch allows you to adjust the posi-
tion of the left and right outside
rearview mirrors. To adjust the posi-
tion of either mirror, move the lever
(
➀) to R or L to select the right side
mirror or the left side mirror, then
press a corresponding point ( ) on
the mirror adjustment control to posi-
tion the selected mirror up, down, left
or right.
After adjustment, put the lever into
neutral position to prevent the inad-
vertent adjustment.
✽ ✽ NOTICE
• The mirrors stop moving when
they reach the maximum adjust-
ing angles, but the motor contin-
ues to operate while the switch is
depressed. Do not depress the
switch longer than necessary, the
motor may be damaged.
• Do not attempt to adjust the out- side rearview mirror by hand.
Doing so may damage the parts.
Folding the outside rearview
mirror
To fold outside rearview mirror, grasp
the housing of mirror and then fold it
toward the rear of the vehicle.
1KMB2092
➀
1KMA2093