2010 KIA Sportage check engine light
[x] Cancel search: check engine lightPage 15 of 371

Knowing your vehicle
63
1
2
3
4
5
6
7
8
9
Disarmed stage
The system will be disarmed when
the doors are unlocked by depress-
ing the unlock button on the transmit-
ter or unlocked with the ignition key.
After depressing unlock button, the
hazard warning lights will blink twice
to indicate that the system is dis-
armed.
After depressing unlock button, if any
door is not opened within 30 sec-
onds, the system will be rearmed.
If the system is not disarmed with the
ignition key or transmitter, insert the
key in the ignition switch, turn the key
to the ON position and wait for 30
seconds. Then the system will be dis-
armed.Your vehicle is equipped with an elec-
tronic engine immobilizer system to
reduce the risk of unauthorized vehi-
cle use.
Your immobilizer system is comprised
of a small transponder in the ignition
key, and antenna coil in the key cylin-
der and Immobilizer Control Unit (or
Smartra Unit).
With this system, whenever you insert
your ignition key into the ignition
switch and turn it to ON, the antenna
coil in the ignition switch receives a
signal from the transponder in the
ignition key and then sends the signal
to the ECU (Engine Control Unit).
The ECU checks the signal whether
the ignition key is valid.
If the key is determined to be valid,
the engine will start.
If the key is determined to be invalid,
the engine will not start.
IMMOBILIZER SYSTEM
(IF EQUIPPED)
CAUTION
Do not change, alter or adjust
the theft-alarm system becauseit could cause the theft-alarmsystem to malfunction andshould only be serviced by anauthorized Kia dealer.
Malfunctions caused by improp-er alterations, adjustments ormodifications to the theft-alarmsystem are not covered by yourvehicle manufacturer warranty.
Page 87 of 371

Knowing your vehicle
78
3
1
2
3
4
5
6
7
8
9
When the ignition switch is turned
ON, the indicator light should illumi-
nate for approximately 6 seconds,
then go off.
Have the system checked if:
The light does not turn on briefly
when you turn the ignition ON.
The light stays on after the engine starts.
The light comes on while the vehi- cle is in motion.Airbag (Supplemental
Restraint System) service
Your Supplemental Restraint System
is virtually maintenance-free. There
are no parts which you can service.
You must have the system serviced
under the following circumstances:
If an airbag ever inflates, the airbagmust be replaced. Do not try to
remove or discard the airbag by
yourself. This must be done by an
authorized Kia dealer.
If the airbag warning indicator light alerts you to a problem, have the
airbag system checked as soon as
possible. Otherwise, your airbag
system may be ineffective.
WARNING- No mainte-
nance or repair
Do not work on the airbag sys- tem’s components or wiring.
This could cause the airbags
to inflate inadvertently, possi-
bly seriously injuring some-
one. Working on the system
could also disable the system
so that the airbags would not
deploy in a collision.
Any work on the airbag sys- tem, such as removing,
installing, or repairing the
steering wheel must be per-
formed by a qualified Kia tech-
nician. Improper handling of
the airbag system including
the steering wheel may result
in serious personal injury or
death.
WARNING- No modifica-
tions
Do not modify any part of the
airbag system modification
could make the airbag system
ineffective.
Page 90 of 371

381
1
2
3
4
5
6
7
8
9
Knowing your vehicle
Closing the hood
1. Before closing the hood, check thefollowing:
ment must be correctly installed.
bustible material must be
removed from the engine com-
partment.
2. Secure the support rod in its clip.
3. Lower the hood to about 30 cm (12 inches) height and then let it
drop to properly lock in place.
Make sure the hood is properly
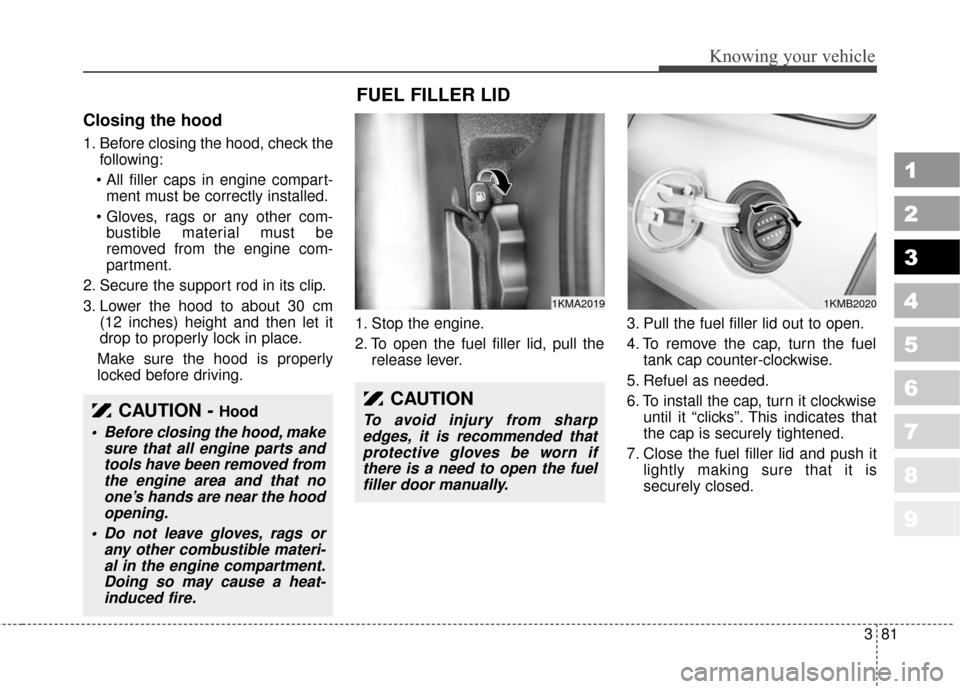
locked before driving. 1. Stop the engine.
2. To open the fuel filler lid, pull the
release lever. 3. Pull the fuel filler lid out to open.
4. To remove the cap, turn the fuel
tank cap counter-clockwise.
5. Refuel as needed.
6. To install the cap, turn it clockwise until it “clicks”. This indicates that
the cap is securely tightened.
7. Close the fuel filler lid and push it lightly making sure that it is
securely closed.
CAUTION - Hood
Before closing the hood, makesure that all engine parts andtools have been removed fromthe engine area and that noone’s hands are near the hoodopening.
Do not leave gloves, rags or any other combustible materi-al in the engine compartment.Doing so may cause a heat-induced fire.
FUEL FILLER LID
1KMA20191KMB2020
CAUTION
To avoid injury from sharpedges, it is recommended thatprotective gloves be worn ifthere is a need to open the fuelfiller door manually.
Page 92 of 371

383
1
2
3
4
5
6
7
8
9
Knowing your vehicle
(Continued)Use only portable plastic fuel
containers designed to carry
and store gasoline.
Do not use cellular phones while refueling. Electric cur-
rent and/or electronic interfer-
ence from cellular phones can
potentially ignite fuel vapors
causing a fire.
When refueling, always shut the engine off. Sparks pro-
duced by electrical compo-
nents related to the engine
can ignite fuel vapors causing
a fire. Once refueling is com-
plete, check to make sure the
filler cap and filler door are
securely closed, before start-
ing the engine.
(Continued)(Continued)
DO NOT use matches or alighter and DO NOT SMOKE or
leave a lit cigarette in your
vehicle while at a gas station
especially during refueling.
Automotive fuel is highly flam-
mable and can, when ignited,
result in fire.
If a fire breaks out during refu- eling, leave the vicinity of the
vehicle, and immediately con-
tact the manager of the gas
station and then contact the
local fire department.CAUTION
Make sure to refuel your vehi- cle according to the “Fuelrequirements” suggested insection 5.
Check to make sure the fuel filler cap is securely closedafter refueling. A loose fuelfiller cap may cause the"Check Engine" (MalfunctionIndicator) light in the instru-ment panel to illuminateunnecessarily.
If the fuel filler cap requires replacement, use only a gen-uine Kia cap or the equivalentspecified for your vehicle. Anincorrect fuel filler cap canresult in a serious malfunctionof the fuel system or emissioncontrol system.
Do not spill fuel on the exteri- or surfaces of the vehicle. Anytype of fuel spilled on paintedsurfaces may damage thepaint.
Page 149 of 371

Driving your vehicle
24
1
2
3
4
5
6
7
8
9
Illuminated ignition switch
(if equipped)
Whenever a door is opened, the igni-
tion switch will be illuminated for your
convenience, provided the ignition
switch is not in the ON position. The
light will go off approximately 10 sec-
onds after closing the door or when
the ignition switch is turned on.
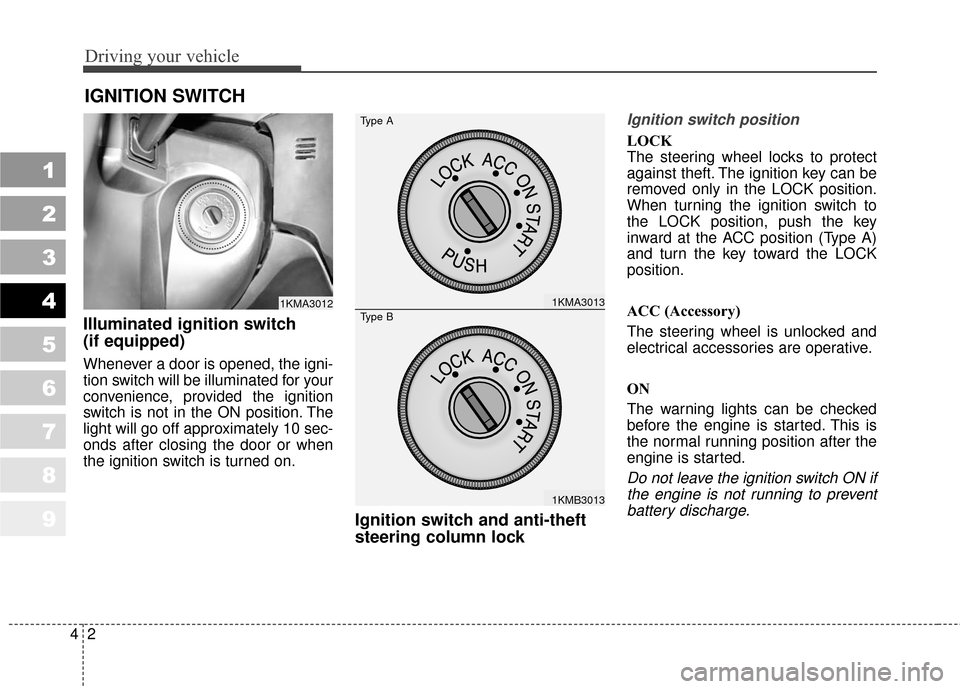
Ignition switch and anti-theft
steering column lock
Ignition switch position
LOCK
The steering wheel locks to protect
against theft. The ignition key can be
removed only in the LOCK position.
When turning the ignition switch to
the LOCK position, push the key
inward at the ACC position (Type A)
and turn the key toward the LOCK
position.
ACC (Accessory)
The steering wheel is unlocked and
electrical accessories are operative.
ON
The warning lights can be checked
before the engine is started. This is
the normal running position after the
engine is started.
Do not leave the ignition switch ON ifthe engine is not running to preventbattery discharge.
IGNITION SWITCH
1KMA30121KMA3013
1KMB3013
Type A
Type B
Page 168 of 371

421
Driving your vehicle
1
2
3
4
5
6
7
8
9
Check the brake warning light by
turning the ignition switch ON (do not
start the engine). This light will be
illuminated when the parking brake is
applied with the ignition switch in the
START or ON position.
Before driving, be sure the parking
brake is fully released and the brake
warning light is off.If the brake warning light remains on
after the parking brake is released,
there may be a malfunction in the
brake system. Immediate attention is
necessary.
If at all possible, cease driving the
vehicle immediately. If that is not pos-
sible, use extreme caution while
operating the vehicle and only con-
tinue to drive the vehicle until you
can reach a safe location or repair
shop.
Parking on curbed streets
When parking your vehicle on an
uphill grade, park as close to the
curb as possible and turn the front
wheels away from the curb so that
the front wheels will contact the
curb if the vehicle moves back-
ward.
When parking your vehicle on a downhill grade, park as close to the
curb as possible and turn the front
wheels toward the curb so that the
front wheels will contact the curb if
the vehicle moves forward.
W-75
Page 171 of 371

Driving your vehicle
24
4
1
2
3
4
5
6
7
8
9
Power steering
Power Steering uses energy from the
engine to assist you in steering the
vehicle. If the engine is off or if the
power steering system becomes
inoperative, the vehicle may still be
steered, but it will require increased
steering effort.
Should you notice any change in the
effort required to steer during normal
vehicle operation, have the power
steering checked by an Authorized
Kia Dealer.
✽ ✽
NOTICE
• Never hold the steering wheel
against a stop (extreme right or
left turn) for more than 5 seconds
with the engine running. Holding
the steering wheel for more than 5
seconds in either position may
cause damage to the power steer-
ing pump.
• If the power steering drive belt breaks or if the power steering
pump malfunctions, the steering
effort will greatly increase.
✽ ✽
NOTICE
If the vehicle is parked for extended
periods outside in cold weather
(below -10°C/14°F), the power steer-
ing may require increased effort
when the engine is first started. This
is caused by increased fluid viscosity
due to the cold weather and does not
indicate a malfunction.
When this happens, increase the
engine RPM by depressing accelera-
tor until the RPM reaches 1,500 rpm
then release or let the engine idle for
two or three minutes to warm up the
fluid.
Tilt steering (if equipped)
A tilt steering wheel allows you to
adjust the steering wheel before you
drive.You can also raise it to the
highest level to give your legs more
room when you exit and enter the
vehicle.
The steering wheel should be posi-
tioned so that it is comfortable for
you to drive, while permitting you to
see the instrument panel warning
lights and gauges.
STEERING WHEEL
WARNING - Steering
wheel
Never adjust the angle of steering wheel while driving.
You may lose your steering
control and cause severe per-
sonal injury or accidents.
After adjusting, push the steering wheel both up and
down to be certain it is locked
in position.
Page 177 of 371

Driving your vehicle
30
4
1
2
3
4
5
6
7
8
9
The Electronic Stability Control
(ESC) monitors information from
various vehicle sensors and then
compares the driver's commands
with the actual behavior of the
vehicle.
If an unstable condition occurs - a
sudden evasive movement for
example - ESC intervenes within
fractions of a second via the engine
computer and brake system and
attempts to stabilize the vehicle.
ESC operation
ESC ON condition
ON, ESC and ESC OFF
indicator lights illuminate
for approximately 3 sec-
onds, then ESC is turned
on.
ton for at least half a sec-
ond after turning the igni-
tion ON to turn ESC off.
(ESC OFF indicator will
illuminate). To turn the
ESC on, press the ESC
OFF button (ESC OFF
indicator light will go off).
you may hear a slight tick-
ing sound. This is the ESC
performing an automatic
system self-check and
does not indicate a prob-
lem.
When operating
When the ESC is in opera-
tion, ESC indicator light
blinks.
Stability Control is operat-
ing properly, you can feel a
slight pulsation in the vehi-
cle. This is only the effect
of brake control and indi-
cates nothing unusual.
mud or slippery road,
pressing the accelerator
pedal may not cause the
engine rpm (revolutions
per minute) to increase.
ELECTRONIC STABILITY CONTROL (IF EQUIPPED)
-
ESC
6KMN2128