2010 KIA Sportage buttons
[x] Cancel search: buttonsPage 12 of 371
33
Knowing your vehicle
1
2
3
4
5
6
7
8
9
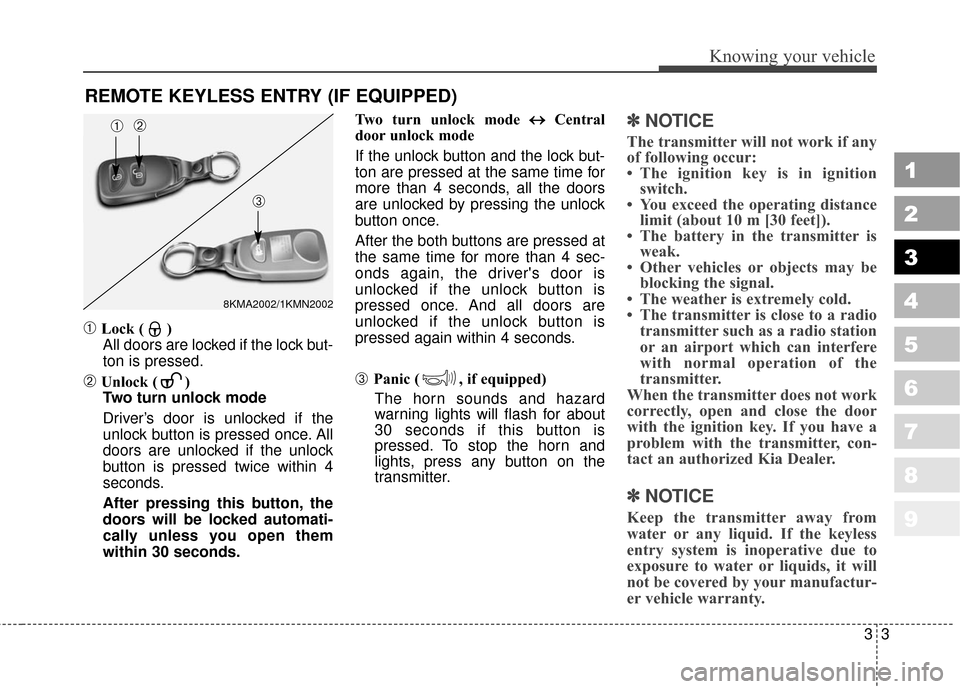
➀Lock ( )All doors are locked if the lock but-
ton is pressed.
➁Unlock ( ) Two turn unlock mode
Driver’s door is unlocked if the
unlock button is pressed once. All
doors are unlocked if the unlock
button is pressed twice within 4
seconds.
After pressing this button, the
doors will be locked automati-
cally unless you open them
within 30 seconds. Two turn unlock mode
↔ ↔
Central
door unlock mode
If the unlock button and the lock but-
ton are pressed at the same time for
more than 4 seconds, all the doors
are unlocked by pressing the unlock
button once.
After the both buttons are pressed at
the same time for more than 4 sec-
onds again, the driver's door is
unlocked if the unlock button is
pressed once. And all doors are
unlocked if the unlock button is
pressed again within 4 seconds.➂ Panic ( , if equipped)
The horn sounds and hazard
warning lights will flash for about
30 seconds if this button is
pressed. To stop the horn and
lights, press any button on the
transmitter.
✽ ✽ NOTICE
The transmitter will not work if any
of following occur:
• The ignition key is in ignition
switch.
• You exceed the operating distance limit (about 10 m [30 feet]).
• The battery in the transmitter is weak.
• Other vehicles or objects may be blocking the signal.
• The weather is extremely cold.
• The transmitter is close to a radio transmitter such as a radio station
or an airport which can interfere
with normal operation of the
transmitter.
When the transmitter does not work
correctly, open and close the door
with the ignition key. If you have a
problem with the transmitter, con-
tact an authorized Kia Dealer.
✽ ✽ NOTICE
Keep the transmitter away from
water or any liquid. If the keyless
entry system is inoperative due to
exposure to water or liquids, it will
not be covered by your manufactur-
er vehicle warranty.
REMOTE KEYLESS ENTRY (IF EQUIPPED)
8KMA2002/1KMN2002
➀➁
➂
Page 18 of 371
39
Knowing your vehicle
1
2
3
4
5
6
7
8
9
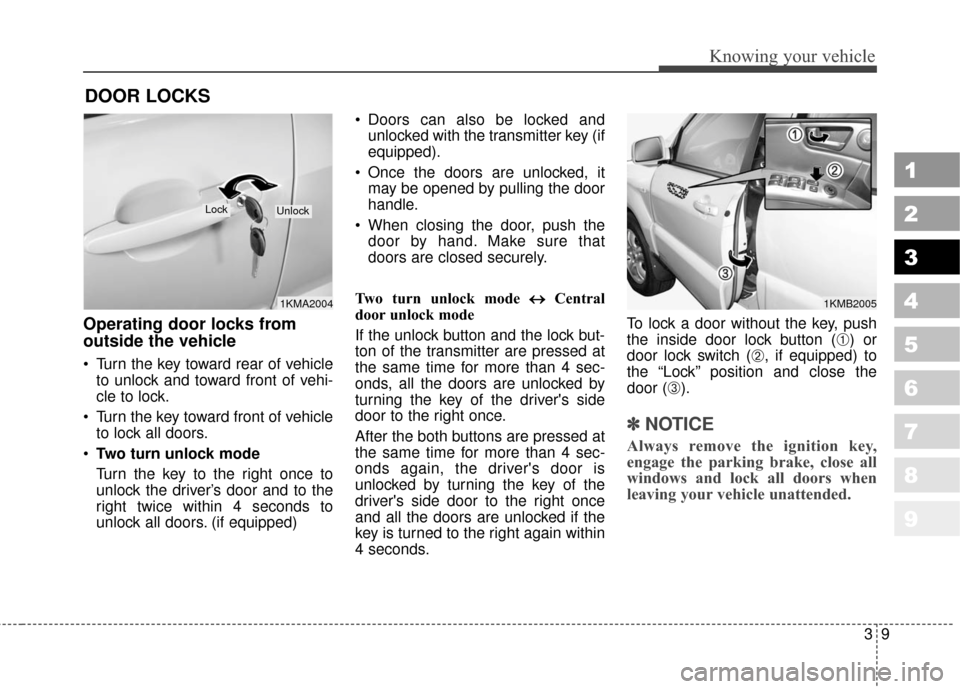
Operating door locks from
outside the vehicle
Turn the key toward rear of vehicleto unlock and toward front of vehi-
cle to lock.
Turn the key toward front of vehicle to lock all doors.
Two turn unlock mode
Turn the key to the right once to
unlock the driver’s door and to the
right twice within 4 seconds to
unlock all doors. (if equipped) Doors can also be locked and
unlocked with the transmitter key (if
equipped).
Once the doors are unlocked, it may be opened by pulling the door
handle.
When closing the door, push the door by hand. Make sure that
doors are closed securely.
Two turn unlock mode ↔ ↔
Central
door unlock mode
If the unlock button and the lock but-
ton of the transmitter are pressed at
the same time for more than 4 sec-
onds, all the doors are unlocked by
turning the key of the driver's side
door to the right once.
After the both buttons are pressed at
the same time for more than 4 sec-
onds again, the driver's door is
unlocked by turning the key of the
driver's side door to the right once
and all the doors are unlocked if the
key is turned to the right again within
4 seconds. To lock a door without the key, push
the inside door lock button (
➀) or
door lock switch (
➁, if equipped) to
the “Lock” position and close the
door (
➂).
✽ ✽ NOTICE
Always remove the ignition key,
engage the parking brake, close all
windows and lock all doors when
leaving your vehicle unattended.
DOOR LOCKS
1KMA2004
LockUnlock
1KMB2005
Page 106 of 371
397
1
2
3
4
5
6
7
8
9
Knowing your vehicle
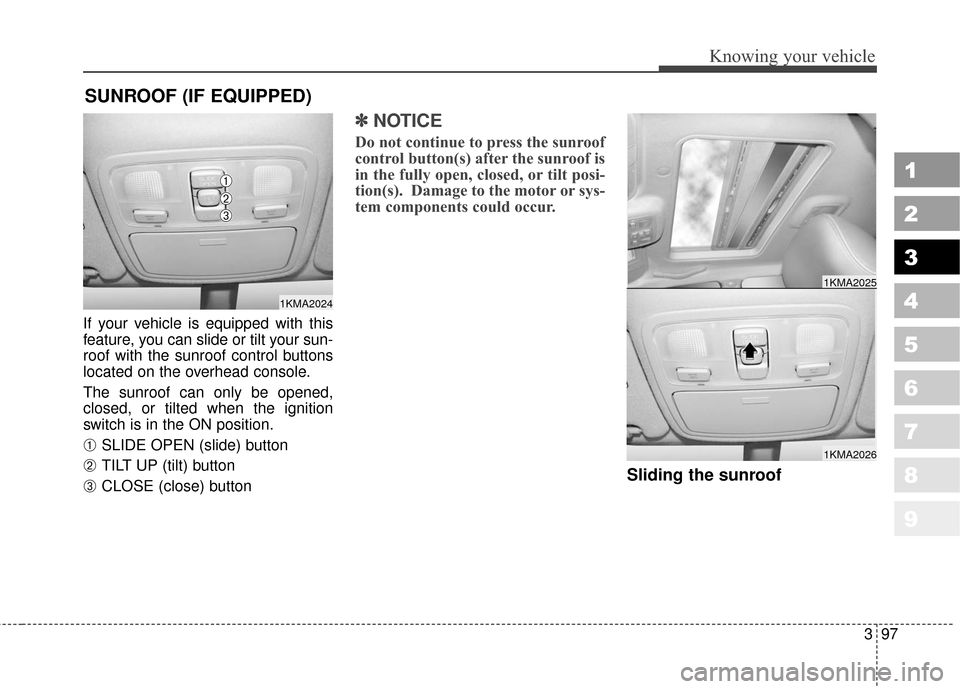
If your vehicle is equipped with this
feature, you can slide or tilt your sun-
roof with the sunroof control buttons
located on the overhead console.
The sunroof can only be opened,
closed, or tilted when the ignition
switch is in the ON position.
➀ SLIDE OPEN (slide) button
➁ TILT UP (tilt) button
➂ CLOSE (close) button
✽ ✽NOTICE
Do not continue to press the sunroof
control button(s) after the sunroof is
in the fully open, closed, or tilt posi-
tion(s). Damage to the motor or sys-
tem components could occur.
Sliding the sunroof
SUNROOF (IF EQUIPPED)
1KMA2024
➀
➁
➂
1KMA2026
1KMA2025
Page 120 of 371
3111
Knowing your vehicle
1
2
3
4
5
6
7
8
9
11. TUNE/ENTER Button
Turn this button clockwise by one
notch to increase frequency by
200KHz (AM: 10KHz) from current
frequency.
Turn this button counterclockwise by
one notch to decrease frequency by
200KHz (AM: 10KHz) from current
frequency.
Press this button while holding SET
UP button to activate / inactivate the
item to.
Select SET UP item using left and
right function of the Tune button.
12. Pre-set Selection Button
Push [1]~[6] buttons less than 0.8
second to play the channel saved in
each button.
Push pre-set button for 0.8 second or
longer to save current channel to the
respective button with a beep.
Page 130 of 371
3121
Knowing your vehicle
1
2
3
4
5
6
7
8
9
✽ ✽NOTICE -Using iPod device
• Some iPod models might not sup-
port the communication protocol
and the files will not be played.
(iPod models supported: Mini, 4G,
Photo, Nano, 5G)
• The order of search or playback of songs in the iPod can be different
from the order searched in the
audio system.
• If the iPod crashes due to its own trouble, reset iPod. (Reset: Refer
to iPod manual)
• iPod may not operate normally on low battery.CAUTION - Using iPod
device
You need the power cable exclusive for iPod in order tooperate iPod with the buttonson the audio system. The PCcable provided by Apple maycause malfunction and do notuse it for vehicle use.
When connecting the device with iPod cable, push in thejack fully not to interfere withcommunication.
When adjusting the sound effects of iPod and the audiosystem, the sound effects ofboth devices will overlap eachand might cause reduce ordistort the quality of thesound.
Deactivate (turn off) the equal- izer function of iPod whenadjusting the audio system’svolume, and turn off the equal-izer of the audio system whenusing the equalizer of iPod.
(Continued)
(Continued) When the iPod cable is con- nected, the system can beswitched to the AUX modeeven without the iPod deviceand can cause noise.Disconnect iPod cable whenyou are not using the iPoddevice.
Page 133 of 371
Knowing your vehicle
124
3
1
2
3
4
5
6
7
8
9
11. TUNE/ENTER Button
Turn this button clockwise by one
notch to increase frequency by
200kHz (AM: 10KHz) from current
frequency.
Turn this button counterclockwise by
one notch to decrease frequency by
200kHz (AM:10KHz) from current
frequency.
Press this button while holding SET
UP button to activate / inactivate the
item to.
Select SET UP item using left and
right function of the Tune button.
12. Pre-set Selection Button
Push [1]~[6] buttons less than 0.8 sec-
ond to play the channel saved in each
button.
Push pre-set button for 0.8 second or
longer to save current channel to the
respective button with a beep.
Page 143 of 371
Knowing your vehicle
134
3
1
2
3
4
5
6
7
8
9
✽ ✽
NOTICE - Using iPod device
• Some iPod models might not sup-
port the communication protocol
and the files will not be played.
(iPod models supported: Mini, 4G,
Photo, Nano, 5G)
• The order of search or playback of songs in the iPod can be different
from the order searched in the
audio system.
• If the iPod crashes due to its own trouble, reset iPod. (Reset: Refer
to iPod manual)
• iPod may not operate normally on low battery.CAUTION - Using iPod
device
You need the power cable exclusive for iPod in order tooperate iPod with the buttonson the audio system. The PCcable provided by Apple maycause malfunction and do notuse it for vehicle use.
When connecting the device with iPod cable, push in thejack fully not to interfere withcommunication.
When adjusting the sound effects of iPod and the audiosystem, the sound effects ofboth devices will overlap eachand might cause reduce ordistort the quality of thesound.
Deactivate (turn off) the equal- izer function of iPod whenadjusting the audio system’svolume, and turn off the equal-izer of the audio system whenusing the equalizer of iPod.
(Continued)
(Continued) When the iPod cable is con- nected, the system can beswitched to the AUX modeeven without the iPod deviceand can cause noise.Disconnect iPod cable whenyou are not using the iPoddevice.
Page 147 of 371
6. INFO Selection Button
Displays the information of the chan-
nel currently played by in the order of
CATEGORY NAME
➟ARTIST NAME
➟COMPOSER NAME➟CHANNEL
NAME
➟...(CAT /CH Selection)
Displays the information of the chan-
nel currently played in the order of
SONG TITLE
➟ARTIST NAME➟
COMPOSER NAME ➟... (CH/TITLE
Selection) (If there is no information
of COMPOSER NAME, it returns to
main display.)
7. SETUP Selection Button
Press this button to adjust to the
SCROLL, SDVC, SIRIUS and adjust-
ment modes.
If no action is taken for 5 seconds
after pressing the button, it will return
to the play mode. (After entering SET
UP mode, move between items
using the left, right and PUSH func-
tions of the TUNE button.)
The set up item changes from
SCROLL
➟ SDVC➟SIRIUS➟SCROLL
➟...
8. CAT/FOLDER Button
Press this button to turn to the
Category search mode. Turn the tune
knob to see available categories.
Press the tune button to go to the
desired category.
9. TUNE knob /ENTER Button
Turn this button clockwise by one
notch to increase the channel.
Turn this button counterclockwise by
one notch to decrease the channel.
Press this button while holding SET
UP button to activate / inactivate the
item to.
Select SET UP item using left and
right function of the Tune button.
10. Preset Selection Button
Push [1]~[6] buttons less than 0.8
second to play the channel saved in
each button.
Hold down the preset button for 0.8
second or longer to save current
channel to the respective button with
a beep.
Troubleshooting
1. Antenna Error
If this message is displayed, the
antenna or antenna cable is broken
or unplugged. Please consult with
your Kia dealership.
2. Acquiring Signal
If this message is displayed, it
means that the antenna is covered
and that the SIRIUS Satellite Radio
signal is not available. Ensure the
antenna is uncovered and has a
clear view of the sky.
9 8
7
6
5
4
3
2
1
3138
Knowing your vehicle