Page 2607 of 3039
Safety Belt System - Safety Belt Shoulder Height Adjuster
Removal and Installation
Removal
NOTE: Removal steps in this procedure may contain installation details. Published: 11-May-2011
1. Refer to: B-Pillar Upper Trim Panel (501-05 Interior Trim and Ornamentation, Removal and Installation).
2. Torque: 40 Nm
Installation
3. Torque: 25 Nm
1. To install, reverse the removal procedure.
Page 2708 of 3039

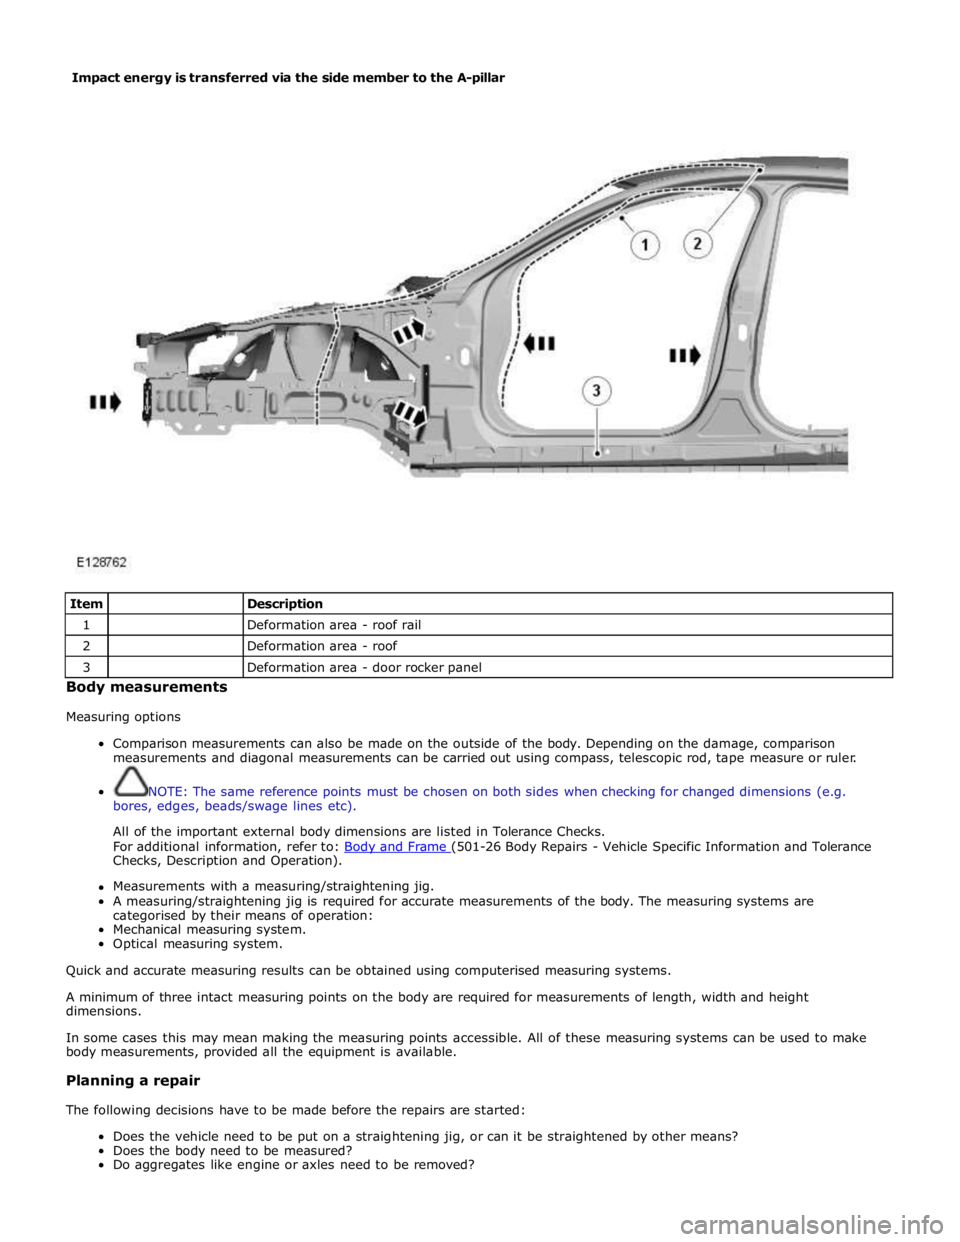
Item
Description 1
Deformation area - roof rail 2
Deformation area - roof 3
Deformation area - door rocker panel Body measurements
Measuring options
Comparison measurements can also be made on the outside of the body. Depending on the damage, comparison
measurements and diagonal measurements can be carried out using compass, telescopic rod, tape measure or ruler.
NOTE: The same reference points must be chosen on both sides when checking for changed dimensions (e.g.
bores, edges, beads/swage lines etc).
All of the important external body dimensions are listed in Tolerance Checks.
For additional information, refer to: Body and Frame (501-26 Body Repairs - Vehicle Specific Information and Tolerance Checks, Description and Operation).
Measurements with a measuring/straightening jig.
A measuring/straightening jig is required for accurate measurements of the body. The measuring systems are
categorised by their means of operation:
Mechanical measuring system.
Optical measuring system.
Quick and accurate measuring results can be obtained using computerised measuring systems.
A minimum of three intact measuring points on the body are required for measurements of length, width and height
dimensions.
In some cases this may mean making the measuring points accessible. All of these measuring systems can be used to make
body measurements, provided all the equipment is available.
Planning a repair
The following decisions have to be made before the repairs are started:
Does the vehicle need to be put on a straightening jig, or can it be straightened by other means?
Does the body need to be measured?
Do aggregates like engine or axles need to be removed? Impact energy is transferred via the side member to the A-pillar
Page 2716 of 3039

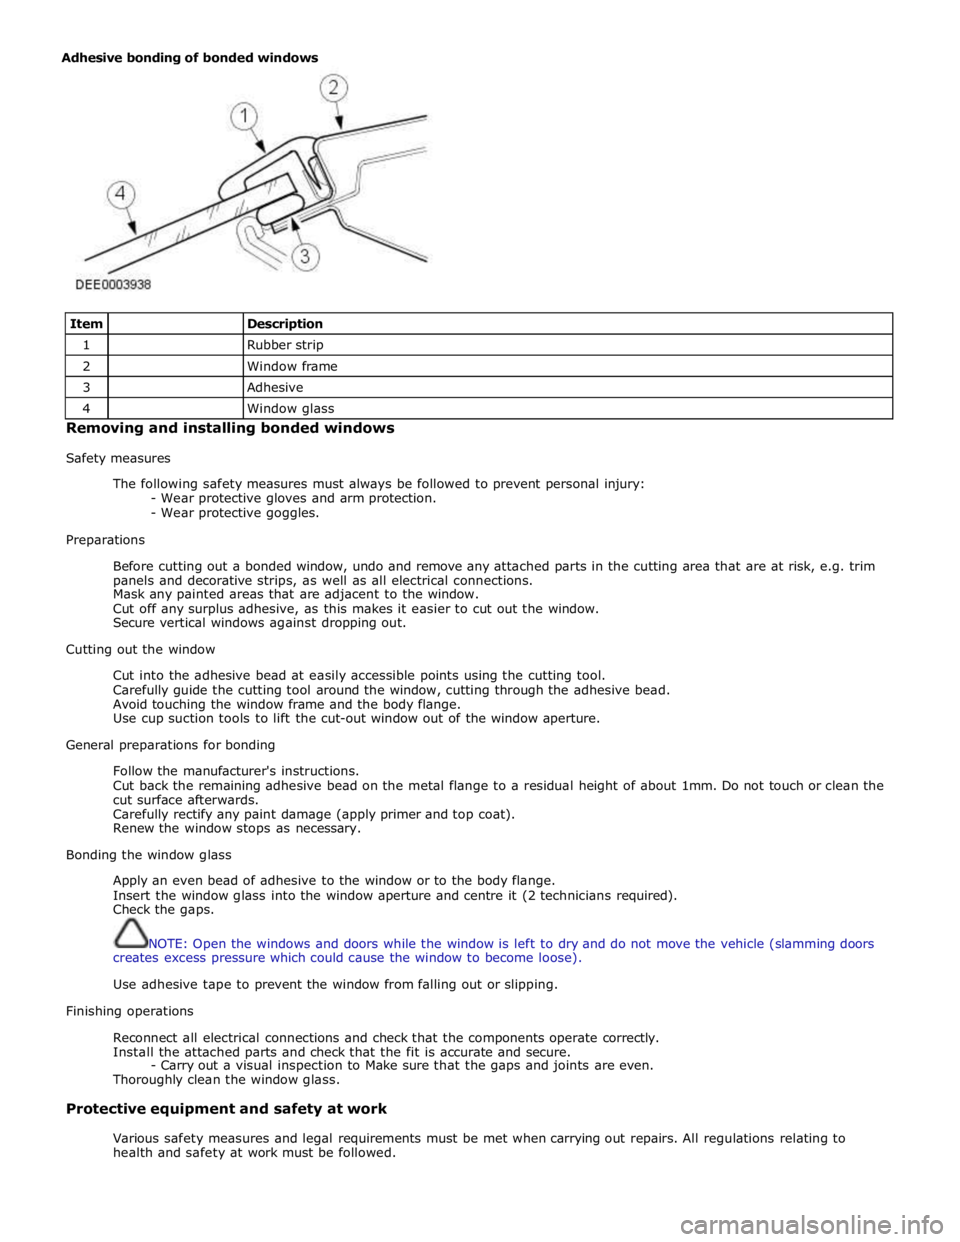
Item
Description 1
Rubber strip 2
Window frame 3
Adhesive 4
Window glass Removing and installing bonded windows
Safety measures
The following safety measures must always be followed to prevent personal injury:
- Wear protective gloves and arm protection.
- Wear protective goggles.
Preparations
Before cutting out a bonded window, undo and remove any attached parts in the cutting area that are at risk, e.g. trim
panels and decorative strips, as well as all electrical connections.
Mask any painted areas that are adjacent to the window.
Cut off any surplus adhesive, as this makes it easier to cut out the window.
Secure vertical windows against dropping out.
Cutting out the window
Cut into the adhesive bead at easily accessible points using the cutting tool.
Carefully guide the cutting tool around the window, cutting through the adhesive bead.
Avoid touching the window frame and the body flange.
Use cup suction tools to lift the cut-out window out of the window aperture.
General preparations for bonding
Follow the manufacturer's instructions.
Cut back the remaining adhesive bead on the metal flange to a residual height of about 1mm. Do not touch or clean the
cut surface afterwards.
Carefully rectify any paint damage (apply primer and top coat).
Renew the window stops as necessary.
Bonding the window glass
Apply an even bead of adhesive to the window or to the body flange.
Insert the window glass into the window aperture and centre it (2 technicians required).
Check the gaps.
NOTE: Open the windows and doors while the window is left to dry and do not move the vehicle (slamming doors
creates excess pressure which could cause the window to become loose).
Use adhesive tape to prevent the window from falling out or slipping.
Finishing operations
Reconnect all electrical connections and check that the components operate correctly.
Install the attached parts and check that the fit is accurate and secure.
- Carry out a visual inspection to Make sure that the gaps and joints are even.
Thoroughly clean the window glass.
Protective equipment and safety at work
Various safety measures and legal requirements must be met when carrying out repairs. All regulations relating to
health and safety at work must be followed. Adhesive bonding of bonded windows