Page 813 of 3039

Component Tests
Engine Oil Leaks
NOTE: Before installing new gaskets or oil seals, make sure that the fault is clearly established.
If the oil leak cannot be identified clearly by a visual inspection, carry out an Ultraviolet test:
Fluorescent Oil Additive Method
1. Clean the engine with a suitable cleaning fluid (brake cleaner).
2. Drain the engine oil and refill with recommended oil, premixed with Diesel Engine Oil Dye or equivalent. Use a minimum
14.8 ml (0.5 ounce) to a maximum 29.6 ml (1 ounce) of fluorescent additive to all engines. If oil is not premixed,
fluorescent additive must first be added to the crankcase.
3. Run engine for 15 minutes. Stop the engine and inspect all seal and gasket areas for leaks using a 12 Volt Master UV
Diagnostic Inspection Kit or equivalent. A clear bright yellow or orange area will identify leak. For extremely small
leaks, several hours may be required for the leak to appear.
4. As necessary, pressurize the main oil gallery system to locate leaks due to incorrectly sealed, loose or cocked plugs. If
the flywheel bolts leak oil, look for sealer on the threads.
5. Repair all leaks as necessary.
Compression Test General Remarks
NOTES:
Removing fuses and disconnecting electrical components may cause the Engine Control Module (ECM) to log Diagnostic
Trouble Codes (DTCs). After the measurements have been carried out, DTCs should be cleared from memory by connecting to
the Manufacturer Approved Diagnostic System.
Only check the compression pressure with the valves set to the prescribed clearance (if this can be adjusted).
The compression pressure should be checked with the engine at normal operating temperature.
Check the Compression Pressure
WARNING: Move gear selector lever to 'P' position. Failure to follow this instruction may result in personal injury.
1. Remove the fuel pump relay.
2. Start the engine - the engine will start, run for a few seconds then stall.
3. Remove the spark plugs.
4. Install the compression tester.
5. Install an auxiliary starter switch in the starting circuit. With the ignition switch OFF, using the auxiliary starter switch,
crank the engine a minimum of five compression strokes and record the highest reading. Note the approximate number
of compression strokes required to obtain the highest reading.
6. Repeat the test on each cylinder, cranking the engine approximately the same number of compression strokes.
7. Install the removed components in reverse order, observing the specified tightening torques.
8. Clear all DTCs from the ECM.
Interpretation of the Results
NOTE: Due to the possibility of loose carbon that has become trapped between the valve face and seat effecting the
pressure readings, when carrying out a compression test and cylinders are found to have low pressures, install the spark plugs,
road test the vehicle and re-test the suspect cylinders. If the correct pressures are restored, no further action is required.
The indicated compression pressures are considered within specification if the lowest reading cylinder is within 75% of the
highest reading.
If the cylinder pressures are found to be low, carry out a leakdown test to determine the location of the fault (if any leakback
can be heard through the engine breather system suspect the piston rings, if any leakback can be heard through the inlet
system suspect the inlet valve or seat, if any leakback can be heard through the exhaust manifold suspect the exhaust valve
or seat. If the measurements for two cylinders next to each other are both too low then it is very likely that the cylinder head
gasket between them is burnt through. This can also be recognized by traces of engine oil in the coolant and/or coolant in the
Page 858 of 3039

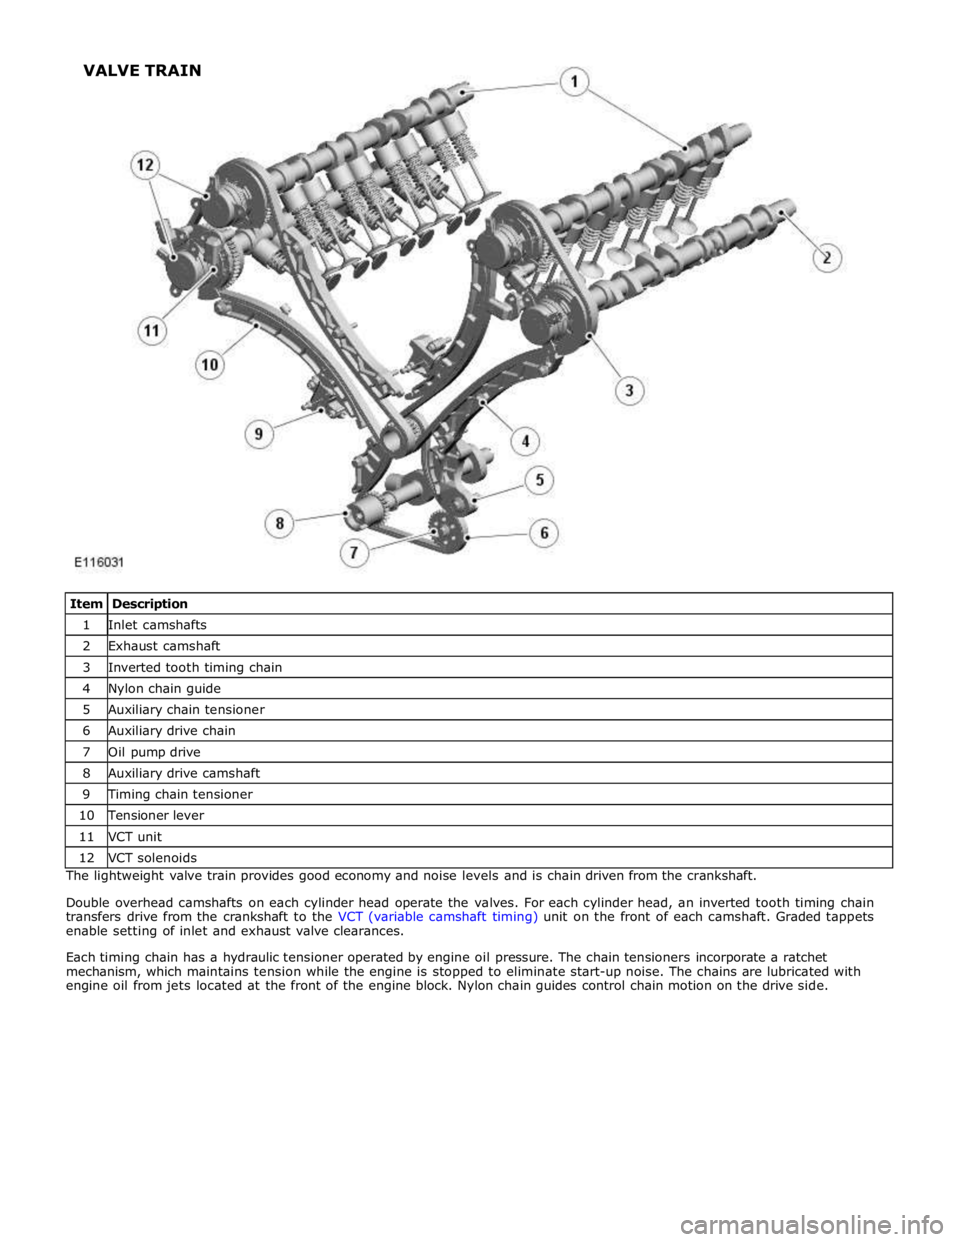
1 Inlet camshafts 2 Exhaust camshaft 3 Inverted tooth timing chain 4 Nylon chain guide 5 Auxiliary chain tensioner 6 Auxiliary drive chain 7 Oil pump drive 8 Auxiliary drive camshaft 9 Timing chain tensioner 10 Tensioner lever 11 VCT unit 12 VCT solenoids The lightweight valve train provides good economy and noise levels and is chain driven from the crankshaft.
Double overhead camshafts on each cylinder head operate the valves. For each cylinder head, an inverted tooth timing chain
transfers drive from the crankshaft to the VCT (variable camshaft timing) unit on the front of each camshaft. Graded tappets
enable setting of inlet and exhaust valve clearances.
Each timing chain has a hydraulic tensioner operated by engine oil pressure. The chain tensioners incorporate a ratchet
mechanism, which maintains tension while the engine is stopped to eliminate start-up noise. The chains are lubricated with
engine oil from jets located at the front of the engine block. Nylon chain guides control chain motion on the drive side. VALVE TRAIN
Page 871 of 3039
Engine - V8 S/C 5.0L Petrol - Engine Oil Draining and Filling
General Procedures
Draining Published: 11-May-2011
WARNING: The spilling of hot engine oil is unavoidable during this procedure, care must be taken to prevent scalding.
CAUTION: Correct installation of the oil filler cap can be obtained by tightening the cap until hard stop.
NOTE: Clean the components general area prior to dismantling.
1. CAUTION: Make sure the engine is warm.
Start the engine and allow to run for 10 minutes, stop the engine.
2.
3. Refer to: Engine Cover - V8 5.0L Petrol/V8 S/C 5.0L Petrol (501-05 Interior Trim and Ornamentation, Removal and Installation).
4.
Loosen the element cover 4 complete turns to allow
engine oil to drain from the filter cover.
Make sure that the O-ring seal is exposed.
5. NOTE: Allow 10 minutes for the engine oil to drain from the oil filter
housing. www.JagDocs.com
Page 874 of 3039
Refer to: Specifications (303-01D Engine - V8 S/C 5.0L Petrol, Specifications).
Clean any residual engine oil from the oil filler cap area.
6.
7. CAUTION: Make sure that the vehicle has been left for 5 minutes
from filling with oil.
Follow the Steps 9-13 before starting the engine.
8.
Start the engine and allow to run for 10 minutes, stop the
engine.
Check for leaks.
9. CAUTIONS:
Make sure that the selector lever and the gearshift mechanism are
in the park (P) position.
Make sure that the hood is open.
Turn the ignition on.
Page 878 of 3039
Published: 11-May-2011
Engine - V8 S/C 5.0L Petrol - Engine Oil Vacuum Draining and Filling
General Procedures
Special Tool(s)
303-1484
Vacuum Pump, Oil Drain
303-1484-01
Adapter for 303-1484
Draining
WARNING: The spilling of hot engine oil is unavoidable during this procedure, care must be taken to prevent scalding.
CAUTION: Correct installation of the oil filler cap can be obtained by tightening the cap until hard stop.
NOTES:
Make sure that the vehicle is parked on level ground.
Clean the components general area prior to dismantling.
1.
Start the engine and allow to run for 10 minutes, stop the
engine.
2. CAUTION: Allow 10 minutes from turning the engine off
before starting oil extraction.
3. Refer to: Engine Cover - V8 5.0L Petrol/V8 S/C 5.0L Petrol (501-05 Interior Trim and Ornamentation, Removal and Installation).
Page 881 of 3039
Specifications).
Clean any residual engine oil from the oil filler cap area.
4.
5. CAUTION: Make sure that the vehicle has been left for 5 minutes
from filling with oil.
Follow the Steps 7-11 before starting the engine.
6.
Start the engine and allow to run for 10 minutes, stop the
engine.
Check for leaks.
7. CAUTIONS:
Make sure that the selector lever and the gearshift mechanism are
in the park (P) position.
Make sure that the hood is open.
Turn the ignition on. www.JagDocs.com
Page 889 of 3039

17.
18. Torque: 10 Nm
NOTE: Install a new sealing washer.
Torque: 24 Nm
19.
20. Refer to: Battery Disconnect and Connect (414-01 Battery, Mounting and Cables, General Procedures).
CAUTION: Make sure that the vehicle is left for 5 minutes from filling with oil and
that the engine oil level is reading at least minimum (by following Steps 23-27), before
starting the engine.
Fill the engine with oil - for filling values on vehicles without supercharger:
Refer to: Specifications (303-01C Engine - V8 5.0L Petrol, Specifications). Fill the engine with oil - for filling values on vehicles with supercharger:
Refer to: Specifications (303-01D Engine - V8 S/C 5.0L Petrol, Specifications). Clean any residual engine oil from the oil filler cap area.
21.
oil. CAUTION: Make sure that the vehicle has been left for 5 minutes from filling with
Follow the Steps 23-27 before starting the engine.
22.
Start the engine and allow to run for 10 minutes, stop the engine.
Check for leaks.
23. CAUTIONS:
Make sure that the selector lever and the gearshift mechanism are in the park (P)
position.
Make sure that the hood is open.
Turn the ignition on.
Page 896 of 3039
Refer to: Specifications (303-01D Engine - V8 S/C 5.0L Petrol, Specifications).
Clean any residual engine oil from the oil filler cap area.
13. CAUTION: Make sure that the vehicle has been left for 5 minutes
from filling with oil.
Follow the Steps 15-19 before starting the engine.
14.
Start the engine and allow to run for 10 minutes, stop the
engine.
Check for leaks.
15. CAUTIONS:
Make sure that the selector lever and the gearshift mechanism are
in the park (P) position.
Make sure that the hood is open.
Turn the ignition on.
16.
Scroll through the trip menu to access the engine oil
level display. www.JagDocs.com