Page 314 of 3039
6. NOTES:
Do not allow the tie-rod end or steering gear boot to twist
when the tie-rod is rotated.
Left-hand, shown right-hand similar.
Rotate the tie-rod to adjust the toe.
Vehicles requiring camber adjustment
7. NOTE: Left-hand shown, right-hand similar.
Loosen the rear lower arm lock nut.
8. NOTE: Left-hand shown, right-hand similar.
Rotate the camber adjustment cam bolt to adjust the camber.
9. Check the camber and toe settings. Follow the equipment manufacturer's
instructions. Adjust as necessary.
Page 346 of 3039

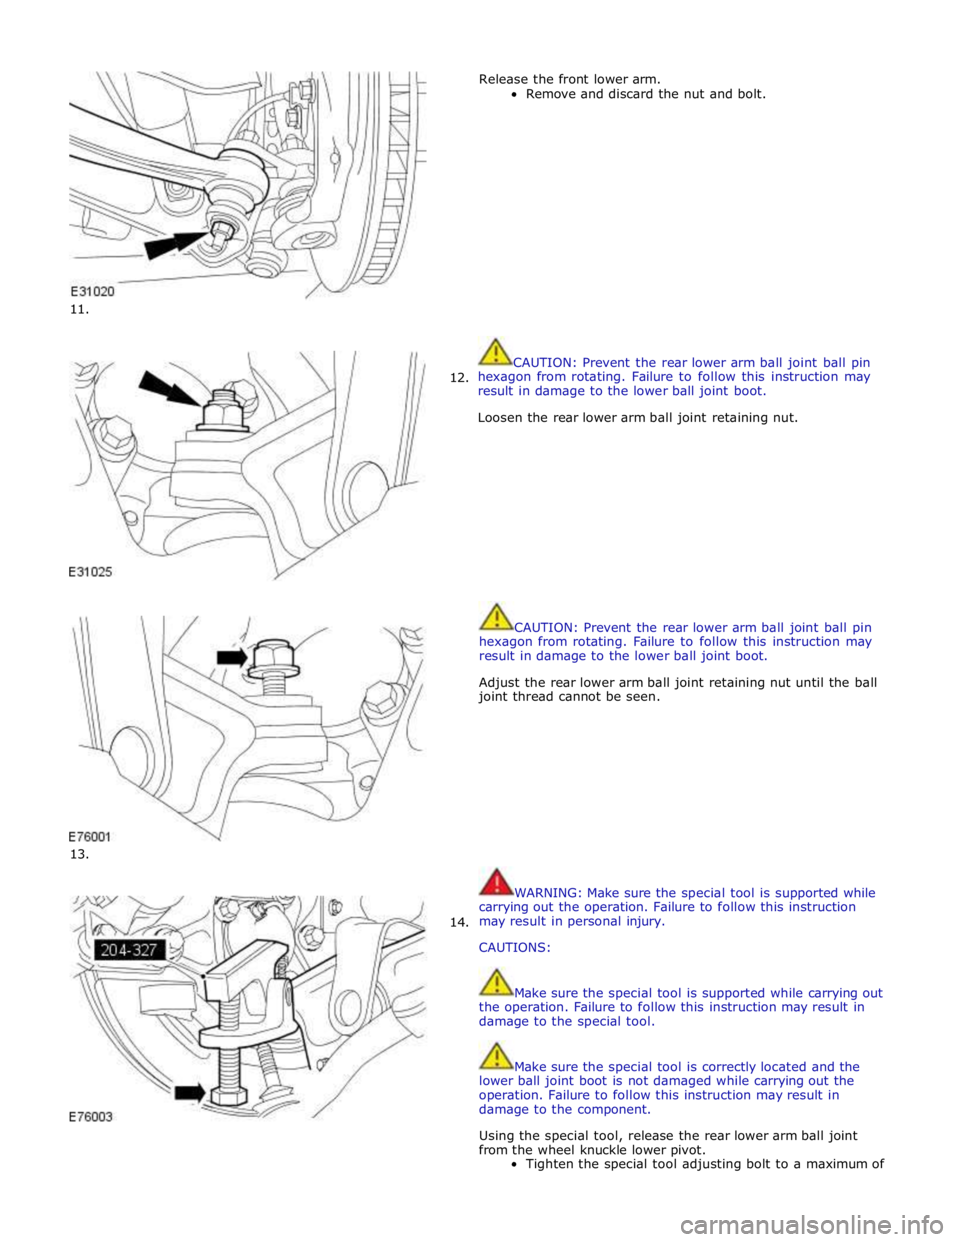
11.
12.
13.
14. Release the front lower arm.
Remove and discard the nut and bolt.
CAUTION: Prevent the rear lower arm ball joint ball pin
hexagon from rotating. Failure to follow this instruction may
result in damage to the lower ball joint boot.
Loosen the rear lower arm ball joint retaining nut.
CAUTION: Prevent the rear lower arm ball joint ball pin
hexagon from rotating. Failure to follow this instruction may
result in damage to the lower ball joint boot.
Adjust the rear lower arm ball joint retaining nut until the ball
joint thread cannot be seen.
WARNING: Make sure the special tool is supported while
carrying out the operation. Failure to follow this instruction
may result in personal injury.
CAUTIONS:
Make sure the special tool is supported while carrying out
the operation. Failure to follow this instruction may result in
damage to the special tool.
Make sure the special tool is correctly located and the
lower ball joint boot is not damaged while carrying out the
operation. Failure to follow this instruction may result in
damage to the component.
Using the special tool, release the rear lower arm ball joint
from the wheel knuckle lower pivot.
Tighten the special tool adjusting bolt to a maximum of
Page 347 of 3039

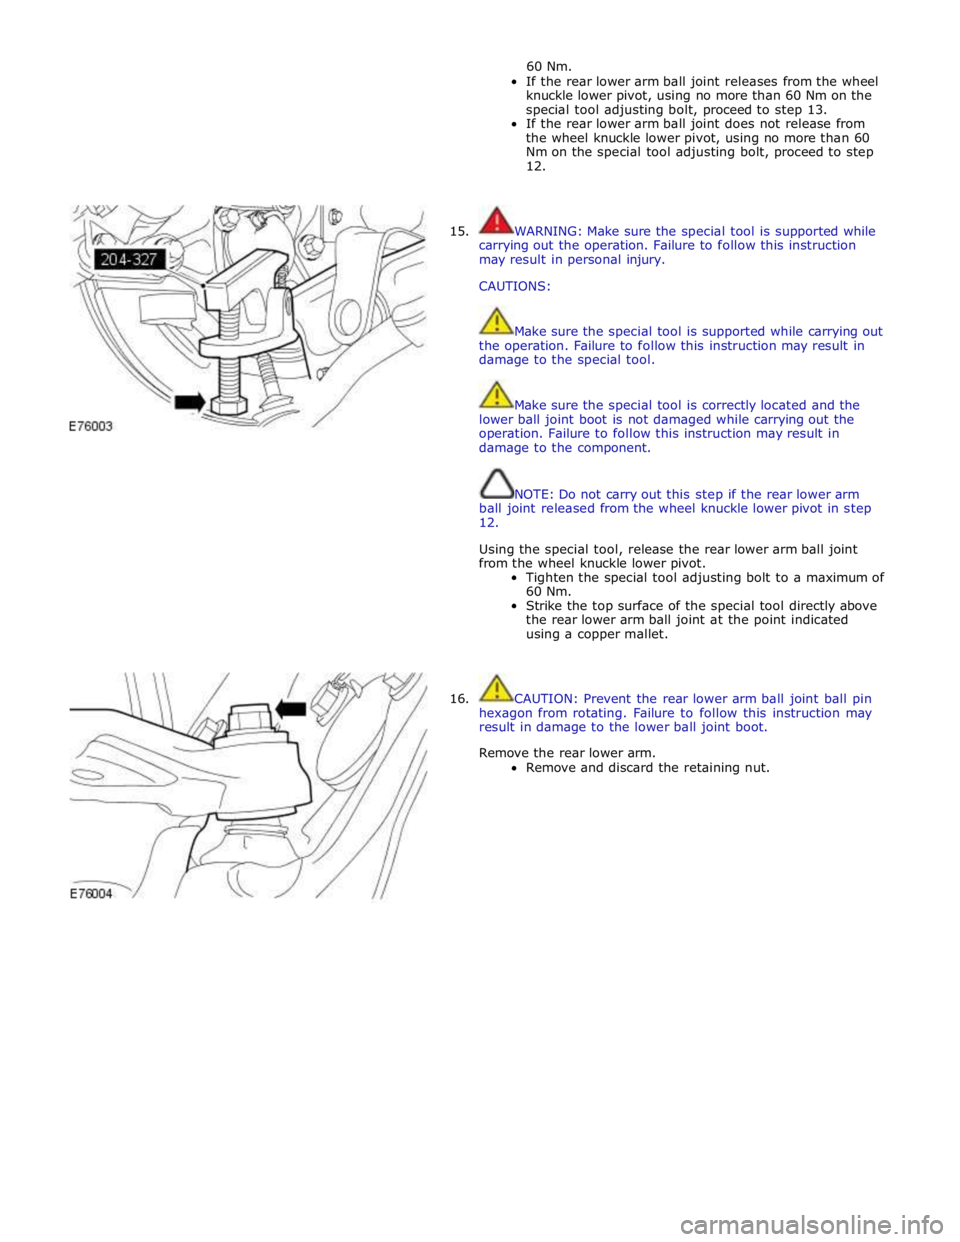
60 Nm.
If the rear lower arm ball joint releases from the wheel
knuckle lower pivot, using no more than 60 Nm on the
special tool adjusting bolt, proceed to step 13.
If the rear lower arm ball joint does not release from
the wheel knuckle lower pivot, using no more than 60
Nm on the special tool adjusting bolt, proceed to step
12.
15. WARNING: Make sure the special tool is supported while
carrying out the operation. Failure to follow this instruction
may result in personal injury.
CAUTIONS:
Make sure the special tool is supported while carrying out
the operation. Failure to follow this instruction may result in
damage to the special tool.
Make sure the special tool is correctly located and the
lower ball joint boot is not damaged while carrying out the
operation. Failure to follow this instruction may result in
damage to the component.
NOTE: Do not carry out this step if the rear lower arm
ball joint released from the wheel knuckle lower pivot in step
12.
Using the special tool, release the rear lower arm ball joint
from the wheel knuckle lower pivot.
Tighten the special tool adjusting bolt to a maximum of
60 Nm.
Strike the top surface of the special tool directly above
the rear lower arm ball joint at the point indicated
using a copper mallet.
16. CAUTION: Prevent the rear lower arm ball joint ball pin
hexagon from rotating. Failure to follow this instruction may
result in damage to the lower ball joint boot.
Remove the rear lower arm.
Remove and discard the retaining nut.
Page 348 of 3039
Installation
1. WARNING: Make sure that a new lower arm ball joint nut
is installed.
CAUTION: Prevent the rear lower arm ball joint ball pin
hexagon from rotating. Failure to follow this instruction may
result in damage to the lower ball joint boot.
Install the rear lower arm.
Tighten the nut to 92 Nm.
2. NOTE: Install a new retaining nut and bolt.
Secure the front lower arm.
Stage 1: Tighten to 60 Nm.
Stage 2: Tighten to a further 135 degrees.
3. Secure the rear lower arm.
Install the rear lower arm inner retaining nut, but do
not tighten fully at this stage.
4. Install the shock absorber and spring assembly.
Tighten the bolt to 175 Nm. www.JagDocs.com
Page 355 of 3039
3. NOTE: Take note of the fitted position of the bush. Using
the special tools, remove the shock absorber bushing.
Installation
1. NOTE: Make sure the shock absorber bushing boot is
correctly located into the special tool.
Install the bushing into the special tool.
2. NOTE: Align to the position noted on removal.
Using the special tools, install the shock absorber bushing.
3. Install the rear lower arm.
For additional information, refer to: Rear Lower Arm (204-01 Front Suspension, Removal and Installation).
Page 575 of 3039
Rear Drive Halfshafts - Inner Constant Velocity (CV) Joint Boot
Removal and Installation
Removal Published: 11-May-2011
1. WARNING: Do not work on or under a vehicle supported only by a
jack. Always support the vehicle on safety stands.
Raise and support the vehicle.
2. Remove the rear halfshaft.
For additional information, refer to: Rear Halfshaft - TDV6 3.0L Diesel /V8 5.0L Petrol/V8 S/C 5.0L Petrol (205-05 Rear Drive Halfshafts, Removal and Installation).
3. CAUTION: Use suitable protective covers to protect the halfshaft.
Using a suitable clamp, secure the rear halfshaft.
4. CAUTION: Make sure the inner constant velocity (CV)
joint is not separated from the halfshaft.
Remove and discard the inner CV joint boot retaining clip.
5. CAUTION: Make sure the CV joint ball bearings do not
drop out of the CV joint.
Using a suitable tool, remove the inner CV joint. www.JagDocs.com
Page 576 of 3039
6. Remove the inner CV joint boot.
Remove and discard the retaining clip.
Installation
1. NOTE: Make sure that the protective sleeve is
correctly installed, prior to installing the CV joint boot.
2. NOTE: Install a new retaining clip.
Page 577 of 3039
3. CAUTIONS:
Only use lubricants meeting the Jaguar specification.
Make sure the CV joint ball bearings do not drop out
of the CV joint.
NOTE: Clean the constant velocity (CV) joint,
removing as much of the old grease as possible.
Install the inner CV joint.
Fill the CV joint with 40 grams of grease.
Fill the CV joint boot with 100 grams of grease.
4. CAUTIONS:
Make sure the CV joint is not separated from the
halfshaft.
Make sure enough air is present in the CV boot.
Install a new retaining clip.
5. Install a new retaining clip.
6. Remove the rear halfshaft from the clamp.