2010 INFINITI QX56 tow
[x] Cancel search: towPage 2900 of 4210
![INFINITI QX56 2010 Factory Service Manual PCS
IPDM E/R (INTELLIGENT POWER DISTRIBUTION MODULE ENGINE ROOM)
PCS-25
< ECU DIAGNOSIS > [IPDM E/R]
C
D
E
F
G H
I
J
K L
B A
O P
N
43 L/Y Wiper auto stop signal Input
ON or
START Wiper switch OFF, LO INFINITI QX56 2010 Factory Service Manual PCS
IPDM E/R (INTELLIGENT POWER DISTRIBUTION MODULE ENGINE ROOM)
PCS-25
< ECU DIAGNOSIS > [IPDM E/R]
C
D
E
F
G H
I
J
K L
B A
O P
N
43 L/Y Wiper auto stop signal Input
ON or
START Wiper switch OFF, LO](/manual-img/42/57032/w960_57032-2899.png)
PCS
IPDM E/R (INTELLIGENT POWER DISTRIBUTION MODULE ENGINE ROOM)
PCS-25
< ECU DIAGNOSIS > [IPDM E/R]
C
D
E
F
G H
I
J
K L
B A
O P
N
43 L/Y Wiper auto stop signal Input
ON or
START Wiper switch OFF, LO, INT Battery voltage
44 BR Daytime light relay
control
(Canada only) Input ONDaytime light system active
0V
Daytime light system inactive Battery voltage
45 G/W Horn relay control Input ON When door locks are operated
using Intelligent Key (OFF
→
ON)* Battery voltage
→ 0V
46 GR Fuel pump relay con-
trol Input —Ignition switch ON or START
0V
Ignition switch OFF or ACC Battery voltage
47 O Throttle control motor
relay control Input —Ignition switch ON or START
0V
Ignition switch OFF or ACC Battery voltage
48 B/R Starter relay (inhibit
switch) Input
ON or
START Selector lever in "P" or "N"
0V
Selector lever any other posi-
tion Battery voltage
49 R/L Trailer tow relay
(With trailer tow)
Illumination
(Without trailer tow) Output ONLighting
switch must
be in the 1st
position OFF
0V
ON Battery voltage
50 W/R Front fog lamp (LH) Output ON or
START Lighting
switch must
be in the 2nd
position
(LOW beam
is ON) and
the front fog
lamp switch OFF
0V
ON Battery voltage
51 W/R Front fog lamp (RH) Output ON or
START Lighting
switch must
be in the 2nd
position
(LOW beam
is ON) and
the front fog
lamp switch OFF
0V
ON Battery voltage
52 L LH low beam head-
lamp
Output — Lighting switch in 2nd position Battery voltage
54 R/Y RH low beam head-
lamp Output — Lighting switch in 2nd position Battery voltage
55 G LH high beam head-
lamp Output —Lighting switch in 2nd position
and placed in HIGH or PASS
position Battery voltage
56 Y
(With
DTRL)
L/W
(Without DTRL) RH high beam head-
lamp
Output —Lighting switch in 2nd position
and placed in HIGH or PASS
position
Battery voltage
57 R/LPa
rking, license, and
tail lamp Output ONLighting
switch 1st po-
sition OFF
0V
ON Battery voltage
59 B Ground Input ——0V
Te r m i n a l
Wire
color Signal name Signal
input/
output Measuring condition
Reference value(Approx.)
Igni-
tion
switch Operation or condition
Revision: April 20092010 QX56
Page 2901 of 4210
![INFINITI QX56 2010 Factory Service Manual PCS-26
< ECU DIAGNOSIS >[IPDM E/R]
IPDM E/R (INTELLIGENT POWER DI
STRIBUTION MODULE ENGINE ROOM)
*: When horn reminder is ON60 B/W
Rear window defog-
ger relay
OutputON or
START Rear defogger switch INFINITI QX56 2010 Factory Service Manual PCS-26
< ECU DIAGNOSIS >[IPDM E/R]
IPDM E/R (INTELLIGENT POWER DI
STRIBUTION MODULE ENGINE ROOM)
*: When horn reminder is ON60 B/W
Rear window defog-
ger relay
OutputON or
START Rear defogger switch](/manual-img/42/57032/w960_57032-2900.png)
PCS-26
< ECU DIAGNOSIS >[IPDM E/R]
IPDM E/R (INTELLIGENT POWER DI
STRIBUTION MODULE ENGINE ROOM)
*: When horn reminder is ON60 B/W
Rear window defog-
ger relay
OutputON or
START Rear defogger switch ON
Battery voltage
Rear defogger switch OFF 0V
61 BR Fuse 32
(With trailer tow) Output OFF
—Battery voltage
Te r m i n a l
Wire
color Signal name Signal
input/
output Measuring condition
Reference value(Approx.)
Igni-
tion
switch Operation or condition
Revision: April 20092010 QX56
Page 2953 of 4210

PG
HARNESSPG-43
< COMPONENT DIAGNOSIS >
C
DE
F
G H
I
J
K L
B A
O P
N
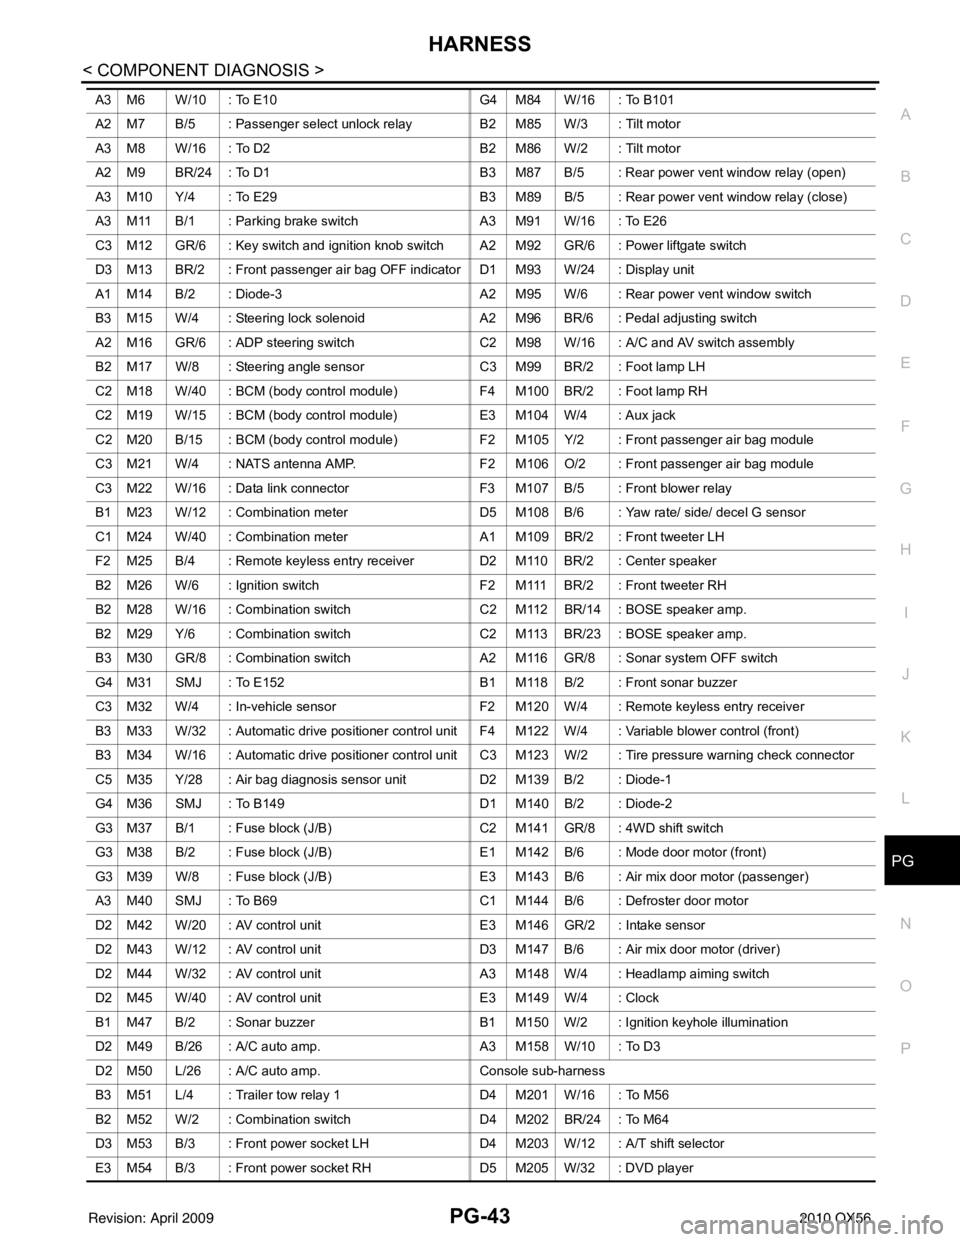
A3 M6 W/10 : To E10
G4 M84 W/16 : To B101
A2 M7 B/5 : Passenger select unlock relay B2 M85 W/3 : Tilt motor
A3 M8 W/16 : To D2 B2 M86 W/2 : Tilt motor
A2 M9 BR/24 : To D1 B3 M87 B/5 : Rear power vent window relay (open)
A3 M10 Y/4 : To E29 B3 M89 B/5 : Rear power vent window relay (close)
A3 M11 B/1 : Parking brake switch A3 M91 W/16 : To E26
C3 M12 GR/6 : Key switch and ignition knob switch A2 M92 GR/6 : Power liftgate switch
D3 M13 BR/2 : Front passenger air bag OFF indicator D1 M93 W/24 : Display unit
A1 M14 B/2 : Diode-3 A2 M95 W/6 : Rear power vent window switch
B3 M15 W/4 : Steering lock solenoid A2 M96 BR/6 : Pedal adjusting switch
A2 M16 GR/6 : ADP steering switch C2 M98 W/16 : A/C and AV switch assembly
B2 M17 W/8 : Steering angle sensor C3 M99 BR/2 : Foot lamp LH
C2 M18 W/40 : BCM (body control module) F4 M100 BR/2 : Foot lamp RH
C2 M19 W/15 : BCM (body control module) E3 M104 W/4 : Aux jack
C2 M20 B/15 : BCM (body control module) F2 M105 Y/2 : Front passenger air bag module
C3 M21 W/4 : NATS antenna AMP. F2 M106 O/2 : Front passenger air bag module
C3 M22 W/16 : Data link connector F3 M107 B/5 : Front blower relay
B1 M23 W/12 : Combination meter D5 M108 B/6 : Yaw rate/ side/ decel G sensor
C1 M24 W/40 : Combination meter A1 M109 BR/2 : Front tweeter LH
F2 M25 B/4 : Remote keyless entry receiver D2 M110 BR/2 : Center speaker
B2 M26 W/6 : Ignition switch F2 M111 BR/2 : Front tweeter RH
B2 M28 W/16 : Combination switch C2 M112 BR/14 : BOSE speaker amp.
B2 M29 Y/6 : Combination switch C2 M113 BR/23 : BOSE speaker amp.
B3 M30 GR/8 : Combination switch A2 M116 GR/8 : Sonar system OFF switch
G4 M31 SMJ : To E152 B1 M118 B/2 : Front sonar buzzer
C3 M32 W/4 : In-vehicle sensor F2 M120 W/4 : Remote keyless entry receiver
B3 M33 W/32 : Automatic drive positioner control unit F4 M122 W/4 : Variable blower control (front)
B3 M34 W/16 : Automatic drive positioner control unit C3 M123 W/2 : Tire pressure warning check connector
C5 M35 Y/28 : Air bag diagnosis sensor unit D2 M139 B/2 : Diode-1
G4 M36 SMJ : To B149 D1 M140 B/2 : Diode-2
G3 M37 B/1 : Fuse block (J/B) C2 M141 GR/8 : 4WD shift switch
G3 M38 B/2 : Fuse block (J/B) E1 M142 B/6 : Mode door motor (front)
G3 M39 W/8 : Fuse block (J/B) E3 M143 B/6 : Air mix door motor (passenger)
A3 M40 SMJ : To B69 C1 M144 B/6 : Defroster door motor
D2 M42 W/20 : AV control unit E3 M146 GR/2 : Intake sensor
D2 M43 W/12 : AV control unit D3 M147B/6 : Air mix door motor (driver)
D2 M44 W/32 : AV control unit A3 M148 W/4 : Headlamp aiming switch
D2 M45 W/40 : AV control unit E3 M149 W/4 : Clock
B1 M47 B/2 : Sonar buzzer B1 M150 W/2 : Ignition keyhole illumination
D2 M49 B/26 : A/C auto amp. A3 M158 W/10 : To D3
D2 M50 L/26 : A/C auto amp. Console sub-harness
B3 M51 L/4 : Trailer tow relay 1 D4 M201 W/16 : To M56
B2 M52 W/2 : Combination switch D4 M202 BR/24 : To M64
D3 M53 B/3 : Front power socket LH D4 M203 W/12 : A/T shift selector
E3 M54 B/3 : Front power socket RH D5 M205 W/32 : DVD player
Revision: April 20092010 QX56
Page 2954 of 4210

PG-44
< COMPONENT DIAGNOSIS >
HARNESS
D2 M55 W/4 : Hazard switchD5 M207 B/3 : Console power socket
D4 M56 W/16 : To M201 C4 M208 BR/20 : To M69
A3 M57 — : Body ground C5 M209 W/2 : Center console area antenna (rear)
F2 M58 B/6 : Intake door motor C4 M210 GR/2 : Center console area antenna (front)
F3 M59 BR/2 : Glove box lamp C4 M212 W/6 : Rear heated seat switch LH
G3 M60 W/6 : Fuse block (J/B) C4 M213 BR/6 : Rear heated seat switch RH
C3 M61 — : Body ground Console switch sub-harness
F4 M62 B/2 : Front blower motor D4 M251 BR/20 : To M63
D4 M63 BR/20 : To M251 D4 M252 BR/6 : Front heated seat switch RH
D4 M64 BR/24 : To M202 C4 M253 GR/6 : VDC OFF switch
F2 M65 W/4 : To M301 C3 M255 W/6 : Front heated seat switch LH
G3 M66 B/1 : To E33 C4 M256 B/2 : A/T shift selector
C3 M69 BR/20 : To M208 D4 M258 GR/8 : Tow mode switch
A2 M70 W/40 : Intelligent key unit C4 M260 W/6 : Heated steering wheel switch
A2 M71 L/4 : Heated steering relay Optical sensor sub-harness
D3 M73 BR/6 : Back-up lamp relay F1 M301 W/4 : To M65
G3 M74 BR/20 : To D102 D1 M302 B/4 : Optical sensor
G3 M75 W/10 : To D101
A3 M76 W/6 : Electric brake (pre-wiring)
E2 M77 Y/4 : Front passenger air bag module
(service replacement)
Revision: April 20092010 QX56
Page 2956 of 4210

PG-46
< COMPONENT DIAGNOSIS >
HARNESS
D4 E6 B/8: Front combination lamp LH (with
daytime light system) C1 E119 W/16: IPDM E/R (intelligent power distribution
module engine room)
C2 E7 GR/2 : Fusible link box (battery) D1 E120 W/6: IPDM E/R (intelligent power distribution
module engine room)
C2 E9 — : Body ground E1 E121 BR/12: IPDM E/R (intelligent power distribution
module engine room)
D4 E11 B/8 : Front combination lamp LH (without
daytime light system) C1 E122 W/12: IPDM E/R (intelligent power distribution
module engine room)
D3 E12 B/5 : Stop lamp relay D1 E123 BR/8: IPDM E/R (intelligent power distribution
module engine room)
B2 E13 W/2 : Hood switch D1 E124 B/6: IPDM E/R (intelligent power distribution
module engine room)
D4 E14 — : Body ground F3 E125 B/47: ABS actuator and electric unit
(control unit)
C2 E15 — : Body ground D4 E126 — : Body ground
C1 E16 B/40 : ECM C2 E130 W/2 : Compressor motor relay
E4 E18 GR/2 : Front wheel sensor LH C3 E131 W/2 : Compressor motor relay
D1 E19 W/16 : To F33 D1 E134 GR/6 : ICC brake hold relay
E3 E21 GR/2 : Brake fluid level switch C2 E135 GR/2 : Transfer dropping resistor
E2 E23 GR/6 : Front wiper motor C1 E140 BR/6 : Trailer tow relay 2
D4 E24 — : Body ground B2 E153 W/2 : Transfer motor relay
F3 E25 BR/3 : Intelligent key warning buzzer B2 E154 W/2 : Transfer motor relay
C3 E27 BR/2 : Fusible link box (battery )D3 E156 L/4 : Trailer turn relay LH
C2 E30 /1 : Fusible link box (battery) D3 E157 L/4 : Trailer turn relay RH
E3 E31 B/3 : Front pressure sensor D5 E158 B/3 : Front sonar sensor LH outer
E3 E32 B/3 : Rear pressure sensor D5 E159 GR/3 : To E164
E1 E39 W/2 : To F34 B4 E160 GR/3 : To E165
D3 E40 B/3 : To E201 C3 E161 B/3 : Battery current sensor
D3 E41 SMJ : To C1 B4 E162 B/3 : Front sonar sensor LH inner
A4 E42 B/6 : ICC sensor C5 E163 B/3 : Front sonar sensor RH inner
E1 E46 B/5 : Transfer shift high relay D5 E164 GR/3 : To E159
D2 E47 B/5 : Transfer shift low relay A4 E165 GR/3 : To E160
C4 E48 B/3 : Refrigerant pressure sensor A3 E166 B/3 : Front sonar sensor RH outer
E3 E49 B/6 : Active booster Engine room sub-harness
D1 E69 L/4 : Transfer shut off relay D3 E201 B/3 : To E40
D5 E101 B/3 : Front turn/fog lamp LH C1 E202 /1 : Fusible link box (battery)
A4 E102 B/3 : Front turn/fog lamp RH C2 E203 — : Engine ground
C3 E103 B/5 : Daytime light relay C3 E204 /1 : Generator
D4 E105 BR/2 : Front and rear washer motor C3 E205 B/3 : Generator
E4 E106 BR/2 : Washer fluid level switch C3 E206 /1 : Generator
B3 E107 B/8 : Front combination lamp RH (without
daytime light system)
A3 E108 B/6 : Front combination lamp RH (with
daytime light system)
Revision: April 20092010 QX56
Page 3124 of 4210

RAX-12
< DISASSEMBLY AND ASSEMBLY >
REAR DRIVE SHAFT
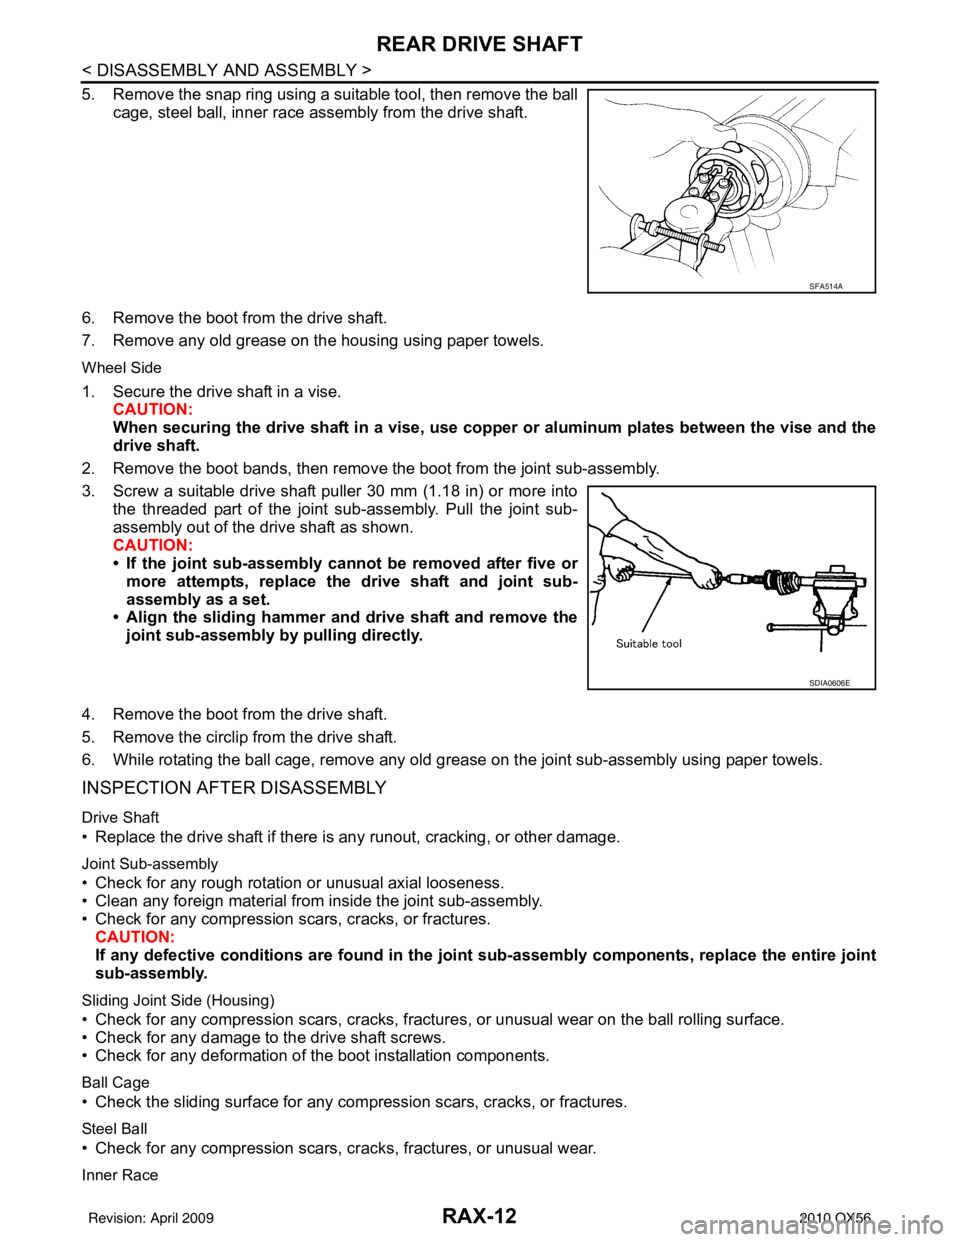
5. Remove the snap ring using a suitable tool, then remove the ballcage, steel ball, inner race assembly from the drive shaft.
6. Remove the boot from the drive shaft.
7. Remove any old grease on the housing using paper towels.
Wheel Side
1. Secure the drive shaft in a vise. CAUTION:
When securing the drive shaft in a vise, use copp er or aluminum plates between the vise and the
drive shaft.
2. Remove the boot bands, then remove the boot from the joint sub-assembly.
3. Screw a suitable drive shaft puller 30 mm (1.18 in) or more into the threaded part of the joint sub-assembly. Pull the joint sub-
assembly out of the drive shaft as shown.
CAUTION:
• If the joint sub-assembly cannot be removed after five ormore attempts, replace the drive shaft and joint sub-
assembly as a set.
• Align the sliding hammer and drive shaft and remove the
joint sub-assembly by pulling directly.
4. Remove the boot from the drive shaft.
5. Remove the circlip from the drive shaft.
6. While rotating the ball cage, remove any old grease on the joint sub-assembly using paper towels.
INSPECTION AFTER DISASSEMBLY
Drive Shaft
• Replace the drive shaft if there is any runout, cracking, or other damage.
Joint Sub-assembly
• Check for any rough rotation or unusual axial looseness.
• Clean any foreign material from inside the joint sub-assembly.
• Check for any compression scars, cracks, or fractures.
CAUTION:
If any defective conditions are found in the joint sub-assembly comp onents, replace the entire joint
sub-assembly.
Sliding Joint Side (Housing)
• Check for any compression scars, cracks, fracture s, or unusual wear on the ball rolling surface.
• Check for any damage to the drive shaft screws.
• Check for any deformation of the boot installation components.
Ball Cage
• Check the sliding surface for any compression scars, cracks, or fractures.
Steel Ball
• Check for any compression scars, cr acks, fractures, or unusual wear.
Inner Race
SFA514A
SDIA0606E
Revision: April 20092010 QX56
Page 3201 of 4210

RSU-14
< REMOVAL AND INSTALLATION >
REAR SUSPENSION MEMBER
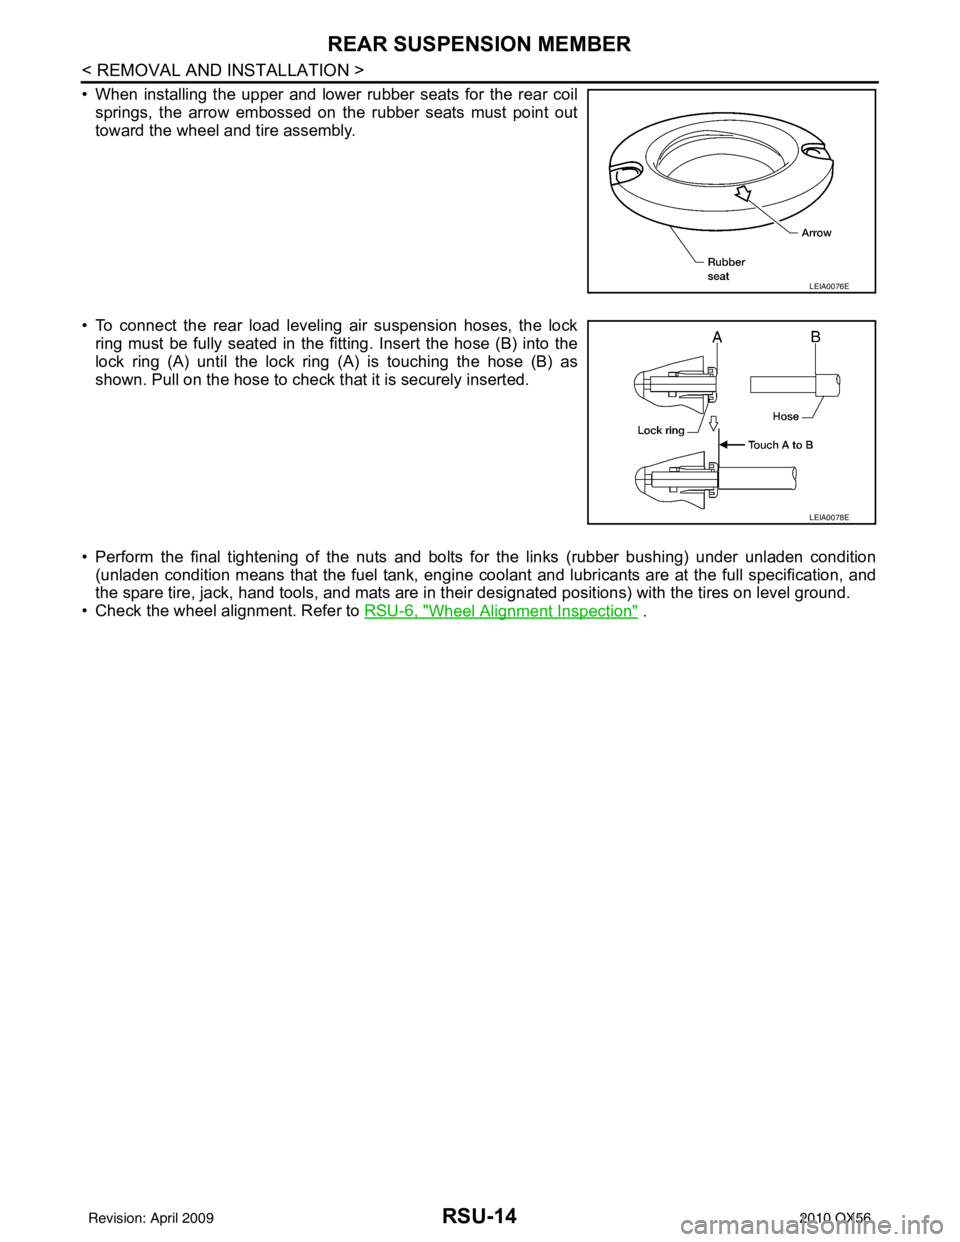
• When installing the upper and lower rubber seats for the rear coilsprings, the arrow embossed on the rubber seats must point out
toward the wheel and tire assembly.
• To connect the rear load leveling air suspension hoses, the lock ring must be fully seated in the fitt ing. Insert the hose (B) into the
lock ring (A) until the lock ring (A) is touching the hose (B) as
shown. Pull on the hose to check that it is securely inserted.
• Perform the final tightening of the nuts and bolts for the links (rubber bushing) under unladen condition (unladen condition means that the fuel tank, engine cool ant and lubricants are at the full specification, and
the spare tire, jack, hand tools, and mats are in t heir designated positions) with the tires on level ground.
• Check the wheel alignment. Refer to RSU-6, "
Wheel Alignment Inspection" .
LEIA0076E
LEIA0078E
Revision: April 20092010 QX56
Page 3209 of 4210

RSU-22
< REMOVAL AND INSTALLATION >
REAR LOWER LINK & COIL SPRING
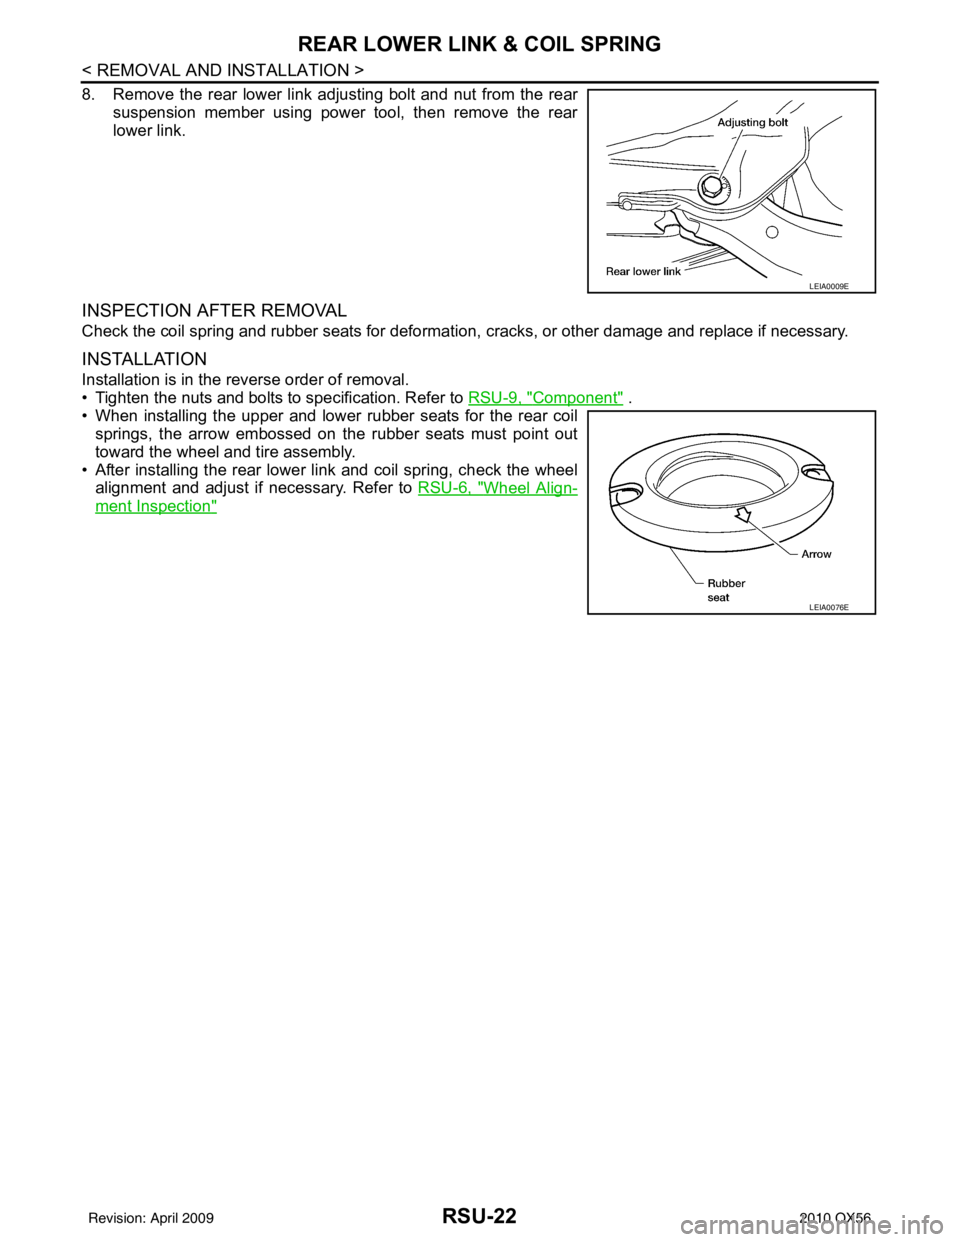
8. Remove the rear lower link adjusting bolt and nut from the rearsuspension member using power tool, then remove the rear
lower link.
INSPECTION AFTER REMOVAL
Check the coil spring and rubber seats for deformation, cracks, or other damage and replace if necessary.
INSTALLATION
Installation is in the reverse order of removal.
• Tighten the nuts and bolts to specification. Refer to RSU-9, "
Component" .
• When installing the upper and lower rubber seats for the rear coil springs, the arrow embossed on the rubber seats must point out
toward the wheel and tire assembly.
• After installing the rear lower link and coil spring, check the wheel alignment and adjust if necessary. Refer to RSU-6, "
Wheel Align-
ment Inspection"
LEIA0009E
LEIA0076E
Revision: April 20092010 QX56