2010 INFINITI QX56 belt
[x] Cancel search: beltPage 3230 of 4210
SEAT BELTSSB-13
< ON-VEHICLE REPAIR >
C
DE
F
G
I
J
K L
M A
B
SB
N
O P
2. Proceed to the designated safe area.
3. Drive the vehicle at approximately 16 km/h (10 MPH). Notify any passengers of a pending sudden stop. The driver and passenger must be prepared to brace t hemselves in the event the retractor does not lock.
Apply brakes firmly and make a very hard stop.
During stop, seat belts should lock and not be extended. If the seat belt retractor assembly does not lock, per-
form the retractor off-vehicle check.
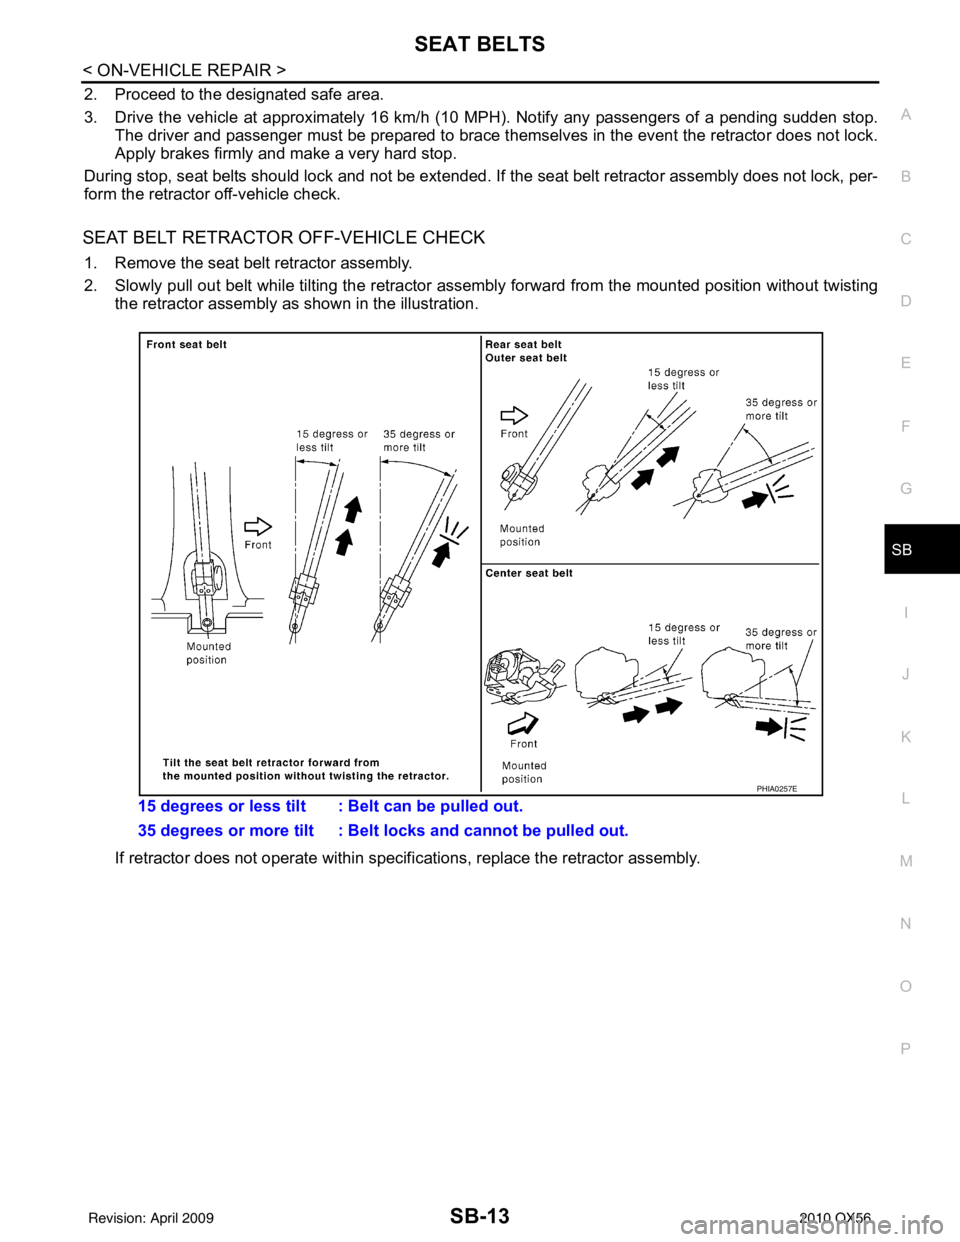
SEAT BELT RETRACTOR OFF-VEHICLE CHECK
1. Remove the seat belt retractor assembly.
2. Slowly pull out belt while tilting the retractor asse mbly forward from the mounted position without twisting
the retractor assembly as shown in the illustration.
If retractor does not operate within specif ications, replace the retractor assembly.
15 degrees or less tilt : Belt can be pulled out.
35 degrees or more tilt : Belt locks and cannot be pulled out.
PHIA0257E
Revision: April 20092010 QX56
Page 3234 of 4210

SCS-2
EXHAUST VALVE SOLENOID CIRCUIT ..........24
Description ........................................................... ...24
Component Function Check ...................................24
Diagnosis Procedure ..............................................24
CK SUSP WARNING INDICATOR CONTROL
CIRCUIT .............................................................
26
Description ........................................................... ...26
Component Function Check ...................................26
Diagnosis Procedure ..............................................26
ECU DIAGNOSIS ..................................... ...28
SUSPENSION CONTROL UNIT ........................28
Reference Value .................................................. ...28
Wiring Diagram .......................................................29
DTC Index ..............................................................34
SYMPTOM DIAGNOSIS .............................36
SUSPENSION CONTROL SYSTEM .............. ...36
Symptom Table ................................................... ...36
SUSPENSION CONTROL SYSTEM INOPER-
ATIVE .................................................................
37
Description ........................................................... ...37
Diagnosis Procedure ...............................................37
SUSPENSION CONTROL SYSTEM DOES
NOT RAISE ........................................................
38
Description ........................................................... ...38
Diagnosis Procedure ...............................................38
SUSPENSION CONTROL SYSTEM DOES
NOT LOWER .....................................................
39
Description ........................................................... ...39
Diagnosis Procedure ...............................................39
PRECAUTION ............................................40
PRECAUTIONS .............................................. ...40
Precaution for Supplemental Restraint System
(SRS) "AIR BAG" and "SEAT BELT PRE-TEN-
SIONER" .............................................................. ...
40
Precaution for Rear Suspension .............................40
Revision: April 20092010 QX56
Page 3272 of 4210
SCS-40
< PRECAUTION >
PRECAUTIONS
PRECAUTION
PRECAUTIONS
Precaution for Supplemental Restraint System (SRS) "AIR BAG" and "SEAT BELT
PRE-TENSIONER"
INFOID:0000000005383225
The Supplemental Restraint System such as “A IR BAG” and “SEAT BELT PRE-TENSIONER”, used along
with a front seat belt, helps to reduce the risk or severity of injury to the driver and front passenger for certain
types of collision. This system includes seat belt switch inputs and dual stage front air bag modules. The SRS
system uses the seat belt switches to determine the front air bag deployment, and may only deploy one front
air bag, depending on the severity of a collision and w hether the front occupants are belted or unbelted.
Information necessary to service the system safely is included in the SR and SB section of this Service Man-
ual.
WARNING:
• To avoid rendering the SRS inopera tive, which could increase the risk of personal injury or death in
the event of a collision which would result in air bag inflation, all maintenance must be performed by
an authorized NISSAN/INFINITI dealer.
• Improper maintenance, including in correct removal and installation of the SRS, can lead to personal
injury caused by unintent ional activation of the system. For re moval of Spiral Cable and Air Bag
Module, see the SR section.
• Do not use electrical test equipmen t on any circuit related to the SRS unless instructed to in this
Service Manual. SRS wiring harn esses can be identified by yellow and/or orange harnesses or har-
ness connectors.
PRECAUTIONS WHEN USING POWER TOOLS (AIR OR ELECTRIC) AND HAMMERS
WARNING:
• When working near the Airbag Diagnosis Sensor Unit or other Airbag System sensors with the Igni-
tion ON or engine running, DO NOT use air or electri c power tools or strike near the sensor(s) with a
hammer. Heavy vibration could activate the sensor( s) and deploy the air bag(s), possibly causing
serious injury.
• When using air or electric power tools or hammers , always switch the Ignition OFF, disconnect the
battery, and wait at least 3 minu tes before performing any service.
Precaution for Rear SuspensionINFOID:0000000005148201
• When installing the rubber bushings, the final ti ghtening must be done under unladen condition and with the
tires on level ground. Oil will shorten the life of the r ubber bushings, so wipe off any spilled oil immediately.
• Unladen condition means the fuel tank, engine coolant and lubricants are at the full specification. The spare tire, jack, hand tools, and mats are in their designated positions.
• After installing suspension components, check the wheel alignment.
• Caulking nuts are not reusable. Always use new caulking nuts for installation. New caulking nuts are pre-
oiled, do not apply any additional lubrication.
Revision: April 20092010 QX56
Page 3273 of 4210

SE-1
BODY INTERIOR
C
DE
F
G H
I
K L
M
SECTION SE
A
B
SE
N
O P
CONTENTS
SEAT
BASIC INSPECTION ....... .............................3
DIAGNOSIS AND REPAIR WORKFLOW ..... .....3
Work Flow ........................................................... ......3
INSPECTION AND ADJUSTMENT .....................5
Preliminary Check ............................................... ......5
FUNCTION DIAGNOSIS ...............................6
THIRD ROW POWER FOLDING SEAT ......... .....6
System Description ............................................. ......6
Component Parts Location ........................................7
Component Description .............................................7
COMPONENT DIAGNOSIS ..........................8
POWER SEAT .....................................................8
Wiring Diagram — Passenger Side — ................ ......8
HEATED SEAT ...................................................12
Description ..............................................................12
Wiring Diagram .......................................................13
THIRD SEAT ......................................................19
Power Supply and Ground Circuit Check for Third
Row Power Folding Seat Control Unit ................. ....
19
Third Row Power Folding Seat Switch ....................20
Third Row Power Folding Seat Motor .....................20
ECU DIAGNOSIS .........................................22
THIRD ROW POWER FOLDING SEAT CON-
TROL UNIT .........................................................
22
Reference Value ................................................. ....22
Wiring Diagram .......................................................24
DTC Index ...............................................................29
Fail Safe ..................................................................30
SYMPTOM DIAGNOSIS ..............................31
THIRD ROW POWER FOLDING SEAT ......... ....31
Symptom Table ................................................... ....31
NONE OF THE THIRD ROW POWER FOLD-
ING SEATS WILL OPERATE WITH ANY
SWITCH. ............................................................
32
None of the Third Row Power Folding Seats Will
Operate With Any Third Row Power Folding Seat
Switch .................................................................. ....
32
ONLY ONE THIRD ROW POWER FOLDING
SEAT WILL OPERATE. ....................................
33
Only One Third Row Power Folding Seat Will Op-
erate .................................................................... ....
33
THIRD ROW POWER FOLDING SEAT WILL
OPERATE IN ONLY ONE DIRECTION. ...........
35
Third Row Power Folding Seat Will Operate in
Only One Direction .............................................. ....
35
THIRD ROW POWER FOLDING SEAT WILL
STOP SHORT OF IT’S FULLY UP OR DOWN
POSITION. .........................................................
37
Third Row Power Folding Seat Stops Short of it's
Fully Up or Down Position .......................................
37
THIRD ROW POWER FOLDING SEAT
MAKES EXCESSIVE NOISE WHILE MOV-
ING. ...................................................................
38
Third Row Power Folding Seat Makes Excessive
Noise While Moving ............................................. ....
38
SQUEAK AND RATTLE TROUBLE DIAG-
NOSES ..............................................................
39
Work Flow ................................................................39
Generic Squeak and Rattle Troubleshooting ...........41
Diagnostic Worksheet ..............................................43
PRECAUTION ..............................................45
PRECAUTIONS .................................................45
Precaution for Supplemental Restraint System
(SRS) "AIR BAG" and "SEAT BELT PRE-TEN-
SIONER" ............................................................. ....
45
Revision: April 20092010 QX56
Page 3317 of 4210
PRECAUTIONSSE-45
< PRECAUTION >
C
DE
F
G H
I
K L
M A
B
SE
N
O P
PRECAUTION
PRECAUTIONS
Precaution for Supplemental Restraint System (SRS) "AIR BAG" and "SEAT BELT
PRE-TENSIONER"
INFOID:0000000005256398
The Supplemental Restraint System such as “AIR BAG” and “SEAT BELT PRE-TENSIONER”, used along
with a front seat belt, helps to reduce the risk or severi ty of injury to the driver and front passenger for certain
types of collision. This system includes seat belt switch inputs and dual stage front air bag modules. The SRS
system uses the seat belt switches to determine the front air bag deployment, and may only deploy one front
air bag, depending on the severity of a collision and w hether the front occupants are belted or unbelted.
Information necessary to service the system safely is included in the SR and SB section of this Service Man-
ual.
WARNING:
• To avoid rendering the SRS inoper ative, which could increase the risk of personal injury or death in
the event of a collision which would result in air bag inflation, all maintenance must be performed by
an authorized NISSAN/INFINITI dealer.
• Improper maintenance, including in correct removal and installation of the SRS, can lead to personal
injury caused by unintentional act ivation of the system. For removal of Spiral Cable and Air Bag
Module, see the SR section.
• Do not use electrical test equipm ent on any circuit related to the SRS unless instructed to in this
Service Manual. SRS wiring harnesses can be identi fied by yellow and/or orange harnesses or har-
ness connectors.
PRECAUTIONS WHEN USING POWER TOOLS (AIR OR ELECTRIC) AND HAMMERS
WARNING:
• When working near the Airbag Diagnosis Sensor Un it or other Airbag System sensors with the Igni-
tion ON or engine running, DO NOT use air or el ectric power tools or strike near the sensor(s) with a
hammer. Heavy vibration could activate the sensor( s) and deploy the air bag(s), possibly causing
serious injury.
• When using air or electric power tools or hammers, always switch the Ignition OFF, disconnect the battery, and wait at least 3 minutes before performing any service.
Precaution Necessary for Steering Wheel Rotation After Battery Disconnect
INFOID:0000000005402593
NOTE:
• This Procedure is applied only to models with Intelligent Key system and NATS (NISSAN ANTI-THEFT SYS-
TEM).
• Remove and install all control units after disconnecti ng both battery cables with the ignition knob in the
″ LOCK ″ position.
• Always use CONSULT-III to perform self-diagnosis as a part of each function inspection after finishing work.
If DTC is detected, perform trouble diagnosis according to self-diagnostic results.
For models equipped with the Intelligent Key system and NATS , an electrically controlled steering lock mech-
anism is adopted on the key cylinder.
For this reason, if the battery is disconnected or if the battery is discharged, the steering wheel will lock and
steering wheel rotation will become impossible.
If steering wheel rotation is required when battery power is interrupted, follow the procedure below before
starting the repair operation.
OPERATION PROCEDURE
1. Connect both battery cables. NOTE:
Supply power using jumper cables if battery is discharged.
2. Use the Intelligent Key or mechanical key to turn the ignition switch to the ″ACC ″ position. At this time, the
steering lock will be released.
3. Disconnect both battery cables. The steering lock will remain released and the steering wheel can be
rotated.
4. Perform the necessary repair operation.
Revision: April 20092010 QX56
Page 3328 of 4210
SE-56
< ON-VEHICLE REPAIR >
SECOND SEAT
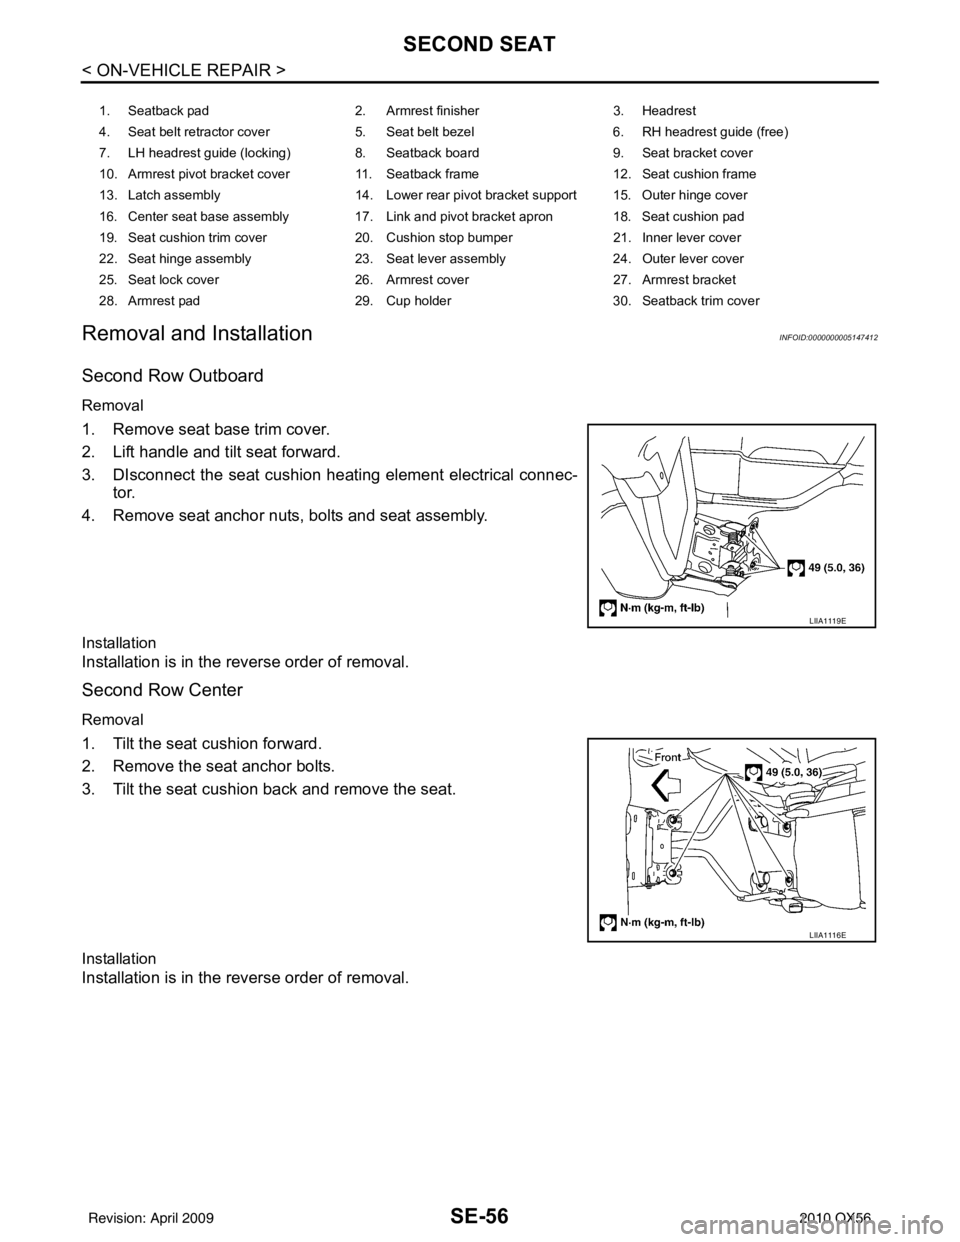
Removal and Installation
INFOID:0000000005147412
Second Row Outboard
Removal
1. Remove seat base trim cover.
2. Lift handle and tilt seat forward.
3. DIsconnect the seat cushion heating element electrical connec- tor.
4. Remove seat anchor nuts, bolts and seat assembly.
Installation
Installation is in the reverse order of removal.
Second Row Center
Removal
1. Tilt the seat cushion forward.
2. Remove the seat anchor bolts.
3. Tilt the seat cushion back and remove the seat.
Installation
Installation is in the reverse order of removal.
1. Seatback pad 2. Armrest finisher 3. Headrest
4. Seat belt retractor cover 5. Seat belt bezel 6. RH headrest guide (free)
7. LH headrest guide (locking) 8. Seatback board 9. Seat bracket cover
10. Armrest pivot bracket cover 11. Seatback frame 12. Seat cushion frame
13. Latch assembly 14. Lower rear pivot bracket support 15. Outer hinge cover
16. Center seat base assembly 17. Link and pivot bracket apron 18. Seat cushion pad
19. Seat cushion trim cover 20. Cushion stop bumper 21. Inner lever cover
22. Seat hinge assembly 23. Seat lever assembly 24. Outer lever cover
25. Seat lock cover 26. Armrest cover 27. Armrest bracket
28. Armrest pad 29. Cup holder 30. Seatback trim cover
LIIA1119E
LIIA1116E
Revision: April 20092010 QX56
Page 3331 of 4210
THIRD SEATSE-59
< ON-VEHICLE REPAIR >
C
DE
F
G H
I
K L
M A
B
SE
N
O P
LH Side SeatINFOID:0000000005147414
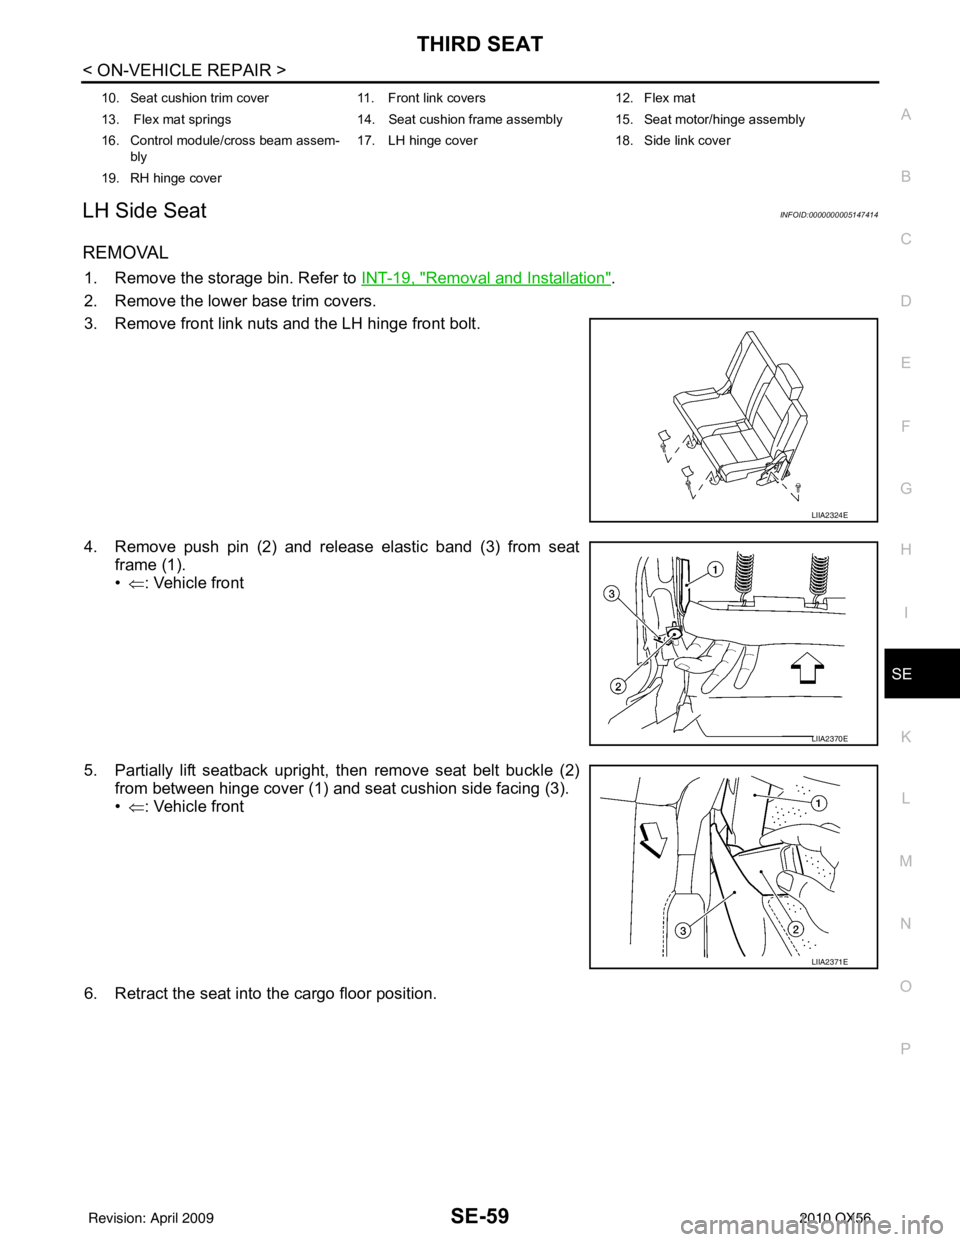
REMOVAL
1. Remove the storage bin. Refer to INT-19, "Removal and Installation".
2. Remove the lower base trim covers.
3. Remove front link nuts and the LH hinge front bolt.
4. Remove push pin (2) and release elastic band (3) from seat frame (1).
•⇐ : Vehicle front
5. Partially lift seatback upright, then remove seat belt buckle (2) from between hinge cover (1) and seat cushion side facing (3).
•⇐ : Vehicle front
6. Retract the seat into the cargo floor position.
10. Seat cushion trim cover 11. Front link covers 12. Flex mat
13. Flex mat springs 14. Seat cushion frame assembly 15. Seat motor/hinge assembly
16. Control module/cross beam assem- bly 17. LH hinge cover
18. Side link cover
19. RH hinge cover
LIIA2324E
LIIA2370E
LIIA2371E
Revision: April 20092010 QX56
Page 3332 of 4210
SE-60
< ON-VEHICLE REPAIR >
THIRD SEAT
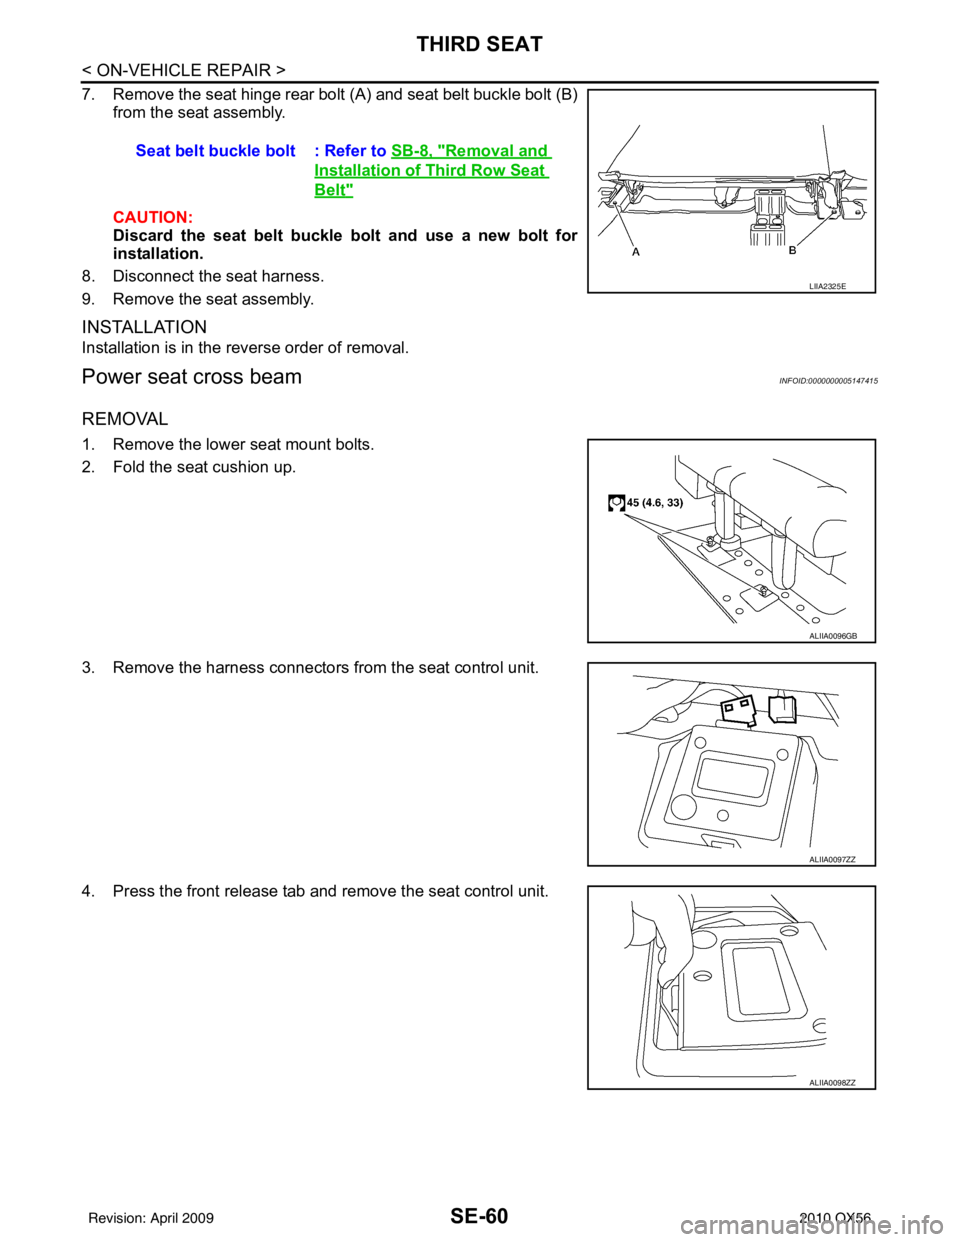
7. Remove the seat hinge rear bolt (A) and seat belt buckle bolt (B)from the seat assembly.
CAUTION:
Discard the seat belt buckle bolt and use a new bolt for
installation.
8. Disconnect the seat harness.
9. Remove the seat assembly.
INSTALLATION
Installation is in the reverse order of removal.
Power seat cross beamINFOID:0000000005147415
REMOVAL
1. Remove the lower seat mount bolts.
2. Fold the seat cushion up.
3. Remove the harness connectors from the seat control unit.
4. Press the front release tab and remove the seat control unit. Seat belt buckle bolt : Refer to
SB-8, "
Removal and
Installation of Third Row Seat
Belt"
LIIA2325E
ALIIA0096GB
ALIIA0097ZZ
ALIIA0098ZZ
Revision: April 20092010 QX56