2010 INFINITI QX56 belt
[x] Cancel search: beltPage 3538 of 4210

SIDE AIR BAG (SATELLITE) SENSORSR-15
< ON-VEHICLE REPAIR >
C
DE
F
G
I
J
K L
M A
B
SR
N
O P
SIDE AIR BAG (S ATELLITE) SENSOR
Removal and InstallationINFOID:0000000005147762
REMOVAL
CAUTION:
• Before servicing the SRS, turn the ignition switch off, disconnect both battery terminals and wait at
least three minutes.
• Do not use old nuts after removal; replace with new nuts.
• Check side air bag (satellite) sensor to make sure it is free of deformities, dents, cracks or rust. If it
shows any visible signs of da mage, replace it with new one.
• Do not disassemble side air bag (satellite) sensor.
• Replace side air bag (satellite ) sensor if it has been dropped or sustained an impact.
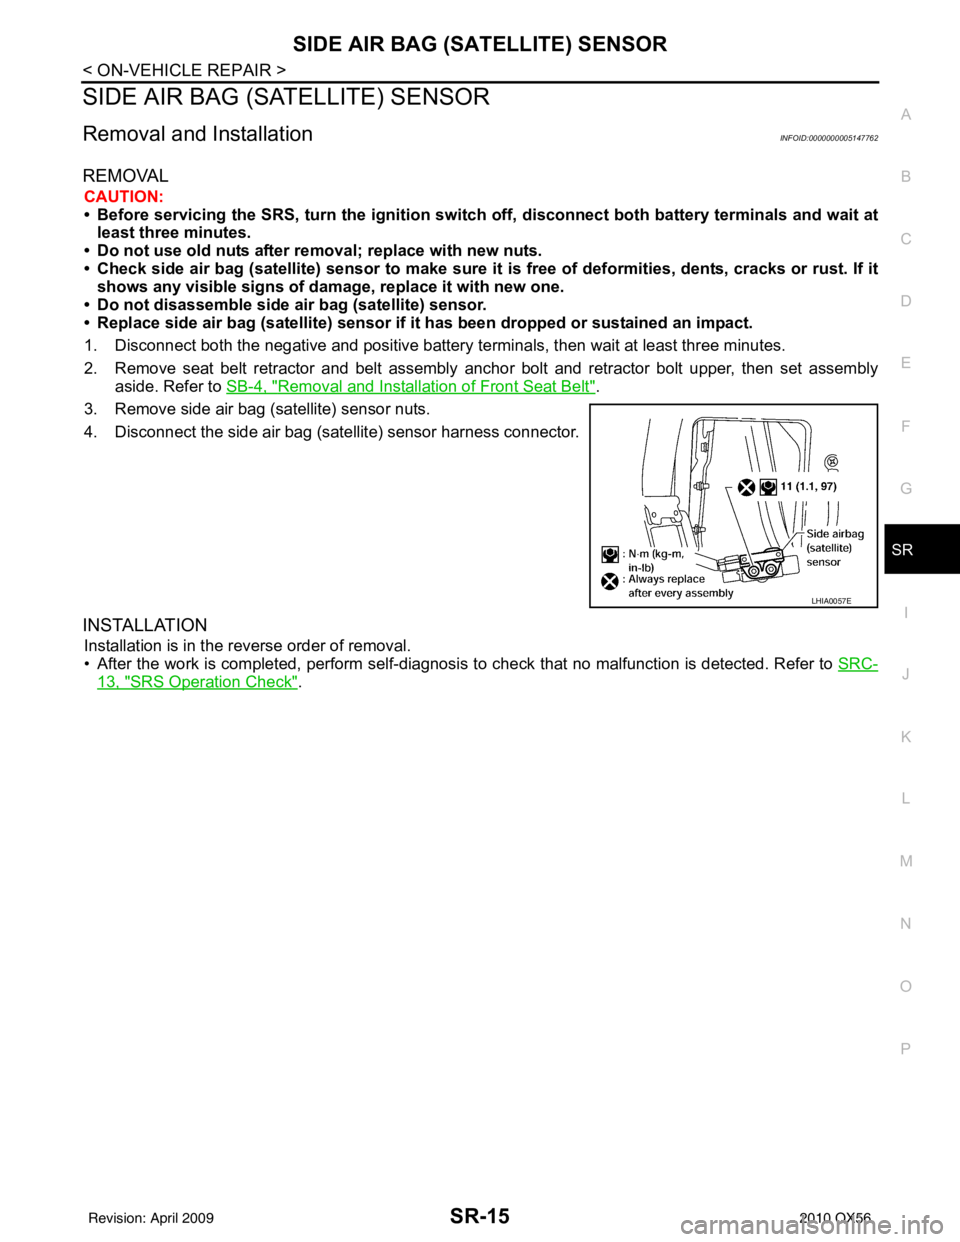
1. Disconnect both the negative and positive battery te rminals, then wait at least three minutes.
2. Remove seat belt retractor and belt assembly anchor bolt and retractor bolt upper, then set assembly
aside. Refer to SB-4, "
Removal and Installation of Front Seat Belt".
3. Remove side air bag (satellite) sensor nuts.
4. Disconnect the side air bag (satellite) sensor harness connector.
INSTALLATION
Installation is in the reverse order of removal.
• After the work is completed, perform self-diagnosis to check that no malfunction is detected. Refer to SRC-
13, "SRS Operation Check".
LHIA0057E
Revision: April 20092010 QX56
Page 3539 of 4210

SR-16
< ON-VEHICLE REPAIR >
FRONT SEAT BELT PRE-TENSIONER
FRONT SEAT BELT PRE-TENSIONER
Removal and InstallationINFOID:0000000005147763
For removal and installation procedures for seat belt and seat belt buckle pre-tensioners, refer to SE-51,
"Removal and Installation".
Revision: April 20092010 QX56
Page 3540 of 4210

DIAGNOSIS SENSOR UNITSR-17
< ON-VEHICLE REPAIR >
C
DE
F
G
I
J
K L
M A
B
SR
N
O P
DIAGNOSIS SENSOR UNIT
Removal and InstallationINFOID:0000000005147764
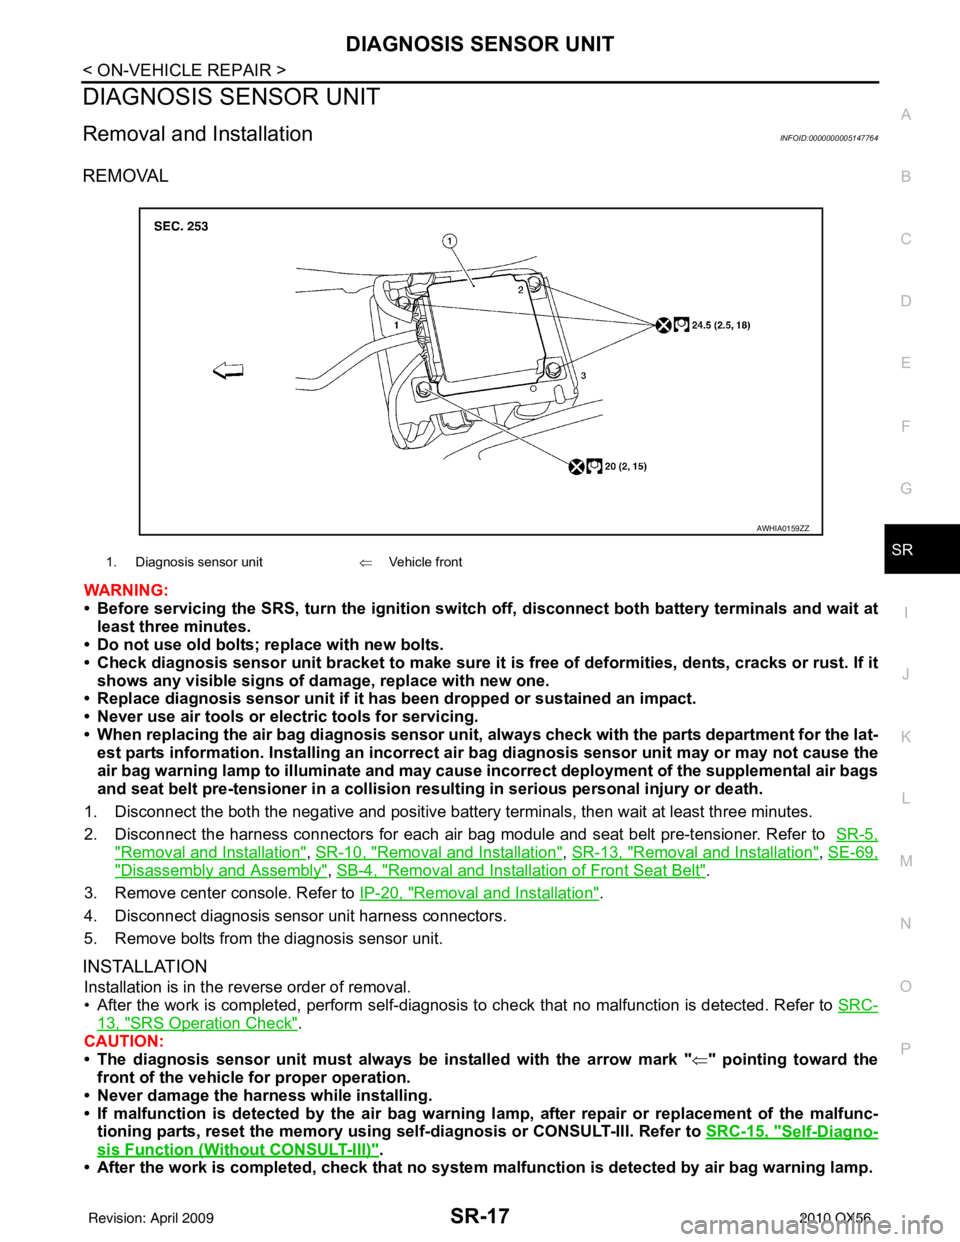
REMOVAL
WARNING:
• Before servicing the SRS, turn the ignition switch off, disconnect both battery terminals and wait at
least three minutes.
• Do not use old bolts; replace with new bolts.
• Check diagnosis sensor unit bracket to make sure it is free of deformities, dents, cracks or rust. If it
shows any visible signs of damage, replace with new one.
• Replace diagnosis sensor unit if it has been dropped or sustained an impact.
• Never use air tools or el ectric tools for servicing.
• When replacing the air bag diagnosis sensor unit, always check with the parts department for the lat-
est parts information. Installing an incorrect air bag diagnosis sensor unit may or may not cause the
air bag warning lamp to illuminate and may cause incorrect deployment of the supplemental air bags
and seat belt pre-tensioner in a collision r esulting in serious personal injury or death.
1. Disconnect the both the negative and positive battery terminals, then wait at least three minutes.
2. Disconnect the harness connectors for each air bag module and seat belt pre-tensioner. Refer to SR-5,
"Removal and Installation", SR-10, "Removal and Installation", SR-13, "Removal and Installation", SE-69,
"Disassembly and Assembly", SB-4, "Removal and Installation of Front Seat Belt".
3. Remove center console. Refer to IP-20, "
Removal and Installation".
4. Disconnect diagnosis sensor unit harness connectors.
5. Remove bolts from the diagnosis sensor unit.
INSTALLATION
Installation is in the reverse order of removal.
• After the work is completed, perform self-diagnosis to check that no malfunction is detected. Refer to SRC-
13, "SRS Operation Check".
CAUTION:
• The diagnosis sensor unit must always be installed with the arrow mark " ⇐" pointing toward the
front of the vehicle for proper operation.
• Never damage the harness while installing.
• If malfunction is detected by the air bag warnin g lamp, after repair or replacement of the malfunc-
tioning parts, reset the memory using sel f-diagnosis or CONSULT-III. Refer to SRC-15, "
Self-Diagno-
sis Function (Without CONSULT-III)".
• After the work is completed, check that no system malfunction is detected by air bag warning lamp.
1. Diagnosis sensor unit⇐Vehicle front
AWHIA0159ZZ
Revision: April 20092010 QX56
Page 3543 of 4210

SR-20
< ON-VEHICLE REPAIR >
COLLISION DIAGNOSIS
COLLISION DIAGNOSIS
For Frontal CollisionINFOID:0000000005147766
Check the SRS components using the following table.
• After the work is completed, perform self-diagnosis to check that no malfunction is detected. Refer to SRC-
13, "SRS Operation Check".
SRS INSPECTION (FOR FRONTAL COLLISION)
PartSRS is activated SRS is NOT activated
Driver air bag module If the driver air bag has deployed:
REPLACE
Install with new fas-
teners. If the driver air bag has NOT been activated:
1. Remove driver air bag module. Check harness cover and connectors for dam-
age, terminals for deformities, and harness for binding.
2. Install driver air bag module into the steering wheel to check fit and alignment with the wheel.
3. If no damage is found, reinstall with new fasteners.
4. If damaged—REPLACE. Install driver air bag modules with new fasteners.
Front passenger air
bag module If the front passenger
air bag has deployed:
REPLACE
Install with new fas-
teners. If the front passenger air bag has NOT been activated:
1. Remove front passenger air bag module. Check harness cover and connectors
for damage, terminals for deformities, and harness for binding.
2. Install front passenger air bag module into the instrument panel to check fit with the instrument panel.
3. If no damage is found, reinstall with new fasteners.
4. If damaged—REPLACE. Install front passenger air bag modules with new fas-
teners.
Crash zone sensor If any of the front air bags or seat belt pre-
tensioners* have
been activated:
REPLACE the crash
zone sensor and
bracket with new fas-
teners.
*: Confirm seat belt
pre-tensioner activa-
tion using CONSULT-
III only. If the front air bags or seat belt pre-tensioners have NOT been activated:
1. Remove the crash zone sensor. Check harness connectors for damage, termi-
nals for deformities, and harness for binding.
2. Check for visible signs of damage (dents, cracks, deformation) of the crash zone sensor and bracket.
3. Install the crash zone sensor to check fit.
4. If no damage is found, reinstall with new fasteners.
5. If damaged—REPLACE the crash zone sensor and bracket with new fasteners.
Seat belt pre-tension-
er assemblies
(All applicable loca-
tions: buckle, reel, lap
outer) If either the driver or
passenger seat belt
pre-tensioner* has
been activated:
REPLACE all seat
belt pre-tensioner as-
semblies with new
fasteners.
*: Confirm seat belt
pre-tensioner activa-
tion using CONSULT-
III only. If the pre-tensioners have NOT been activated:
1. Remove seat belt pre-tensioners.
Check harness cover and connectors for damage, terminals for deformities, and
harness for binding.
2. Check belts for damage and anchors for loose mounting.
3. Check retractor for smooth operation.
4. Check seat belt adjuster for damage.
5. Check for deformities of the center pillar inner.
6. If the center pillar inner has no damage, REPLACE the seat belt pre-tensioner
assembly.
7. If no damage is found, reinstall seat belt pre-tensioner assembly.
8. If damaged—REPLACE. Install the seat belt pre-tensioners with new fasteners.
Diagnosis sensor unit If any of the SRS com- ponents have been
activated:
REPLACE the diag-
nosis sensor unit.
Install with new fas-
teners. If none of the SRS components have been activated:
1. Check case for dents, cracks or deformities.
2. Check connectors for damage, and terminals for deformities.
3. If no damage is found, reinstall with new fasteners.
4. If damaged—REPLACE. Install diagnosis sensor unit with new fasteners.
Revision: April 20092010 QX56
Page 3545 of 4210

SR-22
< ON-VEHICLE REPAIR >
COLLISION DIAGNOSIS
PartSRS is activated SRS is NOT activated
LH side curtain air
bag module If the LH side curtain
air bag has deployed:
REPLACE the LH
side curtain air bag
module. (Repair the
center pillar inner, etc.
before installing new
one if damaged.)If the LH side curtain air bag has NOT deployed:
1. Check for visible signs of damage (dents, tears, deformation) of the center pillar
on the collision side.
2. If damaged—Remove the LH side curtain air bag module.
3. Check for visible signs of damaged (tears etc.) of the LH side curtain air bag mod- ule.
4. Check harness and connectors for damage, and terminals for deformities.
5. If no damage is found, reinstall the LH side curtain air bag module with new fas- teners.
6. If damaged—REPLACE the LH side curtain air bag module with new fasteners.
RH side curtain air
bag module If the RH side curtain
air bag has deployed:
REPLACE the RH
side curtain air bag
module. (Repair the
center pillar inner, etc.
before installing new
one if damaged.)If the RH side curtain air bag has NOT deployed:
1. Check for visible signs of damage (dents, tears, deformation) of the center pillar
on the collision side.
2. If damaged—Remove the RH side curtain air bag module.
3. Check for visible signs of damaged (tears etc.) of the RH side curtain air bag module.
4. Check harness and connectors for damage, and terminals for deformities.
5. If no damage is found, reinstall the RH side curtain air bag module with new fas- teners.
6. If damaged—REPLACE the RH side curtain air bag module with new fasteners.
Front LH side air bag
module If the front LH side air
bag has deployed:
REPLACE front LH
seatback assembly.If the front LH side air bag has NOT deployed:
1. Check for visible signs of damage (dents, tears, deformation) of the seat back on
the collision side.
2. Check harness and connectors for damage, and terminals for deformities.
3. If damaged—REPLACE the front LH seatback assembly.
Front RH side air bag
module If the front RH side air
bag has deployed:
REPLACE front RH
seatback assembly.If the front RH side air bag has NOT deployed:
1. Check for visible signs of damage (dents, tears, deformation) of the seat back on
the collision side.
2. Check harness and connectors for damage, and terminals for deformities.
3. If damaged—REPLACE the front RH seatback assembly.
(LH or RH) side air
bag (satellite) sensor If any of the SRS
components have de-
ployed:
REPLACE the side air
bag (satellite) sensor
on the collision side
with new fasteners.
(Repair the center pil-
lar inner, etc. before
installing new one if
damaged.)If none of the SRS components have been activated:
1. Remove the side air bag (satellite) sensor on the collision side. Check harness
connectors for damage, terminals for deformities, and harness for binding.
2. Check for visible signs of damage (dents, cracks, deformation) of the side air bag
(satellite) sensor.
3. Install the side air bag (satellite) sensor to check fit.
4. If no damage is found, reinstall the side sir bag (satellite) sensor with new fasten- ers.
5. If damaged—REPLACE the side air bag (satellite) sensor with new fasteners.
Diagnosis sensor unit If any of the SRS components have de-
ployed:
REPLACE the diag-
nosis sensor unit with
new fasteners.If none of the SRS components have been activated:
1. Check case and bracket for dents, cracks or deformities.
2. Check connectors for damage, and terminals for deformities.
3. If no damage is found, reinstall the diagnosis sensor unit with new fasteners.
4. If damaged—REPLACE the diagnosis sensor unit with new fasteners.
Seat belt pre-tension-
er assemblies
(All applicable loca-
tions: buckle, reel, lap
outer) If either the driver or
passenger seat belt
pre-tensioner* has
been activated:
REPLACE all seat
belt pre-tensioner as-
semblies with new
fasteners.
*: Confirm seat belt
pre-tensioner activa-
tion using CONSULT-
III only.If the pre-tensioners have NOT been activated:
1. Remove seat belt pre-tensioners.
Check harness cover and connectors for damage, terminals for deformities, and
harness for binding.
2. Check belts for damage and anchors for loose mounting.
3. Check retractor for smooth operation.
4. Check seat belt adjuster for damage.
5. Check for deformities of the center pillar inner.
6. If the center pillar inner has no damage, REPLACE the seat belt pre-tensioner
assembly.
7. If no damage is found, reinstall seat belt pre-tensioner assembly.
8. If damaged—REPLACE. Install the seat belt pre-tensioners with new fasteners.
Revision: April 20092010 QX56
Page 3547 of 4210

SRC-1
RESTRAINTS
C
DE
F
G
I
J
K L
M
SECTION SRC
A
B
SRC
N
O P
CONTENTS
SRS AIRBAG CONTROL SYSTEM
BASIC INSPECTION ....... .............................3
DIAGNOSIS AND REPAIR WORK FLOW .... .....3
Work Flow ........................................................... ......3
INTERMITTENTS INCIDENT ..............................5
Inspection Procedure ......................................... ......5
Trouble Diagnosis with CONSULT-III .......................5
FUNCTION DIAGNOSIS ...............................6
SRS AIR BAG SYSTEM ................................. .....6
SRS Configuration .............................................. ......6
SRS Component Parts Location ...............................7
Driver Air Bag Module ...............................................7
Front Passenger Air Bag Module ..............................8
Front Side Air Bag ............................................... ......8
Side Curtain Air Bag ..................................................8
Front Seat Belt Pre-tensioner with Load Limiter .......8
Direct-connect SRS Component Connectors ............9
OCCUPANT CLASSIFICATION SYSTEM .........10
System Diagram .................................................. ....10
Occupant Classification System (OCS) ..................10
PASSENGER SEAT BELT WARNING SYS-
TEM ....................................................................
12
System Diagram .................................................. ....12
System Description .................................................12
Component Parts Location ......................................12
ON BOARD DIAGNOSTIC (OBD) SYSTEM ......13
Trouble Diagnosis Introduction ........................... ....13
SRS Operation Check .............................................13
Trouble Diagnosis without CONSULT-III ................15
CONSULT-III Function (AIR BAG) ..........................15
Self-Diagnosis Function (Without CONSULT-III) ....15
COMPONENT DIAGNOSIS .........................17
B1049 – B1052, B1054 – B1057 DRIVER AIR-
BAG MODULE ...................................................
17
Description ........................................................... ....17
DTC Logic ................................................................17
Diagnosis Procedure (Component Diagnosis) ........18
B1065 – B1068, B1070 – B1073 PASSEN-
GER AIRBAG MODULE ...................................
20
Description ...............................................................20
DTC Logic ................................................................20
Diagnosis Procedure (Component Diagnosis) ........21
B1134 – B1137 SIDE AIRBAG MODULE LH ...23
Description ...............................................................23
DTC Logic ................................................................23
Diagnosis Procedure (Component Diagnosis) ........24
B1129 – B1132 SIDE AIRBAG MODULE RH ...26
Description ...............................................................26
DTC Logic ................................................................26
Diagnosis Procedure (Component Diagnosis) ........27
B1198 – B1201 SIDE CURTAIN AIR BAG
MODULE LH (FRONT) ......................................
29
Description ...............................................................29
DTC Logic ................................................................29
Diagnosis Procedure (Component Diagnosis) ........30
B1193 – B1196 SIDE CURTAIN AIR BAG
MODULE RH (FRONT) .....................................
32
Description ...............................................................32
DTC Logic ................................................................32
Diagnosis Procedure (Component Diagnosis) ........33
B1150 – B1153 SIDE CURTAIN AIR BAG
MODULE LH (REAR) ........................................
35
Description ...............................................................35
DTC Logic ................................................................35
Diagnosis Procedure (Component Diagnosis) ........36
B1145 – B1148 SIDE CURTAIN AIR BAG
MODULE RH (REAR) .......................................
38
Description ...............................................................38
DTC Logic ................................................................38
Revision: April 20092010 QX56
Page 3548 of 4210

SRC-2
Diagnosis Procedure (Component Diagnosis) ........39
B1086 – B1089 SEAT BELT PRE-TENSION-
ER LH .................................................................
41
Description ........................................................... ...41
DTC Logic ...............................................................41
Diagnosis Procedure (Component Diagnosis) ........42
B1081 – B1084 SEAT BELT PRE-TENSION-
ER RH ................................................................
44
Description ..............................................................44
DTC Logic ...............................................................44
Diagnosis Procedure (Component Diagnosis) ........45
B1182 - B1185 SEAT BELT BUCKLE PRE-
TENSIONER LH .................................................
47
Description ........................................................... ...47
DTC Logic ...............................................................47
Diagnosis Procedure (Component Diagnosis) ........48
B1177 - B1180 SEAT BELT BUCKLE PRE-
TENSIONER RH ................................................
50
Description ........................................................... ...50
DTC Logic ...............................................................50
Diagnosis Procedure (Component Diagnosis) ........51
B1033 – B1035 CRASH ZONE SENSOR .........53
Description ........................................................... ...53
DTC Logic ...............................................................53
Diagnosis Procedure (Component Diagnosis) ........54
B1118 – B1120 SATELLITE SENSOR LH ........56
Description ........................................................... ...56
DTC Logic ...............................................................56
Diagnosis Procedure (Component Diagnosis) ........57
B1113 – B1115 SATELLITE SENSOR RH .......59
Description ........................................................... ...59
DTC Logic ...............................................................59
Diagnosis Procedure (Component Diagnosis) ........60
B1XXX AIR BAG DIAGNOSIS SENSOR UNIT ...62
Description ........................................................... ...62
DTC Logic ...............................................................62
Diagnosis Procedure (Component Diagnosis) ........63
B1023 PASSENGER AIR BAG OFF INDICA-
TOR ....................................................................
64
Description ........................................................... ...64
DTC Logic ...............................................................64
Diagnosis Procedure (Component Diagnosis) ........65
B1017 – B1022 OCCUPANT CLASSIFICA-
TION SYSTEM ................................................ ...
67
Description ........................................................... ...67
DTC Logic ...............................................................67
Diagnosis Procedure (Component Diagnosis) ........68
B1209 – B1211 COLLISION DETECTION ........70
Description ........................................................... ...70
DTC Logic ...............................................................70
Diagnosis Procedure (Component Diagnosis) ........70
ECU DIAGNOSIS .......................................71
DIAGNOSIS SENSOR UNIT .............................71
Wiring Diagram .................................................... ...71
Trouble Diagnosis with CONSULT-III .....................80
Trouble Diagnosis without CONSULT-III ................84
SYMPTOM DIAGNOSIS ............................89
SRS AIR BAG SYSTEM ................................. ...89
"AIR BAG" Warning Lamp Does Not Turn Off ..... ...89
"AIR BAG" Warning Lamp Does Not Turn On ........89
PASSENGER SEAT BELT WARNING SYS-
TEM ....................................................................
91
Seat Belt Warning System Does Not Function .... ...91
PRECAUTION ............................................92
PRECAUTIONS .............................................. ...92
Precaution for Supplemental Restraint System
(SRS) "AIR BAG" and "SEAT BELT PRE-TEN-
SIONER" .............................................................. ...
92
Precaution for SRS "AIR BAG" and "SEAT BELT
PRE-TENSIONER" Service ................................. ...
92
Occupant Classification System Precaution ...........92
Revision: April 20092010 QX56
Page 3552 of 4210

SRC-6
< FUNCTION DIAGNOSIS >
SRS AIR BAG SYSTEM
FUNCTION DIAGNOSIS
SRS AIR BAG SYSTEM
SRS ConfigurationINFOID:0000000005147771
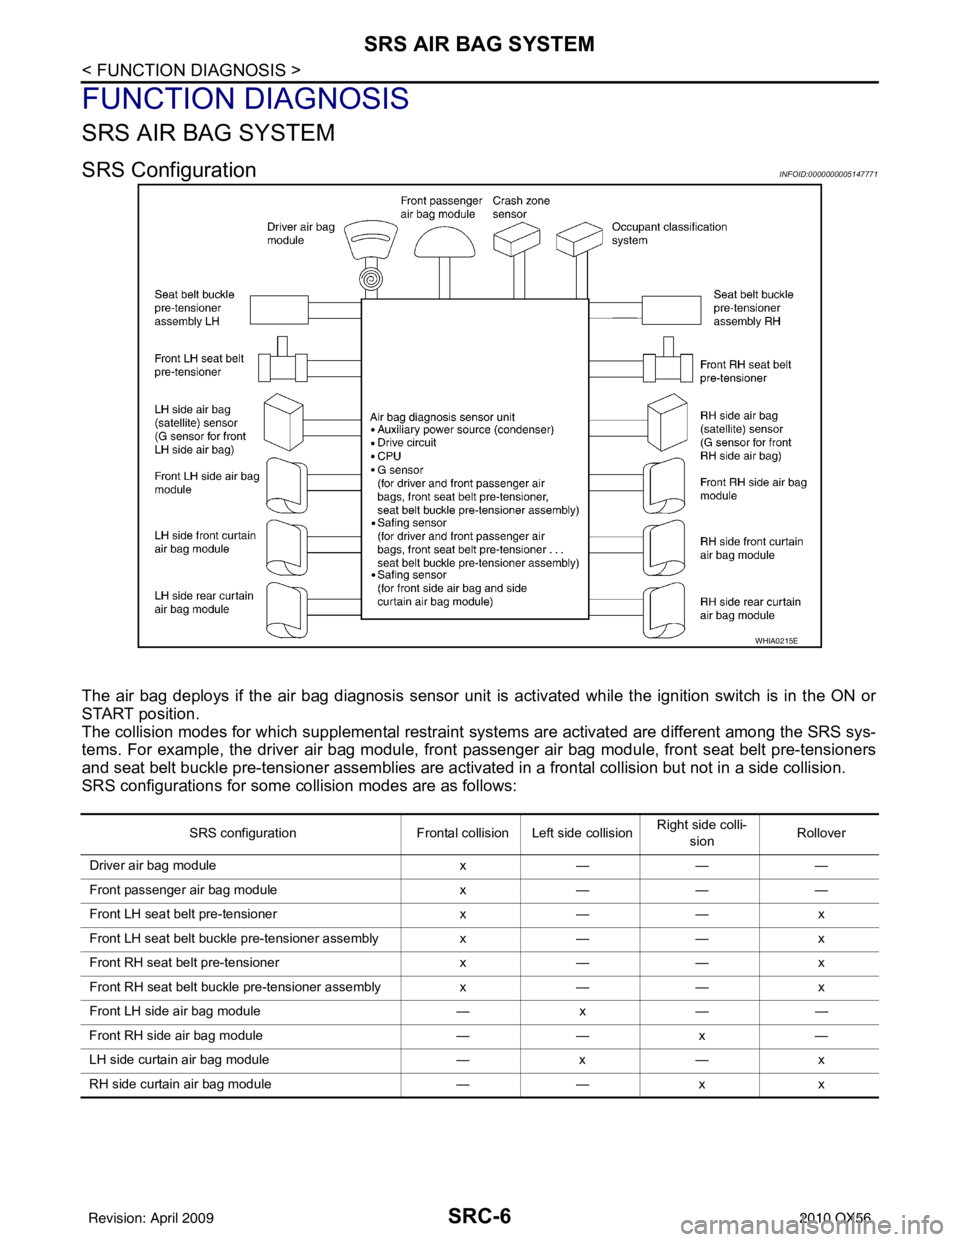
The air bag deploys if the air bag diagnosis sensor unit is activated while the ignition switch is in the ON or
START position.
The collision modes for which supplemental restraint systems are activated are different among the SRS sys-
tems. For example, the driver air bag module, front passenger air bag module, front seat belt pre-tensioners
and seat belt buckle pre-tensioner assemblies are activated in a frontal collision but not in a side collision.
SRS configurations for some collision modes are as follows:
WHIA0215E
SRS configuration Frontal collision Left side collision Right side colli-
sion Rollover
Driver air bag module x— — —
Front passenger air bag module x— — —
Front LH seat belt pre-tensioner x— — x
Front LH seat belt buckle pre-tensioner assembly x— — x
Front RH seat belt pre-tensioner x— — x
Front RH seat belt buckle pre-tensioner assembly x— — x
Front LH side air bag module —x— —
Front RH side air bag module —— x—
LH side curtain air bag module —x— x
RH side curtain air bag module —— xx
Revision: April 20092010 QX56