2010 HUMMER H3 key
[x] Cancel search: keyPage 152 of 410

6-8 Lighting
Dome Lamp Override
The dome lamp override button is
located below the exterior lamps
control.
E(Dome Lamp Override): Press
the button in to turn the lamps off.
In this position, the dome lamps will
remain off when the doors are open.
To return the lamps to automatic
operation, press
Eagain and
return it to the out position. With the
button in this position, the dome
lamps will come on when a door is
opened.
Reading Lamps
The reading lamps are located in
the overhead console.
Press the button located next to
each lamp to turn them on or off.
These lamps will not come on with
the dome lamps.
Lighting Features
Exit Lighting
The interior lamps come on when
the key is removed from the ignition.
The lamps will not come on if the
dome override button is pressed in.
Battery Load
Management
The vehicle has Electric Power
Management (EPM) that estimates
the battery's temperature and state
of charge. It then adjusts the voltage
for best performance and extended
life of the battery. When the battery's state of charge
is low, the voltage is raised slightly
to quickly bring the charge back up.
When the state of charge is high,
the voltage is lowered slightly to
prevent overcharging. If the vehicle
has a voltmeter gauge or a voltage
display on the Driver Information
Center (DIC), you may see the
voltage move up or down. This is
normal. If there is a problem, an
alert will be displayed.
The battery can be discharged at
idle if the electrical loads are very
high. This is true for all vehicles.
This is because the generator
(alternator) may not be spinning fast
enough at idle to produce all the
power that is needed for very high
electrical loads.
Page 169 of 410

Infotainment System 7-15
Phone
Bluetooth
Vehicles with a Bluetooth system
can use a Bluetooth capable cell
phone with a Hands Free Profile to
make and receive phone calls. The
system can be used while the key is
in ON/RUN or ACC/ACCESSORY
position. The range of the Bluetooth
system can be up to 9.1 m (30 ft.).
Not all phones support all functions,
and not all phones are guaranteed
to work with the in-vehicle Bluetooth
system. See gm.com/bluetooth for
more information on compatible
phones.
Voice Recognition
The Bluetooth system uses voice
recognition to interpret voice
commands to dial phone numbers
and name tags.
Noise:Keep interior noise levels to
a minimum. The system may not
recognize voice commands if there
is too much background noise.
When to Speak: A short tone
sounds after the system responds
indicating when it is waiting for a
voice command. Wait until the tone
and then speak.
How to Speak: Speak clearly in a
calm and natural voice.
Audio System
When using the in‐vehicle Bluetooth
system, sound comes through
the vehicle's front audio system
speakers and overrides the audio
system. Use the audio system
volume knob, during a call, to
change the volume level. The
adjusted volume level remains in
memory for later calls. To prevent
missed calls, a minimum volume
level is used if the volume is turned
down too low.
Bluetooth Controls
Use thegbutton, located on the
driver side of the instrument panel
near the headlamp controls, to
operate the in-vehicle Bluetooth
system.
g(Push To Talk): Press to answer
incoming calls, to confirm system
information, and to start speech
recognition.
Page 178 of 410

7-24 Infotainment System
To Transfer Audio to the In-Vehicle
Bluetooth System
The cellular phone must be paired
and connected with the Bluetooth
system before a call can be
transferred. The connection process
can take up to two minutes after the
key is turned to the ON/RUN or
ACC/ACCESSORY position.
During a call with the audio on the
cell phone, press
gfor more than
two seconds. The audio switches
from the cell phone to the vehicle.
Voice Pass-Thru
Voice Pass‐Thru allows access to
the voice recognition commands on
the cell phone. See the cell phone
manufacturers user guide to see if
the cell phone supports this feature. This feature can be used to verbally
access contacts stored in the cell
phone.
1. Press and release
g. The
system responds with “Ready”
followed by a tone.
2. Say “Bluetooth”. The system
responds with “Bluetooth ready”
followed by a tone.
3. Say “Voice”. The system
responds with “OK, accessing
.The cell phone's normal
prompt messages will go
through its cycle according
to the phone's operating
instructions.
Dual Tone Multi-Frequency
(DTMF) Tones
The in‐vehicle Bluetooth system can
send numbers and numbers stored
as name tags during a call. This is
used when calling a menu driven
phone system. Account numbers
can be programmed into the
phonebook for retrieval during menu
driven calls.
Sending a Number During a Call
1. Press and release
g. The
system responds with “Ready”
followed by a tone.
2. Say “Dial”. The system responds
with “Say a number to send
tones” followed by a tone.
Page 183 of 410

Climate Controls 8-3
@(Recirculation):Press to turn
the recirculation mode on or off.
An indicator light comes on when
the recirculation is on. This mode
recirculates and helps to quickly
cool the air inside the vehicle. It can
be used to prevent outside air and
odors from entering the vehicle.
Recirculation is available in the
bi-level and vent modes. This mode
cannot be selected while in the floor,
floor/defog or defrost modes. If you
try to select the recirculation mode,
the indicator flashes three times
indicating it is not available in that
mode. When the recirculation mode
is turned on, the air conditioning
turns on automatically. When it is hot enough outside, the
recirculation mode may turn on
automatically to help improve
cooling performance. The indicator
light will be lit to show this mode is
active. If the recirculation button is
pressed while in this mode, the light
flashes three times and stays on to
indicate that recirculation may not
be shut off.
Rear Window Defogger
The rear window defogger uses
a warming grid to remove fog or
frost from the rear window when the
key is in the ignition and turned to
ON/RUN.
=
(Rear Defogger): Press to turn
the rear window defogger on or off.
After the button is first pressed the
rear window defogger stays on for
about 15 minutes. If turned on
again, the defogger only runs for
about seven and one-half minutes.
Notice: Do not use anything
sharp on the inside of the rear
window. If you do, you could cut
or damage the warming grid, and
the repairs would not be covered
by the vehicle warranty. Do not
attach a temporary vehicle
license, tape, a decal or anything
similar to the defogger grid.
Page 196 of 410

9-12 Driving and Operating
For mounds, washouts, loose
up-hill slopes, ditches, etc.
When wheel spin occurs as the
vehicle is moving, the driver
may notice a slight shaking or
shuddering of the vehicle. This
should be stopped as soon as
possible to prevent damage to
vehicle components. This is the
indication that a loss of traction is
occurring on this terrain. The
operator should:
1. Reduce speed and apply thebrakes.
2. Assess the terrain properly and adjust vehicle speed and gear
ranges accordingly: Four‐Wheel
High position for higher speeds
and Four‐Wheel‐Low Lock for
more torque and lower speeds.
Transmission 1 (First) gear is
generally recommended. 3. Apply slight pressure to the
brake when the shaking or
shuddering sensation is felt,
keeping the vehicle moving in
a controlled manner.
4. Be prepared to alternate between braking and
accelerating through the
adverse terrain.
Getting Familiar with Off-Road
Driving
It is a good idea to practice in an
area that is safe and close to home
before you go into the wilderness.
Off-roading requires some new and
different skills.
Tune your senses to different kinds
of signals. Your eyes need to
constantly sweep the terrain for
unexpected obstacles. Your ears
need to listen for unusual tire or
engine sounds. Use your arms,
hands, feet, and body to respond to
vibrations and vehicle bounce. Controlling the vehicle is the key to
successful off-road driving. One of
the best ways to control the vehicle
is to control the speed. At higher
speeds:
.You approach things faster and
have less time to react.
.There is less time to scan the
terrain for obstacles.
.The vehicle has more bounce
when driving over obstacles.
.More braking distance is
needed, especially on an
unpaved surface.
{WARNING
When you are driving off-road,
bouncing and quick changes in
direction can easily throw you
out of position. This could cause
you to lose control and crash.
So, whether you are driving on
or off the road, you and your
passengers should wear safety
belts.
Page 198 of 410

9-14 Driving and Operating
Crossing Obstacles
Approach Angle—a Key to
Mobility
If you encounter a large dip in the
terrain, do not enter straight on;
enter at an angle —15° minimum
approach (A), 75° maximum
approach angle (B). For very large
dips, ditches or small washes, coast
in, using the engine as a brake
(transmission and transfer case
lowest gears). Then, use the low
ranges in the transmission and
transfer case to power out. Roll The Tires Over Large Rocks
Do not straddle large rocks; drive
over them, letting the tire cover the
rock. The tread of the tire is thicker
and tougher than the sidewall of the
tire and is more resilient to impact
than underbody components.
Log Crossing
Using the proper technique,
the vehicle will cross logs up to
25.4 cm (10 inches) in diameter.
Approach the log at approximately a
15° angle (A) with the transmission
in 1 (First) and the transfer case in
Four‐Wheel‐Low Lock and
“walk”the vehicle over, one tire at a time.
It may be necessary to modulate
the brake pedal and accelerator to
avoid spin-out. Ease the vehicle
down from the log with the brake.
Driving on Hills
Off-road driving often takes you up,
down, or across a hill. Driving safely
on hills requires good judgment
and an understanding of what the
vehicle can and cannot do. There
are some hills that simply cannot be
driven, no matter how well built the
vehicle.
Page 218 of 410

9-34 Driving and Operating
Ignition Positions
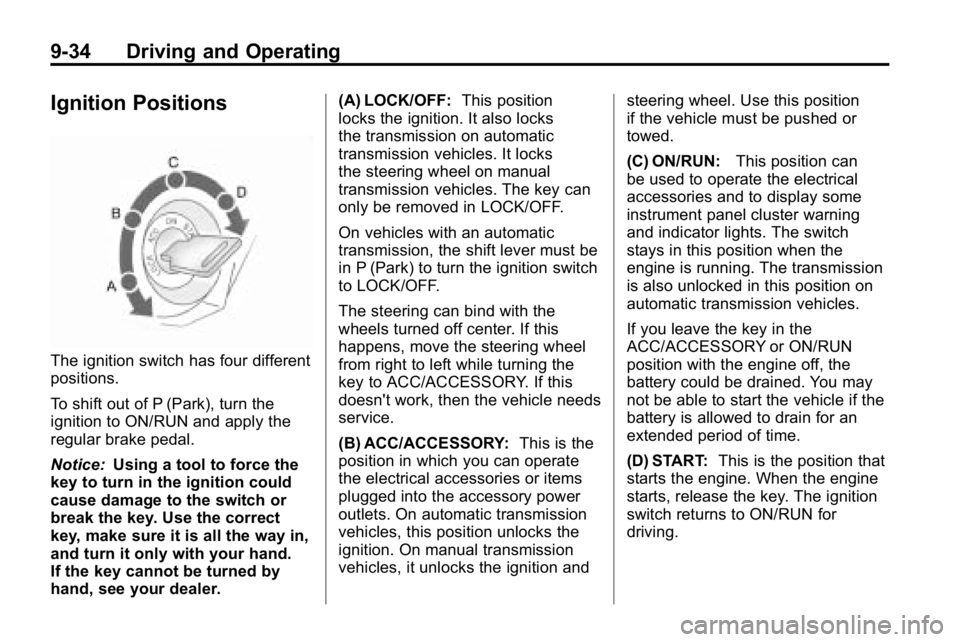
The ignition switch has four different
positions.
To shift out of P (Park), turn the
ignition to ON/RUN and apply the
regular brake pedal.
Notice:Using a tool to force the
key to turn in the ignition could
cause damage to the switch or
break the key. Use the correct
key, make sure it is all the way in,
and turn it only with your hand.
If the key cannot be turned by
hand, see your dealer. (A) LOCK/OFF:
This position
locks the ignition. It also locks
the transmission on automatic
transmission vehicles. It locks
the steering wheel on manual
transmission vehicles. The key can
only be removed in LOCK/OFF.
On vehicles with an automatic
transmission, the shift lever must be
in P (Park) to turn the ignition switch
to LOCK/OFF.
The steering can bind with the
wheels turned off center. If this
happens, move the steering wheel
from right to left while turning the
key to ACC/ACCESSORY. If this
doesn't work, then the vehicle needs
service.
(B) ACC/ACCESSORY: This is the
position in which you can operate
the electrical accessories or items
plugged into the accessory power
outlets. On automatic transmission
vehicles, this position unlocks the
ignition. On manual transmission
vehicles, it unlocks the ignition and steering wheel. Use this position
if the vehicle must be pushed or
towed.
(C) ON/RUN:
This position can
be used to operate the electrical
accessories and to display some
instrument panel cluster warning
and indicator lights. The switch
stays in this position when the
engine is running. The transmission
is also unlocked in this position on
automatic transmission vehicles.
If you leave the key in the
ACC/ACCESSORY or ON/RUN
position with the engine off, the
battery could be drained. You may
not be able to start the vehicle if the
battery is allowed to drain for an
extended period of time.
(D) START: This is the position that
starts the engine. When the engine
starts, release the key. The ignition
switch returns to ON/RUN for
driving.
Page 219 of 410

Driving and Operating 9-35
A warning tone will sound when the
driver door is opened, the ignition is
in ACC/ACCESSORY or LOCK/OFF
and the key is in the ignition.
Retained Accessory
Power (RAP)
These vehicle accessories can be
used for up to 20 minutes after the
engine is turned off:
.Audio System
.Front Wipers
.Power Windows
.Sunroof (if equipped)
These features will work when
the key is in ON/RUN or
ACC/ACCESSORY. Once the
key is turned from ON/RUN to
LOCK/OFF, these features continue
working for up to 20 minutes or until
a door is opened.
Starting the Engine
Place the transmission in the
proper gear.
Automatic Transmission
Move the shift lever to P (Park) or
N (Neutral). The engine will not start
in any other position. To restart the
vehicle when it is already moving,
use N (Neutral) only.
Notice: Do not try to shift to
P (Park) if the vehicle is moving.
If you do, you could damage the
transmission. Shift to P (Park)
only when the vehicle is stopped.
Manual Transmission
The shift lever should be in
N (Neutral) and the parking brake
engaged. Hold the clutch pedal
down to the floor and start the
engine. The vehicle will not start
if the clutch pedal is not all the
way down. Starting Procedure
1. With your foot off the accelerator
pedal, turn the ignition key to
START. When the engine starts,
let go of the key. The idle speed
will go down as the engine
warms. Do not race the engine
immediately after starting it.
Operate the engine and
transmission gently to allow
the oil to warm up and lubricate
all moving parts.
The vehicle has a
Computer-Controlled Cranking
System. This feature assists in
starting the engine and protects
components. If the ignition key is
turned to the START position,
and then released when the
engine begins cranking, the
engine will continue cranking
for a few seconds or until the
vehicle starts. If the engine
does not start and the key is
held in START for many
seconds, cranking will be
stopped after 15 seconds to
prevent cranking motor damage.