Page 258 of 351

This section explains why it is
important to keep your vehicle well
maintained and how to follow basic
maintenance safety precautions.
This section also includes
instructions on how to read the
maintenance minder messages on
the information display, and
instructions for simple maintenance
tasks you may want to take care ofyourself.
If you have the skills and tools to
perform more complex maintenance
tasks on your vehicle, you may want
to purchase the service manual. See
page 335 for information on how to
obtain a copy, or see your dealer.Maintenance Safety.....................
244
Maintenance Minder ..................
245
Fluid Locations ...........................
252
Adding Engine Oil ......................
253
Changing the Engine Oil and Filter .......................................
254
Engine Coolant ...........................
256
Windshield Washers ...................
258
Transmission Fluid .....................
259
Automatic Transmission
Fluid ...................................
259
Manual Transmission Fluid ....
260
Brake and Clutch Fluid ...............
261
Lights ..........................................
262
Cleaning the Seat Belts ...............
267
Floor Mats ..................................
267
Audio Antenna ............................
268
Dust and Pollen Filter .................
268
Wiper Blades ..............................
269
Tires ...........................................
273
Checking the Battery ..................
279
Vehicle Storage ...........................
281
Maintenance
243
Maintenance
Page 267 of 351
CLUTCH FLUID
(Manual
Transmission only)
(Gray cap)
RADIATOR CAP
ENGINE OIL FILL CAP
AUTOMATIC TRANSMISSION
FLUID DIPSTICK (Yellow loop)
WASHER FLUID
(Blue cap)
ENGINE OIL DIPSTICK
(Orange loop) ENGINE COOLANTRESERVOIR BRAKE FLUID
(Black cap)
Fluid Locations
252
Table of Contents
Page 276 of 351

Check the brake fluid level in the
reservoirs monthly.
There are up to two reservoirs,
depending on the model. They are:● Brake fluid reservoir (all models)
● Clutch fluid reservoir
(manual transmission modelsonly)
Replace the brake fluid according to
the time recommendation in the
maintenance minder schedule.
Always use Honda Heavy Duty
Brake Fluid DOT 3. If it is not
available, you should use only DOT 3
or DOT 4 fluid, from a sealed
container, as a temporaryreplacement.
Using any non-Honda brake fluid can
cause corrosion and decrease the life
of the system. Have the brake
system flushed and refilled with
Honda Heavy Duty Brake Fluid
DOT 3 as soon as possible. Brake fluid marked DOT 5 is not
compatible with your vehicle's
braking system and can cause
extensive damage.
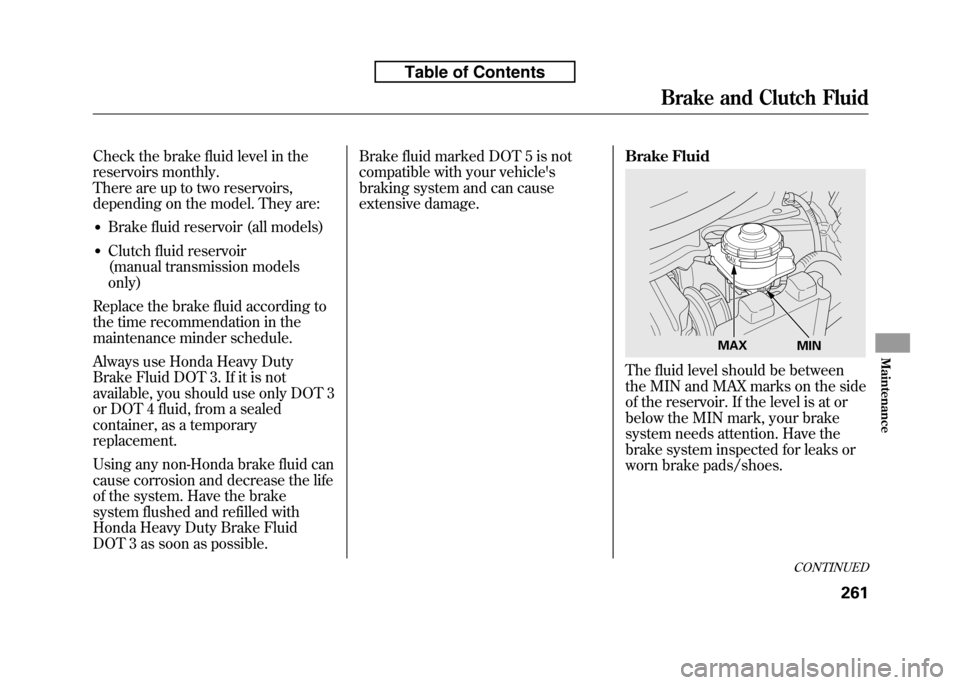
Brake Fluid
The fluid level should be between
the MIN and MAX marks on the side
of the reservoir. If the level is at or
below the MIN mark, your brake
system needs attention. Have the
brake system inspected for leaks or
worn brake pads/shoes.
MAX
MIN
CONTINUED
Brake and Clutch Fluid
261
Maintenance
Table of Contents
Page 277 of 351

Clutch Fluid
Manual Transmission only
The fluid level should be between
the MIN and MAX marks on the side
of the reservoir. If it is not, add brake
fluid to bring it up to that level. Use
the same fluid specified for the brakesystem.
A low fluid level can indicate a leak in
the clutch system. Have this system
inspected as soon as possible.Headlight Aiming
The headlights were properly aimed
when your vehicle was new. If you
regularly carry heavy items in the
cargo area, readjustment may be
required. Adjustments should be
done by your dealer or another
qualified mechanic.
Replacing a Headlight Bulb
Your vehicle has halogen headlight
bulbs. When replacing a bulb, handle
it by its base, and protect the glass
from contact with your skin or hard
objects. If you touch the glass, clean
it with denatured alcohol and a cleancloth.
Halogen headlight bulbs get very hot
when lit. Oil, perspiration, or a scratch
on the glass can cause the bulb to
overheat and shatter.
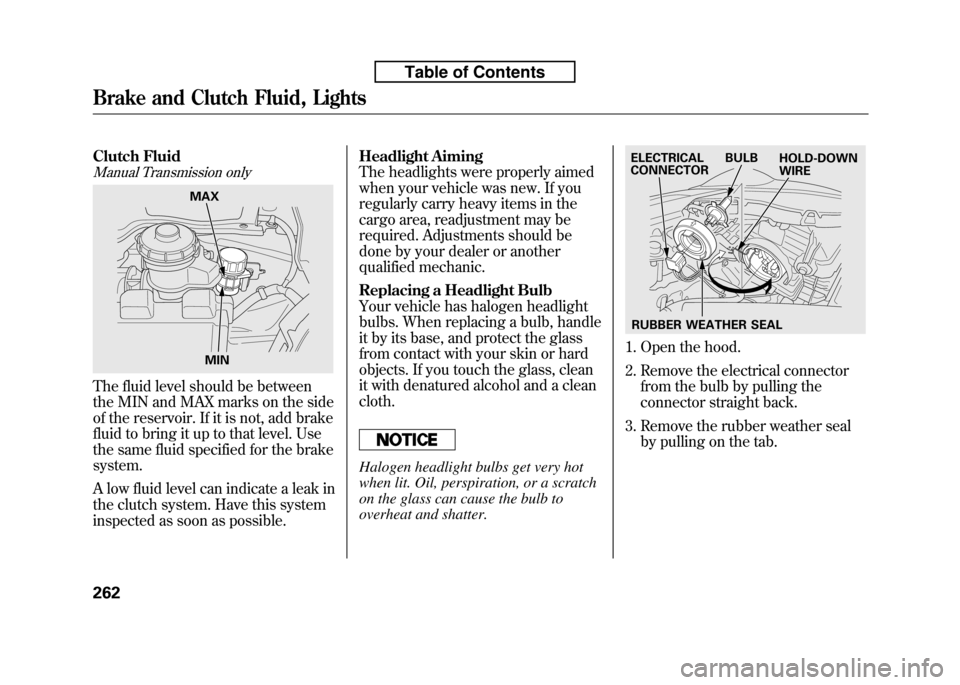
1. Open the hood.
2. Remove the electrical connector
from the bulb by pulling the
connector straight back.
3. Remove the rubber weather seal by pulling on the tab.
MAX
MIN
BULB
ELECTRICAL
CONNECTOR
RUBBER WEATHER SEAL HOLD-DOWN WIRE
Brake and Clutch Fluid, Lights
262
Table of Contents
Page 312 of 351

If the pressure is lower than 32 psi
(220 kPa) and higher than 19 psi
(130 kPa), use the air pump to
bring air to the desired level as
described in step 11. Then drive to
the nearest service station at no
more than 50 mph (80 km/h).
If the pressure is below 19 psi, do
not continue. Have the vehicle
towed (see page 311).
In any case, be sure to have the
damaged tire permanently repaired
as soon as possible.
Remember to return the tire sealant
bottle to your Honda service center
for proper disposal. If the Engine Won't Start
Diagnosing why the engine won't
start falls into two areas, depending
on what you hear when you turn the
ignition switch to the START (III)position:
● You hear nothing, or almost
nothing. The engine's starter
motor does not operate at all, or
operates very slowly.
● You can hear the starter motor
operating normally, or the starter
motor sounds like it is spinning
faster than normal, but the engine
does not start up and run. Nothing Happens or the Starter
Motor Operates Very Slowly
When you turn the ignition switch to
the START (III) position, you do not
hear the normal noise of the engine
trying to start. You may hear a
clicking sound, a series of clicks, or
nothing at all.
Check these things:
● Check the transmission interlock.
If you have a manual transmission,
the clutch pedal must be pushed
all the way to the floor or the
starter will not operate. With an
automatic transmission, it must be
in Park or neutral.
● Turn the ignition switch to the ON
(II) position. Turn on the
headlights, and check their
brightness. If the headlights are
very dim or do not come on at all,
the battery is discharged. See
Jump Starting on page 299.
CONTINUED
Temporarily Repairing a Flat Tire, If the Engine Won't Start
297
Taking Care of the Unexpected
Table of Contents
Page 324 of 351

INTERIOR FUSE BOXNo. Amps. Circuits Protected1 10 A Back Up
2 (7.5 A) TPMS
ꭧ
3 20 A Driver's Power Window 4 - Not Used
5 10 A Back Up Light
6 10 A SRS
7 (10 A) Transmission SOL
ꭧ
8 7.5 A SRS
9 (20 A) Fog Lightꭧ
10 7.5 A A/Cꭧ
11 7.5 A ABS/VSAꭧ
12 10 A ACG
13 20 A ACC Socket
14 7.5 A Key Lock/Radio
15 7.5 A Daytime Running Light
16 10 A Rear Wiper
17 20 A Front Passenger's Power Window
18 20 A Rear Passenger's Side Power Window
19 20 A Rear Driver's Side Power Window
20 15 A Fuel Pump
21 15 A Washer
22 7.5 A Meter
23 10 A Hazard
24 10 A Stop/Horn25 - Not Used No. Amps. Circuits Protected
26 10 A LAF
27 (30 A) Door Lock Main
ꭧ
28 20 A Headlight Main
29 10 A Small Light
30 30 A Main Fan Motor31 - Not Used
32 10 A Right Headlight Low Beam
33 15 A IG Coil
34 10 A Left Headlight Low Beam
35 (15 A) Door Lock
ꭧ
36 (15 A) Door Lockꭧ
37 30 A ABS/VSAꭧFSR
38 (15 A) Door Lockꭧ
39 15 A IGP40 - Not Used
41 - Not Used
42 - Not Used
43 (7.5 A) MG Clutch
44 7.5 A STS45 - Not Used
46 - Not Used
47 (30 A) Sub Fan Motor
48 10 A Left Headlight High Beam
49 (15 A) Door Lock
ꭧ
50 (15 A) Door Lockꭧ
ꭧ : If equipped
CONTINUED
Fuse Locations
309
Taking Care of the Unexpected
Table of Contents