2010 HONDA FIT adding oil
[x] Cancel search: adding oilPage 2 of 351

Bulb ReplacementBack-up Lights ........................266
Brake Lights ........................... 266
Fog Lights ............................... 265
Front Parking Lights ...............263
Front Side Marker Lights ........263
Front Turn Signal Lights .........264
Headlights .............................. 262
Rear Bulbs .............................. 266
Specifications .......................... 319
Taillights ................................. 266
Turn Signal Lights ..........263, 266
Bulbs, Halogen .......................... 262
C
Capacities Chart .........................319
Carbon Monoxide Hazard ............53
Cargo ......................................... 208
Cargo Hook ................................ 212
Cargo, How to Carry ..................208
Carrying Cargo .......................... 208
CAUTION, Explanation of ............iii
CD Care ..................................... 186
CD Error Messages ............128, 157 CD Player
........................... 122, 149
Ceiling Light .............................. 107
Certification Label ......................316
Chains, Tires .............................. 278
Changing a Flat Tire ..................285
Changing Oil How to .................................... 254
When to .................................. 245
Charging System Indicator ........................... 60, 303
Check Fuel Cap Indicator .............70
Checklist, Before Driving ...........215
Childproof Door Locks .................82
Child Safety .................................. 34
Booster Seats ........................... 50
Child Seats .................... 39, 40, 41
Important Safety Reminders .....38
Infants ...................................... 39
Larger Children .......................49
LATCH ..................................... 43
Risks with Airbags ...................35
Small Children ......................... 40
Tethers .................................... 47
Warning Labels ........................36
Where Should a Child Sit? ........35Child Seats
............................. 34, 41
LATCH Anchorage Points ........43
Tether Anchorage Points .........47
Cleaning the Seat Belts ..............267
Clock .......................................... 192
Clutch Fluid ............................... 261
Code, Audio System ...................191
CO in the Exhaust ................53, 326
Cold Weather, Starting in ...........216
Compact Spare Tire ....................284
Controls, Instruments and ............57
Coolant
Adding .................................... 256
Checking ................................ 202
Proper Solution .......................256
Temperature Indicator .............63
Crankcase Emissions Control System ................................... 326
Cruise Control Indicator ...............65
Cruise Control Operation ...........194
Cruise Main Indicator ..................65
Cup Holders ............................... 106
Customer Service .......................332
Index
II
Page 4 of 351

EngineAdding Engine Coolant ...........256
Coolant Temperature Indicator ............................... 63
If it Won't Start ........................297
Malfunction Indicator Lamp ............................. 60, 304
Oil Life Indicator .....................245
Oil Pressure Indicator .......60, 303
Oil, What Kind to Use .............253
Overheating ............................ 301
Specifications .......................... 318
Speed Limiter ..................218, 222
Starting ................................... 216
Engine Coolant .......................... 256
Engine Number .........................317
Ethanol in Gasoline ....................198
Evaporative Emissions Controls .................................. 326
Exhaust Emissions Controls ......327
Exhaust Fumes ............................ 53
Expectant Mothers, Use of Seat
Belts by .................................... 16F
Fan, Interior
............................... 111
Features ..................................... 109
Filters Dust and Pollen .......................268
Oil ........................................... 254
Flashers, Hazard Warning ...........76
Flat Tire, Changing a .................285
Floor Mats ................................. 267
Fluids
Automatic Transmission .........259
Brake ...................................... 261
Clutch ..................................... 261
Location .................................. 252
Manual Transmission ..............260
Windshield Washer .................258
FM/AM Radio Reception ...........184
Four-way Flashers ........................76
Front Airbags ........................... 9, 25
Front Seat Adjusting .................................. 93
Fuel ............................................ 198
Check Fuel Cap Indicator .........70
Economy ................................. 203Fill Door and Cap
....................
199
Gauge ...................................... 70
Low Fuel Indicator ...................62
Octane Requirement ...............198
Reserve Indicator .....................62
Tank, Filling the ......................199
Fuel Economy ............................ 203
Fuses, Checking the ..................307
G
Gas Mileage, Improving .............204
Gasoline ..................................... 198
Low Fuel Indicator ...................62
Octane Requirement ...............198
Tank, Refueling .......................199
Gas Station Procedures ..............199
Gauges
Fuel .......................................... 70
Odometer ................................. 70
Speedometer ............................ 68
Tachometer .............................. 68
Gearshift Lever Positions Automatic Transmission ...............219, 220
Index
IV
Page 216 of 351

3. Holding the grip, pull the supportrod out of its clip. Insert the end
into the designated hole in thehood.
To close the hood, lift it up slightly to
remove the support rod from the
hole. Put the support rod back into
its holding clip. Lower the hood to
about a foot (30 cm) above the
fender, then let it drop. Make sure it
is securely latched. Oil Check
Wait a few minutes after turning the
engine off before you check the oil.
1. Remove the dipstick (orange loop).
2. Wipe off the dipstick with a clean
cloth or paper towel.
3. Insert the dipstick all the way back into its hole.
4. Remove the dipstick again, andcheck the level. It should be
between the upper and lowermarks.
If it is near or below the lower mark,see Adding Engine Oil on page 253.
SUPPORT ROD
GRIP CLIP
DIPSTICK
UPPER MARK
LOWER MARK
Service Station Procedures
201
Before Driving
Table of Contents
Page 258 of 351

This section explains why it is
important to keep your vehicle well
maintained and how to follow basic
maintenance safety precautions.
This section also includes
instructions on how to read the
maintenance minder messages on
the information display, and
instructions for simple maintenance
tasks you may want to take care ofyourself.
If you have the skills and tools to
perform more complex maintenance
tasks on your vehicle, you may want
to purchase the service manual. See
page 335 for information on how to
obtain a copy, or see your dealer.Maintenance Safety.....................
244
Maintenance Minder ..................
245
Fluid Locations ...........................
252
Adding Engine Oil ......................
253
Changing the Engine Oil and Filter .......................................
254
Engine Coolant ...........................
256
Windshield Washers ...................
258
Transmission Fluid .....................
259
Automatic Transmission
Fluid ...................................
259
Manual Transmission Fluid ....
260
Brake and Clutch Fluid ...............
261
Lights ..........................................
262
Cleaning the Seat Belts ...............
267
Floor Mats ..................................
267
Audio Antenna ............................
268
Dust and Pollen Filter .................
268
Wiper Blades ..............................
269
Tires ...........................................
273
Checking the Battery ..................
279
Vehicle Storage ...........................
281
Maintenance
243
Maintenance
Page 268 of 351

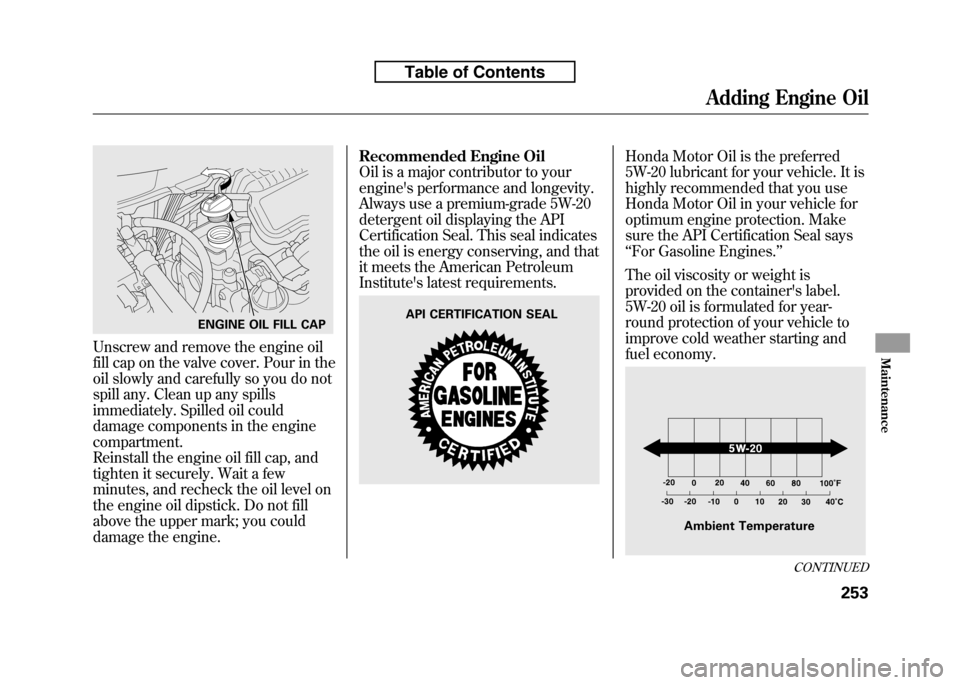
Unscrew and remove the engine oil
fill cap on the valve cover. Pour in the
oil slowly and carefully so you do not
spill any. Clean up any spills
immediately. Spilled oil could
damage components in the enginecompartment.
Reinstall the engine oil fill cap, and
tighten it securely. Wait a few
minutes, and recheck the oil level on
the engine oil dipstick. Do not fill
above the upper mark; you could
damage the engine.Recommended Engine Oil
Oil is a major contributor to your
engine's performance and longevity.
Always use a premium-grade 5W-20
detergent oil displaying the API
Certification Seal. This seal indicates
the oil is energy conserving, and that
it meets the American Petroleum
Institute's latest requirements.
Honda Motor Oil is the preferred
5W-20 lubricant for your vehicle. It is
highly recommended that you use
Honda Motor Oil in your vehicle for
optimum engine protection. Make
sure the API Certification Seal says‘‘
For Gasoline Engines. ’’
The oil viscosity or weight is
provided on the container's label.
5W-20 oil is formulated for year-
round protection of your vehicle to
improve cold weather starting and
fuel economy.
ENGINE OIL FILL CAPAPI CERTIFICATION SEAL
Ambient Temperature
CONTINUED
Adding Engine Oil
253
Maintenance
Table of Contents
Page 269 of 351

Synthetic Oil
You may use a synthetic motor oil if
it meets the same requirements
given for a conventional motor oil, it
displays the API Certification Seal,
and it is the proper weight. You must
follow the oil and filter change
intervals shown on the informationdisplay.
Engine Oil Additives
Your vehicle does not require any oil
additives. Additives may adversely
affect the engine or transmission
performance and durability.Changing the Engine Oil andFilter
Always change the oil and filter
according to the maintenance
messages shown on the information
display. The oil and filter collect
contaminants that can damage your
engine if they are not removedregularly.
Changing the oil and filter requires
special tools and access from
underneath the vehicle. The vehicle
should be raised on a service station-
type hydraulic lift for this service.
Unless you have the knowledge and
proper equipment, you should have
this maintenance done by a skilledmechanic.
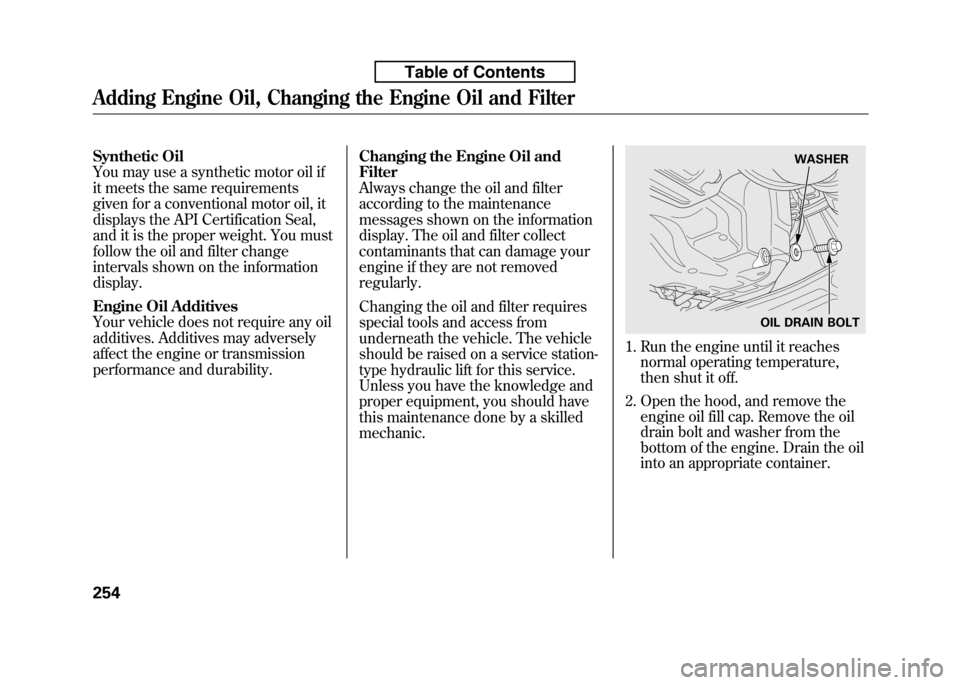
1. Run the engine until it reaches
normal operating temperature,
then shut it off.
2. Open the hood, and remove the engine oil fill cap. Remove the oil
drain bolt and washer from the
bottom of the engine. Drain the oil
into an appropriate container.
WASHER
OIL DRAIN BOLT
Adding Engine Oil, Changing the Engine Oil and Filter
254
Table of Contents