Page 71 of 351
RADIATOR CAPU.S. modelsCanadian models
DOORJAMBS
Safety Labels
55
Driver and Passenger Safety
Table of Contents
Page 267 of 351
CLUTCH FLUID
(Manual
Transmission only)
(Gray cap)
RADIATOR CAP
ENGINE OIL FILL CAP
AUTOMATIC TRANSMISSION
FLUID DIPSTICK (Yellow loop)
WASHER FLUID
(Blue cap)
ENGINE OIL DIPSTICK
(Orange loop) ENGINE COOLANTRESERVOIR BRAKE FLUID
(Black cap)
Fluid Locations
252
Table of Contents
Page 271 of 351

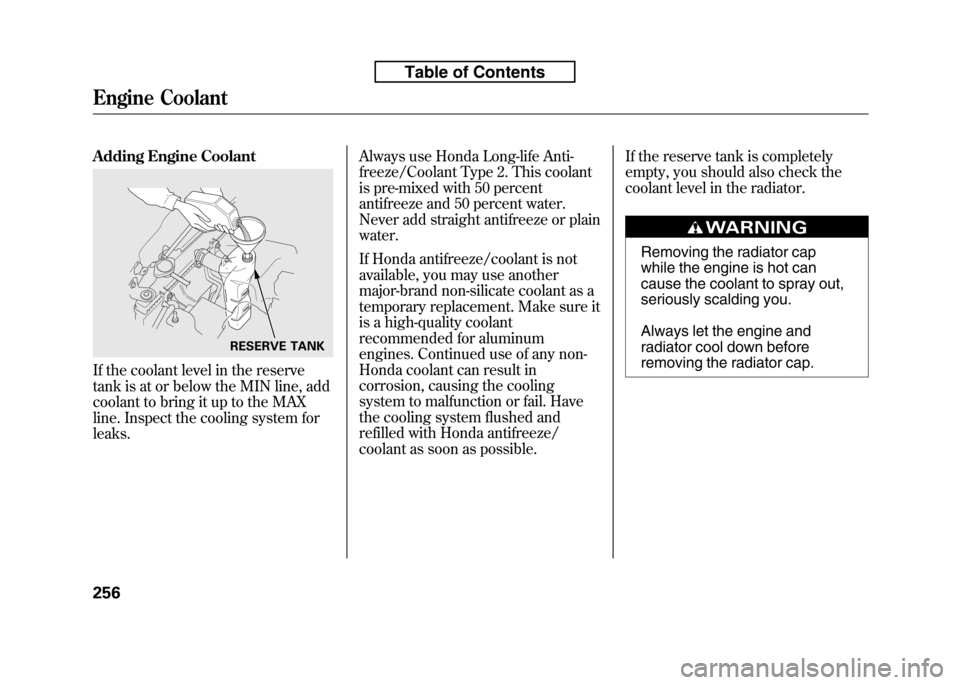
Adding Engine Coolant
If the coolant level in the reserve
tank is at or below the MIN line, add
coolant to bring it up to the MAX
line. Inspect the cooling system forleaks.Always use Honda Long-life Anti-
freeze/Coolant Type 2. This coolant
is pre-mixed with 50 percent
antifreeze and 50 percent water.
Never add straight antifreeze or plainwater.
If Honda antifreeze/coolant is not
available, you may use another
major-brand non-silicate coolant as a
temporary replacement. Make sure it
is a high-quality coolant
recommended for aluminum
engines. Continued use of any non-
Honda coolant can result in
corrosion, causing the cooling
system to malfunction or fail. Have
the cooling system flushed and
refilled with Honda antifreeze/
coolant as soon as possible.If the reserve tank is completely
empty, you should also check the
coolant level in the radiator.
Removing the radiator cap
while the engine is hot can
cause the coolant to spray out,
seriously scalding you.
Always let the engine and
radiator cool down before
removing the radiator cap.
RESERVE TANK
Engine Coolant
256
Table of Contents
Page 272 of 351
1. Make sure the engine and radiatorare cool.
2. Relieve any pressure in the cooling system by turning the radiator cap
counterclockwise, without
pressing down.
3. Remove the radiator cap by pushing down and turningcounterclockwise.4. The coolant level should be up tothe base of the filler neck. Add
coolant if it is low.
Pour the coolant slowly and
carefully so you do not spill any.
Clean up any spill immediately; it
could damage components in the
engine compartment.
5. Put the radiator cap back on, and tighten it fully. 6. Pour coolant into the reserve tank.
Fill it halfway between the MAX
and MIN marks. Put the cap back
on the reserve tank.
Do not add any rust inhibitors or
other additives to your vehicle's
cooling system. They may not be
compatible with the coolant or
engine components.
RADIATOR CAPRESERVE TANK
Engine Coolant
257
Maintenance
Table of Contents
Page 317 of 351

5. Look for any obvious coolantleaks, such as a split radiator hose.
Everything is still extremely hot,
so use caution. If you find a leak, it
must be repaired before you
continue driving (see Emergency
Towing on page 311).
6. If you don't find an obvious leak, check the coolant level in the
radiator reserve tank. Add coolant
if the level is below the MIN mark.
7. If there was no coolant in the reserve tank, you may need to add
coolant to the radiator. Let the
engine cool down until the high
temperature indicator goes off
before checking the radiator.
Removing the radiator cap
while the engine is hot can
cause the coolant to spray out,
seriously scalding you.
Always let the engine and
radiator cool down before
removing the radiator cap.
8. Using gloves or a large heavy cloth, turn the radiator cap
counterclockwise, without pushing
down, to the first stop. After the
pressure releases, push down on
the cap, and turn it until it comesoff. 9. Start the engine, and set the
temperature control dial to
maximum heat. Add coolant to the
radiator up to the base of the filler
neck. If you do not have the proper
coolant mixture available, you can
add plain water. Remember to
have the cooling system drained
and refilled with the proper
mixture as soon as you can.
10. Put the radiator cap back on tightly. Run the engine, and check
the high temperature indicator. If
it begins to blink or comes on
again, the engine needs repair (see
Emergency Towing on page 311).
11. If the temperature stays normal, check the coolant level in the
radiator reserve tank. If it has gone
down, add coolant to the MAX
mark. Put the cap back on tightly.
If the Engine Overheats
302
Table of Contents