2010 HONDA FIT valve
[x] Cancel search: valvePage 252 of 351

Changing a Tire with TPMS
If you have a flat tire, the low tire
pressure indicator will come on.
Replace the flat tire with the compact
spare tire (see page 284).
Each wheel (except the compact
spare tire wheel) is equipped with a
tire pressure sensor mounted inside
the tire behind the valve stem. You
must use TPMS specific wheels. It is
recommended that you always have
your tires serviced by your dealer or
qualified technician.
After you replace the flat tire with the
compact spare tire, the low tire
pressure indicator stays on. This is
normal; the system is not monitoring
the spare tire pressure. Manually
check the spare tire pressure to be
sure it is correct. After several miles
(kilometers) driving with the
compact spare tire, the TPMS
indicator comes on and the low tire
pressure indicator goes off.The low tire pressure indicator or the
TPMS indicator will go off, after
several miles (kilometers) driving,
when you replace the spare tire with
the specified regular tire equipped
with the tire pressure monitorsensor.
Never use a puncture-repairing agent
in a flat tire. If used, you will have to
replace the tire pressure sensor.
Have the flat tire repaired by your
dealer as soon as possible.As required by the FCC: This device
complies with Part 15 of the FCC rules.
Operation is subject to the following twoconditions: (1) This device may notcause harmful interference, and (2) thisdevice must accept any interference
received, including interference that may cause undesired operation.
Changes or modifications not expresslyapproved by the party responsible forcompliance could void the user'sauthority to operate the equipment.
This device complies with IndustryCanada Standard RSS-210. Operation is
subject to the following two conditions: (1) this device may not causeinterference, and (2) this device must
accept any interference that may causeundesired operation of the device.
Tire Pressure Monitoring System (TPMS)
237
Driving
Table of Contents
Page 266 of 351

Symbol Maintenance Main ItemsA ●
Replace engine oilꭧ1
B ●
Replace engine oil and oil filter
● Inspect front and rear brakes
● Check parking brake adjustment
● Inspect these items:
● Tie rod ends, steering gear box, and boots
● Suspension components
● Driveshaft boots
● Brake hoses and lines (including ABS/VSA)
● All fluid levels and condition of fluids
● Exhaust system
#
●Fuel lines and connections#
●Check expiration date for TRK bottleꭧ2
ꭧ 1: If the message ‘‘SERVICE ’’does not appear more than 12 months after the
display is reset, change the engine oil every year.
ꭧ 2: Canadian A/T models only
# : See information on maintenance and emissions warranty on page 249.
NOTE: ●
Independent of maintenance messages in the information display,
replace the brake fluid every 3 years.
● Inspect idle speed every 160,000 miles (256,000 km).
● Adjust the valves during services A, B, 1, 2, or 3 only if they are noisy. Symbol Maintenance Sub Items
1 ●
Rotate tires
2 ●
Replace air cleaner element
If you drive in dusty conditions, replace every 15,000
miles (24,000 km).
● Replace dust and pollen filter
If you drive primarily in urban areas that have high
concentrations of soot in the air from industry and from
diesel-powered vehicles, replace every 15,000 miles
(24,000 km).
● Inspect drive belt
3 ●
Replace transmission fluid
Driving in mountainous areas at very low vehicle
speeds results in higher transmission temperatures.
This requires transmission fluid changes more
frequently than recommended by the maintenance
minder. If you regularly drive your vehicle under these
conditions, have the transmission fluid changed at
60,000 miles (100,000 km), then every 30,000 miles
(48,000 km). (For A/T only)
If you tow a Fit behind a motorhome, the transmission
fluid must be changed every 2 years or 30,000 miles
(48,000 km), whichever comes first. (For A/T only)
4 ●
Replace spark plugs
● Inspect valve clearance
5 ●
Replace engine coolant
Maintenance Minder
Maintenance Minder
251
Table of Contents
Page 268 of 351
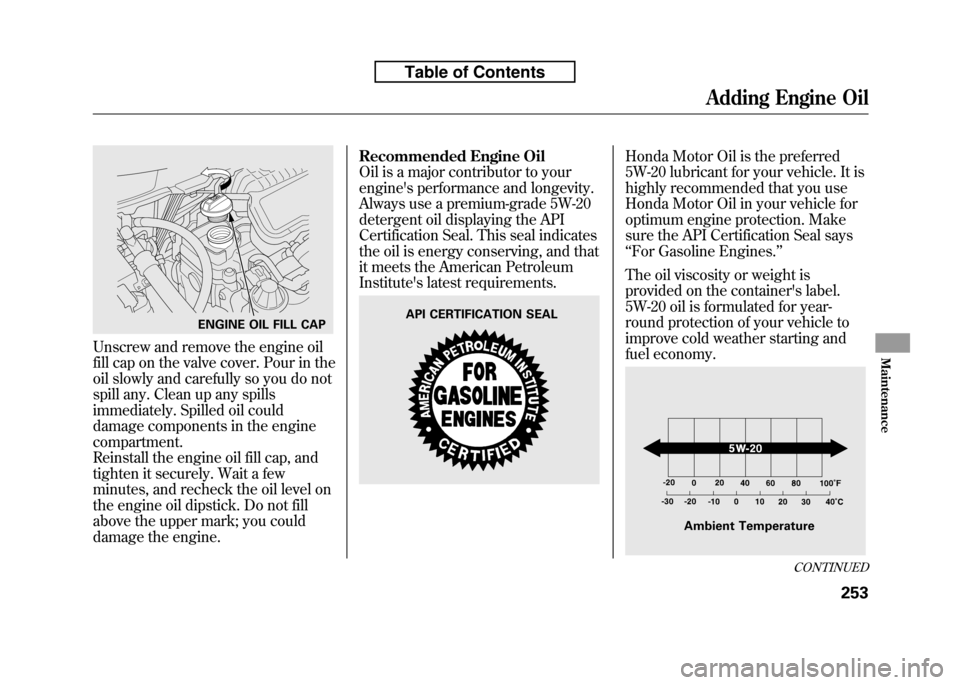
Unscrew and remove the engine oil
fill cap on the valve cover. Pour in the
oil slowly and carefully so you do not
spill any. Clean up any spills
immediately. Spilled oil could
damage components in the enginecompartment.
Reinstall the engine oil fill cap, and
tighten it securely. Wait a few
minutes, and recheck the oil level on
the engine oil dipstick. Do not fill
above the upper mark; you could
damage the engine.Recommended Engine Oil
Oil is a major contributor to your
engine's performance and longevity.
Always use a premium-grade 5W-20
detergent oil displaying the API
Certification Seal. This seal indicates
the oil is energy conserving, and that
it meets the American Petroleum
Institute's latest requirements.
Honda Motor Oil is the preferred
5W-20 lubricant for your vehicle. It is
highly recommended that you use
Honda Motor Oil in your vehicle for
optimum engine protection. Make
sure the API Certification Seal says‘‘
For Gasoline Engines. ’’
The oil viscosity or weight is
provided on the container's label.
5W-20 oil is formulated for year-
round protection of your vehicle to
improve cold weather starting and
fuel economy.
ENGINE OIL FILL CAPAPI CERTIFICATION SEAL
Ambient Temperature
CONTINUED
Adding Engine Oil
253
Maintenance
Table of Contents
Page 305 of 351
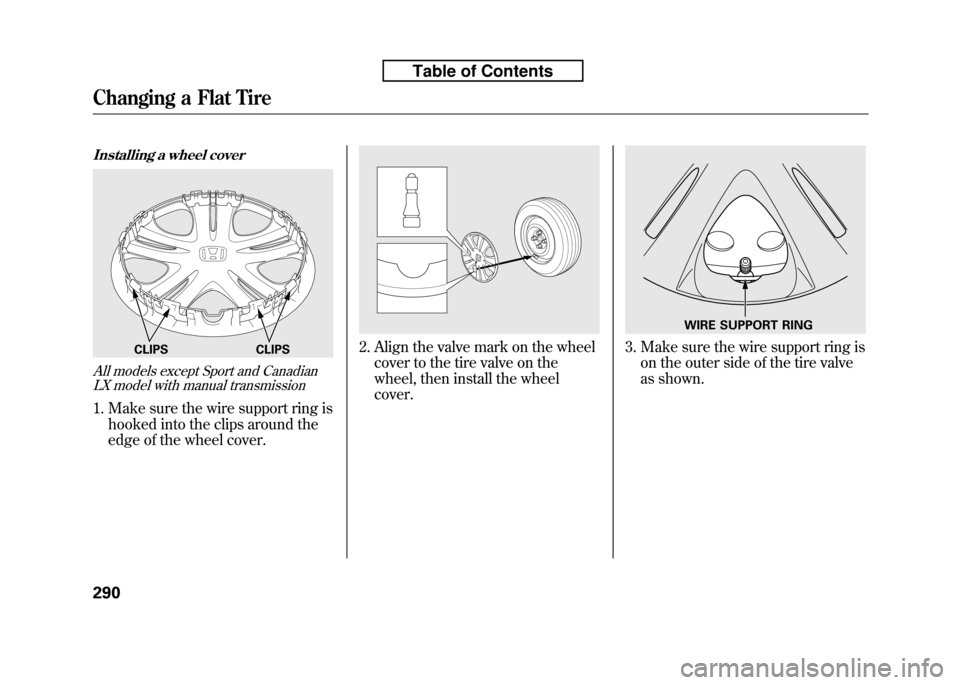
Installing a wheel cover
All models except Sport and CanadianLX model with manual transmission
1. Make sure the wire support ring is
hooked into the clips around the
edge of the wheel cover.
2. Align the valve mark on the wheelcover to the tire valve on the
wheel, then install the wheelcover.3. Make sure the wire support ring ison the outer side of the tire valve
as shown.CLIPS CLIPS
WIRE SUPPORT RING
Changing a Flat Tire
290
Table of Contents
Page 306 of 351
How to Use the Tire Repair Kit
All Canadian models with automatictransmission
To reduce weight, your vehicle is
equipped with a tire repair kit instead
of a spare tire. This kit will allow you
to temporarily repair a flat tire under
the following conditions:
● Only one tire is flat.
● The puncture is smaller than
3/16ths of an inch (4 mm).
● The puncture is located within the tread.
● The wheel rim is not damaged.
● The tire bead is seated.
When making a temporary repair,
carefully follow all instructions in this
owner's manual and in the
instructions that came with the kit. If you have a flat tire while driving,
park the vehicle on a level surface in
a safe place, put the transmission in
Park (P), set the parking brake, and
turn the hazard lights on.
Thoroughly examine the tire for a
puncture or other damage.
If a puncture is wider than 3/16ths of
an inch (4 mm), or is located in the
tire sidewall, do not attempt to repair
the tire. Have your vehicle towed to a
Honda service center. In Canada or
the continental U.S.A. simply call 1-
800-465-PLUS (7587) for Honda Plus
Roadside Assistance.
If the damage is smaller than 3/16ths
of an inch (4 mm) and within the tire
tread, proceed with the followinginstructions.
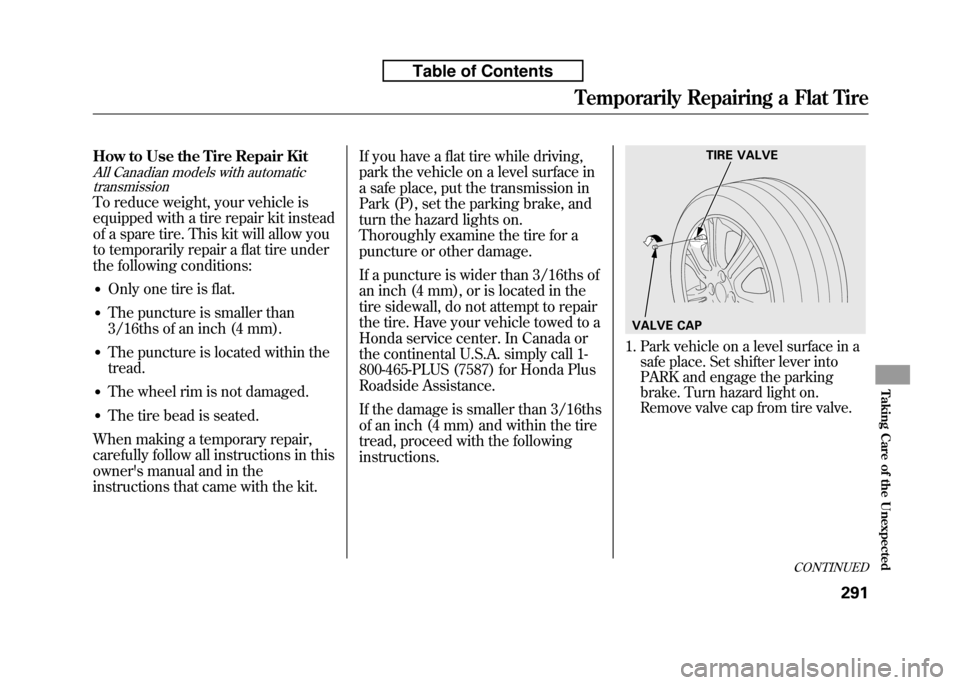
1. Park vehicle on a level surface in a
safe place. Set shifter lever into
PARK and engage the parking
brake. Turn hazard light on.
Remove valve cap from tire valve.
TIRE VALVE
VALVE CAP
CONTINUED
Temporarily Repairing a Flat Tire
291
Taking Care of the Unexpected
Table of Contents
Page 308 of 351
If the date has not expired, shake
the bottle thoroughly and proceed
to step 5.
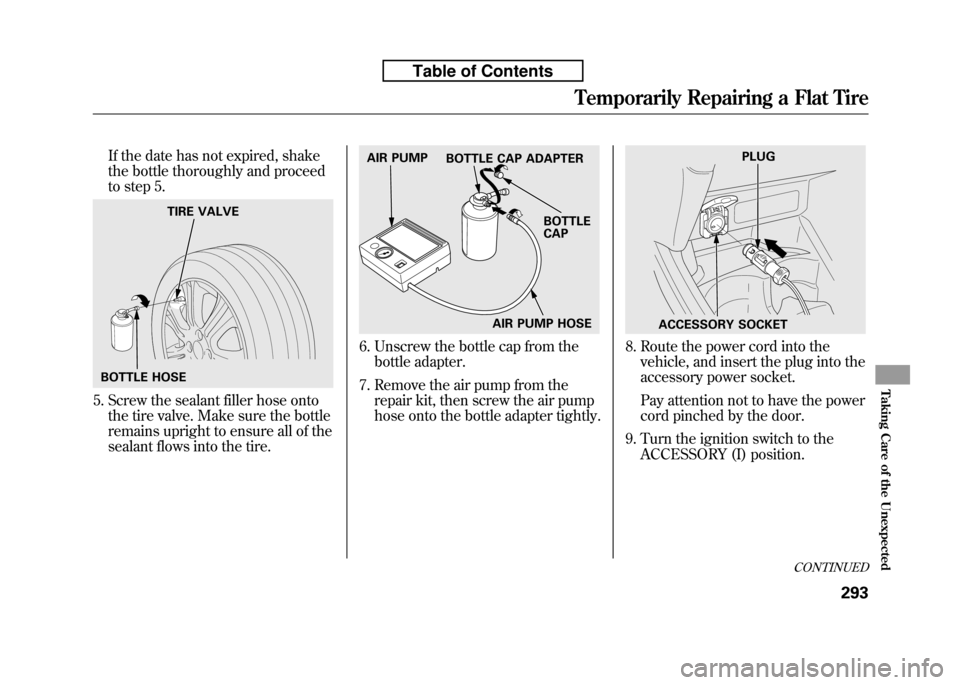
5. Screw the sealant filler hose ontothe tire valve. Make sure the bottle
remains upright to ensure all of the
sealant flows into the tire.
6. Unscrew the bottle cap from the
bottle adapter.
7. Remove the air pump from the repair kit, then screw the air pump
hose onto the bottle adapter tightly.8. Route the power cord into the
vehicle, and insert the plug into the
accessory power socket.
Pay attention not to have the power
cord pinched by the door.
9. Turn the ignition switch to the ACCESSORY (I) position.
BOTTLE HOSE TIRE VALVE
AIR PUMP HOSE
AIR PUMP
BOTTLE CAP ADAPTER
BOTTLE CAP
PLUG
ACCESSORY SOCKET
CONTINUED
Temporarily Repairing a Flat Tire
293
Taking Care of the Unexpected
Table of Contents
Page 309 of 351
In freezing temperatures, turn the
engine on and leave it running
while the flat tire is being serviced.
Prolonged exposure to the cold
may cause the vehicle's battery to
weaken. Under cold conditions,
safely start the vehicle's engine and
keep the engine running at idle
when operating the air pump.
Running the engine with the
vehicle in an enclosed or even
partly enclosed area can cause
a rapid build-up of toxic carbonmonoxide.
Breathing this colorless,
odorless gas can cause
unconsciousness and even
death. Only run the engine to
power the air pump with the
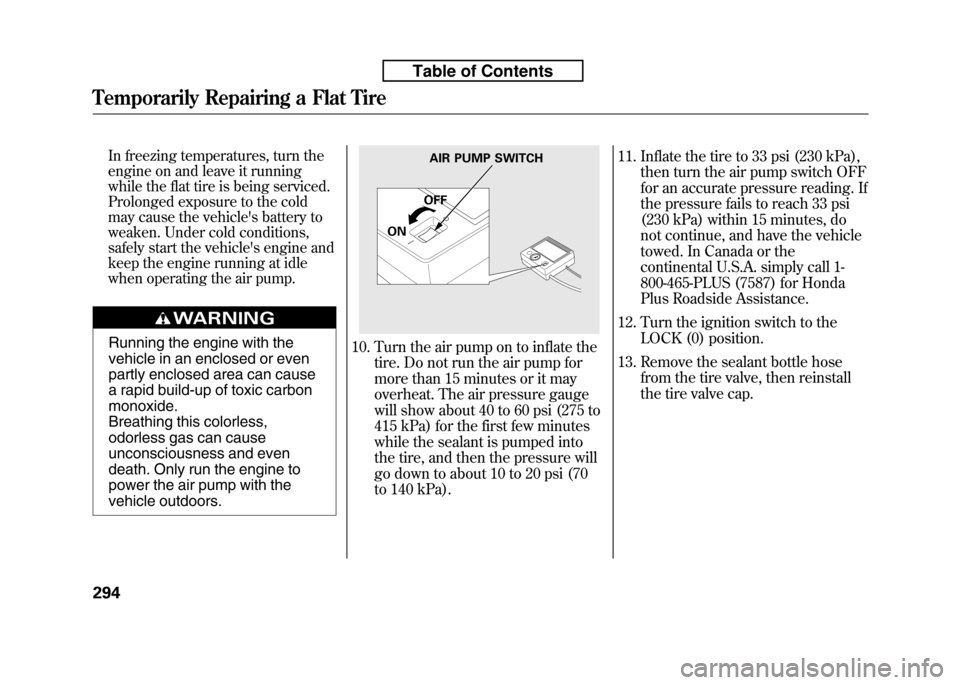
vehicle outdoors.10. Turn the air pump on to inflate thetire. Do not run the air pump for
more than 15 minutes or it may
overheat. The air pressure gauge
will show about 40 to 60 psi (275 to
415 kPa) for the first few minutes
while the sealant is pumped into
the tire, and then the pressure will
go down to about 10 to 20 psi (70
to 140 kPa). 11. Inflate the tire to 33 psi (230 kPa),
then turn the air pump switch OFF
for an accurate pressure reading. If
the pressure fails to reach 33 psi
(230 kPa) within 15 minutes, do
not continue, and have the vehicle
towed. In Canada or the
continental U.S.A. simply call 1-
800-465-PLUS (7587) for Honda
Plus Roadside Assistance.
12. Turn the ignition switch to the LOCK (0) position.
13. Remove the sealant bottle hose from the tire valve, then reinstall
the tire valve cap.
AIR PUMP SWITCH
OFF
ON
Temporarily Repairing a Flat Tire
294
Table of Contents
Page 311 of 351
19. Drive carefully within the speed of50 mph (80 km/h) for 5 minutes.
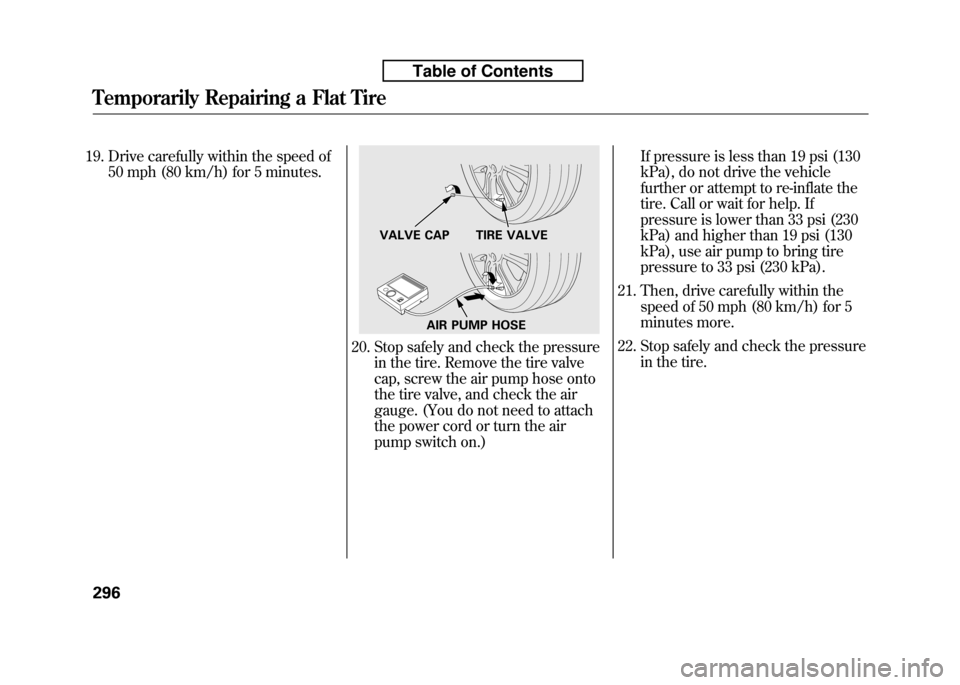
20. Stop safely and check the pressure in the tire. Remove the tire valve
cap, screw the air pump hose onto
the tire valve, and check the air
gauge. (You do not need to attach
the power cord or turn the air
pump switch on.) If pressure is less than 19 psi (130
kPa), do not drive the vehicle
further or attempt to re-inflate the
tire. Call or wait for help. If
pressure is lower than 33 psi (230
kPa) and higher than 19 psi (130
kPa), use air pump to bring tire
pressure to 33 psi (230 kPa).
21. Then, drive carefully within the speed of 50 mph (80 km/h) for 5
minutes more.
22. Stop safely and check the pressure in the tire.
VALVE CAP TIRE VALVE
AIR PUMP HOSE
Temporarily Repairing a Flat Tire
296
Table of Contents