2010 GMC SIERRA Section 7
[x] Cancel search: Section 7Page 353 of 630
Headphones
The RSE includes two 2-channel wireless headphones
that are dedicated to this system. Channel 1 is
dedicated to the video screen, while Channel 2 is
dedicated to RSA selections. These headphones can
used to listen to the radio, CDs, DVDs, MP3s, DVDAs,
any auxiliary source connected to A/V jacks, or the
auxiliary input jack, if the vehicle has this feature.
The wireless headphones have an On/Off button,
channel 1/2 switch, and a volume control.
Push the power button to turn on the headphones.
An indicator light located on the headphones comes on.
If the light comes on but, there is intermittent sound
and/or static on the headphones, or if the indicator light
does not come on, the batteries might need to be
replaced. See“Battery Replacement” later in this
section for more information. Switch the headphones
to Off when not in use.
Infrared transmitters are located at the rear of the
overhead console. The headphones shut off
automatically to save the battery power if the RSE
system and RSA are shut off or if the headphones are
out of range of the transmitters for more than
three minutes. If you move too far forward or step out of
the vehicle, the headphones lose the audio signal.
The headphones may automatically turn off after
four hours of continuous use. To adjust the volume on the headphones, use the
volume control located on the right side.
For optimal audio performance, the headphones must
be worn correctly. Headphones should be worn with
headband over the top of the head for best audio
reception. The symbol L (Left) appears on the upper left
side, above the ear pad and should be positioned on
the left ear. The symbol R (Right) appears on the upper
right side, above the ear pad and should be positioned
on the right ear.
Notice:
Do not store the headphones in heat or
direct sunlight. This could damage the headphones
and repairs will not be covered by the warranty.
Storage in extreme cold can weaken the batteries.
Keep the headphones stored in a cool, dry place.
If the foam ear pads attached to the headphones
become worn or damaged, the pads can be replaced
separately from the headphone set. Refer to your
dealer/retailer for more information.
4-135
Page 355 of 630

To use the auxiliary inputs of the RSE system, connect
an external auxiliary device to the color-coded A/V jacks
and turn both the auxiliary device and the video screen
power on. If the video screen is in the DVD player
mode, pressing the AUX (auxiliary) button on the
remote control switches the video screen from the
DVD player mode to the auxiliary device. The radio can
listen to the audio of the connected auxiliary device by
sourcing to auxiliary. SeeRadio(s)
on page 4‑87for
more information.
How to Change the RSE Video Screen
Settings
The screen display mode (normal, full, and zoom),
screen brightness, and setup menu language can be
changed from the on screen setup menu. To change
any feature, do the following:
1. Press the
z(display) menu button on the
remote control.
2. Use the remote control menu
n,q,p,o
(navigation) arrows and ther(enter) button to
use the setup menu.
3. Press the
zbutton again to remove the setup
menu from the screen.
Audio Output
Audio from the DVD player or auxiliary inputs can be
heard through the following possible sources:
.Wireless Headphones
.Vehicle Speakers
.Vehicle wired headphone jacks on the rear seat
audio system, if the vehicle has this feature.
The RSE system always transmits the audio signal to
the wireless headphones, if there is audio available.
See “Headphones” earlier in this section for more
information.
The DVD player is capable of outputting audio to the
wired headphone jacks on the RSA system, if the
vehicle has this feature. The DVD player can be
selected as an audio source on the RSA system.
See Rear Seat Audio (RSA)
on page 4‑143for
more information.
When a device is connected to the A/V jacks, or
the radio's auxiliary input jack, if the vehicle has this
feature, the rear seat passengers are able to hear audio
from the auxiliary device through the wireless or wired
headphones. The front seat passengers are able to
listen to playback from this device through the vehicle
speakers by selecting AUX as the source on the radio.
4-137
Page 356 of 630

Video Screen
The video screen is located in the overhead console.
To use the video screen, do the following:1. Push the release button located on the overhead console.
2. Move the screen to the desired position.
When the video screen is not in use, push it up into its
locked position.
If a DVD is playing and the screen is raised to its locked
position, the screen remains on. This is normal, and the
DVD continues to play through the previous audio
source. Use the remote control power button or eject
the disc to turn off the screen.
The overhead console contains the infrared transmitters
for the wireless headphones and the infrared receivers
for the remote control. They are located at the rear of
the console.
Notice: Avoid directly touching the video screen, as
damage may occur. See “Cleaning the Video
Screen” later in this section for more information.
Remote Control
To use the remote control, aim it at the transmitter
window at the rear of the RSE overhead console and
press the desired button. Direct sunlight or very bright
light could affect the ability of the RSE transmitter to
receive signals from the remote control. If the remote
control does not seem to be working, the batteries might
need to be replaced. See “Battery Replacement”later in
this section. Objects blocking the line of sight could also
affect the function of the remote control.
If a CD or DVD is in the Radio DVD slot, the remote
control
O(power) button can be used to turn on the
video screen display and start the disc. The radio can
also turn on the video screen display. See Radio(s)
on
page 4‑87for more information.
Notice: Storing the remote control in a hot area or
in direct sunlight can damage it, and the repairs will
not be covered by the warranty. Storage in extreme
cold can weaken the batteries. Keep the remote
control stored in a cool, dry place.
If the remote control becomes lost or damaged, a new
universal remote control can be purchased. If this
happens, make sure the universal remote control uses
a code set of Toshiba
®.
4-138
Page 369 of 630
Section 5 Driving Your Vehicle
Your Driving, the Road, and the Vehicle. . . . . . . . . .5-2
Defensive Driving . . . . . . . . . . . . . . . . . . . . . . . . . . . . . . . 5-2
Drunk Driving . . . . . . . . . . . . . . . . . . . . . . . . . . . . . . . . . . . 5-2
Control of a Vehicle . . . . . . . . . . . . . . . . . . . . . . . . . . . . . 5-3
Braking . . . . . . . . . . . . . . . . . . . . . . . . . . . . . . . . . . . . . . . . . 5-3
Antilock Brake System (ABS) . . . . . . . . . . . . . . . . . . . 5-4
Braking in Emergencies . . . . . . . . . . . . . . . . . . . . . . . . . 5-5
StabiliTrak
®System . . . . . . . . . . . . . . . . . . . . . . . . . . . . . 5-6
Locking Rear Axle . . . . . . . . . . . . . . . . . . . . . . . . . . . . . . 5-8
Steering . . . . . . . . . . . . . . . . . . . . . . . . . . . . . . . . . . . . . . . . . 5-8
Off-Road Recovery . . . . . . . . . . . . . . . . . . . . . . . . . . . . 5-10
Passing . . . . . . . . . . . . . . . . . . . . . . . . . . . . . . . . . . . . . . . . 5-10
Loss of Control . . . . . . . . . . . . . . . . . . . . . . . . . . . . . . . . 5-10
Off-Road Driving . . . . . . . . . . . . . . . . . . . . . . . . . . . . . . . 5-11
Driving at Night . . . . . . . . . . . . . . . . . . . . . . . . . . . . . . . . 5-23
Driving in Rain and on Wet Roads . . . . . . . . . . . . . 5-23
Before Leaving on a Long Trip . . . . . . . . . . . . . . . . . 5-24 Highway Hypnosis . . . . . . . . . . . . . . . . . . . . . . . . . . . . . 5-24
Hill and Mountain Roads . . . . . . . . . . . . . . . . . . . . . . . 5-25
Winter Driving . . . . . . . . . . . . . . . . . . . . . . . . . . . . . . . . . 5-26
If Your Vehicle is Stuck in Sand,
Mud, Ice, or Snow . . . . . . . . . . . . . . . . . . . . . . . . . . 5-28
Rocking Your Vehicle to Get It Out . . . . . . . . . . . . . 5-28
Recovery Hooks . . . . . . . . . . . . . . . . . . . . . . . . . . . . . . . 5-29
Loading the Vehicle . . . . . . . . . . . . . . . . . . . . . . . . . . . . 5-30
Adding a Snow Plow or Similar Equipment . . . . 5-36
Truck-Camper Loading Information . . . . . . . . . . . . 5-40
Pickup Conversion to Chassis Cab . . . . . . . . . . . . 5-43
Towing . . . . . . . . . . . . . . . . . . . . . . . . . . . . . . . . . . . . . . . . . . . . 5-43
Towing Your Vehicle . . . . . . . . . . . . . . . . . . . . . . . . . . . 5-43
Recreational Vehicle Towing . . . . . . . . . . . . . . . . . . . 5-43
Towing a Trailer . . . . . . . . . . . . . . . . . . . . . . . . . . . . . . . . 5-50
Trailer Recommendations . . . . . . . . . . . . . . . . . . . . . . 5-77
5-1
Page 378 of 630
Off-Road Recovery
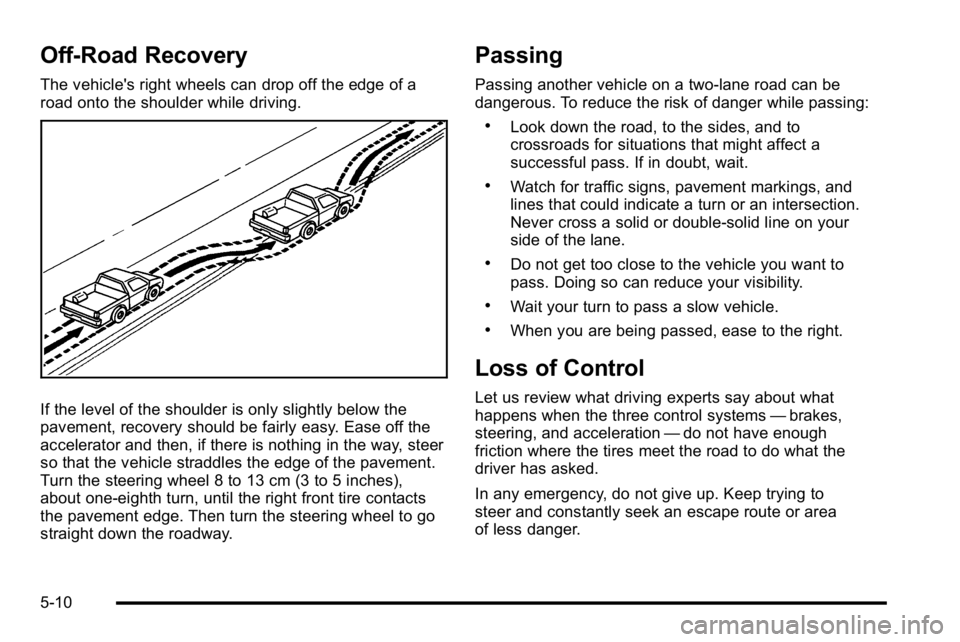
The vehicle's right wheels can drop off the edge of a
road onto the shoulder while driving.
If the level of the shoulder is only slightly below the
pavement, recovery should be fairly easy. Ease off the
accelerator and then, if there is nothing in the way, steer
so that the vehicle straddles the edge of the pavement.
Turn the steering wheel 8 to 13 cm (3 to 5 inches),
about one-eighth turn, until the right front tire contacts
the pavement edge. Then turn the steering wheel to go
straight down the roadway.
Passing
Passing another vehicle on a two-lane road can be
dangerous. To reduce the risk of danger while passing:
.Look down the road, to the sides, and to
crossroads for situations that might affect a
successful pass. If in doubt, wait.
.Watch for traffic signs, pavement markings, and
lines that could indicate a turn or an intersection.
Never cross a solid or double‐solid line on your
side of the lane.
.Do not get too close to the vehicle you want to
pass. Doing so can reduce your visibility.
.Wait your turn to pass a slow vehicle.
.When you are being passed, ease to the right.
Loss of Control
Let us review what driving experts say about what
happens when the three control systems—brakes,
steering, and acceleration —do not have enough
friction where the tires meet the road to do what the
driver has asked.
In any emergency, do not give up. Keep trying to
steer and constantly seek an escape route or area
of less danger.
5-10
Page 399 of 630
The Tire and Loading Information label also
shows the size of the original equipment tires (C)
and the recommended cold tire inflation
pressures (D). For more information on tires and
inflation seeTires
on page 6‑64andInflation - Tire
Pressure
on page 6‑72.
There is also important loading information on the
vehicle Certification/Tire label. It tells you the
Gross Vehicle Weight Rating (GVWR) and the
Gross Axle Weight Rating (GAWR) for the front
and rear axles. See “Certification/Tire Label” later
in this section.
Steps for Determining Correct Load Limit
1.Locate the statement “The combined weight
of occupants and cargo should never exceed
XXX kg or XXX lbs” on your vehicle's placard.
2.Determine the combined weight of the
driver and passengers that will be riding in
your vehicle.
3.Subtract the combined weight of the driver
and passengers from XXX kg or XXX lbs.
4.The resulting figure equals the available
amount of cargo and luggage load capacity.
For example, if the“XXX”amount equals
1400 lbs and there will be five 150 lb
passengers in your vehicle, the amount of
available cargo and luggage load capacity
is 650 lbs (1400 −750 (5 x 150) = 650 lbs).
5.Determine the combined weight of luggage
and cargo being loaded on the vehicle. That
weight may not safely exceed the available
cargo and luggage load capacity calculated
in Step 4.
6.If your vehicle will be towing a trailer, the load
from your trailer will be transferred to your
vehicle. Consult this manual to determine
how this reduces the available cargo and
luggage load capacity of your vehicle.
SeeTowing a Trailer
on page 5‑50for
important information on towing a trailer,
towing safety rules and trailering tips.
5-31
Page 414 of 630
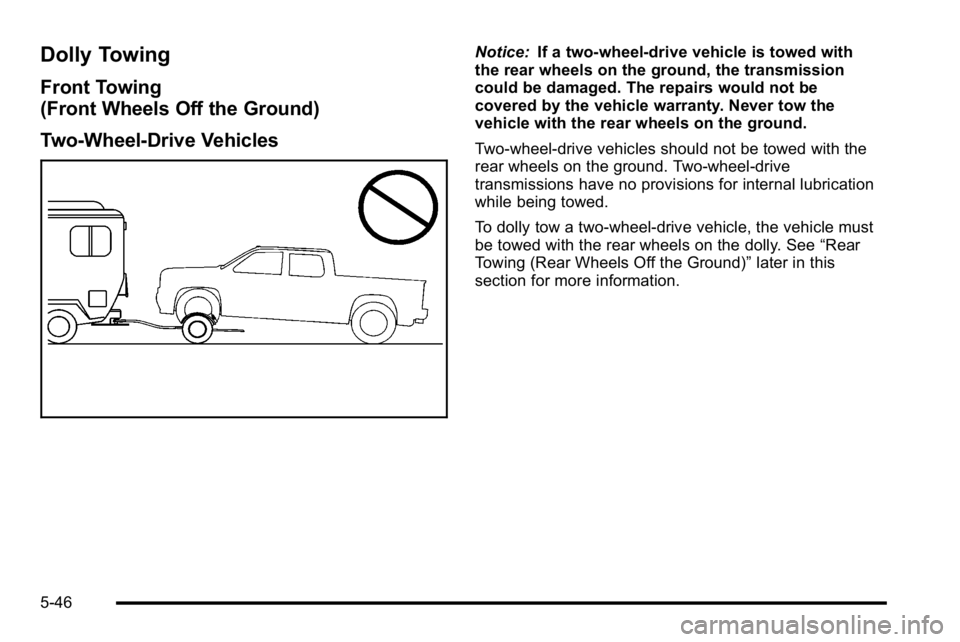
Dolly Towing
Front Towing
(Front Wheels Off the Ground)
Two-Wheel-Drive Vehicles
Notice:If a two-wheel-drive vehicle is towed with
the rear wheels on the ground, the transmission
could be damaged. The repairs would not be
covered by the vehicle warranty. Never tow the
vehicle with the rear wheels on the ground.
Two-wheel-drive vehicles should not be towed with the
rear wheels on the ground. Two-wheel-drive
transmissions have no provisions for internal lubrication
while being towed.
To dolly tow a two‐wheel‐drive vehicle, the vehicle must
be towed with the rear wheels on the dolly. See “Rear
Towing (Rear Wheels Off the Ground)” later in this
section for more information.
5-46
Page 418 of 630
Towing a Trailer
If the vehicle has a diesel engine, see the DURAMAX®
Diesel manual for more information.
If the vehicle has a two–mode hybrid engine, see the
Two–mode Hybrid manual for more information.
Do not tow a trailer during break‐in. SeeNew Vehicle
Break-In
on page 3‑21for more information.
{WARNING:
The driver can lose control when pulling a trailer if
the correct equipment is not used or the vehicle is
not driven properly. For example, if the trailer is
too heavy, the brakes may not work well or even
at all. The driver and passengers could be
seriously injured. The vehicle may also be
damaged; the resulting repairs would not be
covered by the vehicle warranty. Pull a trailer only
if all the steps in this section have been followed.
Ask your dealer/retailer for advice and information
about towing a trailer with the vehicle. Notice:
Pulling a trailer improperly can damage the
vehicle and result in costly repairs not covered by
the vehicle warranty. To pull a trailer correctly,
follow the advice in this section and see your
dealer/retailer for important information about
towing a trailer with the vehicle.
To identify the trailering capacity of the vehicle, read the
information in “Weight of the Trailer” that appears later
in this section.
Trailering is different than just driving the vehicle by
itself. Trailering means changes in handling,
acceleration, braking, durability and fuel economy.
Successful, safe trailering takes correct equipment, and
it has to be used properly.
The following information has many time-tested,
important trailering tips and safety rules. Many of
these are important for your safety and that of your
passengers. So please read this section carefully before
pulling a trailer.
5-50