2010 GMC SIERRA buttons
[x] Cancel search: buttonsPage 9 of 630

A.Outlet Adjustment on page 4‑29.
B. Turn Signal/Multifunction Lever on page 4‑4.
C. Driver Information Center (DIC) Buttons. See Driver Information Center (DIC) on page 4‑51.
D. Hazard Warning Flashers on page 4‑3.
E. Instrument Panel Cluster on page 4‑30.
F. Shift Lever. See Automatic Transmission Operation
on page 3‑28. Tow/Haul Selector Button
(If Equipped). See Tow/Haul Modeon page 3‑34.
Range Selection Mode (Allison Transmission and
Hydra-Matic
®6‐Speed Button (If Equipped). See
Automatic Transmission Operation on page 3‑28.
G. Audio System(s) on page 4‑84.
H. Instrument Panel Storage on page 3‑76.
I. Integrated Trailer Brake Controller (If Equipped). See Towing a Trailer on page 5‑50.
J. Exterior Lamps on page 4‑10.
K. Hood Release on page 6‑15.
L. Parking Brake on page 3‑50.
M. Dome Lamp Override
on page 4‑15.Dome Lampson page 4‑14.Fog Lampson page 4‑13(If Equipped).
N. Cruise Control on page 4‑7.
O. Tilt Wheel on page 4‑3. P.
Horn on page 4‑3.
Q. Audio Steering Wheel Controls
on page 4‑145(If Equipped).
R. Automatic Transfer Case Control (If Equipped). See Four-Wheel Drive on page 3‑36.
S. Ashtray (If Equipped). See Ashtray(s) and
Cigarette Lighter on page 4‑18.
T. StabiliTrak
®Systemon page 5‑6(If Equipped).
Ultrasonic Rear Parking Assist (URPA)on
page 3‑60(If Equipped). Pedal Adjust Button
(If Equipped). See Adjustable Throttle and Brake
Pedal
on page 3‑26. Heated Windshield Washer
Fluid Button (If Equipped). Windshield Washeron
page 4‑6.
U. Accessory Power Outlet(s) on page 4‑17.
V. Climate Control System (With Heater Only)
on
page 4‑18or Climate Control System (With Air
Conditioning)on page 4‑20and Dual Automatic
Climate Control System on page 4‑22.
W. Power Take Off (PTO) Control (If Equipped). See Power Take Off (PTO) in the Duramax Diesel
Supplement Index.
X. Passenger Airbag Off Control (If Equipped). See Airbag Off Switch on page 2‑82.
Y. Glove Box on page 3‑75.
1-3
Page 11 of 630

A.Outlet Adjustment on page 4‑29.
B. Turn Signal/Multifunction Lever on page 4‑4.
C. Instrument Panel Cluster on page 4‑30.
D. Hazard Warning Flashers
on page 4‑3.
E. Shift Lever. See Automatic Transmission Operation
on page 3‑28.
F. Tow/Haul Mode
on page 3‑34(If Equipped).
G. Driver Information Center (DIC) Buttons. See Driver Information Center (DIC) on page 4‑51.
H. Audio System(s) on page 4‑84.
I. Exterior Lamps on page 4‑10.
J. Integrated Trailer Brake Controller (If Equipped). See Towing a Trailer on page 5‑50.
K. Dome Lamp Override
on page 4‑15.Dome Lampson page 4‑14.
L. Automatic Transfer Case Control. (If Equipped). See Four-Wheel Drive on page 3‑36.
M. Hood Release on page 6‑15.
N. Parking Brake on page 3‑50. O.
Cruise Control on page 4‑7.
P. Tilt Wheel on page 4‑3.
Q. Horn on page 4‑3.
R. Audio Steering Wheel Controls on page 4‑145.
S. Climate Control System (With Heater Only)
on
page 4‑18or Climate Control System (With Air
Conditioning)on page 4‑20or Dual Automatic
Climate Control Systemon page 4‑22(If Equipped).
T. Accessory Power Outlet(s)
on page 4‑17.
Cigarette Lighter (If Equipped). See Ashtray(s) and
Cigarette Lighter
on page 4‑18.
U. StabiliTrak®Systemon page 5‑6(If Equipped).
Pedal Adjust Button (If Equipped). See Adjustable
Throttle and Brake Pedal
on page 3‑26. Ultrasonic
Rear Parking Assist (URPA)on page 3‑60(If Equipped). Heated Windshield Washer Fluid
Button (If Equipped). See Windshield Washeron
page 4‑6.
V. Passenger Airbag Off Control (If Equipped). See Airbag Off Switch on page 2‑82.
W. Glove Box on page 3‑75.
1-5
Page 27 of 630

Transmission
Range Selection Mode
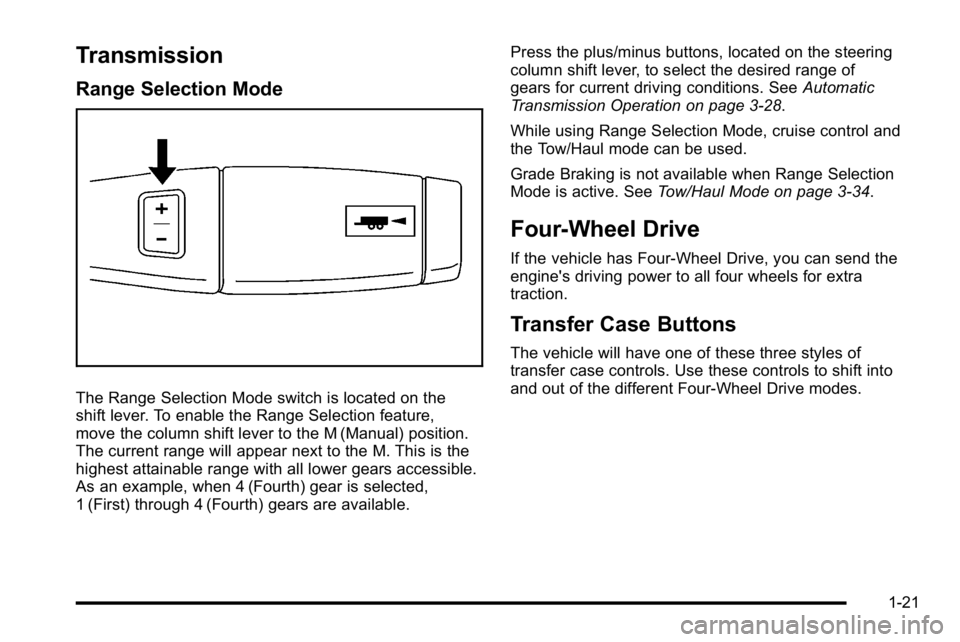
The Range Selection Mode switch is located on the
shift lever. To enable the Range Selection feature,
move the column shift lever to the M (Manual) position.
The current range will appear next to the M. This is the
highest attainable range with all lower gears accessible.
As an example, when 4 (Fourth) gear is selected,
1 (First) through 4 (Fourth) gears are available.Press the plus/minus buttons, located on the steering
column shift lever, to select the desired range of
gears for current driving conditions. See
Automatic
Transmission Operation on page 3‑28.
While using Range Selection Mode, cruise control and
the Tow/Haul mode can be used.
Grade Braking is not available when Range Selection
Mode is active. See Tow/Haul Mode on page 3‑34.
Four-Wheel Drive
If the vehicle has Four-Wheel Drive, you can send the
engine's driving power to all four wheels for extra
traction.
Transfer Case Buttons
The vehicle will have one of these three styles of
transfer case controls. Use these controls to shift into
and out of the different Four-Wheel Drive modes.
1-21
Page 33 of 630

Driver Information Center (DIC)
The DIC display is located at the bottom of the
instrument panel cluster. It shows the status of many
vehicle systems and enables access to the
personalization menu.
The DIC buttons are
located on the instrument
panel, next to the steering
wheel.
Some vehicles do not
have the buttons shown,
however some of the
menus can be viewed by
using the trip odometer
reset stem.
3:Press this button to display the odometer, trip
odometer, fuel range, average economy, fuel used,
timer, and transmission temperature. The compass
and outside air temperature will also be shown in the
display. The temperature will be shown in °F or °C
depending on the units selected.
T: Press this button to display the oil life, units, tire
pressure readings for vehicles with the Tire Pressure
Monitor System (TPMS), trailer brake gain and output
information for vehicles with the Integrated Trailer Brake
Control (ITBC) system, engine hours, Remote Keyless
Entry (RKE) transmitter programming, compass zone
setting, and compass recalibration.
U: Press this button to customize the feature settings
on your vehicle. See DIC Vehicle Customization (With
DIC Buttons)
on page 4‑75for more information.
V: Press this button to set or reset certain functions
and to turn off or acknowledge messages on the DIC.
For more information, see Driver Information Center
(DIC) on page 4‑51.
1-27
Page 34 of 630

Vehicle Customization
Some vehicle features can be programmed by
using the DIC buttons next to the steering wheel.
These features include:
.Language
.Door Lock and Unlock Settings
.RKE Lock and Unlock Feedback
.Lighting
.Chime Volume
.Memory Features
.Remote Start
.Digital Speedometer Display
See DIC Vehicle Customization (With DIC Buttons)
on
page 4‑75.
Cruise Control
The cruise control buttons
are located on left side of
the steering wheel.
T: Turns the system on or off. The indicator light is
on when cruise control is on and turns off when cruise
control is off.
+ RES : Press to make the vehicle accelerate or
resume to a previously set speed.
SET −:Press to set the speed or make the vehicle
decelerate.
[: Press to cancel cruise control without erasing the
set speed from memory.
See Cruise Control on page 4‑7.
1-28
Page 36 of 630

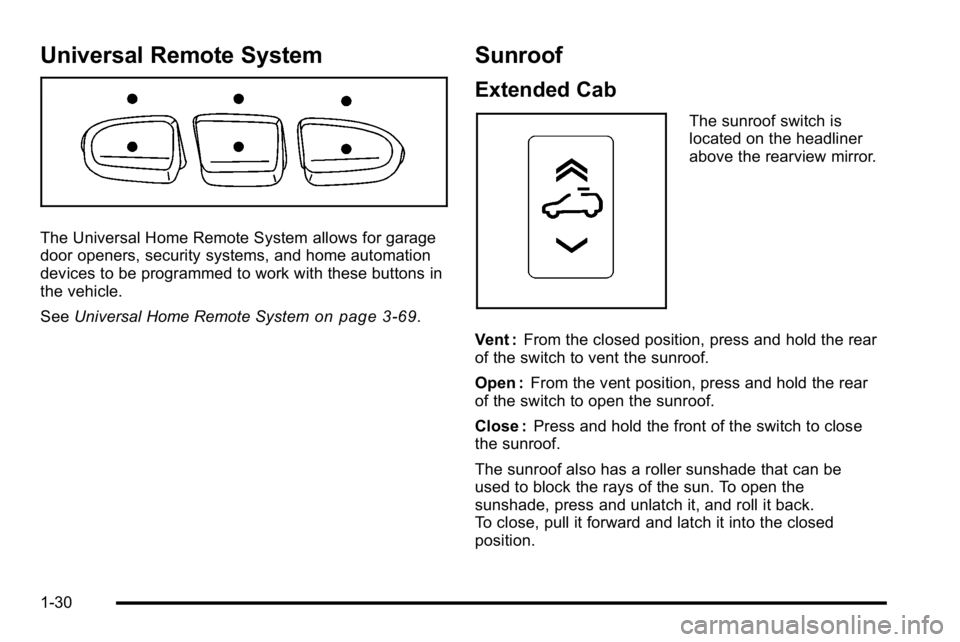
Universal Remote System
The Universal Home Remote System allows for garage
door openers, security systems, and home automation
devices to be programmed to work with these buttons in
the vehicle.
SeeUniversal Home Remote System
on page 3‑69.
Sunroof
Extended Cab
The sunroof switch is
located on the headliner
above the rearview mirror.
Vent : From the closed position, press and hold the rear
of the switch to vent the sunroof.
Open : From the vent position, press and hold the rear
of the switch to open the sunroof.
Close : Press and hold the front of the switch to close
the sunroof.
The sunroof also has a roller sunshade that can be
used to block the rays of the sun. To open the
sunshade, press and unlatch it, and roll it back.
To close, pull it forward and latch it into the closed
position.
1-30
Page 38 of 630

Tire Pressure Monitor
This vehicle may have a Tire Pressure Monitor
System (TPMS).
The Tire Pressure Monitor
alerts you when a
significant reduction in
pressure occurs in one or
more of the vehicle’s tires
by illuminating the low tire
pressure warning light on
the instrument cluster.
The warning light will remain on until the tire pressure is
corrected. The proper tire pressures for your vehicle are
listed on the Tire and Loading Information label located
on the driver side center pillar (B pillar). See Loading
the Vehicle
on page 5‑30.
You may notice during cooler conditions that the low tire
pressure warning light will appear when the vehicle is
first started and then turn off as you drive. This may be
an early indicator that your tire pressures are getting
low and the tires need to be inflated to the proper
pressure. Note:
The Tire Pressure Monitor can alert you about
low tire pressure, but it does not replace normal monthly
tire maintenance. It is the driver ’s responsibility to
maintain correct tire pressures.
See Tire Pressure Monitor System
on page 6‑75and
Tire Pressure Monitor Operation on page 6‑76.
Engine Oil Life System
The engine oil life system calculates engine oil life
based on vehicle use and, on most vehicles, displays a
DIC message when it is necessary to change the
engine oil and filter. The oil life system should be reset
to 100% only following an oil change.
Resetting the Oil Life System
To reset the Engine Oil Life System on most vehicles:
1. Display the OIL LIFE REMAINING on the DIC. If the vehicle does not have DIC buttons, the
vehicle must be in P (Park) to access this display.
2. Press and hold the SET/RESET button on the DIC, or the trip odometer reset stem if the vehicle does
not have DIC buttons, for more than five seconds.
The oil life will change to 100%.
1-32
Page 42 of 630

OnStar Steering Wheel Controls
This vehicle may have a Talk/Mute button that can
be used to interact with OnStar hands-free calling.
SeeAudio Steering Wheel Controls
on page 4‑145for
more information.
On some vehicles, the mute button can be used to
dial numbers into voice mail systems, or to dial phone
extensions. See the OnStar Owner's Guide for more
information.
Your Responsibility
Increase the volume of the radio if the OnStar advisor
cannot be heard.
If the light next to the OnStar buttons is red, the system
may not be functioning properly. Press
Qand request a
vehicle diagnostic. If the light appears clear (no light is
appearing), your OnStar subscription has expired and
all services have been deactivated. Press
Qto confirm
that the OnStar equipment is active.
1-36