2010 GMC SIERRA Section 7
[x] Cancel search: Section 7Page 79 of 630
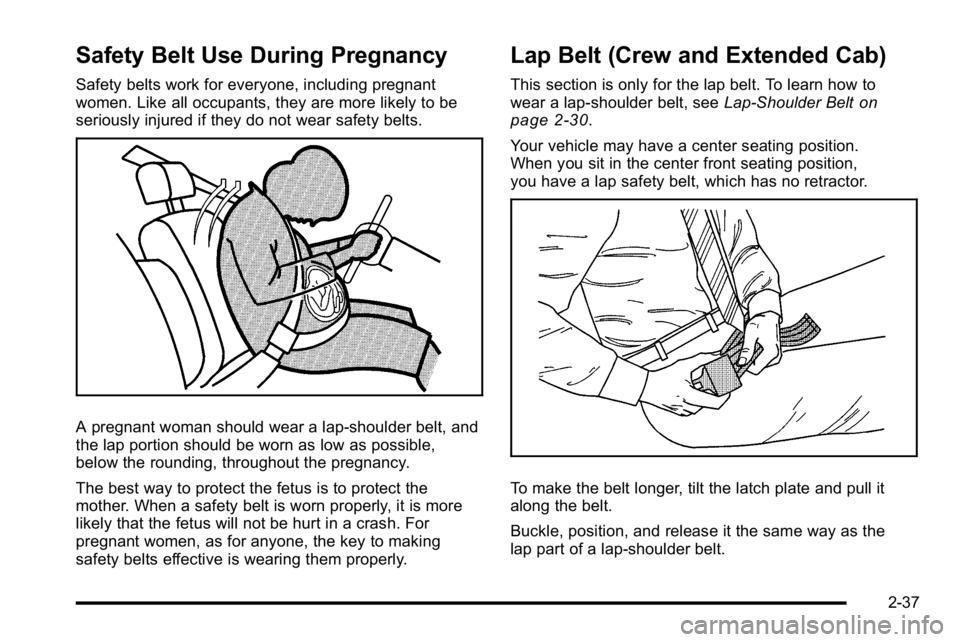
Safety Belt Use During Pregnancy
Safety belts work for everyone, including pregnant
women. Like all occupants, they are more likely to be
seriously injured if they do not wear safety belts.
A pregnant woman should wear a lap-shoulder belt, and
the lap portion should be worn as low as possible,
below the rounding, throughout the pregnancy.
The best way to protect the fetus is to protect the
mother. When a safety belt is worn properly, it is more
likely that the fetus will not be hurt in a crash. For
pregnant women, as for anyone, the key to making
safety belts effective is wearing them properly.
Lap Belt (Crew and Extended Cab)
This section is only for the lap belt. To learn how to
wear a lap-shoulder belt, seeLap-Shoulder Belton
page 2‑30.
Your vehicle may have a center seating position.
When you sit in the center front seating position,
you have a lap safety belt, which has no retractor.
To make the belt longer, tilt the latch plate and pull it
along the belt.
Buckle, position, and release it the same way as the
lap part of a lap-shoulder belt.
2-37
Page 136 of 630
Replacing Restraint System Parts
After a Crash
{WARNING:
A crash can damage the restraint systems in your
vehicle. A damaged restraint system may not
properly protect the person using it, resulting in
serious injury or even death in a crash. To help
make sure your restraint systems are working
properly after a crash, have them inspected and
any necessary replacements made as soon as
possible.
If the vehicle has been in a crash, do you need new
safety belts or LATCH system (if equipped) parts?
After a very minor crash, nothing may be necessary.
But the safety belt assemblies that were used during
any crash may have been stressed or damaged.
See your dealer/retailer to have the safety belt
assemblies inspected or replaced. If the vehicle has the LATCH system and it was
being used during a crash, you may need new
LATCH system parts.
New parts and repairs may be necessary even if the
safety belt or LATCH system (if equipped), was not
being used at the time of the crash.
If an airbag inflates, you will need to replace airbag
system parts. See the part on the airbag system earlier
in this section.
Have the safety belt pretensioners checked if the
vehicle has been in a crash, if the airbag readiness light
stays on after the vehicle is started, or while you are
driving. See
Airbag Readiness Light
on page 4‑33.
2-94
Page 137 of 630

Section 3 Features and Controls
Keys. . . . . . . . . . . . . . . . . . . . . . . . . . . . . . . . . . . . . . . . . . . . . . . . 3-3
Remote Keyless Entry (RKE) System . . . . . . . . . . . 3-4
Remote Keyless Entry (RKE) System Operation . . . . . . . . . . . . . . . . . . . . . . . . . . . . . . . . . . . . . 3-4
Remote Vehicle Start . . . . . . . . . . . . . . . . . . . . . . . . . . . 3-7
Doors and Locks . . . . . . . . . . . . . . . . . . . . . . . . . . . . . . . . . . 3-9
Door Locks . . . . . . . . . . . . . . . . . . . . . . . . . . . . . . . . . . . . . 3-9
Power Door Locks . . . . . . . . . . . . . . . . . . . . . . . . . . . . . . 3-9
Delayed Locking . . . . . . . . . . . . . . . . . . . . . . . . . . . . . . . 3-10
Programmable Automatic Door Locks . . . . . . . . . . 3-10
Rear Door Security Locks . . . . . . . . . . . . . . . . . . . . . 3-10
Lockout Protection . . . . . . . . . . . . . . . . . . . . . . . . . . . . . 3-11
Rear Doors . . . . . . . . . . . . . . . . . . . . . . . . . . . . . . . . . . . . 3-11
Tailgate . . . . . . . . . . . . . . . . . . . . . . . . . . . . . . . . . . . . . . . . 3-12
Windows . . . . . . . . . . . . . . . . . . . . . . . . . . . . . . . . . . . . . . . . . . 3-14
Manual Windows . . . . . . . . . . . . . . . . . . . . . . . . . . . . . . 3-15
Power Windows . . . . . . . . . . . . . . . . . . . . . . . . . . . . . . . 3-15
Power Sliding Rear Window . . . . . . . . . . . . . . . . . . . 3-16
Sun Visors . . . . . . . . . . . . . . . . . . . . . . . . . . . . . . . . . . . . . 3-17 Theft-Deterrent Systems
. . . . . . . . . . . . . . . . . . . . . . . . .3-17
Content Theft-Deterrent . . . . . . . . . . . . . . . . . . . . . . . . 3-17
PASS-Key
®III+ Electronic Immobilizer . . . . . . . . . 3-19
PASS-Key®III+ Electronic Immobilizer
Operation . . . . . . . . . . . . . . . . . . . . . . . . . . . . . . . . . . . . 3-19
Starting and Operating Your Vehicle . . . . . . . . . . . .3-21
New Vehicle Break-In . . . . . . . . . . . . . . . . . . . . . . . . . . 3-21
Ignition Positions . . . . . . . . . . . . . . . . . . . . . . . . . . . . . . 3-22
Retained Accessory Power (RAP) . . . . . . . . . . . . . 3-23
Starting the Engine . . . . . . . . . . . . . . . . . . . . . . . . . . . . 3-23
Fast Idle System . . . . . . . . . . . . . . . . . . . . . . . . . . . . . . . 3-25
Adjustable Throttle and Brake Pedal . . . . . . . . . . . 3-26
Engine Coolant Heater . . . . . . . . . . . . . . . . . . . . . . . . . 3-26
Active Fuel Management™ . . . . . . . . . . . . . . . . . . . . 3-27
Automatic Transmission Operation . . . . . . . . . . . . . 3-28
Tow/Haul Mode . . . . . . . . . . . . . . . . . . . . . . . . . . . . . . . . 3-34
Four-Wheel Drive . . . . . . . . . . . . . . . . . . . . . . . . . . . . . . 3-36
Parking Brake . . . . . . . . . . . . . . . . . . . . . . . . . . . . . . . . . 3-50
Shifting Into Park . . . . . . . . . . . . . . . . . . . . . . . . . . . . . . 3-51
Shifting Out of Park . . . . . . . . . . . . . . . . . . . . . . . . . . . . 3-53
Parking Over Things That Burn . . . . . . . . . . . . . . . . 3-53
Engine Exhaust . . . . . . . . . . . . . . . . . . . . . . . . . . . . . . . . 3-54
Running the Vehicle While Parked . . . . . . . . . . . . . 3-55
3-1
Page 138 of 630
Section 3 Features and Controls
Mirrors. . . . . . . . . . . . . . . . . . . . . . . . . . . . . . . . . . . . . . . . . . . . 3-56
Manual Rearview Mirror . . . . . . . . . . . . . . . . . . . . . . . . 3-56
Automatic Dimming Rearview Mirror . . . . . . . . . . . 3-56
Outside Manual Mirrors . . . . . . . . . . . . . . . . . . . . . . . . 3-56
Outside Towing Mirrors . . . . . . . . . . . . . . . . . . . . . . . . 3-57
Outside Power Mirrors . . . . . . . . . . . . . . . . . . . . . . . . . 3-57
Outside Power Foldaway Mirrors . . . . . . . . . . . . . . 3-58
Park Tilt Mirrors . . . . . . . . . . . . . . . . . . . . . . . . . . . . . . . . 3-59
Outside Convex Mirror . . . . . . . . . . . . . . . . . . . . . . . . . 3-59
Outside Heated Mirrors . . . . . . . . . . . . . . . . . . . . . . . . 3-59
Object Detection Systems . . . . . . . . . . . . . . . . . . . . . . .3-60
Ultrasonic Rear Parking Assist (URPA) . . . . . . . . 3-60
Rear Vision Camera (RVC) . . . . . . . . . . . . . . . . . . . . 3-63 Universal Home Remote System
. . . . . . . . . . . . . . . .3-69
Universal Home Remote System Operation (With Three Round LED) . . . . . . . . . . . . . . . . . . . . 3-69
Storage Areas . . . . . . . . . . . . . . . . . . . . . . . . . . . . . . . . . . . . 3-75
Glove Box . . . . . . . . . . . . . . . . . . . . . . . . . . . . . . . . . . . . . 3-75
Cupholders . . . . . . . . . . . . . . . . . . . . . . . . . . . . . . . . . . . . 3-75
Instrument Panel Storage . . . . . . . . . . . . . . . . . . . . . 3-76
Center Console Storage . . . . . . . . . . . . . . . . . . . . . . 3-76
Roof Rack System . . . . . . . . . . . . . . . . . . . . . . . . . . . . . 3-77
Rear Seat Armrest . . . . . . . . . . . . . . . . . . . . . . . . . . . . . 3-78
Cargo Management System . . . . . . . . . . . . . . . . . . . 3-78
Sunroof . . . . . . . . . . . . . . . . . . . . . . . . . . . . . . . . . . . . . . . . . . . 3-80
3-2
Page 140 of 630

If you are locked out of the vehicle, call the Roadside
Assistance Center. SeeRoadside Assistance Program
on page 8‑7.
Remote Keyless Entry (RKE) System
SeeRadio Frequency Statementon page 8‑19for
information regarding Part 15 of the Federal
Communications Commission (FCC) Rules and
RSS-210/211 of Industry and Science Canada.
Changes or modifications to this system by other than
an authorized service facility could void authorization to
use this equipment.
If there is a decrease in the RKE operating range,
try this:
.Check the distance. The transmitter may be too far
from the vehicle. Stand closer during rainy or
snowy weather.
.Check the location. Other vehicles or objects may
be blocking the signal. Take a few steps to the left
or right, hold the transmitter higher, and try again.
.Check the transmitter's battery. See “Battery
Replacement” later in this section.
.If the transmitter is still not working correctly, see
your dealer/retailer or a qualified technician for
service.
Remote Keyless Entry (RKE) System
Operation
The Remote Keyless Entry (RKE) transmitter functions
work up to 195 feet (60 m) away from the vehicle.
There are other conditions which can affect the
performance of the transmitter. See Remote Keyless
Entry (RKE) System on page 3‑4.
With Remote Start
(Without Remote Start Similar)
3-4
Page 164 of 630
Automatic Transmission Operation
If the vehicle is a Two-mode Hybrid, see the Two-mode
Hybrid manual for more information.
Vehicles with an automatic transmission have an
electronic shift position indicator within the instrument
panel cluster. This display comes on when the ignition
key is turned to the ON/RUN position.
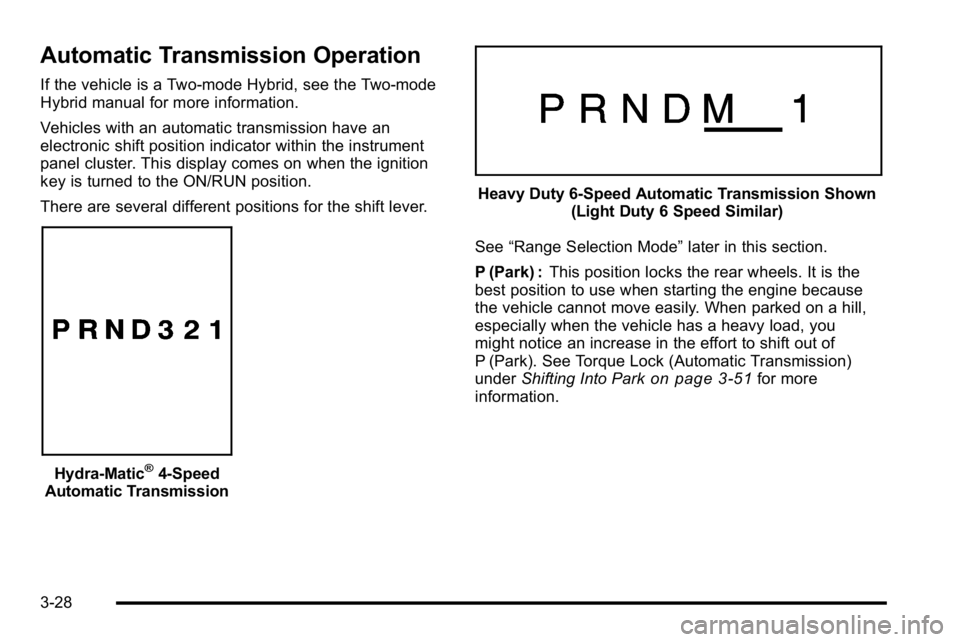
There are several different positions for the shift lever.
Hydra-Matic®4-Speed
Automatic Transmission
Heavy Duty 6-Speed Automatic Transmission Shown (Light Duty 6 Speed Similar)
See “Range Selection Mode” later in this section.
P (Park) : This position locks the rear wheels. It is the
best position to use when starting the engine because
the vehicle cannot move easily. When parked on a hill,
especially when the vehicle has a heavy load, you
might notice an increase in the effort to shift out of
P (Park). See Torque Lock (Automatic Transmission)
under Shifting Into Park
on page 3‑51for more
information.
3-28
Page 167 of 630
If the shift stabilization feature determines that a current
vehicle speed cannot be maintained, the transmission
does not upshift and instead holds the current gear.
In some cases, this could appear to be a delayed shift,
however the transmission is operating normally.
The transmission uses adaptive shift controls.
Adaptive shift controls continually compares key shift
parameters to pre-programmed ideal shifts stored in the
transmissions computer. The transmission constantly
makes adjustments to improve vehicle performance
according to how the vehicle is being used, such as
with a heavy load or when temperature changes.
During this adaptive shift control process, shifting
might feel different as the transmission determines
the best settings.
When temperatures are very cold, the Allison
Transmission
®and Hydra-Matic®6-Speed
transmission's gear shifting could be delayed
providing more stable shifts until the engine
warms up. Shifts could be more noticeable with a
cold transmission. This difference in shifting is normal. M (Manual Mode) :
This position is available on
vehicles with the Allison Transmission
®or Hydra-Matic®
6-Speed transmission. It lets drivers select the range of
gears appropriate for current driving conditions. If the
vehicle has this feature, see Range Select Mode
(Allison Transmission
®or Hydra-Matic®6-Speed
transmission) later in this section.
3 (Third) : This position is also used for normal driving.
It reduces vehicle speed more than D (Drive) without
using the brakes. You might choose 3 (Third) instead of
D (Drive) when driving on hilly, winding roads, when
towing a trailer, so there is less shifting between gears
and when going down a steep hill.
2 (Second) : This position reduces vehicle speed even
more than 3 (Third) without using the brakes. You can
use 2 (Second) on hills. It can help control vehicle
speed as you go down steep mountain roads, but then
you would also want to use the brakes off and on.
If you manually select 2 (Second) in an automatic
transmission, the transmission will start in second gear.
You can use this feature for reducing the speed of the
rear wheels when you are trying to start the vehicle
from a stop on slippery road surfaces.
3-31
Page 199 of 630

Rear Vision Camera (RVC)
This vehicle may have a Rear Vision Camera system.
Read this entire section before using it.
{WARNING:
The Rear Vision Camera (RVC) system does not
replace driver vision. RVC does not:
.Detect objects that are outside the camera's
field of view, below the bumper, or underneath
the vehicle.
.Detect children, pedestrians, bicyclists,
or pets.
Do not back the vehicle by only looking at the
RVC screen, or use the screen during longer,
higher speed backing maneuvers or where there
could be cross-traffic. Your judged distances using
the screen will differ from actual distances.
So if you do not use proper care before backing
up, you could hit a vehicle, child, pedestrian,
bicyclist, or pet, resulting in vehicle damage,
injury, or death. Even though the vehicle has the
RVC system, always check carefully before
backing up by checking behind and around the
vehicle.
Vehicles Without Navigation System
The rear vision camera system is designed to help the
driver when backing up by displaying a view of the
area behind the vehicle. When the key is in the
ON/RUN position and the driver shifts the vehicle into
R (Reverse), the video image automatically appears on
the inside rear view mirror. Once the driver shifts out of
R (Reverse), the video image automatically disappears
from the inside rear view mirror.
Turning the Rear Vision Camera System
Off or On
To turn off the rear vision camera system, press and
hold
z, located on the inside rearview mirror, until the
left indicator light turns off. The rear camera vision
display is now disabled.
To turn the rear vision camera system on again, press
and hold
zuntil the left indicator light illuminates.
The rear vision camera system display is now enabled
and the display will appear in the mirror normally.
3-63