2010 GMC CANYON lock
[x] Cancel search: lockPage 261 of 448
Four-Wheel-Drive Vehicles
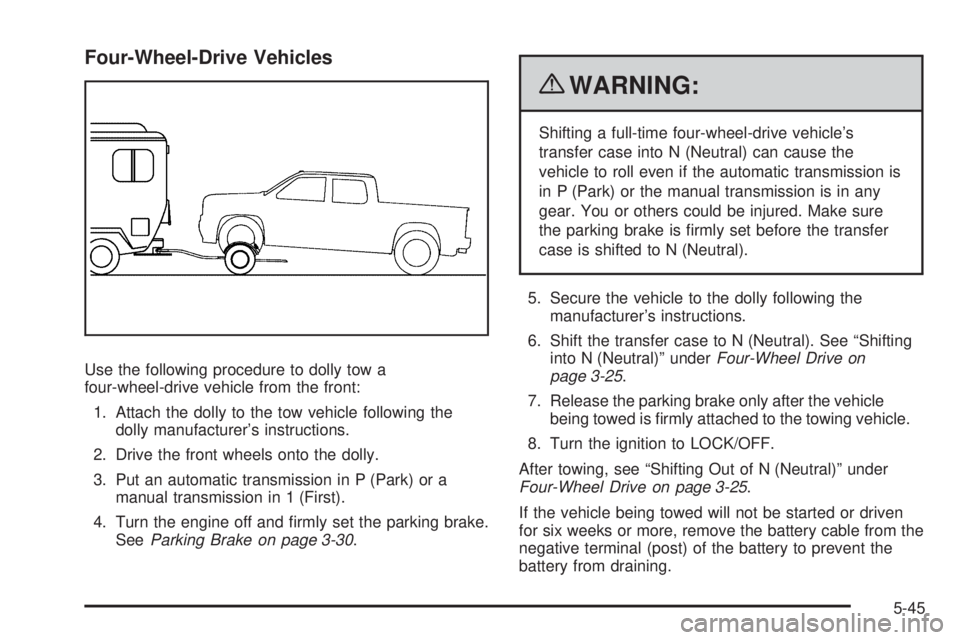
Use the following procedure to dolly tow a
four-wheel-drive vehicle from the front:
1. Attach the dolly to the tow vehicle following the
dolly manufacturer’s instructions.
2. Drive the front wheels onto the dolly.
3. Put an automatic transmission in P (Park) or a
manual transmission in 1 (First).
4. Turn the engine off and firmly set the parking brake.
SeeParking Brake on page 3-30.
{WARNING:
Shifting a full-time four-wheel-drive vehicle’s
transfer case into N (Neutral) can cause the
vehicle to roll even if the automatic transmission is
in P (Park) or the manual transmission is in any
gear. You or others could be injured. Make sure
the parking brake is firmly set before the transfer
case is shifted to N (Neutral).
5. Secure the vehicle to the dolly following the
manufacturer’s instructions.
6. Shift the transfer case to N (Neutral). See “Shifting
into N (Neutral)” underFour-Wheel Drive on
page 3-25.
7. Release the parking brake only after the vehicle
being towed is firmly attached to the towing vehicle.
8. Turn the ignition to LOCK/OFF.
After towing, see “Shifting Out of N (Neutral)” under
Four-Wheel Drive on page 3-25.
If the vehicle being towed will not be started or driven
for six weeks or more, remove the battery cable from the
negative terminal (post) of the battery to prevent the
battery from draining.
5-45
Page 262 of 448
Rear Towing (Rear Wheels Off the Ground)
Two-Wheel-Drive Vehicles
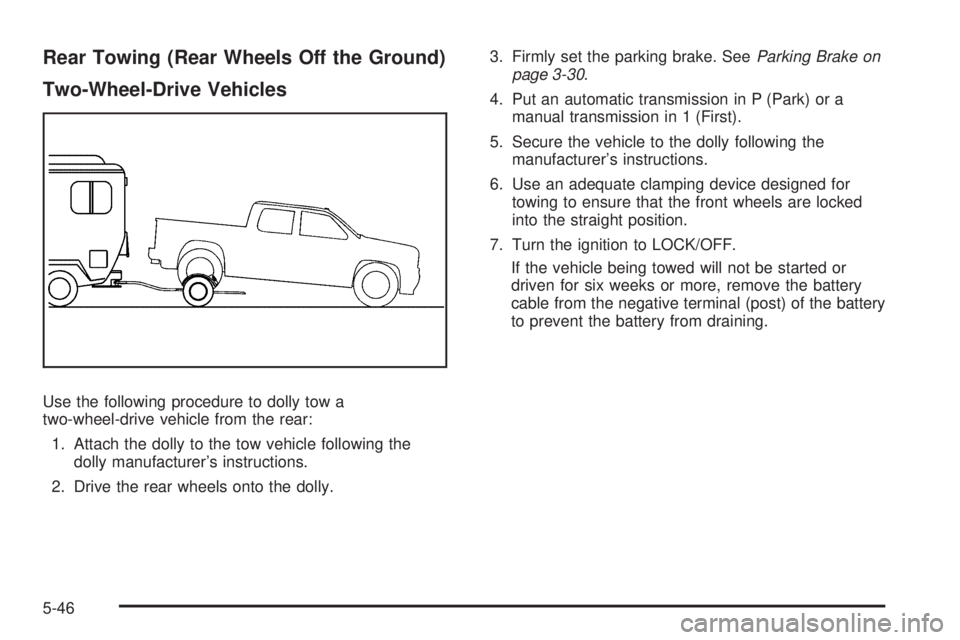
Use the following procedure to dolly tow a
two-wheel-drive vehicle from the rear:
1. Attach the dolly to the tow vehicle following the
dolly manufacturer’s instructions.
2. Drive the rear wheels onto the dolly.3. Firmly set the parking brake. SeeParking Brake on
page 3-30.
4. Put an automatic transmission in P (Park) or a
manual transmission in 1 (First).
5. Secure the vehicle to the dolly following the
manufacturer’s instructions.
6. Use an adequate clamping device designed for
towing to ensure that the front wheels are locked
into the straight position.
7. Turn the ignition to LOCK/OFF.
If the vehicle being towed will not be started or
driven for six weeks or more, remove the battery
cable from the negative terminal (post) of the battery
to prevent the battery from draining.
5-46
Page 263 of 448
Four-Wheel-Drive Vehicles
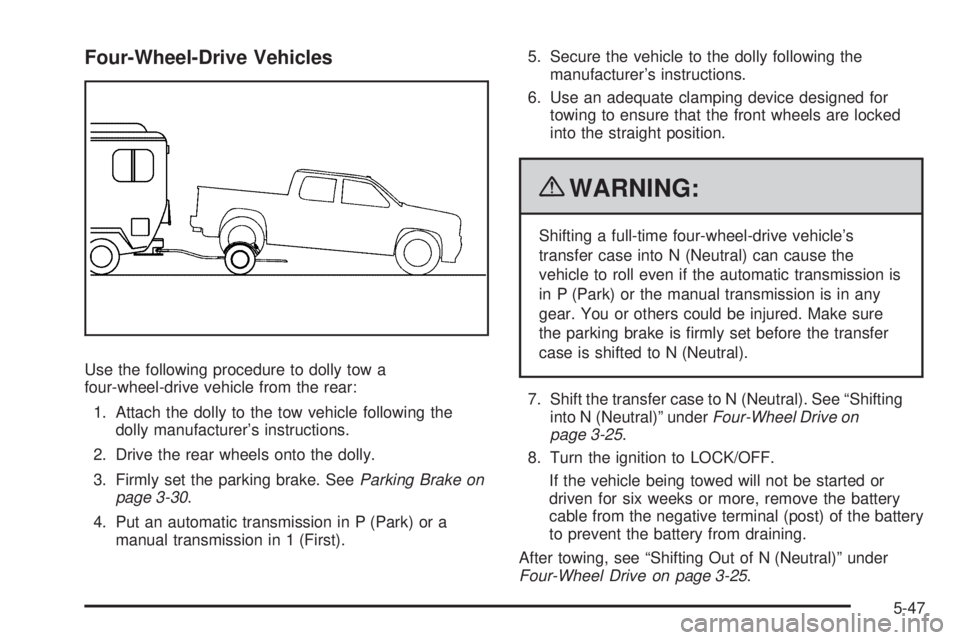
Use the following procedure to dolly tow a
four-wheel-drive vehicle from the rear:
1. Attach the dolly to the tow vehicle following the
dolly manufacturer’s instructions.
2. Drive the rear wheels onto the dolly.
3. Firmly set the parking brake. SeeParking Brake on
page 3-30.
4. Put an automatic transmission in P (Park) or a
manual transmission in 1 (First).5. Secure the vehicle to the dolly following the
manufacturer’s instructions.
6. Use an adequate clamping device designed for
towing to ensure that the front wheels are locked
into the straight position.
{WARNING:
Shifting a full-time four-wheel-drive vehicle’s
transfer case into N (Neutral) can cause the
vehicle to roll even if the automatic transmission is
in P (Park) or the manual transmission is in any
gear. You or others could be injured. Make sure
the parking brake is firmly set before the transfer
case is shifted to N (Neutral).
7. Shift the transfer case to N (Neutral). See “Shifting
into N (Neutral)” underFour-Wheel Drive on
page 3-25.
8. Turn the ignition to LOCK/OFF.
If the vehicle being towed will not be started or
driven for six weeks or more, remove the battery
cable from the negative terminal (post) of the battery
to prevent the battery from draining.
After towing, see “Shifting Out of N (Neutral)” under
Four-Wheel Drive on page 3-25.
5-47
Page 278 of 448
Tires..............................................................6-57
Tire Sidewall Labeling...................................6-58
Tire Terminology and Definitions.....................6-61
Inflation - Tire Pressure.................................6-64
High-Speed Operation...................................6-65
Tire Pressure Monitor System.........................6-66
Tire Pressure Monitor Operation.....................6-67
Tire Inspection and Rotation...........................6-71
When It Is Time for New Tires.......................6-72
Buying New Tires.........................................6-73
Different Size Tires and Wheels......................6-75
Uniform Tire Quality Grading..........................6-75
Wheel Alignment and Tire Balance..................6-77
Wheel Replacement......................................6-77
Tire Chains..................................................6-78
If a Tire Goes Flat........................................6-79
Changing a Flat Tire.....................................6-80
Removing the Spare Tire and Tools................6-81
Removing the Flat Tire and Installing the
Spare Tire................................................6-85
Secondary Latch System...............................6-93
Storing a Flat or Spare Tire and Tools............6-96
Spare Tire.................................................6-101
Appearance Care..........................................6-102
Interior Cleaning.........................................6-102
Fabric/Carpet..............................................6-103Leather......................................................6-104
Instrument Panel, Vinyl, and Other Plastic
Surfaces.................................................6-105
Care of Safety Belts....................................6-105
Weatherstrips.............................................6-105
Washing Your Vehicle..................................6-106
Cleaning Exterior Lamps/Lenses....................6-106
Finish Care................................................6-107
Windshield and Wiper Blades.......................6-107
Aluminum or Chrome-Plated Wheels and Trim . . .6-108
Tires.........................................................6-108
Sheet Metal Damage...................................6-109
Finish Damage...........................................6-109
Underbody Maintenance...............................6-109
Chemical Paint Spotting...............................6-109
Vehicle Identi�cation.....................................6-110
Vehicle Identification Number (VIN)................6-110
Service Parts Identification Label...................6-110
Electrical System..........................................6-111
Add-On Electrical Equipment.........................6-111
Windshield Wiper Fuses...............................6-111
Fuses and Circuit Breakers..........................6-111
Engine Compartment Fuse Block...................6-112
Capacities and Speci�cations........................6-118
Section 6 Service and Appearance Care
6-2
Page 279 of 448
Service
For service and parts needs, visit your dealer/retailer.
You will receive genuine GM parts and GM-trained and
supported service people.
Genuine GM parts have one of these marks:
Accessories and Modi�cations
When non-dealer/non-retailer accessories are added to
the vehicle, they can affect vehicle performance and
safety, including such things as airbags, braking, stability,
ride and handling, emissions systems, aerodynamics,
durability, and electronic systems like antilock brakes,
traction control, and stability control. Some of these
accessories could even cause malfunction or damage
not covered by the vehicle warranty.
Damage to vehicle components resulting from the
installation or use of non-GM certified parts, including
control module modifications, are not covered under the
terms of the vehicle warranty and may affect remaining
warranty coverage for affected parts.
GM Accessories are designed to complement and
function with other systems on the vehicle. Your GM
dealer/retailer can accessorize the vehicle using genuine
GM Accessories. When you go to your GM dealer/
retailer and ask for GM Accessories, you will know
that GM-trained and supported service technicians
will perform the work using genuine GM Accessories.
Also, seeAdding Equipment to Your Airbag-Equipped
Vehicle on page 2-80.
6-3
Page 284 of 448
Filling the Tank
{WARNING:
Fuel vapor burns violently and a fuel fire can
cause bad injuries. To help avoid injuries to you
and others, read and follow all the instructions on
the fuel pump island. Turn off the engine when
refueling. Do not smoke near fuel or when
refueling the vehicle. Do not use cellular phones.
Keep sparks, flames, and smoking materials away
from fuel. Do not leave the fuel pump unattended
when refueling the vehicle. This is against the law
in some places. Do not re-enter the vehicle while
pumping fuel. Keep children away from the fuel
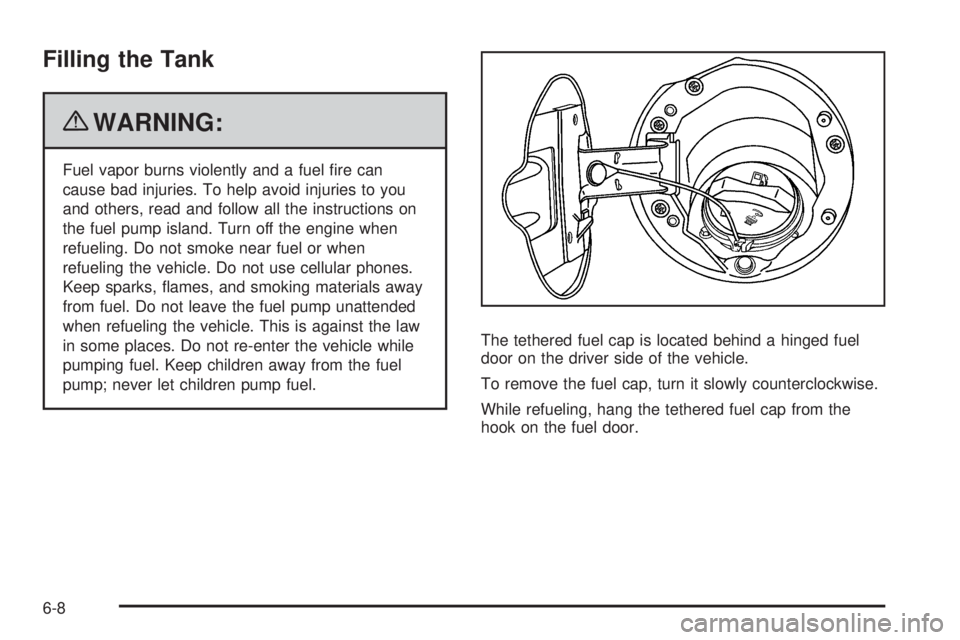
pump; never let children pump fuel.The tethered fuel cap is located behind a hinged fuel
door on the driver side of the vehicle.
To remove the fuel cap, turn it slowly counterclockwise.
While refueling, hang the tethered fuel cap from the
hook on the fuel door.
6-8
Page 285 of 448

{WARNING:
Fuel can spray out on you if you open the fuel cap
too quickly. If you spill fuel and then something
ignites it, you could be badly burned. This spray
can happen if the tank is nearly full, and is more
likely in hot weather. Open the fuel cap slowly and
wait for any hiss noise to stop. Then unscrew the
cap all the way.
Be careful not to spill fuel. Do not top off or overfill the
tank and wait a few seconds after you have finished
pumping before removing the nozzle. Clean fuel from
painted surfaces as soon as possible. SeeWashing
Your Vehicle on page 6-106.
When replacing the fuel cap, turn it clockwise until it
clicks. Make sure the cap is fully installed. The diagnostic
system can determine if the fuel cap has been left off or
improperly installed. This would allow fuel to evaporate
into the atmosphere. If the fuel cap is not properlyinstalled, the FUEL CAP message appears on the Driver
Information Center (DIC) and the check engine light will
be lit on the instrument panel cluster. SeeDIC Warnings
and Messages on page 4-37andMalfunction Indicator
Lamp on page 4-28for more information.
{WARNING:
If a fire starts while you are refueling, do not
remove the nozzle. Shut off the flow of fuel by
shutting off the pump or by notifying the station
attendant. Leave the area immediately.
Notice:If you need a new fuel cap, be sure to get
the right type. Your dealer/retailer can get one
for you. If you get the wrong type, it may not �t
properly. This may cause the malfunction indicator
lamp to light and may damage the fuel tank and
emissions system. SeeMalfunction Indicator Lamp
on page 4-28.
6-9
Page 289 of 448
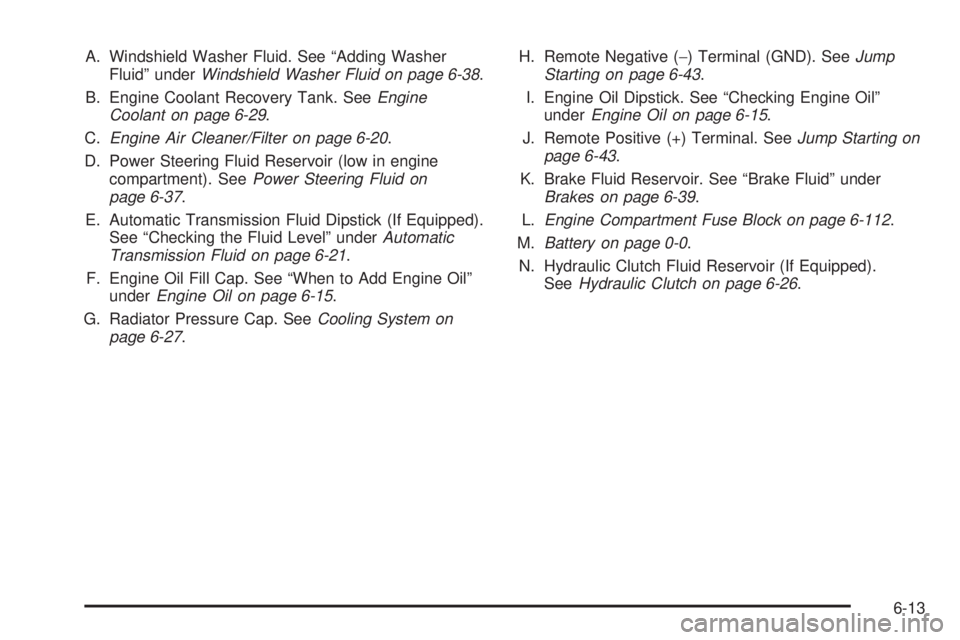
A. Windshield Washer Fluid. See “Adding Washer
Fluid” underWindshield Washer Fluid on page 6-38.
B. Engine Coolant Recovery Tank. SeeEngine
Coolant on page 6-29.
C.Engine Air Cleaner/Filter on page 6-20.
D. Power Steering Fluid Reservoir (low in engine
compartment). SeePower Steering Fluid on
page 6-37.
E. Automatic Transmission Fluid Dipstick (If Equipped).
See “Checking the Fluid Level” underAutomatic
Transmission Fluid on page 6-21.
F. Engine Oil Fill Cap. See “When to Add Engine Oil”
underEngine Oil on page 6-15.
G. Radiator Pressure Cap. SeeCooling System on
page 6-27.H. Remote Negative (−) Terminal (GND). SeeJump
Starting on page 6-43.
I. Engine Oil Dipstick. See “Checking Engine Oil”
underEngine Oil on page 6-15.
J. Remote Positive (+) Terminal. SeeJump Starting on
page 6-43.
K. Brake Fluid Reservoir. See “Brake Fluid” under
Brakes on page 6-39.
L.Engine Compartment Fuse Block on page 6-112.
M.Battery on page 0-0.
N. Hydraulic Clutch Fluid Reservoir (If Equipped).
SeeHydraulic Clutch on page 6-26.
6-13