Page 291 of 448

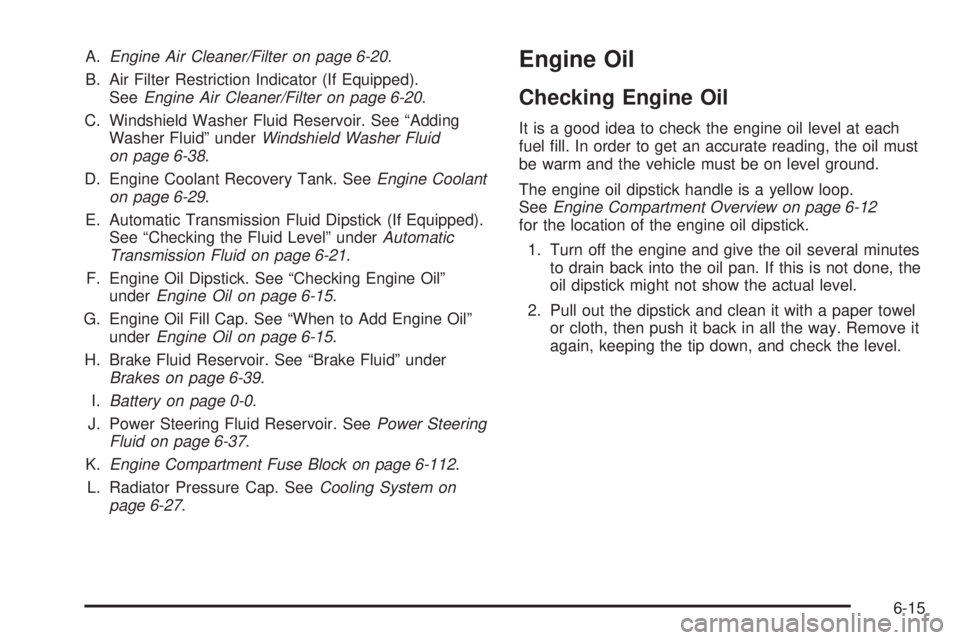
A.Engine Air Cleaner/Filter on page 6-20.
B. Air Filter Restriction Indicator (If Equipped).
SeeEngine Air Cleaner/Filter on page 6-20.
C. Windshield Washer Fluid Reservoir. See “Adding
Washer Fluid” underWindshield Washer Fluid
on page 6-38.
D. Engine Coolant Recovery Tank. SeeEngine Coolant
on page 6-29.
E. Automatic Transmission Fluid Dipstick (If Equipped).
See “Checking the Fluid Level” underAutomatic
Transmission Fluid on page 6-21.
F. Engine Oil Dipstick. See “Checking Engine Oil”
underEngine Oil on page 6-15.
G. Engine Oil Fill Cap. See “When to Add Engine Oil”
underEngine Oil on page 6-15.
H. Brake Fluid Reservoir. See “Brake Fluid” under
Brakes on page 6-39.
I.Battery on page 0-0.
J. Power Steering Fluid Reservoir. SeePower Steering
Fluid on page 6-37.
K.Engine Compartment Fuse Block on page 6-112.
L. Radiator Pressure Cap. SeeCooling System on
page 6-27.Engine Oil
Checking Engine Oil
It is a good idea to check the engine oil level at each
fuel fill. In order to get an accurate reading, the oil must
be warm and the vehicle must be on level ground.
The engine oil dipstick handle is a yellow loop.
SeeEngine Compartment Overview on page 6-12
for the location of the engine oil dipstick.
1. Turn off the engine and give the oil several minutes
to drain back into the oil pan. If this is not done, the
oil dipstick might not show the actual level.
2. Pull out the dipstick and clean it with a paper towel
or cloth, then push it back in all the way. Remove it
again, keeping the tip down, and check the level.
6-15
Page 295 of 448

How to Reset the Engine Oil Life
System
The Engine Oil Life System calculates when to change
the engine oil and filter based on vehicle use. Whenever
the oil is changed, reset the system so it can calculate
when the next oil change is required. If a situation occurs
where the oil is changed prior to a CHANGE OIL
message being turned on, reset the system.
To reset the Engine Oil Life system:
1. With the engine off, turn the ignition to ON/RUN.
2. Press and release the stem in the lower center
of the instrument cluster until the OIL LIFE
message is displayed.
3. Once the alternating OIL LIFE and RESET
messages appear, press and hold the stem
until several beeps sound. This confirms that
the oil life system has been reset.
4. Turn the key to LOCK/OFF.
If the CHANGE OIL message comes back on when the
vehicle is started, the engine oil life system has not
reset. Repeat the procedure. SeeDIC Warnings
and Messages on page 4-37.
What to Do with Used Oil
Used engine oil contains certain elements that can be
unhealthy for your skin and could even cause cancer.
Do not let used oil stay on your skin for very long. Clean
your skin and nails with soap and water, or a good hand
cleaner. Wash or properly dispose of clothing or rags
containing used engine oil. See the manufacturer’s
warnings about the use and disposal of oil products.
Used oil can be a threat to the environment. If you
change your own oil, be sure to drain all the oil from the
filter before disposal. Never dispose of oil by putting it
in the trash, pouring it on the ground, into sewers, or into
streams or bodies of water. Recycle it by taking it to a
place that collects used oil.
6-19
Page 300 of 448

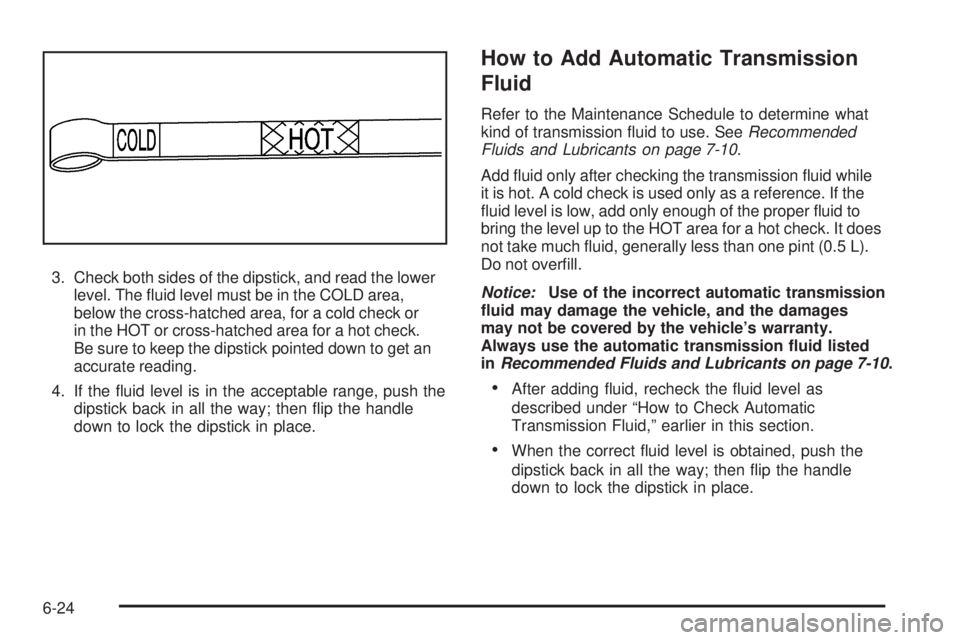
3. Check both sides of the dipstick, and read the lower
level. The fluid level must be in the COLD area,
below the cross-hatched area, for a cold check or
in the HOT or cross-hatched area for a hot check.
Be sure to keep the dipstick pointed down to get an
accurate reading.
4. If the fluid level is in the acceptable range, push the
dipstick back in all the way; then flip the handle
down to lock the dipstick in place.
How to Add Automatic Transmission
Fluid
Refer to the Maintenance Schedule to determine what
kind of transmission fluid to use. SeeRecommended
Fluids and Lubricants on page 7-10.
Add fluid only after checking the transmission fluid while
it is hot. A cold check is used only as a reference. If the
fluid level is low, add only enough of the proper fluid to
bring the level up to the HOT area for a hot check. It does
not take much fluid, generally less than one pint (0.5 L).
Do not overfill.
Notice:Use of the incorrect automatic transmission
�uid may damage the vehicle, and the damages
may not be covered by the vehicle’s warranty.
Always use the automatic transmission �uid listed
inRecommended Fluids and Lubricants on page 7-10.
•After adding fluid, recheck the fluid level as
described under “How to Check Automatic
Transmission Fluid,” earlier in this section.
•When the correct fluid level is obtained, push the
dipstick back in all the way; then flip the handle
down to lock the dipstick in place.
6-24
Page 309 of 448
If coolant is needed, add the proper mixture directly to
the radiator, but be sure the cooling system is cool
before this is done.
1. Remove the radiator pressure cap when the
cooling system, including the upper radiator hose,
is no longer hot. Turn the pressure cap slowly
counterclockwise about one full turn.
If you hear a hiss, wait for that to stop. A hiss
means there is still some pressure left.
2. Keep turning the cap to remove it.3. Fill the radiator with the proper DEX-COOL®
coolant mixture, up to the base of the filler
neck. SeeEngine Coolant on page 6-29for more
information about the proper coolant mixture.
4. Fill the coolant recovery tank to the
FULL COLD mark.
5. Reinstall the cap on the coolant recovery tank,
but leave the radiator pressure cap off.
6-33
Page 327 of 448
Headlamps
A. Low-Beam Headlamp/Daytime Running
Lamps (DRL)
B. High-Beam Headlamp
To replace one of these bulbs:
1. Open the hood. SeeHood Release on page 6-11.
2. Reach in and access the bulb sockets from
inside the engine compartment.3. Turn the bulb socket counterclockwise to remove it
from the headlamp assembly and pull it straight out.
4. Unplug the electrical connector from the old bulb by
releasing the clips on the bulb socket.
5. Pull the old bulb straight out.
6. Push the new bulb straight in until it clicks to
secure it.
7. Plug in the electrical connector to the new bulb
socket.
8. Push the bulb socket straight in and turn it clockwise
to secure it in the headlamp assembly.
6-51
Page 328 of 448

Front Turn Signal, Parking and
Daytime Running Lamps (DRL)
To replace one of these bulbs:
1. Open the hood. SeeHood Release on page 6-11.
2. Reach in to access either one of the bulb sockets in
the engine compartment.
3. Turn the bulb socket counterclockwise and remove
it from the lamp assembly.
4. Holding the socket, pull the old bulb to release it
from the bulb socket.5. Push the new bulb into the socket until it clicks.
6. Push the bulb socket straight into the lamp
assembly and turn it clockwise to secure.
Center High-Mounted
Stoplamp (CHMSL)
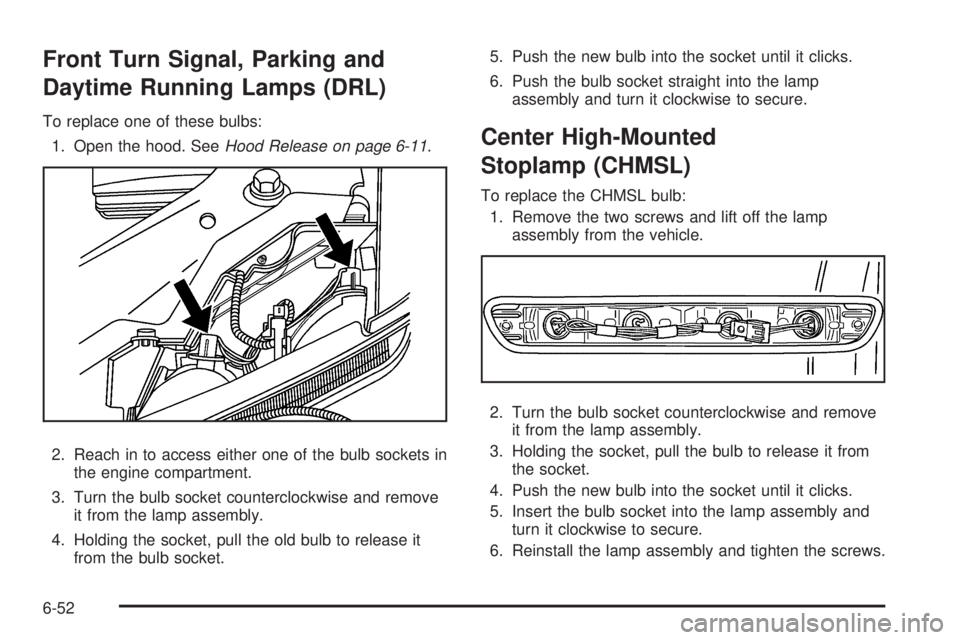
To replace the CHMSL bulb:
1. Remove the two screws and lift off the lamp
assembly from the vehicle.
2. Turn the bulb socket counterclockwise and remove
it from the lamp assembly.
3. Holding the socket, pull the bulb to release it from
the socket.
4. Push the new bulb into the socket until it clicks.
5. Insert the bulb socket into the lamp assembly and
turn it clockwise to secure.
6. Reinstall the lamp assembly and tighten the screws.
6-52
Page 329 of 448
Taillamps, Turn Signal, Stoplamps
and Back-up Lamps
A. Stoplamp/Taillamp
B. Turn Signal/Taillamp
C. Back-up LampTo replace one of these bulbs:
1. Open the tailgate. SeeTailgate on page 3-8.
2. Remove the two rear
lamp assembly screws
near the tailgate latch.
3. Pull the lamp assembly away from the vehicle.
4. Turn the bulb socket counterclockwise to remove it
from the taillamp assembly.
5. Holding the socket, pull the old bulb straight out to
release it from the socket.
6. Push the new bulb straight into the socket until it
clicks.
7. Insert the bulb socket into the taillamp assembly
and turn it clockwise to secure.
8. Reinstall the taillamp assembly and tighten the
screws.
6-53
Page 330 of 448
License Plate Lamp
To replace one of these bulbs:
1. Reach under the rear bumper for the bulb socket.
2. Turn the bulb socket counterclockwise and pull
the bulb socket out of the connector.
3. Pull the old bulb straight out from the bulb socket.
4. Push the new bulb straight in until it clicks to
secure it.
5. Reach under the rear bumper to reinstall the bulb
socket into the connector.
6. Turn the bulb socket clockwise to secure it to the
connector.
Replacement Bulbs
Exterior Lamp Bulb Number
Center High-Mounted
Stoplamp (CHMSL)912
License Plate Bulb W5W
Headlamps
High-beam 9005
Low-beam/Daytime Running
Lamp (DRL)9006
Parking/Front Turn Signal 3757KA
Parking Lamp (Inboard) 3157A
Stoplamp, Rear Turn Signal,
Taillamp, and Back-up Lamp3057
For replacement bulbs not listed here, contact your
dealer/retailer.
6-54