Page 329 of 352

Downloaded from www.Manualslib.com manuals search engine 327
FREQUENTLY ASKED QUESTIONS
QUESTIONANSWERSOLUTION
There is a difference in sound quality betweenthe different audiosources (radio, CD...).
For optimum sound quality, the audio settings (Volume, Bass, Treble, Ambience, Loudness) can be adapted to the different sound sources,which may result in audible differences when changing source(radio, CD...).
Check that the audio settings (Volume, Bass, Treble, Ambience, Loudness) are adapted tothe sources listened to. It is advisable to setthe AUDIO functions (Bass, Treble, Front-Rear Balance, Left-Right Balance) to the middle position, select the musical ambience "None" and set the loudness correction to the "Active" position in CD mode or to the "Inactive" position in radio mode.
The CD is ejected automatically or is not played by the player.
The CD is inserted upside down, is unplayable, does not contain any audio data or contains an audio format which the player cannot play.
The CD is protected by an anti-pirating protection system which is not recognised by the audio equipment.
- Check that the CD is inserted in the playerthe right way up.
- Check the condition of the CD: the CD cannot be played if it is too damaged.
- Check the content in the case of a recordedCD: consult the advice in the "Audio" section.
- The audio equipment's CD player does notplay DVDs.
- Due to their quality level, certain writeableCDs will not be played by the audio system.
The message "USB peripheral error" isdisplayed on the screen.
The Bluetooth connectionis cut.
The battery of the peripheral may not be suffi ciently charged.
Recharge the battery of the peripheral device.
The USB memory stick is not recognised.
The memory stick may be corrupt.
Reformat the memory stick.
The CD player sound ispoor.The CD used is scratched or of poor quality.
Insert good quality CDs and store them in suitable conditions.
The audio equipment settings (bass, treble, ambiences) are unsuitable. Set the treble or bass level to 0, without selectingan ambience.
Page 330 of 352

Downloaded from www.Manualslib.com manuals search engine 328
QUESTIONANSWERSOLUTION
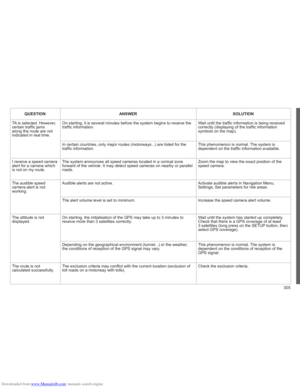
The stored stations donot function (no sound, 87.5 Mhz is displayed...).
An incorrect waveband is selected.
Press the BAND AST button to return to the waveband (AM, FM1, FM2, FMAST) on whichthe stations are stored.
The traffi c announcement(TA) is displayed. I donot receive any traffi c information.
The radio station is not part of the regional traffi c information network.
Tune to a radio station which broadcasts traffi c information.
The quality of receptionof the radio station listened to graduallydeteriorates or the stored stations do not function(no sound, 87.5 Mhz is displayed...).
The vehicle is too far from the transmitter used by the station listened to or there is no transmitter in the geographical area through whichthe vehicle is travelling.
Activate the RDS function to enable the system to check whether there is a more powerful transmitter in the geographical area.
The environment (hills, buildings, tunnels, basement car parks...) block reception, including in RDS mode. This phenomenon is normal and does not indicate a failure of the audio equipment.
The aerial is absent or has been damaged (for example when goingthrough a car wash or into an underground car park).
Have the aerial checked by a CITROËN dealer.
Sound cut-outs of 1 to2 seconds in radio mode.During this brief sound cut-out, the RDS searches for any frequency permitting better reception of the station.
Deactivate the RDS function if the phenomenon is too frequent and always on the same route.
With the engine off, the audio equipment switches off after a few minutes of use.
When the engine is switched off, the audio equipment operating timedepends on the battery charge.
The switch-off is normal: the audio equipment switches to economy mode and switches off to prevent discharging of the vehicle's battery.
Start the vehicle's engine to increase the batterycharge.
The message "the audio system is overheated" appears on the display.
In order to protect the installation if the surrounding temperature is toohigh, the audio equipment switches to an automatic thermal protectionmode leading to a reduction of the volume or stopping of the playing of the CD.
Switch the audio system off for a few minutes toallow the system to cool.
Page 331 of 352
Downloaded from www.Manualslib.com manuals search engine 329
For reasons of safety, the driver should only carry out
operations which require prolonged attention while the
vehicle is stationary.
The pla
yer is compatible with the following formats:
DVD-R, DVD+R, DVD+RW, CD-R, CD-RW, VCD and
SVCD.
Usin
g the AUX1 and AUX2 inputs, this pack permits
the connection of auxiliary systems (camcorder,
games console, etc.).
The audio equipment onl
y plays audio fi les with the
extension ".mp3" with a sampling rate of 32 KHz to
48 KHz.
All of the functions of the video pack are described in theseparate manual supplied with your vehicle.
VIDEO PACK
DVD/AUDIO CD/MP3 PLAYER
01 First steps
02 Configuration
03 Basic functions
04 Screen menu map
Frequently asked questions p.
p.
p.
p.
p.
CONTENTS
330
332
333
335
336
Page 332 of 352
Downloaded from www.Manualslib.com manuals search engine 330
01
12
89
6
3
3
4
1
7
52
FIRST STEPS
MONITORS AND DVD/CD PLAYER
INFRA-RED
HEADPHONES
The monitors are located inthe tops of the front seats.
The DVD/CD pla
yer is
located on the centre console.
1. Monitor positioning handles.
2. Folding and pivoting TFT/LCD screen.
3. Infra-red cell.
4. DVD/CD player opening provided for thedisc.
5. On/Off.
DVD/CD eject.
6. LED:
On green: player in operation.
Flashing: receiving information or ejectingthe disc.
7. AV1 AUDIO input.
8. AV2 AUDIO input.
9. VIDEO input.
1. 2 channel stereo.
2. On/Off.
3. Volume adjustment.
The headphones are supplied with the video pack.
The presence of an object between the infra-red cell on the monitor and the headphones may result in a reduction in the sound quality.
Supply:2 batteries R03/AAA 1.5 V.
Page 333 of 352
Downloaded from www.Manualslib.com manuals search engine 331
99
7788
11111010122
133
144
15555
44166
22
11188
17733
66
01FIRST STEPS
REMOTE CONTROL
1. Power On/Off, Eject.
2.
Selection of the source from DVD, audio CD and AUX.
3.
Change screen.
4. DVD screen adjustments
(brightness, contrast, …).
5. Selection confi rmation.
6. Fast forward/backward.
In th
e menus: move the cursor
left/right, up/down.
7. Volume increase
/decrease.
8. Pla
y/Pause.
9. Next chapter.
10.
SHIFT: activation of the yellow buttons.
11.
Selection of the audio
language.
With
SHIFT: selection of thesubtitle language. 12. Chan
ge chapter.
With SHIFT: chan
ge title.
13. Previous chapter.
14.
Stop play.
15. RETURN:
Short press: return to
the previous menu.
Lon
g press: return to the main menu.
16. Displa
y the main DVD menu.
17. Z
OOM: Selection of different
image formats.
18. Displa
y/mask the screen.
Power:
2 batteries R03/AAA 1.5 V.
Numeric keypad
Page 334 of 352
Downloaded from www.Manualslib.com manuals search engine 332
02
1
2
3
5
4
1
2
3
CONFIGURATION
SETUP MENU
The "Settings" menu appears on the screen:
"Video settings", "Languages", "Users", "Defaultsettings".
Select the options using the and
buttons.
Press the
SETUP button.
Press the
OK button to confi rm your choice.
The "Video settings" menu appears on the screen:"Brightness", "Contrast", "Colour", "Back-lighting".
Select the "Video settings" menu using the and buttons. Press the
SETUP button. The "Settings" menu
appears on the screen.
Press the
OK button to confi rm your choice.
The settin
g is saved.
Select the input required using the
and buttons.
VIDEO SETTINGS
Page 335 of 352
Downloaded from www.Manualslib.com manuals search engine 333
03
31
2
BASIC FUNCTIONS
SETTING UP THE MONITORS
Using the positioning handles,extract the monitor from the casing.
Release the table usin
g the button and tilt it down.
The monitor is not a touch screen.
Do not press directly on the surface of the monitor, this may
damage the LCD screen. Pivot the monitor upwards until it is
in contact with the upper part o
f theseat.
A notch locks it in
position.
Page 336 of 352
Downloaded from www.Manualslib.com manuals search engine 334
1
2
3
4
1
2
BASIC FUNCTIONS
VIDEO PACK ON/OFF
Press the POWER/EJECT button on the DVD/CDplayer or on the remote control.
To switch on the s
ystem, switch on the vehicle's
ignition.
When the ignition is o
ff, the video pack will switch off automatically
after approximately ten minutes to avoid discharging the battery.
Play begins automatically. To load a disc, insert it care
fully, printed face
uppermost, until it is fully inserted.
Remove the disc care
fully.
Press the P
OWER/EJECT button on the DVD/CD
player or remote control.
LOADING/EJECTING A DVD/CD