2010 CHEVROLET IMPALA coolant temperature
[x] Cancel search: coolant temperaturePage 5 of 432

Vehicle Symbol ChartHere are some additional symbols that may be found on
the vehicle and what they mean. For more information
on the symbol, refer to the index.9
:Airbag Readiness Light
#
:Air Conditioning
!
:Antilock Brake System (ABS)
g
:Audio Steering Wheel Controls or OnStar
®
$
:Brake System Warning Light
"
:Charging System
I
:Cruise Control
B
:Engine Coolant Temperature
O
:Exterior Lamps
#
:Fog Lamps
.
:Fuel Gage
+
:Fuses
i
:Headlamp High/Low-Beam Changer
j
:LATCH System Child Restraints
*
:Malfunction Indicator Lamp
:
:Oil Pressure
}
:Power
/
:Remote Vehicle Start
>
:Safety Belt Reminders
7
:Tire Pressure Monitor
F
:Traction Control
M
:Windshield Washer Fluid
v
Page 114 of 432

The engine will shut off automatically after 10 minutes,
unless a time extension has been done or the vehicle’s
key is inserted into the ignition switch and turned to
ON/RUN.
To manually shut off a remote start, do any of the
following.•
Aim the RKE transmitter at the vehicle and press
and release the remote start button.
•
Turn on the hazard warning flashers.
•
Turn the ignition switch out of LOCK/OFF position
and then back to LOCK/OFF.
After the engine has been started two times, or one
time with a time extension, the vehicle’s ignition must
be turned to ON/RUN using the key before the remote
start procedure can be used again. SeeIgnition
Positions on page 3-20for information regarding the
ignition positions on your vehicle.The remote vehicle start feature will not operate if any
of the follow occur:
•
The remote start system is disabled through the DIC.
•
The vehicle’s key is in the ignition.
•
The vehicle’s hood is open.
•
The hazard warning flashers are on.
•
The check engine light is on. SeeMalfunction
Indicator Lamp on page 4-31.
•
The engine coolant temperature is too high.
•
The oil pressure is low.
•
The content theft-deterrent alarm has been activated.
•
Two remote vehicle starts, or one start with a time
extension, have already been provided for that
ignition cycle.
3-8
Page 151 of 432
Instrument Panel Overview...............................4-3
Hazard Warning Flashers................................4-3
Horn.............................................................4-3
Tilt Wheel . . . ..................................................4-3
Turn Signal/Multifunction Lever.........................4-4
Turn and Lane-Change Signals........................4-4
Headlamp High/Low-Beam Changer..................4-5
Flash-to-Pass.................................................4-5
Windshield Wipers..........................................4-5
Windshield Washer.........................................4-6
Cruise Control................................................4-6
Exterior Lamps...............................................4-9
Daytime Running Lamps (DRL)/Automatic
Headlamp System......................................4-10
Fog Lamps..................................................4-11
Instrument Panel Brightness...........................4-11
Courtesy Lamps...........................................4-11
Dome Lamp . . ...............................................4-11
Entry Lighting...............................................4-12
Delayed Entry Lighting...................................4-12
Delayed Exit Lighting.....................................4-13
Parade Dimming...........................................4-13
Reading Lamps............................................4-13
Map Lamps . . ...............................................4-13
Electric Power Management...........................4-13Battery Run-Down Protection ..........................4-14
Accessory Power Outlet(s).............................4-15
Ashtray(s) and Cigarette Lighter......................4-16
Climate Controls............................................4-16
Climate Control System.................................4-16
Outlet Adjustment.........................................4-20
Passenger Compartment Air Filter...................4-20
Warning Lights, Gages, and Indicators............4-21
Instrument Panel Cluster . . ..............................4-22
Speedometer and Odometer
...........................4-23
Tachometer.................................................4-23
Safety Belt Reminders . . .................................4-23
Airbag Readiness Light ..................................4-24
Passenger Airbag Status Indicator...................4-25
Charging System Light ..................................4-26
Brake System Warning Light ..........................4-27
Antilock Brake System (ABS) Warning
Light........................................................4-28
Traction Control System (TCS) Warning
Light........................................................4-28
Electronic Stability Control Indicator Light . . . . . . . . .4-29
Engine Coolant Temperature Warning Light . . . . . .4-30
Engine Coolant Temperature Gage..................4-30
Tire Pressure Light.......................................4-31
Malfunction Indicator Lamp.............................4-31
Section 4 Instrument Panel
4-1
Page 180 of 432
Engine Coolant Temperature
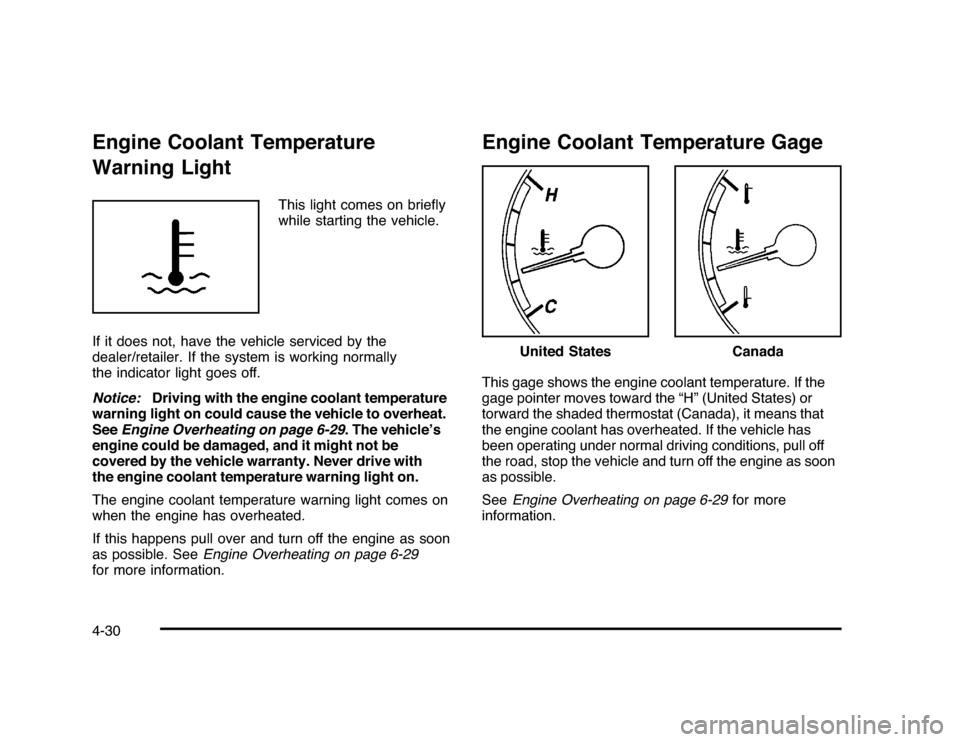
Warning Light
This light comes on briefly
while starting the vehicle.
If it does not, have the vehicle serviced by the
dealer/retailer. If the system is working normally
the indicator light goes off.
Notice:Driving with the engine coolant temperature
warning light on could cause the vehicle to overheat.
SeeEngine Overheating on page 6-29. The vehicle’s
engine could be damaged, and it might not be
covered by the vehicle warranty. Never drive with
the engine coolant temperature warning light on.
The engine coolant temperature warning light comes on
when the engine has overheated.
If this happens pull over and turn off the engine as soon
as possible. SeeEngine Overheating on page 6-29
for more information.
Engine Coolant Temperature GageThis gage shows the engine coolant temperature. If the
gage pointer moves toward the “H” (United States) or
torward the shaded thermostat (Canada), it means that
the engine coolant has overheated. If the vehicle has
been operating under normal driving conditions, pull off
the road, stop the vehicle and turn off the engine as soon
as possible.
SeeEngine Overheating on page 6-29for more
information.
United States
Canada
4-30
Page 195 of 432
DRIVER DOOR OPENThis message displays when the driver door is not
closed properly. Make sure that the door is closed
completely.ENGINE HOT A/C
(Air Conditioning) OFFThis message displays when the engine coolant
becomes hotter than the normal operating temperature.
To avoid added strain on a hot engine, the air
conditioning compressor is automatically turned off.
When the coolant temperature returns to normal, the A/C
operation automatically resumes. You can continue to
drive your vehicle. If this message continues to appear,
have the system repaired by your dealer/retailer as soon
as possible to avoid compressor damage.ENGINE OVERHEATED IDLE ENGINENotice:If you drive your vehicle while the engine
is overheating, severe engine damage may occur.
If an overheat warning appears on the instrument
panel cluster and/or DIC, stop the vehicle as soon as
possible. Do not increase the engine speed above
normal idling speed. SeeEngine Overheating
on page 6-29for more information.This message displays when the engine coolant
temperature is too hot. Stop and allow the vehicle to
idle until it cools down.
ENGINE OVERHEATED STOP ENGINENotice:If you drive your vehicle while the engine
is overheating, severe engine damage may occur.
If an overheat warning appears on the instrument
panel cluster and/or DIC, stop the vehicle as soon
as possible. SeeEngine Overheating on page 6-29
for more information.
This message displays along with a continuous chime
when the engine has overheated. Stop and turn the
engine off immediately to avoid severe engine damage.
SeeEngine Overheating on page 6-29.ENGINE POWER IS REDUCEDThis message displays when the vehicle’s engine power
is reduced. Reduced engine power can affect the
vehicle’s ability to accelerate. If this message is on, but
there is no reduction in performance, proceed to your
destination. The performance may be reduced the next
time the vehicle is driven. The vehicle may be driven at a
reduced speed while this message is on, but acceleration
and speed may be reduced. Anytime this message stays
on, the vehicle should be taken to your dealer/retailer for
service as soon as possible.
4-45
Page 294 of 432

How to Add FluidRefer to the Maintenance Schedule to determine what
kind of transmission fluid to use. SeeRecommended
Fluids and Lubricants on page 7-10.
If the fluid level is low, add only enough of the proper
fluid to bring the level into the cross-hatched area on the
dipstick.
1. Pull out the dipstick.
2. Using a long-neck funnel, add enough fluid at the
dipstick hole to bring it to the proper level.
It does not take much fluid, generally less than
one pint (0.5 L). Do not overfill.
Notice:Use of the incorrect automatic transmission
fluid may damage the vehicle, and the damages
may not be covered by the vehicle’s warranty.
Always use the automatic transmission fluid listed
inRecommended Fluids and Lubricants on
page 7-10.
3. After adding fluid, recheck the fluid level as
described under “How to Check Automatic
Transmission Fluid,” earlier in this section.
4. When the correct fluid level is obtained, push the
dipstick back in all the way.
Cooling SystemThe Cooling System allows the engine to maintain the
correct working temperature.
A. Coolant Recovery Tank
B. Pressure Cap
C. Electric Engine Cooling Fans3.5L V6 Engine shown, 3.9L Engine similar
6-24
Page 296 of 432
What to Use
{
WARNING:
Adding only plain water to the cooling system can
be dangerous. Plain water, or some other liquid
such as alcohol, can boil before the proper coolant
mixture will. The vehicle’s coolant warning system
is set for the proper coolant mixture. With plain
water or the wrong mixture, the engine could get
too hot but you would not get the overheat
warning. The engine could catch fire and you or
others could be burned. Use a 50/50 mixture of
clean, drinkable water and DEX-COOL
®
coolant.Use a 50/50 mixture of clean, drinkable water and
DEX-COOL
®
coolant. If using this mixture, nothing else
needs to be added. This mixture:
•
Gives freezing protection down to−34°F (−37°C),
outside temperature.
•
Gives boiling protection up to 265°F (129°C),
engine temperature.
•
Protects against rust and corrosion.
•
Will not damage aluminum parts.
•
Helps keep the proper engine temperature.
Notice:If an improper coolant mixture is used,
the engine could overheat and be badly damaged.
The repair cost would not be covered by the vehicle
warranty. Too much water in the mixture can
freeze and crack the engine, radiator, heater core,
and other parts.
Notice:If extra inhibitors and/or additives are used
in the vehicle’s cooling system, the vehicle could
be damaged. Use only the proper mixture of
the engine coolant listed in this manual for the
cooling system. SeeRecommended Fluids and
Lubricants on page 7-10for more information.
6-26
Page 299 of 432
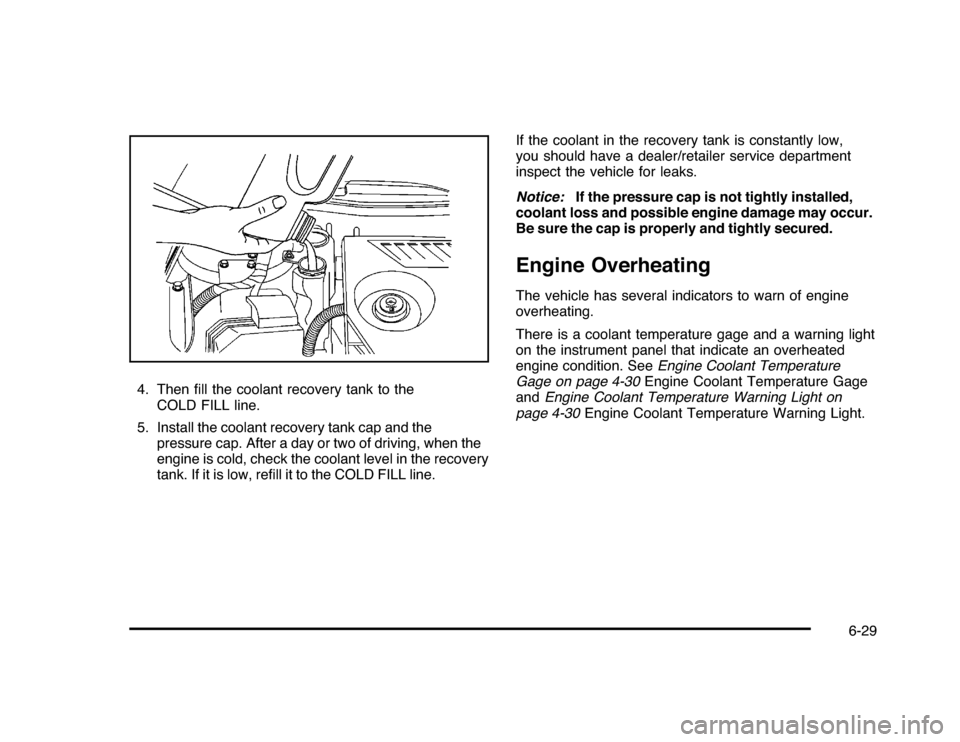
4. Then fill the coolant recovery tank to the
COLD FILL line.
5. Install the coolant recovery tank cap and the
pressure cap. After a day or two of driving, when the
engine is cold, check the coolant level in the recovery
tank. If it is low, refill it to the COLD FILL line.If the coolant in the recovery tank is constantly low,
you should have a dealer/retailer service department
inspect the vehicle for leaks.
Notice:If the pressure cap is not tightly installed,
coolant loss and possible engine damage may occur.
Be sure the cap is properly and tightly secured.
Engine OverheatingThe vehicle has several indicators to warn of engine
overheating.
There is a coolant temperature gage and a warning light
on the instrument panel that indicate an overheated
engine condition. SeeEngine Coolant Temperature
Gage on page 4-30Engine Coolant Temperature Gage
andEngine Coolant Temperature Warning Light on
page 4-30Engine Coolant Temperature Warning Light.
6-29