2010 CHEVROLET IMPALA brake fluid
[x] Cancel search: brake fluidPage 5 of 432

Vehicle Symbol ChartHere are some additional symbols that may be found on
the vehicle and what they mean. For more information
on the symbol, refer to the index.9
:Airbag Readiness Light
#
:Air Conditioning
!
:Antilock Brake System (ABS)
g
:Audio Steering Wheel Controls or OnStar
®
$
:Brake System Warning Light
"
:Charging System
I
:Cruise Control
B
:Engine Coolant Temperature
O
:Exterior Lamps
#
:Fog Lamps
.
:Fuel Gage
+
:Fuses
i
:Headlamp High/Low-Beam Changer
j
:LATCH System Child Restraints
*
:Malfunction Indicator Lamp
:
:Oil Pressure
}
:Power
/
:Remote Vehicle Start
>
:Safety Belt Reminders
7
:Tire Pressure Monitor
F
:Traction Control
M
:Windshield Washer Fluid
v
Page 271 of 432

Service............................................................6-3
Accessories and Modifications..........................6-3
California Proposition 65 Warning.....................6-4
California Perchlorate Materials Requirements.....6-4
Doing Your Own Service Work.........................6-4
Adding Equipment to the Outside of the
Vehicle . . . . ..................................................6-5
Fuel................................................................6-5
Gasoline Octane............................................6-6
Gasoline Specifications....................................6-6
California Fuel...............................................6-6
Additives.......................................................6-7
Fuel E85 (85% Ethanol)..................................6-8
Fuels in Foreign Countries...............................6-9
Filling the Tank............................................6-10
Filling a Portable Fuel Container.....................6-12
Checking Things Under the Hood....................6-12
Hood Release..............................................6-13
Engine Compartment Overview.......................6-14
Engine Oil...................................................6-15
Engine Oil Life System..................................6-18
Engine Air Cleaner/Filter................................6-19
Automatic Transmission Fluid.........................6-22
Cooling System............................................6-24Engine Coolant.............................................6-25
Engine Overheating.......................................6-29
Overheated Engine Protection
Operating Mode........................................6-32
Power Steering Fluid.....................................6-32
Windshield Washer Fluid . . ..............................6-33
Brakes........................................................6-35
Battery........................................................6-38
Jump Starting...............................................6-39
Headlamp Aiming...........................................6-43
Bulb Replacement..........................................6-43
Halogen Bulbs..............................................6-43
Headlamps, Front Turn Signal, Sidemarker,
and Parking Lamps....................................6-44
Taillamps, Turn Signal, Sidemarker,
Stoplamps and Back-up Lamps...................6-47
License Plate Lamp......................................6-49
Replacement Bulbs.......................................6-49
Windshield Wiper Blade Replacement..............6-49
Tires..............................................................6-51
Tire Sidewall Labeling . . .................................6-52
Tire Terminology and Definitions . . ...................6-56
Inflation - Tire Pressure.................................6-59
Section 6 Service and Appearance Care
6-1
Page 285 of 432

A. Windshield Washer Fluid Reservoir. See “Adding
Washer Fluid” underWindshield Washer Fluid
on page 6-33.
B. Battery. SeeBattery on page 6-38.
C. Underhood Fuse Block. SeeUnderhood Fuse Block
on page 6-97.
D. Remote Positive (+) Terminal. SeeJump Starting on
page 6-39.
E. Coolant Recovery Tank. See “Checking Coolant”
underCooling System on page 6-24.
F. Pressure Cap. SeeCooling System on page 6-24.
G. Power Steering Fluid Cap. SeePower Steering Fluid
on page 6-32.
H. Engine Oil Fill Cap. See “When to Add Engine Oil”
underEngine Oil on page 6-15.
I. Engine Oil Dipstick. See “Checking Engine Oil”
underEngine Oil on page 6-15.
J. Automatic Transmission Fluid Dipstick (Out of View).
See “Checking the Fluid Level” underAutomatic
Transmission Fluid on page 6-22.
K. Brake Master Cylinder Reservoir. See “Brake Fluid”
underBrakes on page 6-35.
L. Engine Air Cleaner/Filter. SeeEngine Air
Cleaner/Filter on page 6-19.
Engine OilChecking Engine OilIt is a good idea to check the engine oil level at each
fuel fill. In order to get an accurate reading, the oil must
be warm and the vehicle must be on level ground.
The engine oil dipstick handle is a yellow loop.
SeeEngine Compartment Overview on page 6-14
for the location of the engine oil dipstick.
1. Turn off the engine and give the oil several minutes
to drain back into the oil pan. If this is not done, the
oil dipstick might not show the actual level.
2. Pull out the dipstick and clean it with a paper towel
or cloth, then push it back in all the way. Remove it
again, keeping the tip down, and check the level.
6-15
Page 293 of 432

Checking the Fluid LevelPrepare your vehicle as follows:
1. Park your vehicle on a level place. Keep the engine
running.
2. With the parking brake applied, place the shift lever
in P (Park).
3. With your foot on the brake pedal, move the shift
lever through each gear range, pausing for about
three seconds in each range. Then, position
the shift lever in P (Park).
4. Let the engine run at idle for three to five minutes.
Then, without shutting off the engine, follow these steps:
1. Pull out the dipstick and wipe it with a clean rag or
paper towel.
The transmission fluid
dipstick handle is the black
loop with this symbol on it.
It is located near the rear of
the engine compartment.
SeeEngine Compartment Overview on page 6-14
for more information on location.
2. Push it back in all the way, wait three seconds and
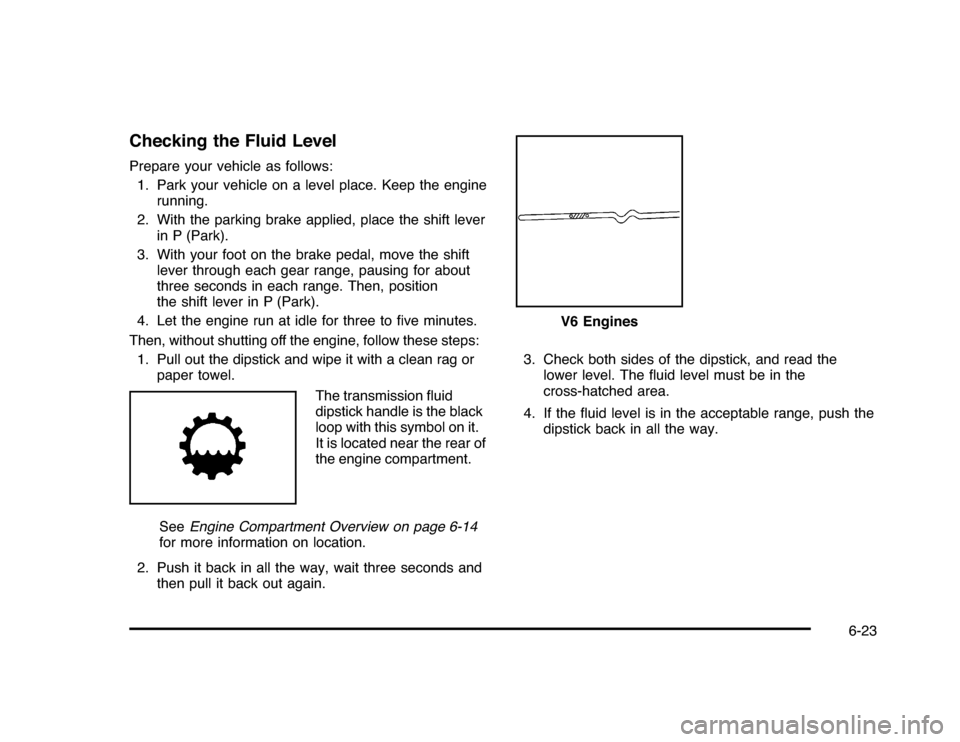
then pull it back out again.3. Check both sides of the dipstick, and read the
lower level. The fluid level must be in the
cross-hatched area.
4. If the fluid level is in the acceptable range, push the
dipstick back in all the way.
V6 Engines
6-23
Page 305 of 432

BrakesBrake Fluid
The brake master cylinder
reservoir is filled with
DOT 3 brake fluid. See
Engine Compartment
Overview on page 6-14for
the location of the reservoir.
There are only two reasons why the brake fluid level in
the reservoir might go down:
•
The brake fluid level goes down because of normal
brake lining wear. When new linings are installed,
the fluid level goes back up.
•
A fluid leak in the brake hydraulic system can also
cause a low fluid level. Have the brake hydraulic
system fixed, since a leak means that sooner
or later the brakes will not work well.Do not top off the brake fluid. Adding fluid does not
correct a leak. If fluid is added when the linings
are worn, there will be too much fluid when new brake
linings are installed. Add or remove brake fluid, as
necessary, only when work is done on the brake
hydraulic system.
{
WARNING:
If too much brake fluid is added, it can spill on the
engine and burn, if the engine is hot enough. You
or others could be burned, and the vehicle could
be damaged. Add brake fluid only when work is
done on the brake hydraulic system.
When the brake fluid falls to a low level, the brake
warning light comes on. SeeBrake System Warning
Light on page 4-27.
6-35
Page 306 of 432

What to AddUse only new DOT 3 brake fluid from a sealed container.
SeeRecommended Fluids and Lubricants on page 7-10.
Always clean the brake fluid reservoir cap and the
area around the cap before removing it. This helps keep
dirt from entering the reservoir.
{
WARNING:
With the wrong kind of fluid in the brake hydraulic
system, the brakes might not work well. This could
cause a crash. Always use the proper brake fluid.Notice:
•
Using the wrong fluid can badly damage brake
hydraulic system parts. For example, just a
few drops of mineral-based oil, such as engine
oil, in the brake hydraulic system can damage
brake hydraulic system parts so badly that they
will have to be replaced. Do not let someone
put in the wrong kind of fluid.
•
If brake fluid is spilled on the vehicle’s painted
surfaces, the paint finish can be damaged.
Be careful not to spill brake fluid on the vehicle.
If you do, wash it off immediately. SeeWashing
Your Vehicle on page 6-91.
Brake WearThis vehicle has disc brakes. Disc brake pads have
built-in wear indicators that make a high-pitched warning
sound when the brake pads are worn and new pads
are needed. The sound can come and go or be heard all
the time the vehicle is moving, except when applying
the brake pedal firmly.
6-36
Page 376 of 432

MaintenanceI•
Change engine oil and filter. SeeEngine Oil on
page 6-15.An Emission Control Service.
•
Engine coolant level check. SeeEngine Coolant on
page 6-25.
•
Windshield washer fluid level check. SeeWindshield
Washer Fluid on page 6-33.
•
Tire inflation check. SeeInflation - Tire Pressure on
page 6-59.
•
Tire wear inspection. SeeTire Inspection and
Rotation on page 6-65.
•
Rotate tires. SeeTire Inspection and Rotation on
page 6-65.
•
Fluids visual leak check (or every 12 months,
whichever occurs first). A leak in any system must
be repaired and the fluid level checked.
•
Engine air cleaner filter inspection (vehicles driven
in dusty conditions only). SeeEngine Air
Cleaner/Filter on page 6-19.
•
Brake system inspection (or every 12 months,
whichever occurs first).
MaintenanceII•
Perform all services described in MaintenanceI.
•
Steering and suspension inspection. Visual
inspection for damaged, loose, or missing parts or
signs of wear.
•
Engine cooling system inspection. Visual inspection
of hoses, pipes, fittings, and clamps and
replacement, if needed.
•
Windshield wiper blade inspection for wear,
cracking, or contamination and windshield and wiper
blade cleaning, if contaminated. SeeWindshield
and Wiper Blades on page 6-92. Worn or damaged
wiper blade replacement. SeeWindshield Wiper
Blade Replacement on page 6-49.
•
Body hinges and latches, key lock cylinders, folding
seat hardware, and rear compartment hinges
lubrication. SeeRecommended Fluids and
Lubricants on page 7-10. More frequent lubrication
may be required when vehicle is exposed to a
corrosive environment. Applying silicone grease on
weatherstrips with a clean cloth makes them last
longer, seal better, and not stick or squeak.
•
Restraint system component check. SeeChecking
the Restraint Systems on page 2-74.
7-4
Page 377 of 432

•
Automatic transmission fluid level check and adding
fluid, if needed. SeeAutomatic Transmission Fluid
on page 6-22.
•
Engine air cleaner filter inspection. SeeEngine Air
Cleaner/Filter on page 6-19.
•
Passenger compartment air filter replacement
(or every 12 months, whichever occurs first).
More frequent replacement may be required if
vehicle is driven regularly under dusty conditions.
Additional Required ServicesAt Each Fuel Stop
•
Engine oil level check. SeeEngine Oil on
page 6-15.
•
Engine coolant level check. SeeEngine Coolant on
page 6-25.
•
Windshield washer fluid level check. SeeWindshield
Washer Fluid on page 6-33.
Once a Month
•
Tire inflation check. SeeInflation - Tire Pressure on
page 6-59.
•
Tire wear inspection. SeeTire Inspection and
Rotation on page 6-65.
Once a Year
•
Starter switch check. SeeOwner Checks and
Services on page 7-8.
•
Parking brake and automatic transmission P (Park)
mechanism check. SeeOwner Checks and
Services on page 7-8.
•
Automatic transmission shiftlock control system
check. SeeOwner Checks and Services on
page 7-8.
•
Ignition transmission lock check. SeeOwner
Checks and Services on page 7-8.
•
Engine cooling system and pressure cap pressure
check. Radiator and air conditioning condenser
outside cleaning. SeeCooling System on
page 6-24.
•
Exhaust system and nearby heat shields inspection
for loose or damaged components.
•
Throttle system inspection for interference, binding
or for damaged or missing parts. Replace parts as
needed. Replace any components that have
high effort or excessive wear. Do not lubricate
accelerator or cruise control cables.
7-5