2010 CHEVROLET IMPALA air filter
[x] Cancel search: air filterPage 151 of 432
Instrument Panel Overview...............................4-3
Hazard Warning Flashers................................4-3
Horn.............................................................4-3
Tilt Wheel . . . ..................................................4-3
Turn Signal/Multifunction Lever.........................4-4
Turn and Lane-Change Signals........................4-4
Headlamp High/Low-Beam Changer..................4-5
Flash-to-Pass.................................................4-5
Windshield Wipers..........................................4-5
Windshield Washer.........................................4-6
Cruise Control................................................4-6
Exterior Lamps...............................................4-9
Daytime Running Lamps (DRL)/Automatic
Headlamp System......................................4-10
Fog Lamps..................................................4-11
Instrument Panel Brightness...........................4-11
Courtesy Lamps...........................................4-11
Dome Lamp . . ...............................................4-11
Entry Lighting...............................................4-12
Delayed Entry Lighting...................................4-12
Delayed Exit Lighting.....................................4-13
Parade Dimming...........................................4-13
Reading Lamps............................................4-13
Map Lamps . . ...............................................4-13
Electric Power Management...........................4-13Battery Run-Down Protection ..........................4-14
Accessory Power Outlet(s).............................4-15
Ashtray(s) and Cigarette Lighter......................4-16
Climate Controls............................................4-16
Climate Control System.................................4-16
Outlet Adjustment.........................................4-20
Passenger Compartment Air Filter...................4-20
Warning Lights, Gages, and Indicators............4-21
Instrument Panel Cluster . . ..............................4-22
Speedometer and Odometer
...........................4-23
Tachometer.................................................4-23
Safety Belt Reminders . . .................................4-23
Airbag Readiness Light ..................................4-24
Passenger Airbag Status Indicator...................4-25
Charging System Light ..................................4-26
Brake System Warning Light ..........................4-27
Antilock Brake System (ABS) Warning
Light........................................................4-28
Traction Control System (TCS) Warning
Light........................................................4-28
Electronic Stability Control Indicator Light . . . . . . . . .4-29
Engine Coolant Temperature Warning Light . . . . . .4-30
Engine Coolant Temperature Gage..................4-30
Tire Pressure Light.......................................4-31
Malfunction Indicator Lamp.............................4-31
Section 4 Instrument Panel
4-1
Page 167 of 432
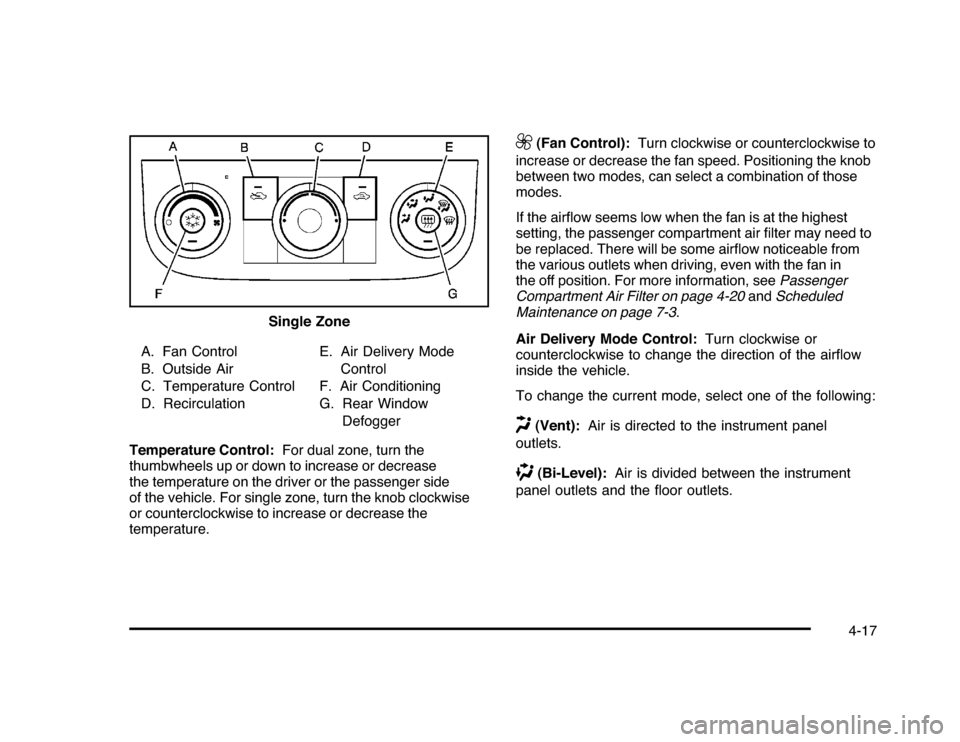
A. Fan Control
B. Outside Air
C. Temperature Control
D. RecirculationE. Air Delivery Mode
Control
F. Air Conditioning
G. Rear Window
Defogger
Temperature Control:For dual zone, turn the
thumbwheels up or down to increase or decrease
the temperature on the driver or the passenger side
of the vehicle. For single zone, turn the knob clockwise
or counterclockwise to increase or decrease the
temperature.
9
(Fan Control):Turn clockwise or counterclockwise to
increase or decrease the fan speed. Positioning the knob
between two modes, can select a combination of those
modes.
If the airflow seems low when the fan is at the highest
setting, the passenger compartment air filter may need to
be replaced. There will be some airflow noticeable from
the various outlets when driving, even with the fan in
the off position. For more information, seePassenger
Compartment Air Filter on page 4-20andScheduled
Maintenance on page 7-3.
Air Delivery Mode Control:Turn clockwise or
counterclockwise to change the direction of the airflow
inside the vehicle.
To change the current mode, select one of the following:
H
(Vent):Air is directed to the instrument panel
outlets.
)
(Bi-Level):Air is divided between the instrument
panel outlets and the floor outlets. Single Zone
4-17
Page 170 of 432
Outlet AdjustmentUse the thumbwheel located below or to the side of the
outlet, to change the direction of the air flow.Operation Tips•
Clear away any ice, snow or leaves from the air
inlets at the base of the windshield that may
block the flow of air into the vehicle.
•
Use of non-GM approved hood deflectors may
adversely affect the performance of the system.
•
Keep the path under the front seats clear of objects
to help circulate the air inside the vehicle more
effectively.
•
If the airflow seems low when the fan is at the
highest setting, the passenger compartment
air filter, if equipped, may need to replaced.
For more information, seePassenger Compartment
Air Filter on page 4-20andScheduled Maintenance
on page 7-3.
•
If fogging reoccurs while in vent or bi-level modes
with mild temperature throughout the vehicle, turn
on the air conditioner to reduce windshield fogging.
Passenger Compartment Air FilterThe vehicle has a passenger compartment particulate
air filter. It is located in the engine compartment,
below the air inlet grille on the passenger side.
The filter traps most of the pollen from air entering
the climate control system. It needs to be changed
periodically to ensure system performance. For
information on how often to change the passenger
compartment air filter, seeScheduled Maintenance
on page 7-3.
To change the passenger compartment air filter:
1. Turn off the ignition when the windshield wipers are
in the up position.
2. Raise the vehicle hood.
3. Pull back the hood weatherstrip from the
passengers side of the vehicle halfway to center.
4-20
Page 271 of 432

Service............................................................6-3
Accessories and Modifications..........................6-3
California Proposition 65 Warning.....................6-4
California Perchlorate Materials Requirements.....6-4
Doing Your Own Service Work.........................6-4
Adding Equipment to the Outside of the
Vehicle . . . . ..................................................6-5
Fuel................................................................6-5
Gasoline Octane............................................6-6
Gasoline Specifications....................................6-6
California Fuel...............................................6-6
Additives.......................................................6-7
Fuel E85 (85% Ethanol)..................................6-8
Fuels in Foreign Countries...............................6-9
Filling the Tank............................................6-10
Filling a Portable Fuel Container.....................6-12
Checking Things Under the Hood....................6-12
Hood Release..............................................6-13
Engine Compartment Overview.......................6-14
Engine Oil...................................................6-15
Engine Oil Life System..................................6-18
Engine Air Cleaner/Filter................................6-19
Automatic Transmission Fluid.........................6-22
Cooling System............................................6-24Engine Coolant.............................................6-25
Engine Overheating.......................................6-29
Overheated Engine Protection
Operating Mode........................................6-32
Power Steering Fluid.....................................6-32
Windshield Washer Fluid . . ..............................6-33
Brakes........................................................6-35
Battery........................................................6-38
Jump Starting...............................................6-39
Headlamp Aiming...........................................6-43
Bulb Replacement..........................................6-43
Halogen Bulbs..............................................6-43
Headlamps, Front Turn Signal, Sidemarker,
and Parking Lamps....................................6-44
Taillamps, Turn Signal, Sidemarker,
Stoplamps and Back-up Lamps...................6-47
License Plate Lamp......................................6-49
Replacement Bulbs.......................................6-49
Windshield Wiper Blade Replacement..............6-49
Tires..............................................................6-51
Tire Sidewall Labeling . . .................................6-52
Tire Terminology and Definitions . . ...................6-56
Inflation - Tire Pressure.................................6-59
Section 6 Service and Appearance Care
6-1
Page 285 of 432

A. Windshield Washer Fluid Reservoir. See “Adding
Washer Fluid” underWindshield Washer Fluid
on page 6-33.
B. Battery. SeeBattery on page 6-38.
C. Underhood Fuse Block. SeeUnderhood Fuse Block
on page 6-97.
D. Remote Positive (+) Terminal. SeeJump Starting on
page 6-39.
E. Coolant Recovery Tank. See “Checking Coolant”
underCooling System on page 6-24.
F. Pressure Cap. SeeCooling System on page 6-24.
G. Power Steering Fluid Cap. SeePower Steering Fluid
on page 6-32.
H. Engine Oil Fill Cap. See “When to Add Engine Oil”
underEngine Oil on page 6-15.
I. Engine Oil Dipstick. See “Checking Engine Oil”
underEngine Oil on page 6-15.
J. Automatic Transmission Fluid Dipstick (Out of View).
See “Checking the Fluid Level” underAutomatic
Transmission Fluid on page 6-22.
K. Brake Master Cylinder Reservoir. See “Brake Fluid”
underBrakes on page 6-35.
L. Engine Air Cleaner/Filter. SeeEngine Air
Cleaner/Filter on page 6-19.
Engine OilChecking Engine OilIt is a good idea to check the engine oil level at each
fuel fill. In order to get an accurate reading, the oil must
be warm and the vehicle must be on level ground.
The engine oil dipstick handle is a yellow loop.
SeeEngine Compartment Overview on page 6-14
for the location of the engine oil dipstick.
1. Turn off the engine and give the oil several minutes
to drain back into the oil pan. If this is not done, the
oil dipstick might not show the actual level.
2. Pull out the dipstick and clean it with a paper towel
or cloth, then push it back in all the way. Remove it
again, keeping the tip down, and check the level.
6-15
Page 289 of 432
How to Reset the Engine Oil Life
SystemThe Engine Oil Life System calculates when to change
the engine oil and filter based on vehicle use. Whenever
the oil is changed, reset the system so it can calculate
when the next oil change is required. If a situation occurs
where the oil is changed prior to a CHANGE ENGINE OIL
SOON message being turned on, reset the system.
Always reset the engine oil life to 100% after every oil
change. It will not reset itself. To reset the Engine
Oil Life System:
1. Display the OIL LIFE REMAINING on the DIC.
2. Press and hold the SET/RESET button on the DIC
for more than five seconds. The oil life will change
to 100%.
If the CHANGE ENGINE OIL SOON message comes
back on when the vehicle is started, the Engine Oil Life
System has not reset. Repeat the procedure.
What to Do with Used OilUsed engine oil contains certain elements that can be
unhealthy for your skin and could even cause cancer.
Do not let used oil stay on your skin for very long. Clean
your skin and nails with soap and water, or a good
hand cleaner. Wash or properly dispose of clothing or
rags containing used engine oil. See the manufacturer’s
warnings about the use and disposal of oil products.
Used oil can be a threat to the environment. If you
change your own oil, be sure to drain all the oil from the
filter before disposal. Never dispose of oil by putting it
in the trash, pouring it on the ground, into sewers, or into
streams or bodies of water. Recycle it by taking it to a
place that collects used oil.Engine Air Cleaner/FilterThe engine air cleaner/filter is located in the engine
compartment on the driver’s side of the vehicle.
SeeEngine Compartment Overview on page 6-14for
more information on location.
6-19
Page 290 of 432
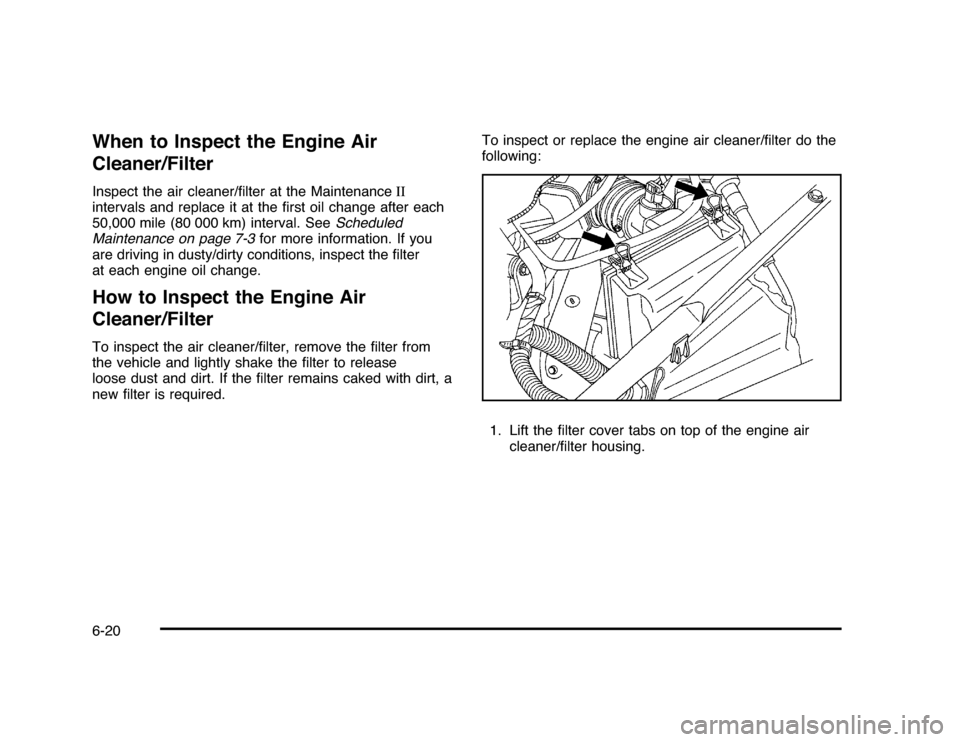
When to Inspect the Engine Air
Cleaner/FilterInspect the air cleaner/filter at the MaintenanceII
intervals and replace it at the first oil change after each
50,000 mile (80 000 km) interval. SeeScheduled
Maintenance on page 7-3for more information. If you
are driving in dusty/dirty conditions, inspect the filter
at each engine oil change.How to Inspect the Engine Air
Cleaner/FilterTo inspect the air cleaner/filter, remove the filter from
the vehicle and lightly shake the filter to release
loose dust and dirt. If the filter remains caked with dirt, a
new filter is required.To inspect or replace the engine air cleaner/filter do the
following:
1. Lift the filter cover tabs on top of the engine air
cleaner/filter housing.6-20
Page 370 of 432

Capacities and SpecificationsThe following approximate capacities are given in Metric and English conversions. SeeRecommended Fluids and
Lubricants on page 7-10for more information.
ApplicationCapacities
Metric English
Air Conditioning Refrigerant R134aFor the air conditioning system refrigerant charge
amount, see the refrigerant caution label located
under the hood. See your dealer/retailer for more
information.
Automatic Transmission (Bottom Pan Removal) 7.0 L 7.4 qt
Cooling System Including Reservoir
3.5L V6, 3.5L and 3.9L V6 Flexible Fuel Engines 9.6 L 10.1 qt
Engine Oil with Filter
3.5L V6, 3.5L and 3.9L V6 Flexible Fuel Engines 3.8 L 4.0 qt
Fuel Tank
3.5L V6 Engine (with NU6 emissions) 64.4 L 17.0 gal
3.5L V6 Engine (without NU6 emissions) 66.2 L 17.5 gal
3.9L V6 Engine 66.2 L 17.5 gal
Wheel Nut Torque 140Y100 lb ft
All capacities are approximate. When adding, be sure to fill to the approximate level, as recommended in this
manual. Recheck fluid level after filling.
6-100