2010 CHEVROLET HHR reset
[x] Cancel search: resetPage 234 of 480
The radio may also be capable of adjusting all tone
and speaker controls to the middle position by
pressing
ffor more than two seconds until the radio
beeps once.
If a station's frequency is weak, or has static, decrease
the treble.
EQ (Equalization): Press this button to select preset
equalization settings.
To return to the manual mode, press EQ until Manual
displays or start to manually adjust the bass, midrange,
or treble by pressing
f.
Adjusting the Speakers (Balance/Fade)
Depending on which radio the vehicle has, the Balance/
Fade can be adjusted using
for`.
To adjust balance or fade using
f:
1. Press
funtil the speaker control tabs display.
2. Press the softkey under the desired tab, or continue pressing
fto highlight the desired tab. 3. Turn
fto adjust the highlighted setting. The
highlighted setting can also be adjusted by
pressing either SEEK arrow.
On some radios,
\FWD andsREV can also
be used to adjust the highlighted level.
To adjust balance or fade using
`:
1. Press
`until the speaker control labels display.
2. Continue pressing
`until the desired speaker
control label displays.
3. Turn
fto adjust the setting. The setting can
also be adjusted by pressing either SEEK
arrow,
\FWD, orsREV.
The radio may be capable of adjusting balance or fade
to the middle position by pressing the softkey below the
BAL or FADE tab for more than two seconds. The radio
beeps once and the level adjusts to the middle position.
The radio may also be capable of adjusting all tone
and speaker controls to the middle position by
pressing
ffor more than two seconds until the radio
beeps once.
4-68
Page 247 of 480

Loading XM:The audio system is acquiring and
processing audio and text data. No action is needed.
This message should disappear shortly.
Channel Off Air: This channel is not currently in
service. Tune in to another channel.
Channel Unauth: This channel is blocked or cannot be
received with your XM Subscription package.
Channel Unavail: This previously assigned channel is
no longer assigned. Tune to another station. If this
station was one of the presets, choose another station
for that preset button.
No Artist Info: No artist information is available at this
time on this channel. The system is working properly.
No Title Info: No song title information is available at
this time on this channel. The system is working
properly.
No CAT Info: No category information is available at
this time on this channel. The system is working
properly.
No Information: No text or informational messages are
available at this time on this channel. The system is
working properly. CAT Not Found:
There are no channels available for
the selected category. The system is working properly.
XM Theftlocked: The XM receiver in the vehicle could
have previously been in another vehicle. For security
purposes, XM receivers cannot be swapped between
vehicles. If this message is received after having the
vehicle serviced, check with your dealer/retailer.
XM Radio ID: If tuned to channel 0, this message
alternates with the XM™ Radio 8 digit radio ID label.
This label is needed to activate the service.
Unknown: If this message is received when tuned to
channel 0, there could be a receiver fault. Consult with
your dealer/retailer.
Check Antenna: If this message does not clear within
a short period of time, the receiver or antenna could
have a fault. Consult with your dealer/retailer.
Check XM Receivr: If this message does not clear
within a short period of time, the receiver could have a
fault. Consult with your dealer/retailer.
XM Not Available: If this message does not clear
within a short period of time, the receiver could have a
fault. Consult with your dealer/retailer.
4-81
Page 259 of 480
To change radio stations:
.Press and releaseworxto go to the next or
previous radio station stored as a preset.
.Press and holdworxto go to the next or
previous radio station in the selected band with a
strong signal.
To select tracks on a CD:
Press and release
worxto go to the next or previous
track.
To select tracks on an iPod or USB device:
1. Press and hold
worxwhile listening to a song
until the contents of the current folder display on
the radio display.
2. Press and release
worxto scroll up or down the
list, then press and hold
wto play the highlighted
track. To navigate folders on an iPod or USB device:
1. Press and hold
worxwhile listening to a song
until the contents of the current folder display on
the radio display.
2. Press and hold
xto go back to the previous
folder list.
3. Press and release
worxto scroll up or down
the list.
.To select a folder, press and holdwwhen the
folder is highlighted.
.To go back further in the folder list, press and
hold
x.
c(End): Press to reject an incoming call, or end a
current call.
b g(Mute / Voice Recognition): Press to silence the
vehicle speakers only. Press again to turn the sound on.
For vehicles with Bluetooth
®or OnStar®systems press
and hold
b gfor longer than two seconds to interact
with those systems. See Bluetooth®on page 4‑82and
the OnStar Owner's Guide for more information.
4-93
Page 325 of 480
Cold Temperature Operation
For Vehicles With the 2.2L or
2.4L L4 Engine
If in an area of extreme cold, where the temperature
falls below−20°F (−29°C), use either an SAE 5W-30
synthetic oil or an SAE 0W-30 engine oil. Both provide
easier cold starting for the engine at extremely low
temperatures. Always use an oil that meets the required
specification, GM6094M. See “What Kind of Engine Oil
to Use” for more information.
Engine Oil Additives / Engine Oil
Flushes
Do not add anything to the oil. The recommended oils
with the starburst symbol that meet GM standards are
all that is needed for good performance and engine
protection.
Engine oil system flushes are not recommended and
could cause engine damage not covered by the vehicle
warranty.
Engine Oil Life System
When to Change Engine Oil
This vehicle has the Engine Oil Life System, a computer
system that indicates when to change the engine oil
and filter. This is based on engine revolutions and
engine temperature, and not on mileage. Based on
driving conditions, the mileage at which an oil change is
indicated can vary considerably. For the oil life system
to work properly, the system must be reset every time
the oil is changed.
When the system has calculated that oil life has been
diminished, it indicates that an oil change is necessary.
A CHANGE OIL SOON message comes on. See DIC
Warnings and Messages
on page 4‑48. Change the
oil as soon as possible within the next 600 miles
(1 000 km). It is possible that, if driving under the best
conditions, the oil life system might not indicate that an
oil change is necessary for over a year. However, the
engine oil and filter must be changed at least once a
year and at this time the system must be reset. Your
dealer/retailer has trained service people who will
perform this work using genuine parts and reset the
system. It is also important to check the oil regularly
and keep it at the proper level.
6-23
Page 326 of 480

If the system is ever reset accidentally, the oil must
be changed at 3,000 miles (5 000 km) since the last
oil change. Remember to reset the oil life system
whenever the oil is changed.
How to Reset the Engine Oil Life
System
The Engine Oil Life System calculates when to change
your engine oil and filter based on vehicle use.
Whenever the oil is changed, reset the system so it
can calculate when the next oil change is required. If a
situation occurs where the oil is changed prior to a
CHANGE OIL SOON message being turned on, reset
the system.
After changing the engine oil, the system must be reset:1. Turn the ignition to ON/RUN, with the engine off.
2. Press the information and reset buttons on the Driver Information Center (DIC) at the same time to
enter the personalization menu. See DIC Vehicle
Personalization on page 4‑54. 3. Press the information button to scroll through the
available personalization menu modes until the
DIC display shows OIL‐LIFE RESET.
4. Press and hold the reset button until the DIC display shows ACKNOWLEDGED. This will tell
you the system has been reset.
5. Turn the key to LOCK/OFF.
For vehicles with the 2.2L (VIN Code V) or 2.4L
(VIN Code B) engines, you can also reset the system
as follows: 1. Turn the ignition key to ON/RUN with the engine off.
2. Fully press and release the accelerator pedal slowly three times within five seconds.
3. Turn the key to LOCK/OFF, then start the engine.
If the CHANGE OIL SOON message comes back on
when the vehicle is started, the engine oil life system
has not reset. Repeat the reset procedure.
6-24
Page 347 of 480
To disconnect the jumper cables from both vehicles:1. Disconnect the black negative (−) cable from the vehicle that had the dead battery.
2. Disconnect the black negative (−) cable from the vehicle with the good battery.
3. Disconnect the red positive (+) cable from the vehicle with the good battery.
4. Disconnect the red positive (+) cable from the other vehicle.
5. Return the positive (+) terminal cover to its original position.
Headlamp Aiming
The vehicle has a visual optical headlamp aiming
system. The aim has been preset at the factory and
should need no further adjustment.
However, if the vehicle is damaged in a crash, the
headlamp aim may be affected and adjustment may be
necessary.
If oncoming vehicles flash their high beams at you, this
may also mean the vertical aim needs to be adjusted. It is recommended that the vehicle is taken to your
dealer/retailer for service if the headlamps need to be
re-aimed. It is possible however, to re-aim the
headlamps as described.
The vehicle should:
.Be placed so the headlamps are 25 ft. (7.6 m) from
a light colored wall.
.Have all four tires on a level surface which is level
all the way to the wall.
.Be placed so it is perpendicular to the wall or other
flat surface.
.Not have any snow, ice, or mud on it.
.Be fully assembled and all other work stopped
while headlamp aiming is being performed.
.Normally loaded with a full tank of fuel and one
person or 160 lbs (75 kg) sitting on the driver seat.
.Have all tires properly inflated.
.Have the spare tire is in its original location in the
vehicle.
6-45
Page 372 of 480
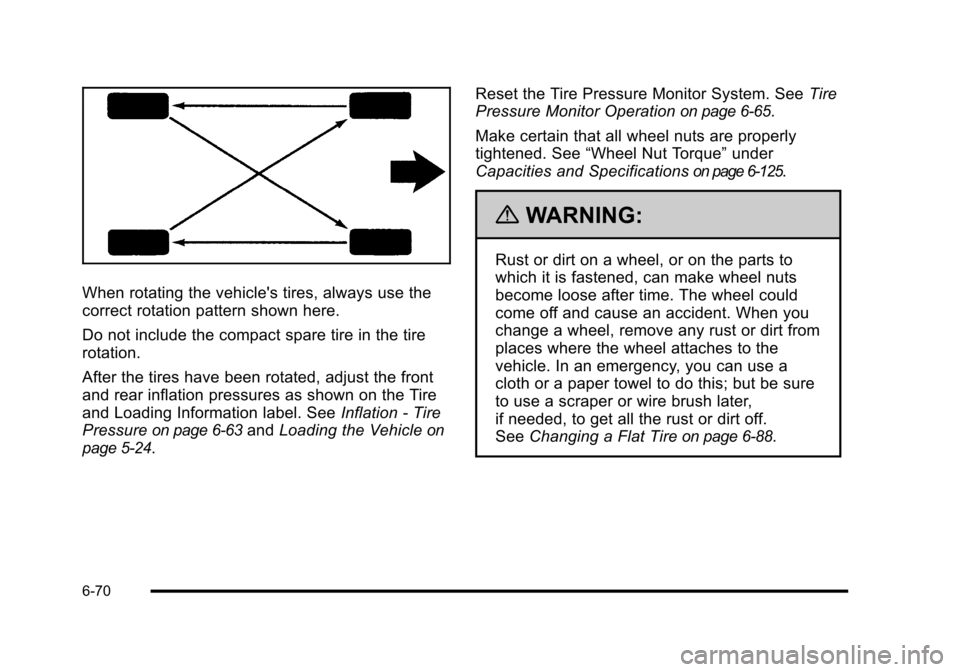
When rotating the vehicle's tires, always use the
correct rotation pattern shown here.
Do not include the compact spare tire in the tire
rotation.
After the tires have been rotated, adjust the front
and rear inflation pressures as shown on the Tire
and Loading Information label. SeeInflation - Tire
Pressure
on page 6‑63and Loading the Vehicleon
page 5‑24
. Reset the Tire Pressure Monitor System. See
Tire
Pressure Monitor Operation
on page 6‑65.
Make certain that all wheel nuts are properly
tightened. See “Wheel Nut Torque” under
Capacities and Specifications
on page 6‑125.
{WARNING:
Rust or dirt on a wheel, or on the parts to
which it is fastened, can make wheel nuts
become loose after time. The wheel could
come off and cause an accident. When you
change a wheel, remove any rust or dirt from
places where the wheel attaches to the
vehicle. In an emergency, you can use a
cloth or a paper towel to do this; but be sure
to use a scraper or wire brush later,
if needed, to get all the rust or dirt off.
See Changing a Flat Tire
on page 6‑88.
6-70
Page 431 of 480
Rotation of New Tires
To maintain ride, handling, and performance of the
vehicle, it is important that the first rotation service
for new tires be performed when they have 8 000 to
13 000 km (5,000 to 8,000 miles). SeeTire Inspection
and Rotation on page 6‑69.
Scheduled Maintenance
When the Change Oil Soon Message
Displays
Change engine oil and filter. See Engine Oilon
page 6‑19. An Emission Control Service.
When the Change Oil Soon message displays, service
is required for the vehicle as soon as possible, within
the next 1 000 km/600 miles. If driving under the best
conditions, the engine oil life system might not indicate
the need for vehicle service for more than a year. The
engine oil and filter must be changed at least once a
year and the oil life system must be reset. Your dealer/retailer has trained service technicians
who will perform this work and reset the system. If the
engine oil life system is reset accidentally, service the
vehicle within 5 000 km/3,000 miles since the last
service. Reset the oil life system whenever the oil is
changed. See
Engine Oil Life System on page 6‑23.
When the Change Oil Soon message displays, certain
services, checks, and inspections are required. The
services described for Maintenance Ishould be
performed at every engine oil change. The services
described for Maintenance IIshould be
performed when:
.Maintenance Iwas performed the last time the
engine oil was changed.
.It has been 10 months or more since the Change
Oil Soon message has displayed or since the last
service.
7-3