2010 CHEVROLET HHR stop start
[x] Cancel search: stop startPage 28 of 480

Tire Pressure Monitor
This vehicle may have a Tire Pressure Monitor
System (TPMS).
The Tire Pressure Monitor
alerts you when a
significant reduction in
pressure occurs in one or
more of the vehicle’s tires
by illuminating the low tire
pressure warning light on
the instrument cluster.
If the warning light comes on, stop as soon as possible
and inflate the tires to the recommended pressure
shown on the tire loading information label located on
the driver side center pillar (B pillar). See Loading the
Vehicle
on page 5‑24. The warning light will remain on
until the tire pressure is corrected. You may notice during cooler conditions that the low tire
pressure warning light will appear when the vehicle is
first started and then turn off as you drive. This may be
an early indicator that your tire pressures are getting
low and the tires need to be inflated to the proper
pressure.
The Tire Pressure Monitor can alert you about low tire
pressure, but it does not replace normal monthly tire
maintenance. It is the driver
’s responsibility to maintain
correct tire pressures.
See Tire Pressure Monitor System
on page 6‑64and
Tire Pressure Monitor Operation on page 6‑65.
Tire Sealant and Compressor Kit
This vehicle may come with a jack and spare tire or a
tire sealant and compressor kit. The kit can be used to
seal small punctures in the tread area of the tire.
See Tire Sealant and Compressor Kit
on page 6‑78for
complete operating information.
1-22
Page 30 of 480
Driving for Better Fuel Economy
Driving habits can affect fuel mileage. Here are some
driving tips to get the best fuel economy possible.
.Avoid fast starts and accelerate smoothly.
.Brake gradually and avoid abrupt stops.
.Avoid idling the engine for long periods of time.
.When road and weather conditions are
appropriate, use cruise control, if equipped.
.Always follow posted speed limits or drive more
slowly when conditions require.
.Keep vehicle tires properly inflated.
.Combine several trips into a single trip.
.Replace the vehicle's tires with the same TPC
Spec number molded into the tire's sidewall near
the size.
.Follow recommended scheduled maintenance.
Battery
This vehicle has a maintenance free battery located in
the cargo area. Access to the battery is not necessary
to jump start the vehicle. There are positive (+) and
negative (−) terminals in the engine compartment.
SeeBattery
on page 6‑40andJump Startingon
page 6‑41.
Roadside Assistance Program
U.S.: 1-800-CHEV-USA (1-800-243-8872)
TTY Users: 1-888-889-2438
Canada: 1-800-268-6800
As the owner of a new Chevrolet, you are automatically
enrolled in the Roadside Assistance program. This
program provides technically trained advisors who are
available 24 hours a day, 365 days a year, minor repair
information or towing arrangements.
Roadside Assistance and OnStar
If you have a current OnStar subscription, press the
OnStar button and the current GPS location will be sent
to an OnStar Advisor who will assess your problem,
contact Roadside Assistance, and relay exact location
to get you the help you need.
Online Owner Center
The Online Owner Center is a complimentary service
that includes online service reminders, vehicle
maintenance tips, online owner manual, special
privileges and more.
Sign up today at: www.gmownercenter.com/chevrolet
(U.S.) or www.gm.ca (Canada).
1-24
Page 39 of 480
Reclining Seatbacks
{WARNING:
You can lose control of the vehicle if you try to
adjust a manual driver's seat while the vehicle is
moving. The sudden movement could startle and
confuse you, or make you push a pedal when you
do not want to. Adjust the driver's seat only when
the vehicle is not moving.
{WARNING:
If either seatback is not locked, it could move
forward in a sudden stop or crash. That could
cause injury to the person sitting there. Always
push and pull on the seatbacks to be sure they
are locked.
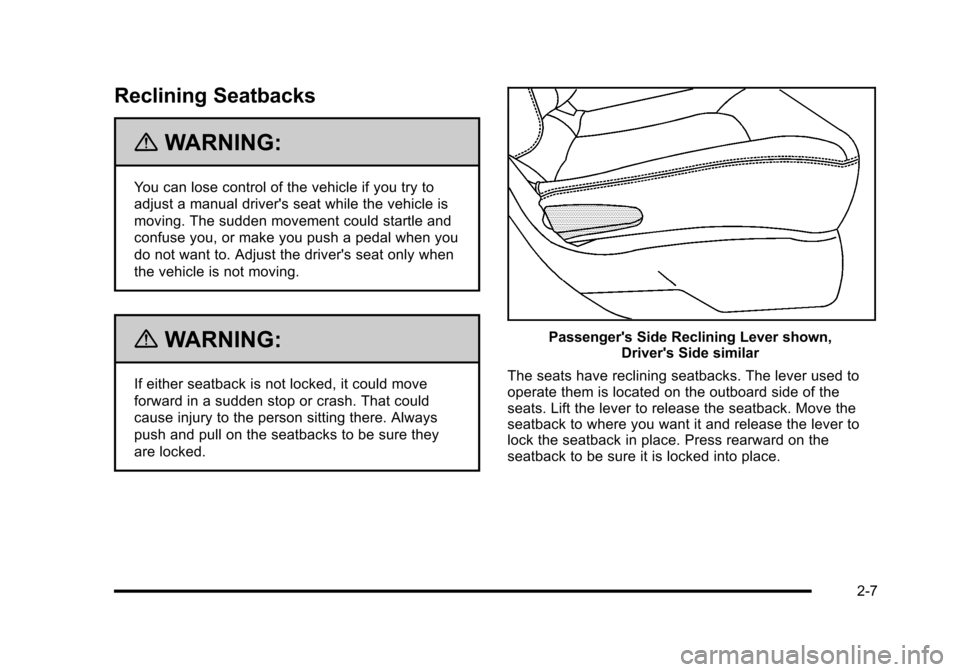
Passenger's Side Reclining Lever shown,Driver's Side similar
The seats have reclining seatbacks. The lever used to
operate them is located on the outboard side of the
seats. Lift the lever to release the seatback. Move the
seatback to where you want it and release the lever to
lock the seatback in place. Press rearward on the
seatback to be sure it is locked into place.
2-7
Page 134 of 480
Starting and Operating Your
Vehicle
New Vehicle Break-In
Notice:The vehicle does not need an elaborate
break-in. But it will perform better in the long run
if you follow these guidelines:
.Do not drive at any one constant speed,
fast or slow, for the first 500 miles (805 km).
Do not make full-throttle starts. Avoid
downshifting to brake or slow the vehicle.
.Avoid making hard stops for the first
200 miles (322 km) or so. During this time
the new brake linings are not yet broken in.
Hard stops with new linings can mean
premature wear and earlier replacement.
Follow this breaking-in guideline every time
you get new brake linings.
.Do not tow a trailer during break-in. See
Towing a Trailer (Automatic Transmission)
on page 5‑32or Towing a Trailer (Manual
Transmission)
on page 5‑40for the trailer
towing capabilities of your vehicle and more
information.
Following break‐in, engine speed and load can be
gradually increased.
3-22
Page 137 of 480
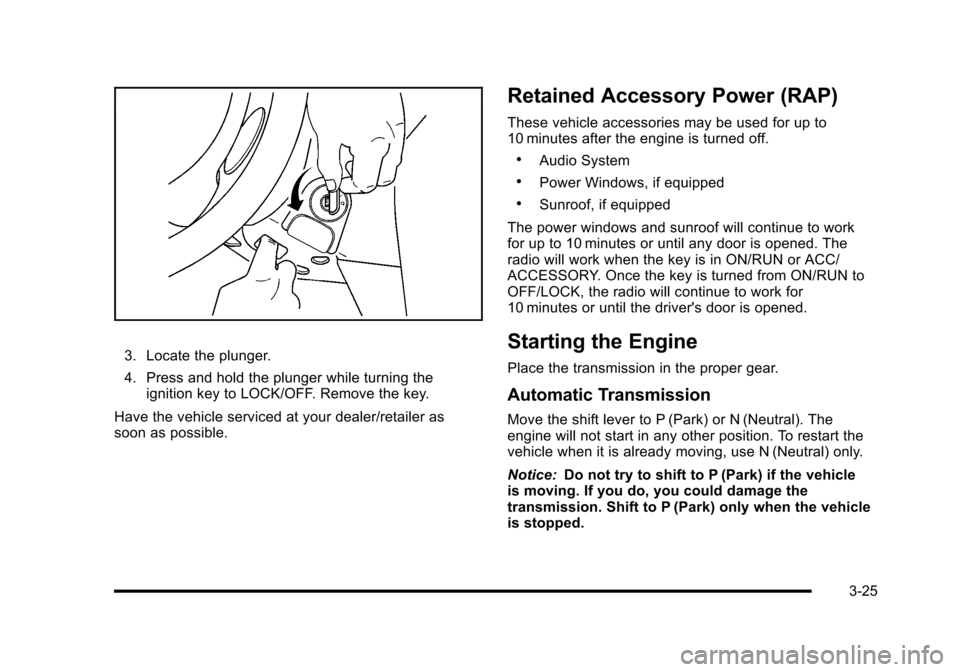
3. Locate the plunger.
4. Press and hold the plunger while turning theignition key to LOCK/OFF. Remove the key.
Have the vehicle serviced at your dealer/retailer as
soon as possible.
Retained Accessory Power (RAP)
These vehicle accessories may be used for up to
10 minutes after the engine is turned off.
.Audio System
.Power Windows, if equipped
.Sunroof, if equipped
The power windows and sunroof will continue to work
for up to 10 minutes or until any door is opened. The
radio will work when the key is in ON/RUN or ACC/
ACCESSORY. Once the key is turned from ON/RUN to
OFF/LOCK, the radio will continue to work for
10 minutes or until the driver's door is opened.
Starting the Engine
Place the transmission in the proper gear.
Automatic Transmission
Move the shift lever to P (Park) or N (Neutral). The
engine will not start in any other position. To restart the
vehicle when it is already moving, use N (Neutral) only.
Notice: Do not try to shift to P (Park) if the vehicle
is moving. If you do, you could damage the
transmission. Shift to P (Park) only when the vehicle
is stopped.
3-25
Page 138 of 480
Manual Transmission
The shift lever should be in N (Neutral) and the parking
brake engaged. Hold the clutch pedal down to the floor
and start the engine. The vehicle will not start if the
clutch pedal is not all the way down.
Starting Procedure
1. With your foot off the accelerator pedal, turn theignition key to START. When the engine starts, let
go of the key. The idle speed will go down as the
engine warms. Do not race the engine immediately
after starting it. Operate the engine and
transmission gently to allow the oil to warm up and
lubricate all moving parts.
The vehicle has a Computer-Controlled Cranking
System. This feature assists in starting the engine
and protects components. If the ignition key is
turned to the START position, and then released
when the engine begins cranking, the engine will
continue cranking for a few seconds or until the
vehicle starts. If the engine does not start and the
key is held in START for many seconds, cranking
will be stopped after 15 seconds to prevent
cranking motor damage. To prevent gear damage,
this system also prevents cranking if the engine is
already running. Engine cranking can be stopped
by turning the ignition switch to ACC/ACCESSORY
or LOCK/OFF. Notice:
Cranking the engine for long periods of
time, by returning the key to the START position
immediately after cranking has ended, can overheat
and damage the cranking motor, and drain the
battery. Wait at least 15 seconds between each try,
to let the cranking motor cool down.
2. If the engine does not start after 5‐10 seconds, especially in very cold weather (below 0°F or
−18°C), it could be flooded with too much gasoline.
Push the accelerator pedal all the way to the floor
and holding it there as you hold the key in START
for a maximum of 15 seconds. Wait at least
15 seconds between each try, to allow the cranking
motor to cool. When the engine starts, let go of the
key and accelerator. If the vehicle starts briefly but
then stops again, repeat the procedure. This clears
the extra gasoline from the engine. Do not race the
engine immediately after starting it. Operate the
engine and transmission gently until the oil warms
up and lubricates all moving parts.
Notice: The engine is designed to work with the
electronics in the vehicle. If you add electrical parts
or accessories, you could change the way the
engine operates. Before adding electrical
equipment, check with your dealer/retailer. If you
do not, the engine might not perform properly.
Any resulting damage would not be covered by the
vehicle warranty.
3-26
Page 141 of 480
Make sure the shift lever is fully in P (Park) before
starting the engine. The vehicle has an automatic
transmission shift lock control system. You have to fully
apply the regular brakes first and then press the shift
lever button before the vehicle can shift from P (Park)
when the ignition key is in ON/RUN. If the vehicle
cannot shift out of P (Park), ease pressure on the shift
lever and push the shift lever all the way into P (Park)
as you maintain brake application. Then press the shift
lever button and then move the shift lever into another
gear. SeeShifting Out of Park (Automatic Transmission)
on page 3‑37.
R (Reverse): Use this gear to back up.
Notice: Shifting to R (Reverse) while the vehicle is
moving forward could damage the transmission.
The repairs would not be covered by the vehicle
warranty. Shift to R (Reverse) only after the vehicle
is stopped.
To rock your vehicle back and forth to get out of snow,
ice, or sand without damaging the transmission, see If
Your Vehicle is Stuck in Sand, Mud, Ice, or Snow
on
page 5‑23. N (Neutral):
In this position, the engine does not
connect with the wheels. To restart the engine when the
vehicle is already moving, use N (Neutral) only. Also,
use N (Neutral) when the vehicle is being towed.
{WARNING:
Shifting into a drive gear while the engine is
running at high speed is dangerous. Unless your
foot is firmly on the brake pedal, the vehicle could
move very rapidly. You could lose control and hit
people or objects. Do not shift into a drive gear
while the engine is running at high speed.
Notice: Shifting out of P (Park) or N (Neutral) with
the engine running at high speed may damage the
transmission. The repairs would not be covered by
the vehicle warranty. Be sure the engine is not
running at high speed when shifting the vehicle.
3-29
Page 144 of 480
2 (Second):Press the clutch pedal as you let up on the
accelerator pedal and shift into 2 (Second). Then, slowly
let up on the clutch pedal as you press the accelerator
pedal.
3 (Third), 4 (Fourth) and 5 (Fifth): Shift into 3 (Third),
4 (Fourth) and 5 (Fifth) the same way you do for
2 (Second). Slowly let up on the clutch pedal as
you press the accelerator pedal down.
To stop, let up on the accelerator pedal and press the
brake pedal. Just before the vehicle stops, press
the clutch pedal and the brake pedal, and shift to
N (Neutral).
N (Neutral): Use this position when you start or idle the
engine.
R (Reverse): To back up, press down the clutch pedal
and shift into R (Reverse).
For SS models, lift upwards on the ring located on the
underside of the shift knob to shift into R (Reverse). Notice:
Shifting to R (Reverse) while the vehicle is
moving forward could damage the transmission.
The repairs would not be covered by the vehicle
warranty. Shift to R (Reverse) only after the vehicle
is stopped.
Also, use R (Reverse), along with the parking brake, for
parking the vehicle.
Shift Speeds
{WARNING:
If you skip a gear when you downshift, you could
lose control of the vehicle. You could injure
yourself or others. Do not shift down more than
one gear at a time when you downshift.
3-32