2010 CHEVROLET EQUINOX tire pressure
[x] Cancel search: tire pressurePage 5 of 394
Introduction v
Notice:This means there is
something that could result in
property or vehicle damage. This
would not be covered by the
vehicle's warranty.
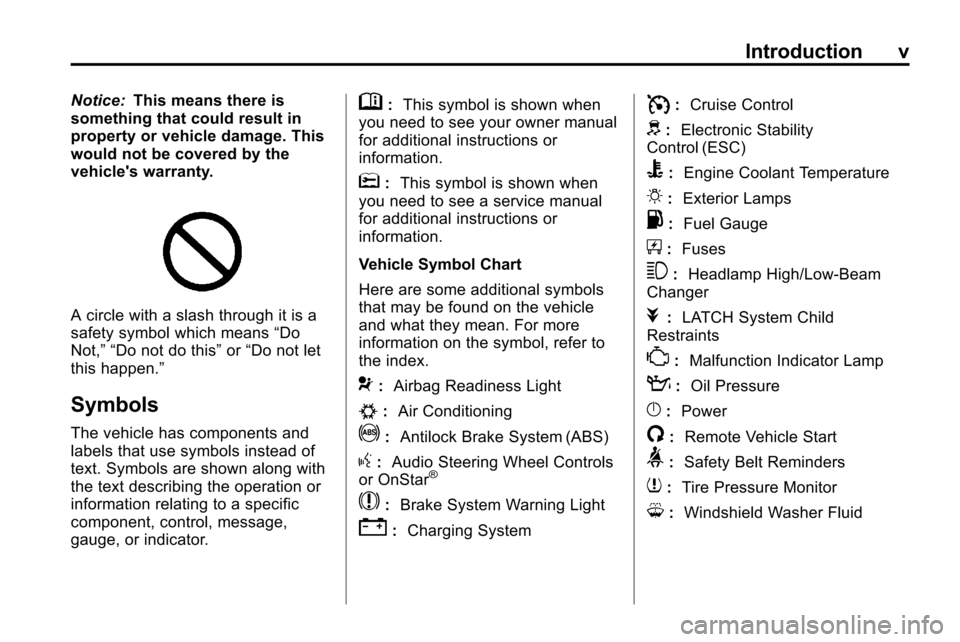
A circle with a slash through it is a
safety symbol which means “Do
Not,” “Do not do this” or“Do not let
this happen.”
Symbols
The vehicle has components and
labels that use symbols instead of
text. Symbols are shown along with
the text describing the operation or
information relating to a specific
component, control, message,
gauge, or indicator.
M: This symbol is shown when
you need to see your owner manual
for additional instructions or
information.
*: This symbol is shown when
you need to see a service manual
for additional instructions or
information.
Vehicle Symbol Chart
Here are some additional symbols
that may be found on the vehicle
and what they mean. For more
information on the symbol, refer to
the index.
9: Airbag Readiness Light
#:Air Conditioning
!:Antilock Brake System (ABS)
g:Audio Steering Wheel Controls
or OnStar®
$: Brake System Warning Light
":Charging System
I:Cruise Control
d:Electronic Stability
Control (ESC)
B: Engine Coolant Temperature
O:Exterior Lamps
.:Fuel Gauge
+:Fuses
3: Headlamp High/Low-Beam
Changer
j: LATCH System Child
Restraints
*: Malfunction Indicator Lamp
::Oil Pressure
}:Power
/:Remote Vehicle Start
>:Safety Belt Reminders
7:Tire Pressure Monitor
M:Windshield Washer Fluid
Page 87 of 394
Instruments and Controls 4-1
Instruments and
Controls
Instrument Panel Overview
Instrument Panel Overview . . . . 4-4
Controls
Steering Wheel Adjustment . . . 4-6
Steering Wheel Controls . . . . . . 4-6
Horn . . . . . . . . . . . . . . . . . . . . . . . . . . 4-7
Windshield Wiper/Washer . . . . . 4-7
Rear Window Wiper/Washer . . . . . . . . . . . . . . . . . . . . . . 4-8
Compass . . . . . . . . . . . . . . . . . . . . . 4-8
Clock (With Date Display) . . . . . 4-9
Clock (Without Date Display) . . . . . . . . . . . . . . . . . . . . 4-10
Power Outlets . . . . . . . . . . . . . . . 4-10
Warning Lights, Gauges, and
Indicators
Warning Lights, Gauges, and Indicators . . . . . . . . . . . . . . . . . . . 4-11
Instrument Cluster . . . . . . . . . . . 4-12
Speedometer . . . . . . . . . . . . . . . . 4-13
Odometer . . . . . . . . . . . . . . . . . . . . 4-13
Tachometer . . . . . . . . . . . . . . . . . . 4-13
Fuel Gauge . . . . . . . . . . . . . . . . . . 4-13
Engine Coolant Temperature Gauge . . . . . . . . . . . . . . . . . . . . . . 4-14
Safety Belt Reminders . . . . . . . 4-14
Airbag Readiness Light . . . . . . 4-15
Passenger Airbag Status Indicator . . . . . . . . . . . . . . . . . . . . 4-15
Charging System Light . . . . . . 4-16
Malfunction Indicator Lamp . . . . . . . . . . . . . 4-16
Brake System Warning Light . . . . . . . . . . . . . . . . . . . . . . . 4-19 Antilock Brake System (ABS)
Warning Light . . . . . . . . . . . . . . 4-20
Traction Off Light . . . . . . . . . . . . 4-20
StabiliTrak®OFF Light . . . . . . . 4-20
Traction Control System
(TCS)/StabiliTrak
®Light . . . . 4-21
Tire Pressure Light . . . . . . . . . . 4-21
Engine Oil Pressure Light . . . . 4-22
Fuel Economy Light . . . . . . . . . 4-22
Low Fuel Warning Light . . . . . . 4-22
Security Light . . . . . . . . . . . . . . . . 4-23
High-Beam on Light . . . . . . . . . 4-23
Fog Lamp Light . . . . . . . . . . . . . . 4-23
Lamps on Reminder . . . . . . . . . 4-23
Cruise Control Light . . . . . . . . . 4-24
Information Displays
Driver Information Center (DIC) . . . . . . . . . . . . . . . 4-24
Page 107 of 394
Instruments and Controls 4-21
SeeTraction Control System (TCS)on page 8‑41andStabiliTrak
Systemon page 8‑43for more
information.
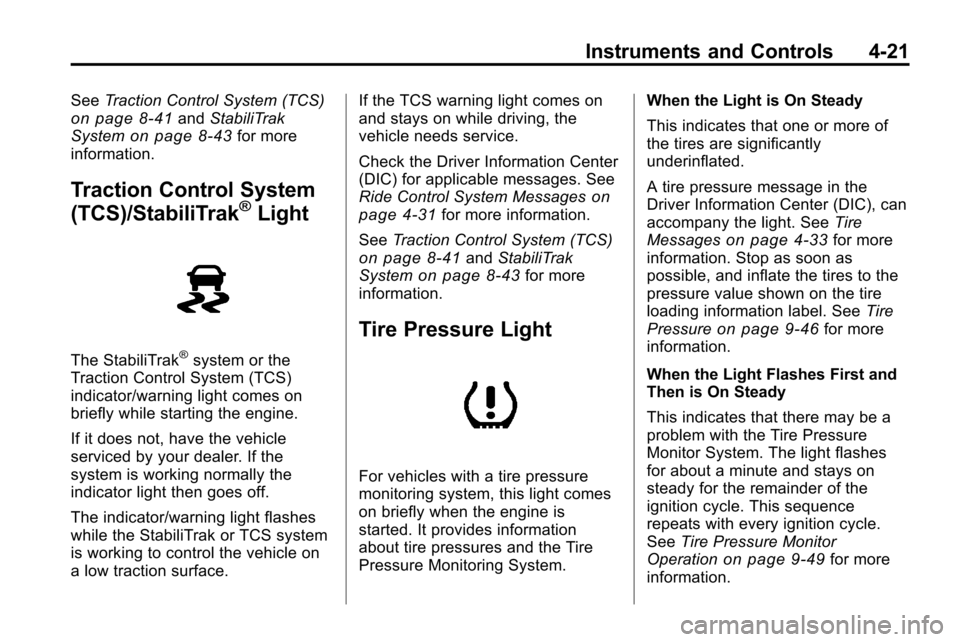
Traction Control System
(TCS)/StabiliTrak®Light
The StabiliTrak®system or the
Traction Control System (TCS)
indicator/warning light comes on
briefly while starting the engine.
If it does not, have the vehicle
serviced by your dealer. If the
system is working normally the
indicator light then goes off.
The indicator/warning light flashes
while the StabiliTrak or TCS system
is working to control the vehicle on
a low traction surface. If the TCS warning light comes on
and stays on while driving, the
vehicle needs service.
Check the Driver Information Center
(DIC) for applicable messages. See
Ride Control System Messages
on
page 4‑31for more information.
See Traction Control System (TCS)
on page 8‑41andStabiliTrak
Systemon page 8‑43for more
information.
Tire Pressure Light
For vehicles with a tire pressure
monitoring system, this light comes
on briefly when the engine is
started. It provides information
about tire pressures and the Tire
Pressure Monitoring System. When the Light is On Steady
This indicates that one or more of
the tires are significantly
underinflated.
A tire pressure message in the
Driver Information Center (DIC), can
accompany the light. See
Tire
Messages
on page 4‑33for more
information. Stop as soon as
possible, and inflate the tires to the
pressure value shown on the tire
loading information label. See Tire
Pressure
on page 9‑46for more
information.
When the Light Flashes First and
Then is On Steady
This indicates that there may be a
problem with the Tire Pressure
Monitor System. The light flashes
for about a minute and stays on
steady for the remainder of the
ignition cycle. This sequence
repeats with every ignition cycle.
See Tire Pressure Monitor
Operation
on page 9‑49for more
information.
Page 112 of 394

4-26 Instruments and Controls
Timer
This display can be used as a timer.
To start the timer, press
Vor SET/
CLR while Timer is displayed. The
display will show the amount of time
that has passed since the timer was
last reset, not including time the
ignition is off. Time will continue to
be counted as long as the ignition is
on, even if another display is being
shown on the DIC. The timer will
record up to 99 hours, 59 minutes
and 59 seconds (99:59:59) after
which the display will return to zero.
To stop the timer, press
Vor SET/
CLR briefly while Timer is displayed.
To reset the timer to zero, press and
hold
Vor SET/CLR.
Digital Speedometer
The speedometer shows how fast
the vehicle is moving in either
kilometers per hour (km/h) or miles
per hour (mph). The speedometer
cannot be reset. Turn-by-Turn
This display is used for the OnStar
or Navigation System Turn-by-Turn
guidance. See
OnStar
®Systemon
page 4‑39or the Navigation
manual, if the vehicle has
navigation, for more information.
Blank Display
This display shows no information.
Vehicle Information Menu
Items
Press the MENU button until Vehicle
Information Menu is displayed. Then
press
xto scroll through the
following menu items:
.Unit
.Tire Pressure
.Remaining Oil Life
.Blank Unit
Press
Vor SET/CLR to enter the
unit menu. Then press
worxto
switch between US or Metric when
the Unit display is active. Press
V
or SET/CLR to confirm the setting.
This will change the displays on the
cluster and DIC to either metric or
English (US) measurements.
Tire Pressure
The display will show a vehicle with
the approximate pressures of all
four tires. Tire pressure is displayed
in either pounds per square
inch (psi) or in kilopascal (kPa).
Any time the tire pressures are
adjusted the system needs to
relearn the new pressures. To
relearn the tire pressures press
Vor
SET/CLR while the Tire Pressure
display is active. The display will
ask for confirmation of a relearn.
Press
worxto select Yes or No.
Then press
Vor SET/CLR to
confirm the selection. See Tire
Page 113 of 394
Instruments and Controls 4-27
Pressure Monitor Systemon
page 9‑49and Tire Pressure
Monitor Operationon page 9‑49for
more information.
Remaining Oil Life
This display shows an estimate of
the oil's remaining useful life.
If “Remaining Oil Life 99%” is
displayed, that means 99% of the
current oil life remains.
When the remaining oil life is low,
the “Change Engine Oil Soon”
message will appear on the display.
See Engine Oil Messages
on
page 4‑30. The oil should be
changed as soon as possible. See
Engine Oil
on page 9‑10. In
addition to the engine oil life system
monitoring the oil life, additional
maintenance is recommended in the
Maintenance Schedule in this
manual. See Scheduled
Maintenance
on page 10‑2for
more information. Remember, the Oil Life display must
be reset after each oil change. It
will not reset itself. Also, be careful
not to reset the Oil Life display
accidentally at any time other than
when the oil has just been changed.
It cannot be reset accurately until
the next oil change. To reset the
engine oil life system, press
Vor
SET/CLR while the Oil Life display
is active. The display will ask for
confirmation of a reset. Press
wor
xto select Yes or No. Then pressVor SET/CLR to confirm the
selection. See Engine Oil Life
System
on page 9‑11.
Blank Display
This display shows no information.
Compass
The vehicle may have a compass in
the Driver Information Center (DIC).
See Compass on page 4‑8.
Vehicle Messages
Messages are displayed on the DIC
to notify the driver that the status of
the vehicle has changed and that
some action may be needed by the
driver to correct the condition.
Multiple messages may appear one
after another.
Some messages may not require
immediate action, but you can press
Vor SET/CLR to acknowledge that
you received the messages and to
clear them from the display. Some
messages cannot be cleared from
the DIC display because they are
more urgent. These messages
require action before they can be
cleared. You should take any
messages that appear on the
display seriously and remember that
clearing the messages will only
make the messages disappear, not
correct the problem. You will find the
possible messages that can be
displayed and some information
about them grouped by subject in
the following information.
Page 119 of 394

Instruments and Controls 4-33
Tire Messages
Service Tire Monitor System
This message displays if there is a
problem with the Tire Pressure
Monitor System (TPMS). SeeTire
Pressure Monitor Operation
on
page 9‑49for more information.
Tire Learning Active
This message displays when the
system is learning new tires. See
Tire Pressure Monitor Operation
on
page 9‑49for more information.
Tire Low Add Air To Tire
On vehicles with the Tire Pressure
Monitor System (TPMS), this
message displays when the
pressure in one or more of the
vehicle's tires is low.
This message also displays “Left
Front”, “Right Front”, “Left Rear”,
or “Right Rear” to indicate the
location of the low tire. The low tire pressure warning light
will also come on. See
Tire
Pressure Light on page 4‑21.
If a tire pressure message appears
on the DIC, stop as soon as you
can. Inflate the tires by adding air
until the tire pressure is equal to the
values shown on the Tire Loading
Information label. See Tires
on
page 9‑40, Vehicle Load Limitson
page 8‑24, and Tire Pressureon
page 9‑46.
You can receive more than one tire
pressure message at a time. To
read the other messages that may
have been sent at the same time,
press the set/reset button. The DIC
also shows the tire pressure values.
See Driver Information Center (DIC)
on page 4‑24.
Transmission Messages
Service Transmission
This message displays if there is a
problem with the transmission. See
your dealer.
Shift To Park
This message displays when the
transmission needs to be shifted to
P (Park). This may appear when
attempting to remove the key from
the ignition if the vehicle is not in
P (Park).
Transmission Hot –Idle
Engine
This message displays and a chime
sounds if the transmission fluid in
the vehicle gets hot. Driving with the
transmission fluid temperature high
can cause damage to the vehicle.
Stop the vehicle and let it idle to
allow the transmission to cool. This
message clears when the fluid
temperature reaches a safe level.
Page 228 of 394
8-24 Driving and Operating
Vehicle Load Limits
It is very important to know how
much weight the vehicle can
carry. This weight is called the
vehicle capacity weight and
includes the weight of all
occupants, cargo and all
nonfactory‐installed options.
Two labels on the vehicle
show how much weight it may
properly carry, the Tire and
Loading Information label and
the Certification label.
{WARNING
Do not load the vehicle any
heavier than the Gross
Vehicle Weight Rating
(GVWR), or either the
maximum front or rear Gross
Axle Weight Rating (GAWR).
If you do, parts on the vehicle
can break, and it can change
(Continued)
WARNING (Continued)
the way the vehicle handles.
These could cause you to lose
control and crash. Also,
overloading can shorten the
life of the vehicle.
Tire and Loading Information
Label
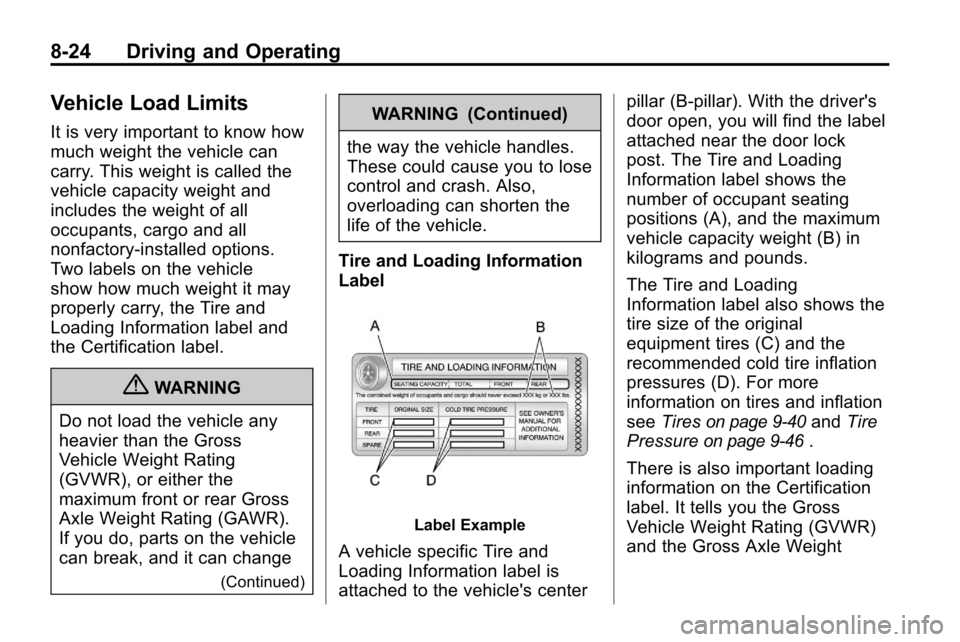
Label Example
A vehicle specific Tire and
Loading Information label is
attached to the vehicle's center pillar (B-pillar). With the driver's
door open, you will find the label
attached near the door lock
post. The Tire and Loading
Information label shows the
number of occupant seating
positions (A), and the maximum
vehicle capacity weight (B) in
kilograms and pounds.
The Tire and Loading
Information label also shows the
tire size of the original
equipment tires (C) and the
recommended cold tire inflation
pressures (D). For more
information on tires and inflation
see
Tires
on page 9‑40and Tire
Pressure
on page 9‑46.
There is also important loading
information on the Certification
label. It tells you the Gross
Vehicle Weight Rating (GVWR)
and the Gross Axle Weight
Page 270 of 394
9-2 Vehicle Care
Wheels and Tires
Tires . . . . . . . . . . . . . . . . . . . . . . . . . 9-40
Tire Sidewall Labeling . . . . . . . 9-40
Tire Designations . . . . . . . . . . . . 9-42
Tire Terminology andDefinitions . . . . . . . . . . . . . . . . . . 9-43
Tire Pressure . . . . . . . . . . . . . . . . 9-46
Tire Pressure Monitor System . . . . . . . . . . . . . . . . . . . . . 9-47
Tire Pressure Monitor Operation . . . . . . . . . . . . . . . . . . 9-49
Tire Inspection . . . . . . . . . . . . . . . 9-52
Tire Rotation . . . . . . . . . . . . . . . . . 9-52
When It Is Time for New Tires . . . . . . . . . . . . . . . . . . . . . . . 9-53 Buying New Tires . . . . . . . . . . . . 9-54
Different Size Tires and
Wheels . . . . . . . . . . . . . . . . . . . . . 9-55
Uniform Tire Quality Grading . . . . . . . . . . . . . . . . . . . . 9-56
Wheel Alignment and Tire Balance . . . . . . . . . . . . . . . . . . . . 9-57
Wheel Replacement . . . . . . . . . 9-57
Tire Chains . . . . . . . . . . . . . . . . . . 9-58
If a Tire Goes Flat . . . . . . . . . . . 9-59
Tire Changing . . . . . . . . . . . . . . . 9-61
Compact Spare Tire . . . . . . . . . 9-68
Jump Starting
Jump Starting . . . . . . . . . . . . . . . . 9-69
Towing
Towing the Vehicle . . . . . . . . . . . 9-72
Recreational Vehicle Towing . . . . . . . . . . . . . . . . . . . . . 9-72
Appearance Care
Exterior Care . . . . . . . . . . . . . . . . 9-75
Interior Care . . . . . . . . . . . . . . . . . 9-79