2010 CHEVROLET EQUINOX steering wheel adjustment
[x] Cancel search: steering wheel adjustmentPage 87 of 394

Instruments and Controls 4-1
Instruments and
Controls
Instrument Panel Overview
Instrument Panel Overview . . . . 4-4
Controls
Steering Wheel Adjustment . . . 4-6
Steering Wheel Controls . . . . . . 4-6
Horn . . . . . . . . . . . . . . . . . . . . . . . . . . 4-7
Windshield Wiper/Washer . . . . . 4-7
Rear Window Wiper/Washer . . . . . . . . . . . . . . . . . . . . . . 4-8
Compass . . . . . . . . . . . . . . . . . . . . . 4-8
Clock (With Date Display) . . . . . 4-9
Clock (Without Date Display) . . . . . . . . . . . . . . . . . . . . 4-10
Power Outlets . . . . . . . . . . . . . . . 4-10
Warning Lights, Gauges, and
Indicators
Warning Lights, Gauges, and Indicators . . . . . . . . . . . . . . . . . . . 4-11
Instrument Cluster . . . . . . . . . . . 4-12
Speedometer . . . . . . . . . . . . . . . . 4-13
Odometer . . . . . . . . . . . . . . . . . . . . 4-13
Tachometer . . . . . . . . . . . . . . . . . . 4-13
Fuel Gauge . . . . . . . . . . . . . . . . . . 4-13
Engine Coolant Temperature Gauge . . . . . . . . . . . . . . . . . . . . . . 4-14
Safety Belt Reminders . . . . . . . 4-14
Airbag Readiness Light . . . . . . 4-15
Passenger Airbag Status Indicator . . . . . . . . . . . . . . . . . . . . 4-15
Charging System Light . . . . . . 4-16
Malfunction Indicator Lamp . . . . . . . . . . . . . 4-16
Brake System Warning Light . . . . . . . . . . . . . . . . . . . . . . . 4-19 Antilock Brake System (ABS)
Warning Light . . . . . . . . . . . . . . 4-20
Traction Off Light . . . . . . . . . . . . 4-20
StabiliTrak®OFF Light . . . . . . . 4-20
Traction Control System
(TCS)/StabiliTrak
®Light . . . . 4-21
Tire Pressure Light . . . . . . . . . . 4-21
Engine Oil Pressure Light . . . . 4-22
Fuel Economy Light . . . . . . . . . 4-22
Low Fuel Warning Light . . . . . . 4-22
Security Light . . . . . . . . . . . . . . . . 4-23
High-Beam on Light . . . . . . . . . 4-23
Fog Lamp Light . . . . . . . . . . . . . . 4-23
Lamps on Reminder . . . . . . . . . 4-23
Cruise Control Light . . . . . . . . . 4-24
Information Displays
Driver Information Center (DIC) . . . . . . . . . . . . . . . 4-24
Page 91 of 394

Instruments and Controls 4-5
A.Air Vents on page 7‑6.
B. Turn and Lane-Change Signals
on page 5‑3.Exterior Lamp
Controlson page 5‑1. Fog
Lampson page 5‑3(If
Equipped).
C. Instrument Cluster
on
page 4‑12.
D. Windshield Wiper/Washer
on
page 4‑7. Rear Window
Wiper/Washer on page 4‑8.
E. Power Door Locks
on
page 1‑7.
F. Instrument Panel Storage
on
page 3‑1.
G. Safety Locks on page 1‑7. H.
AM-FM Radio
on page 6‑11.
Navigation System (If
Equipped). See Navigation
System Manual.
I. Cruise Control
on page 8‑44.
J. Instrument Panel Illumination
Control
on page 5‑4.
K. Steering Wheel Adjustment
on
page 4‑6.
L. Horn on page 4‑7.
M. Steering Wheel Controls
on
page 4‑6.
N. Ignition Positions on page 8‑28.
O. Climate Control Systems
on
page 7‑1or Automatic Climate
Control System on page 7‑3. P. Shift Lever. See
Shifting Into
Park on page 8‑32.
Q. Fuel Economy Mode
on
page 8‑37(If Equipped).
R. StabiliTrak System
on
page 8‑43.
S. Cupholders on page 3‑1.
T. Power Outlets on page 4‑10.
U. CD Player on page 6‑19.
V. Driver Information Center Buttons. See Driver Information
Center (DIC) on page 4‑24.
W. Hazard Warning Flashers
on
page 5‑2.
X. Glove Box on page 3‑1.
Page 92 of 394

4-6 Instruments and Controls
Controls
Steering Wheel
Adjustment
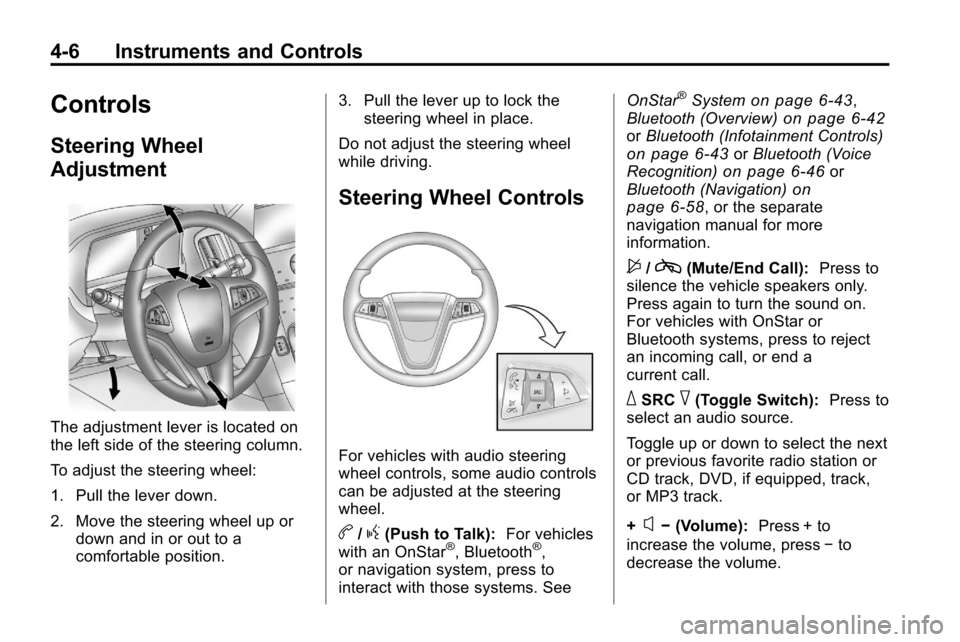
The adjustment lever is located on
the left side of the steering column.
To adjust the steering wheel:
1. Pull the lever down.
2. Move the steering wheel up ordown and in or out to a
comfortable position. 3. Pull the lever up to lock the
steering wheel in place.
Do not adjust the steering wheel
while driving.
Steering Wheel Controls
For vehicles with audio steering
wheel controls, some audio controls
can be adjusted at the steering
wheel.
b/g(Push to Talk): For vehicles
with an OnStar®, Bluetooth®,
or navigation system, press to
interact with those systems. See OnStar
®Systemon page 6‑43,
Bluetooth (Overview)on page 6‑42or Bluetooth (Infotainment Controls)on page 6‑43orBluetooth (Voice
Recognition)on page 6‑46or
Bluetooth (Navigation)on
page 6‑58, or the separate
navigation manual for more
information.
$/c(Mute/End Call): Press to
silence the vehicle speakers only.
Press again to turn the sound on.
For vehicles with OnStar or
Bluetooth systems, press to reject
an incoming call, or end a
current call.
_SRC^(Toggle Switch): Press to
select an audio source.
Toggle up or down to select the next
or previous favorite radio station or
CD track, DVD, if equipped, track,
or MP3 track.
+
x− (Volume): Press + to
increase the volume, press −to
decrease the volume.
Page 263 of 394

Driving and Operating 8-59
.Do not use the Fuel Saver Mode
when towing.
.Obey speed limit restrictions.
Do not drive faster than the
maximum posted speed for
trailers, or no more than 90 km/h
(55 mph), to reduce wear on the
vehicle.
.For vehicles with the Ultra Rear
Parking Assist (URPA) system,
turn the system off when towing
a trailer. If the tow bar is
installed while not towing a
trailer, change the URPA system
to the“Tow Bar” setting. See
Ultrasonic Parking Assist
on
page 8‑46for more information.
Driving with a Trailer
Towing a trailer requires experience.
Get familiar with handling and
braking with the added trailer
weight. The vehicle is now longer
and not as responsive as the
vehicle is by itself. Check all trailer hitch parts and
attachments, safety chains,
electrical connectors, lamps, tires
and mirror adjustments. If the trailer
has electric brakes, start the vehicle
and trailer moving and then apply
the trailer brake controller by hand
to be sure the brakes are working.
During the trip, check regularly to be
sure that the load is secure, and the
lamps and trailer brakes are working
properly.
Towing with a Stability Control
System
When towing, the sound of the
stability control system might be
heard. The system is reacting to the
vehicle movement caused by the
trailer, which mainly occurs during
cornering. This is normal when
towing heavier trailers.
Following Distance
Stay at least twice as far behind the
vehicle ahead as you would when
driving the vehicle without a trailer.
This can help to avoid situations
that require heavy braking and
sudden turns.
Passing
More passing distance is needed
when towing a trailer. Because the
rig is longer, it is necessary to go
farther beyond the passed vehicle
before returning to the lane.
Backing Up
Hold the bottom of the steering
wheel with one hand. To move the
trailer to the left, move that hand to
the left. To move the trailer to the
right, move your hand to the right.
Always back up slowly and,
if possible, have someone
guide you.
Page 392 of 394

i-10 INDEX
ServiceAccessories and
Modifications . . . . . . . . . . . . . . . . . 9-4
Doing Your Own Work . . . . . . . . . 9-4
Engine Soon Light . . . . . . . . . . . . 4-16
Maintenance Records . . . . . . 10-10
Maintenance, General Information . . . . . . . . . . . . . . . . . . 10-1
Parts Identification Label . . . . . 11-1
Publications Ordering Information . . . . . . . . . . . . . . . . 12-12
Scheduling Appointments . . . . . 12-8
Vehicle Messages . . . . . . . . . . . . 4-32
Servicing the Airbag-Equipped Vehicle . . . . . 2-34
Shifting
Into Park . . . . . . . . . . . . . . . . . . . . . . 8-32
Out of Park . . . . . . . . . . . . . . . . . . . 8-33 Sidemarker
Bulb Replacement . . . . . . . . . . . . 9-32
Signals, Turn and Lane-Change . . . . . . . . . . . . . . . . . 5-3
Spare Tire Compact . . . . . . . . . . . . . . . . . . . . . . 9-68
Specifications and
Capacities . . . . . . . . . . . . . . . . . . . . 11-2
Speedometer . . . . . . . . . . . . . . . . . . 4-13
StabiliTrak System . . . . . . . . . . . . . 8-43
StabiliTrak
®OFF Light . . . . . . . . . 4-20
Start Assist, Hills . . . . . . . . . . . . . . 8-41
Start Vehicle, Remote . . . . . . . . . . 1-5
Starter Switch Check . . . . . . . . . . 9-25
Starting the Engine . . . . . . . . . . . . 8-30
Steering . . . . . . . . . . . . . . . . . . . . . . . . 8-5 Fluid, Power . . . . . . . . . . . . . . . . . . 9-20
Wheel Adjustment . . . . . . . . . . . . . 4-6
Wheel Controls . . . . . . . . . . . . . . . . 4-6 Stoplamps and Back-Up Lamps
Bulb Replacement . . . . . . . . . . . . 9-32
Storage Mass Media (MEM) . . . . . . . . . . . 6-25
Storage Areas Cargo Cover . . . . . . . . . . . . . . . . . . . 3-1
Center Console . . . . . . . . . . . . . . . . 3-1
Convenience Net . . . . . . . . . . . . . . 3-1
Glove Box . . . . . . . . . . . . . . . . . . . . . 3-1
Instrument Panel . . . . . . . . . . . . . . 3-1
Roof Rack System . . . . . . . . . . . . . 3-2
Stuck Vehicle . . . . . . . . . . . . . . . . . . 8-23
Sun Visors . . . . . . . . . . . . . . . . . . . . . 1-18
Sunroof . . . . . . . . . . . . . . . . . . . . . . . . 1-18
Symbols . . . . . . . . . . . . . . . . . . . . . . . . . . .v
System Roof Rack . . . . . . . . . . . . . . . . . . . . . 3-2
System Check Automatic TransmissionShiftlock Control . . . . . . . . . . . . 9-25