2010 CHEVROLET EQUINOX navigation system
[x] Cancel search: navigation systemPage 91 of 394

Instruments and Controls 4-5
A.Air Vents on page 7‑6.
B. Turn and Lane-Change Signals
on page 5‑3.Exterior Lamp
Controlson page 5‑1. Fog
Lampson page 5‑3(If
Equipped).
C. Instrument Cluster
on
page 4‑12.
D. Windshield Wiper/Washer
on
page 4‑7. Rear Window
Wiper/Washer on page 4‑8.
E. Power Door Locks
on
page 1‑7.
F. Instrument Panel Storage
on
page 3‑1.
G. Safety Locks on page 1‑7. H.
AM-FM Radio
on page 6‑11.
Navigation System (If
Equipped). See Navigation
System Manual.
I. Cruise Control
on page 8‑44.
J. Instrument Panel Illumination
Control
on page 5‑4.
K. Steering Wheel Adjustment
on
page 4‑6.
L. Horn on page 4‑7.
M. Steering Wheel Controls
on
page 4‑6.
N. Ignition Positions on page 8‑28.
O. Climate Control Systems
on
page 7‑1or Automatic Climate
Control System on page 7‑3. P. Shift Lever. See
Shifting Into
Park on page 8‑32.
Q. Fuel Economy Mode
on
page 8‑37(If Equipped).
R. StabiliTrak System
on
page 8‑43.
S. Cupholders on page 3‑1.
T. Power Outlets on page 4‑10.
U. CD Player on page 6‑19.
V. Driver Information Center Buttons. See Driver Information
Center (DIC) on page 4‑24.
W. Hazard Warning Flashers
on
page 5‑2.
X. Glove Box on page 3‑1.
Page 92 of 394

4-6 Instruments and Controls
Controls
Steering Wheel
Adjustment
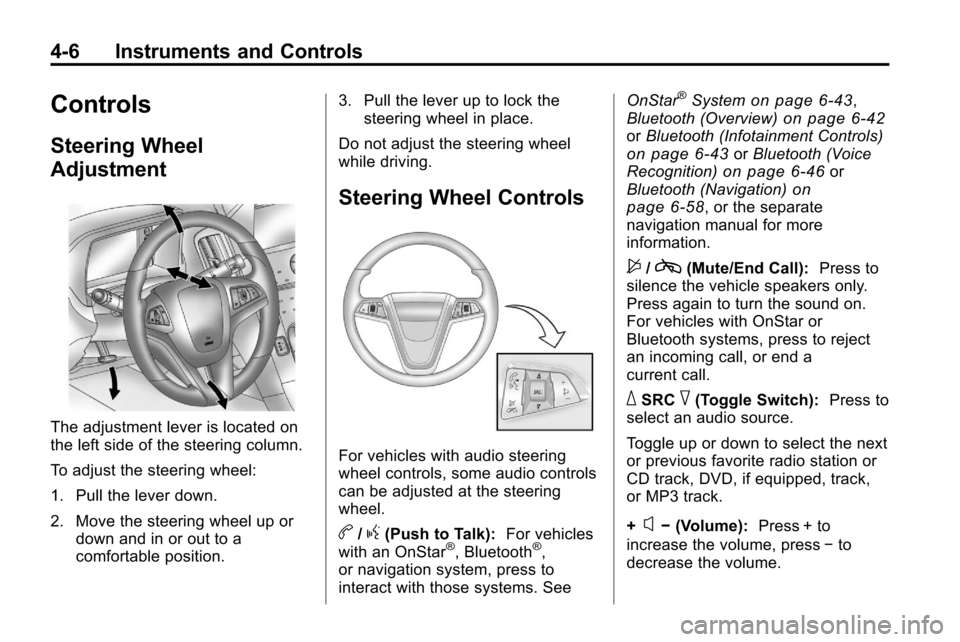
The adjustment lever is located on
the left side of the steering column.
To adjust the steering wheel:
1. Pull the lever down.
2. Move the steering wheel up ordown and in or out to a
comfortable position. 3. Pull the lever up to lock the
steering wheel in place.
Do not adjust the steering wheel
while driving.
Steering Wheel Controls
For vehicles with audio steering
wheel controls, some audio controls
can be adjusted at the steering
wheel.
b/g(Push to Talk): For vehicles
with an OnStar®, Bluetooth®,
or navigation system, press to
interact with those systems. See OnStar
®Systemon page 6‑43,
Bluetooth (Overview)on page 6‑42or Bluetooth (Infotainment Controls)on page 6‑43orBluetooth (Voice
Recognition)on page 6‑46or
Bluetooth (Navigation)on
page 6‑58, or the separate
navigation manual for more
information.
$/c(Mute/End Call): Press to
silence the vehicle speakers only.
Press again to turn the sound on.
For vehicles with OnStar or
Bluetooth systems, press to reject
an incoming call, or end a
current call.
_SRC^(Toggle Switch): Press to
select an audio source.
Toggle up or down to select the next
or previous favorite radio station or
CD track, DVD, if equipped, track,
or MP3 track.
+
x− (Volume): Press + to
increase the volume, press −to
decrease the volume.
Page 112 of 394

4-26 Instruments and Controls
Timer
This display can be used as a timer.
To start the timer, press
Vor SET/
CLR while Timer is displayed. The
display will show the amount of time
that has passed since the timer was
last reset, not including time the
ignition is off. Time will continue to
be counted as long as the ignition is
on, even if another display is being
shown on the DIC. The timer will
record up to 99 hours, 59 minutes
and 59 seconds (99:59:59) after
which the display will return to zero.
To stop the timer, press
Vor SET/
CLR briefly while Timer is displayed.
To reset the timer to zero, press and
hold
Vor SET/CLR.
Digital Speedometer
The speedometer shows how fast
the vehicle is moving in either
kilometers per hour (km/h) or miles
per hour (mph). The speedometer
cannot be reset. Turn-by-Turn
This display is used for the OnStar
or Navigation System Turn-by-Turn
guidance. See
OnStar
®Systemon
page 4‑39or the Navigation
manual, if the vehicle has
navigation, for more information.
Blank Display
This display shows no information.
Vehicle Information Menu
Items
Press the MENU button until Vehicle
Information Menu is displayed. Then
press
xto scroll through the
following menu items:
.Unit
.Tire Pressure
.Remaining Oil Life
.Blank Unit
Press
Vor SET/CLR to enter the
unit menu. Then press
worxto
switch between US or Metric when
the Unit display is active. Press
V
or SET/CLR to confirm the setting.
This will change the displays on the
cluster and DIC to either metric or
English (US) measurements.
Tire Pressure
The display will show a vehicle with
the approximate pressures of all
four tires. Tire pressure is displayed
in either pounds per square
inch (psi) or in kilopascal (kPa).
Any time the tire pressures are
adjusted the system needs to
relearn the new pressures. To
relearn the tire pressures press
Vor
SET/CLR while the Tire Pressure
display is active. The display will
ask for confirmation of a relearn.
Press
worxto select Yes or No.
Then press
Vor SET/CLR to
confirm the selection. See Tire
Page 125 of 394

Instruments and Controls 4-39
OnStar®System
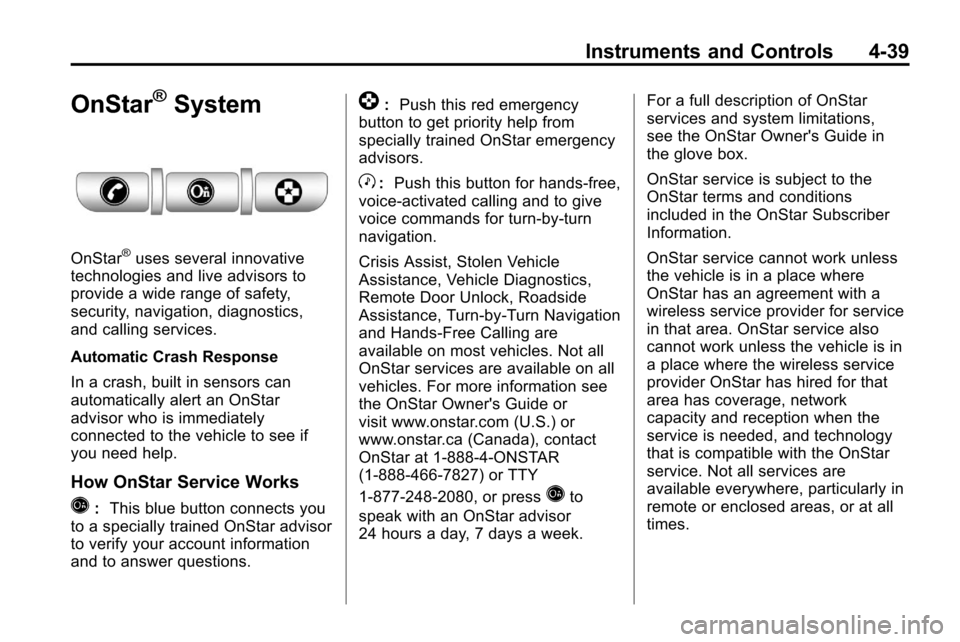
OnStar®uses several innovative
technologies and live advisors to
provide a wide range of safety,
security, navigation, diagnostics,
and calling services.
Automatic Crash Response
In a crash, built in sensors can
automatically alert an OnStar
advisor who is immediately
connected to the vehicle to see if
you need help.
How OnStar Service Works
Q: This blue button connects you
to a specially trained OnStar advisor
to verify your account information
and to answer questions.
]: Push this red emergency
button to get priority help from
specially trained OnStar emergency
advisors.
X: Push this button for hands‐free,
voice‐activated calling and to give
voice commands for turn‐by‐turn
navigation.
Crisis Assist, Stolen Vehicle
Assistance, Vehicle Diagnostics,
Remote Door Unlock, Roadside
Assistance, Turn‐by‐Turn Navigation
and Hands‐Free Calling are
available on most vehicles. Not all
OnStar services are available on all
vehicles. For more information see
the OnStar Owner's Guide or
visit www.onstar.com (U.S.) or
www.onstar.ca (Canada), contact
OnStar at 1-888-4-ONSTAR
(1‐888‐466‐7827) or TTY
1‐877‐248‐2080, or press
Qto
speak with an OnStar advisor
24 hours a day, 7 days a week. For a full description of OnStar
services and system limitations,
see the OnStar Owner's Guide in
the glove box.
OnStar service is subject to the
OnStar terms and conditions
included in the OnStar Subscriber
Information.
OnStar service cannot work unless
the vehicle is in a place where
OnStar has an agreement with a
wireless service provider for service
in that area. OnStar service also
cannot work unless the vehicle is in
a place where the wireless service
provider OnStar has hired for that
area has coverage, network
capacity and reception when the
service is needed, and technology
that is compatible with the OnStar
service. Not all services are
available everywhere, particularly in
remote or enclosed areas, or at all
times.
Page 131 of 394

Infotainment System 6-1
Infotainment
System
Introduction
Introduction . . . . . . . . . . . . . . . . . . . 6-1
Theft-Deterrent Feature . . . . . . . 6-2
Overview (Radio with CD) . . . . . 6-3
Overview (Radio withCD/DVD/MEM) . . . . . . . . . . . . . 6-5
Operation . . . . . . . . . . . . . . . . . . . . . 6-7
Radio
AM-FM Radio . . . . . . . . . . . . . . . . 6-11
Satellite Radio . . . . . . . . . . . . . . . 6-14
Radio Reception . . . . . . . . . . . . . 6-18
Multi-Band Antenna . . . . . . . . . . 6-18
Audio Players
CD Player . . . . . . . . . . . . . . . . . . . 6-19
CD/DVD Player . . . . . . . . . . . . . . 6-21
Mass Storage Media (MEM) . . . . . . . . . . . . . . . 6-25
Auxiliary Devices (Radio
with CD) . . . . . . . . . . . . . . . . . . . . 6-28
Auxiliary Devices (Radio with CD/DVD/MEM) . . . . . . . 6-31
Rear Seat Infotainment
Rear Seat Entertainment(RSE) System . . . . . . . . . . . . . . 6-33
Phone
Bluetooth (Overview) . . . . . . . . 6-42
Bluetooth (InfotainmentControls) . . . . . . . . . . . . . . . . . . . 6-43
Bluetooth (Voice Recognition) . . . . . . . . . . . . . . . 6-46
Bluetooth (Navigation) . . . . . . . 6-58
Introduction
Read the following pages to
become familiar with the audio
system's features.
{WARNING
Taking your eyes off the road for
extended periods could cause a
crash resulting in injury or death
to you or others. Do not give
extended attention to
entertainment tasks while driving.
This system provides access to
many audio and non audio listings.
To minimize taking your eyes off the
road while driving, do the following
while the vehicle is parked:
.Become familiar with the
operation and controls of the
audio system.
.Set up the tone, speaker
adjustments, and preset radio
stations.
Page 132 of 394

6-2 Infotainment System
For more information, seeDefensive
Driving on page 8‑3.
This vehicle's infotainment system
may be equipped with a noise
reduction system which can work
improperly if the audio amplifier,
engine calibrations, exhaust system,
microphones, radio, or speakers are
modified or replaced. This could
result in more noticeable engine
noise at certain speeds. Notice:
Contact your dealer
before adding any equipment.
Adding audio or communication
equipment could interfere with
the operation of the vehicle's
engine, radio, or other systems,
and could damage them. Follow
federal rules covering mobile
radio and telephone equipment.
The vehicle has Retained
Accessory Power (RAP). With RAP,
the audio system can be played
even after the ignition is turned off.
See Retained Accessory Power
(RAP)
on page 8‑29for more
information.
Navigation/Radio System
For vehicles with a navigation radio
system, see the separate Navigation
System manual.
Theft-Deterrent Feature
The theft-deterrent feature works by
learning a portion of the Vehicle
Identification Number (VIN) to
the infotainment system. The
infotainment system does not
operate if it is stolen or moved to
a different vehicle.
Page 163 of 394

Infotainment System 6-33
Selecting a Track
Using the control buttons:
.PressgSEEK orlSEEK to
select the previous or next track.
.Turn the MENU/SEL knob to
select a track in the current sub
menu. The track will start to play.
Selecting a track in a different
folder:
1. Press the MENU/SEL knob.
2. Select Folder List.
3. Select the folder.
4. Select the track.
Searching for Tracks
It is normal for the search feature
to take some time to display the
information after reading the device
due to the amount of information
stored.
Files that do not have any meta
data stored in the ID3 tag display
as Unknown. Tracks can be searched by:
.Playlists
.Artists
.Albums
.Song Titles
.Genres
The number of objects in each
category is shown in parentheses
after the category.
To search for tracks:
1. Press the MENU/SEL knob.
2. Select Search.
3. Select: Playlists, Artists, Albums, Song Titles, Genres,
Composers, or Audiobooks.
4. Select the track. The search rate increases if the MENU/SEL knob
is continuously turned while
searching in a list.
Recording Tracks to MEM
See Mass Storage Media (MEM)
on
page 6‑25for more information.
Rear Seat
Infotainment
Rear Seat Entertainment
(RSE) System
The vehicle may have a DVD Rear
Seat Entertainment (RSE) system.
The RSE system works with the
vehicle's infotainment system. The
DVD player is part of the front radio.
The RSE system includes a radio
with a DVD player, two rear seat
video display screens, audio/video
jacks, two wireless headphones,
and a remote control. See CD/DVD
Player
on page 6‑21or the
separate navigation system manual
for more information on the vehicle's
DVD system.
Page 168 of 394

6-38 Infotainment System
If a CD, DVD, or MP3 disc is in the
Radio DVD slot, the remote control
Obutton can be used to turn on the
video screen display and start the
disc. The infotainment system can
also turn on the video screen
display. See CD/DVD Player
on
page 6‑21or the separate
navigation system manual for
more information.
Notice: Storing the remote
control in a hot area or in direct
sunlight can damage it, and the
repairs will not be covered by the
warranty. Storage in extreme cold
can weaken the batteries. Keep
the remote control stored in a
cool, dry place.
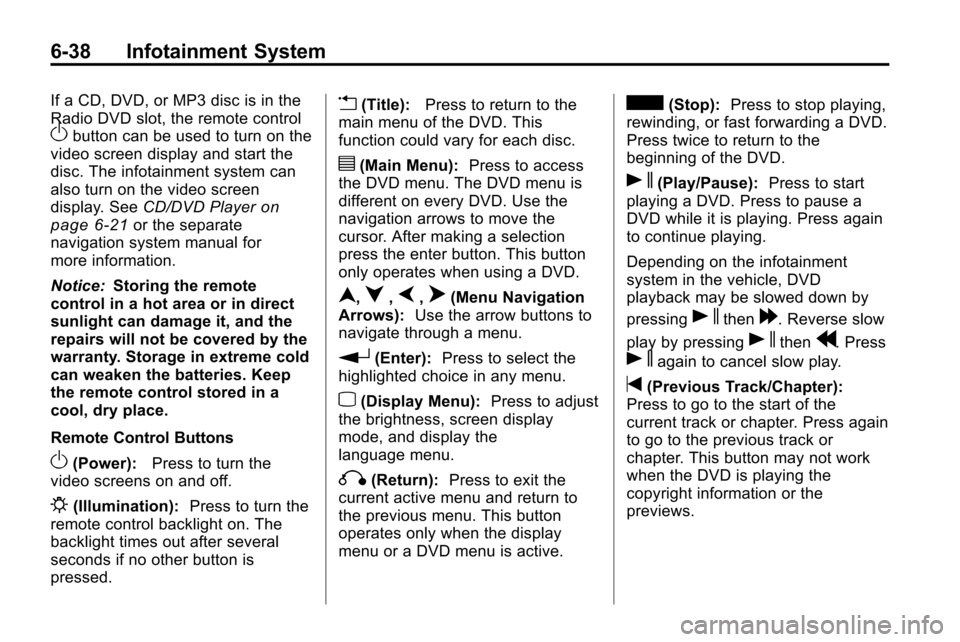
Remote Control Buttons
O(Power): Press to turn the
video screens on and off.
P(Illumination): Press to turn the
remote control backlight on. The
backlight times out after several
seconds if no other button is
pressed.
v(Title): Press to return to the
main menu of the DVD. This
function could vary for each disc.
y(Main Menu): Press to access
the DVD menu. The DVD menu is
different on every DVD. Use the
navigation arrows to move the
cursor. After making a selection
press the enter button. This button
only operates when using a DVD.
n,q,p,o(Menu Navigation
Arrows): Use the arrow buttons to
navigate through a menu.
r(Enter): Press to select the
highlighted choice in any menu.
z(Display Menu): Press to adjust
the brightness, screen display
mode, and display the
language menu.
q(Return): Press to exit the
current active menu and return to
the previous menu. This button
operates only when the display
menu or a DVD menu is active.
c(Stop): Press to stop playing,
rewinding, or fast forwarding a DVD.
Press twice to return to the
beginning of the DVD.
s(Play/Pause): Press to start
playing a DVD. Press to pause a
DVD while it is playing. Press again
to continue playing.
Depending on the infotainment
system in the vehicle, DVD
playback may be slowed down by
pressing
sthen[. Reverse slow
play by pressing
sthenr. Press
sagain to cancel slow play.
t(Previous Track/Chapter):
Press to go to the start of the
current track or chapter. Press again
to go to the previous track or
chapter. This button may not work
when the DVD is playing the
copyright information or the
previews.