2010 CHEVROLET EQUINOX infotainment
[x] Cancel search: infotainmentPage 1 of 394

2010 Chevrolet Equinox Owner ManualM
Keys, Doors and Windows. . . 1-1
Keys and Locks . . . . . . . . . . . . . . . 1-2
Doors . . . . . . . . . . . . . . . . . . . . . . . . . . 1-8
Vehicle Security . . . . . . . . . . . . . . 1-12
Exterior Mirrors . . . . . . . . . . . . . . . 1-14
Interior Mirrors . . . . . . . . . . . . . . . . 1-15
Windows . . . . . . . . . . . . . . . . . . . . . 1-16
Roof . . . . . . . . . . . . . . . . . . . . . . . . . . 1-18
Seats and Restraints . . . . . . . . . 2-1
Head Restraints . . . . . . . . . . . . . . . 2-2
Front Seats . . . . . . . . . . . . . . . . . . . . 2-3
Rear Seats . . . . . . . . . . . . . . . . . . . . 2-8
Safety Belts . . . . . . . . . . . . . . . . . . . . 2-9
Airbag System . . . . . . . . . . . . . . . . 2-22
Child Restraints . . . . . . . . . . . . . . 2-37 Storage
. . . . . . . . . . . . . . . . . . . . . . . 3-1
Storage Compartments . . . . . . . . 3-1
Additional Storage Features . . . 3-1
Roof Rack System . . . . . . . . . . . . . 3-2
Instruments and Controls . . . . 4-1
Instrument Panel Overview . . . . 4-4
Controls . . . . . . . . . . . . . . . . . . . . . . . 4-6
Warning Lights, Gauges, and Indicators . . . . . . . . . . . . . . . . . . . 4-11
Information Displays . . . . . . . . . . 4-24
Vehicle Messages . . . . . . . . . . . . 4-27
Vehicle Personalization . . . . . . . 4-34
OnStar
®System . . . . . . . . . . . . . . 4-39 Lighting
. . . . . . . . . . . . . . . . . . . . . . . 5-1
Exterior Lighting . . . . . . . . . . . . . . . 5-1
Interior Lighting . . . . . . . . . . . . . . . . 5-4
Lighting Features . . . . . . . . . . . . . . 5-4
Infotainment System . . . . . . . . . 6-1
Introduction . . . . . . . . . . . . . . . . . . . . 6-1
Radio . . . . . . . . . . . . . . . . . . . . . . . . . 6-11
Audio Players . . . . . . . . . . . . . . . . 6-19
Rear Seat Infotainment . . . . . . . 6-33
Phone . . . . . . . . . . . . . . . . . . . . . . . . 6-42
Climate Controls . . . . . . . . . . . . . 7-1
Climate Control Systems . . . . . . 7-1
Air Vents . . . . . . . . . . . . . . . . . . . . . . . 7-6
Maintenance . . . . . . . . . . . . . . . . . . . 7-6
Page 92 of 394
4-6 Instruments and Controls
Controls
Steering Wheel
Adjustment
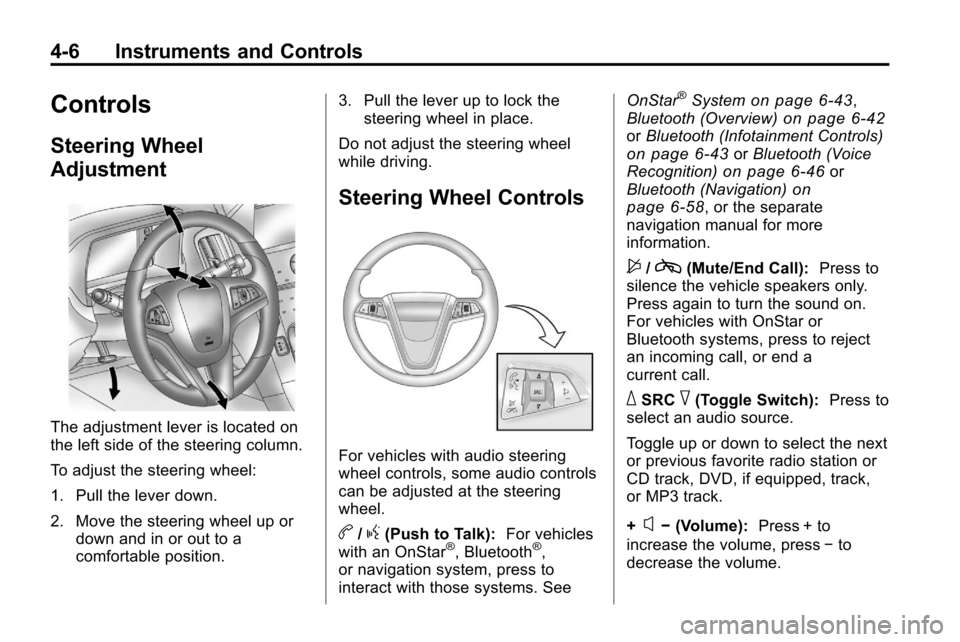
The adjustment lever is located on
the left side of the steering column.
To adjust the steering wheel:
1. Pull the lever down.
2. Move the steering wheel up ordown and in or out to a
comfortable position. 3. Pull the lever up to lock the
steering wheel in place.
Do not adjust the steering wheel
while driving.
Steering Wheel Controls
For vehicles with audio steering
wheel controls, some audio controls
can be adjusted at the steering
wheel.
b/g(Push to Talk): For vehicles
with an OnStar®, Bluetooth®,
or navigation system, press to
interact with those systems. See OnStar
®Systemon page 6‑43,
Bluetooth (Overview)on page 6‑42or Bluetooth (Infotainment Controls)on page 6‑43orBluetooth (Voice
Recognition)on page 6‑46or
Bluetooth (Navigation)on
page 6‑58, or the separate
navigation manual for more
information.
$/c(Mute/End Call): Press to
silence the vehicle speakers only.
Press again to turn the sound on.
For vehicles with OnStar or
Bluetooth systems, press to reject
an incoming call, or end a
current call.
_SRC^(Toggle Switch): Press to
select an audio source.
Toggle up or down to select the next
or previous favorite radio station or
CD track, DVD, if equipped, track,
or MP3 track.
+
x− (Volume): Press + to
increase the volume, press −to
decrease the volume.
Page 95 of 394
Instruments and Controls 4-9
Clock (With Date Display)
The infotainment system controls,
located on the instrument panel, are
used to access the time and date
settings through the menu system.
SeeOperation
on page 6‑7for
information about how to use the
menu system.
Setting the Time and Date
1. Turn the infotainment system ON.
2. Press the CONFIG button and select Time and Date Settings.
3. Select Set Time or Set Date.
4. Turn the MENU/SEL knob to adjust the highlighted value.
5. Press the MENU/SEL knob to select the next value. 6. To save the time or date and
return to the Time and Date
Settings menu, press the
0
BACK button at any time or
press the MENU/SEL knob after
adjusting the minutes or year.
Setting the 12/24 Hour Format
1. Turn the infotainment
system ON.
2. Press the CONFIG button and select Time and Date Settings.
3. Highlight 12/24 Hour Format.
4. Press the MENU/SEL knob to select the 12 hour or 24 hour
display format.
Setting the Month & Day
Format
1. Turn the infotainment
system ON.
2. Press the CONFIG button and select Time and Date Settings. 3. Highlight Month & Day Format.
4. Press the MENU/SEL knob to
select MM/DD (month/day) or
DD/MM (day/month).
Setting the Auto Time Adjust
1. Turn the infotainmentsystem ON.
2. Press the CONFIG button and select Time and Date Settings.
3. Highlight Auto Time Adjust.
4. Press the MENU/SEL knob to turn Auto Time Adjust on or off.
5. Press the MENU/SEL knob to select Time Zone, and then
select the Time Zone.
6. Press the MENU/SEL knob to turn Daylight Savings on or off.
Page 96 of 394
4-10 Instruments and Controls
Clock (Without Date
Display)
The infotainment system controls,
located on the instrument panel, are
used to access the time and date
settings through the menu system.
SeeOperation
on page 6‑7for
information about how to use the
menu system.
Setting the Time
1. Turn the infotainment system ON.
2. Press the CONFIG button and select Time Settings, or press
the
Hbutton.
3. Select Set Time.
4. Turn the MENU/SEL knob to adjust the highlighted value.
5. Press the MENU/SEL knob to select the next value. 6. To save the time and return to
the Time Settings menu, press
the
0BACK button at any time
or press the SELECT button
after adjusting the minutes.
Setting the 12/24 Hour Format
1. Turn the infotainment system ON.
2. Press the CONFIG button and select Time Settings, or press
the
Hbutton.
3. Highlight 12/24 Hour Format.
4. Press the MENU/SEL knob to select the 12 hour or 24 hour
display format.
Power Outlets
The accessory power outlets can
be used to connect electrical
equipment, such as a cellular
phone.
There are four accessory power
outlets in the following locations,
below the CD slot, inside the center console storage, on the rear of the
center console storage, and in the
rear cargo compartment.
To use the outlets, remove the
cover. Close the outlet cover, when
not in use.
Notice:
If electrical devices are
left plugged into a power outlet,
the battery may drain causing the
vehicle not to start or damage to
the battery. This would not be
covered by the vehicle warranty.
Always unplug all electrical
devices when turning off the
vehicle.
Certain electrical accessories
may not be compatible with the
accessory power outlets and could
result in blown vehicle or adapter
fuses. If you experience a problem,
see your dealer for additional
information on the accessory power
outlet.
Page 120 of 394
4-34 Instruments and Controls
Vehicle Reminder
Messages
Ice Possible Drive With Care
This message is displayed when ice
conditions are possible.
Turn Wiper Control to
Intermittent First
This message is displayed when
attempting to adjust the intermittent
wiper speed without intermittent
selected on the wiper control. See
Windshield Wiper/Washer
on
page 4‑7.
Vehicle
Personalization
The audio system controls are used
to access the personalization
menus for customizing vehicle
features.
CONFIG (Configuration): Press to
access the Configuration
Settings Menu.
MENU / SELECT Knob: Press the
center of this knob to enter the
menus and select menu items. Turn
the knob to scroll through the
menus.
0BACK: Press to exit or move
backwards in a menu.
Entering the Personalization
Menus
1. Turn the infotainment system on and press the CONFIG button to
access the Configuration
Settings menu.
2. Turn the MENU / SELECT knob to highlight Vehicle Settings. 3. Press the center of the
MENU / SELECT knob to select
the Vehicle Settings menu.
The following list of menu items will
be available:
.Climate and Air Quality
.Comfort and Convenience
.Collision/Detection Systems
.Languages
.Lighting
.Power Door Locks
.Remote Lock/Unlock/Start
.Return to Factory Settings
Turn the MENU / SELECT knob to
highlight the menu. Press the knob
to select it. Each of the menus is
detailed in the following information.
All of the menus may not be
available. Only those tied to the
features on your vehicle will be
shown.
Page 131 of 394

Infotainment System 6-1
Infotainment
System
Introduction
Introduction . . . . . . . . . . . . . . . . . . . 6-1
Theft-Deterrent Feature . . . . . . . 6-2
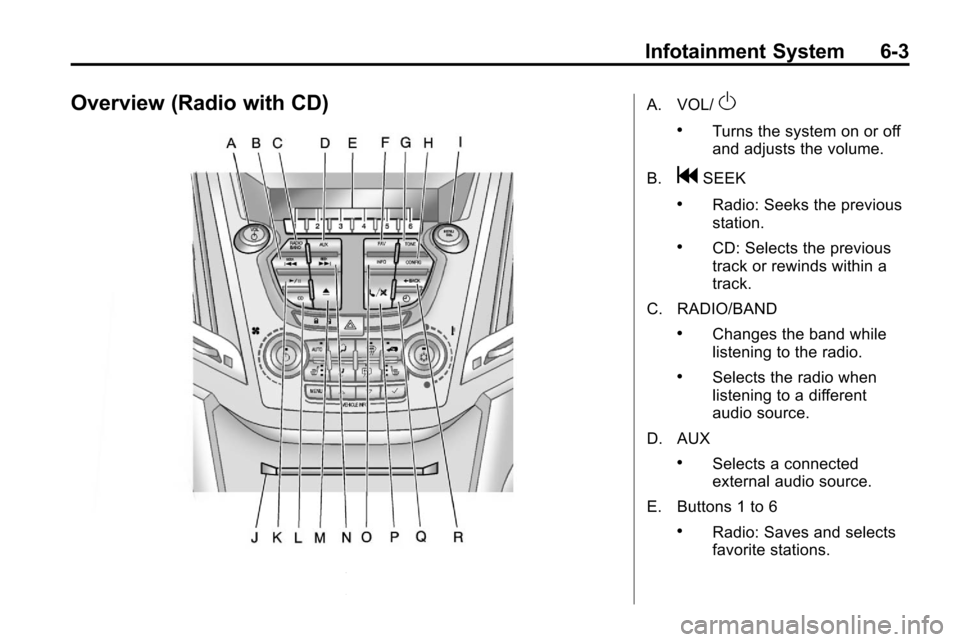
Overview (Radio with CD) . . . . . 6-3
Overview (Radio withCD/DVD/MEM) . . . . . . . . . . . . . 6-5
Operation . . . . . . . . . . . . . . . . . . . . . 6-7
Radio
AM-FM Radio . . . . . . . . . . . . . . . . 6-11
Satellite Radio . . . . . . . . . . . . . . . 6-14
Radio Reception . . . . . . . . . . . . . 6-18
Multi-Band Antenna . . . . . . . . . . 6-18
Audio Players
CD Player . . . . . . . . . . . . . . . . . . . 6-19
CD/DVD Player . . . . . . . . . . . . . . 6-21
Mass Storage Media (MEM) . . . . . . . . . . . . . . . 6-25
Auxiliary Devices (Radio
with CD) . . . . . . . . . . . . . . . . . . . . 6-28
Auxiliary Devices (Radio with CD/DVD/MEM) . . . . . . . 6-31
Rear Seat Infotainment
Rear Seat Entertainment(RSE) System . . . . . . . . . . . . . . 6-33
Phone
Bluetooth (Overview) . . . . . . . . 6-42
Bluetooth (InfotainmentControls) . . . . . . . . . . . . . . . . . . . 6-43
Bluetooth (Voice Recognition) . . . . . . . . . . . . . . . 6-46
Bluetooth (Navigation) . . . . . . . 6-58
Introduction
Read the following pages to
become familiar with the audio
system's features.
{WARNING
Taking your eyes off the road for
extended periods could cause a
crash resulting in injury or death
to you or others. Do not give
extended attention to
entertainment tasks while driving.
This system provides access to
many audio and non audio listings.
To minimize taking your eyes off the
road while driving, do the following
while the vehicle is parked:
.Become familiar with the
operation and controls of the
audio system.
.Set up the tone, speaker
adjustments, and preset radio
stations.
Page 132 of 394

6-2 Infotainment System
For more information, seeDefensive
Driving on page 8‑3.
This vehicle's infotainment system
may be equipped with a noise
reduction system which can work
improperly if the audio amplifier,
engine calibrations, exhaust system,
microphones, radio, or speakers are
modified or replaced. This could
result in more noticeable engine
noise at certain speeds. Notice:
Contact your dealer
before adding any equipment.
Adding audio or communication
equipment could interfere with
the operation of the vehicle's
engine, radio, or other systems,
and could damage them. Follow
federal rules covering mobile
radio and telephone equipment.
The vehicle has Retained
Accessory Power (RAP). With RAP,
the audio system can be played
even after the ignition is turned off.
See Retained Accessory Power
(RAP)
on page 8‑29for more
information.
Navigation/Radio System
For vehicles with a navigation radio
system, see the separate Navigation
System manual.
Theft-Deterrent Feature
The theft-deterrent feature works by
learning a portion of the Vehicle
Identification Number (VIN) to
the infotainment system. The
infotainment system does not
operate if it is stolen or moved to
a different vehicle.
Page 133 of 394
Infotainment System 6-3
Overview (Radio with CD)A. VOL/O
.Turns the system on or off
and adjusts the volume.
B.
gSEEK
.Radio: Seeks the previous
station.
.CD: Selects the previous
track or rewinds within a
track.
C. RADIO/BAND
.Changes the band while
listening to the radio.
.Selects the radio when
listening to a different
audio source.
D. AUX
.Selects a connected
external audio source.
E. Buttons 1 to 6
.Radio: Saves and selects
favorite stations.