2010 CHEVROLET EQUINOX battery
[x] Cancel search: batteryPage 9 of 394
Keys, Doors and Windows 1-3
Remote Keyless Entry
(RKE) System
SeeRadio Frequency Statementon
page 12‑16for information
regarding Part 15 of the Federal
Communications Commission (FCC)
Rules and RSS-210/211 of Industry
Canada.
Changes or modifications to
this system by other than an
authorized service facility could void
authorization to use this equipment.
If there is a decrease in the RKE
operating range:
.Check the distance. The
transmitter may be too far
from the vehicle.
.Check the location. Other
vehicles or objects may be
blocking the signal.
.Check the transmitter's battery.
See “Battery Replacement” later
in this section.
.If the transmitter is still not
working correctly, see your
dealer or a qualified technician
for service.
Remote Keyless Entry
(RKE) System Operation
The Remote Keyless Entry (RKE)
transmitter will work up to 60 m
(195 feet) away from the vehicle.
There are other conditions which
can affect the performance of the
transmitter. See Remote Keyless
Entry (RKE) System on page 1‑3.
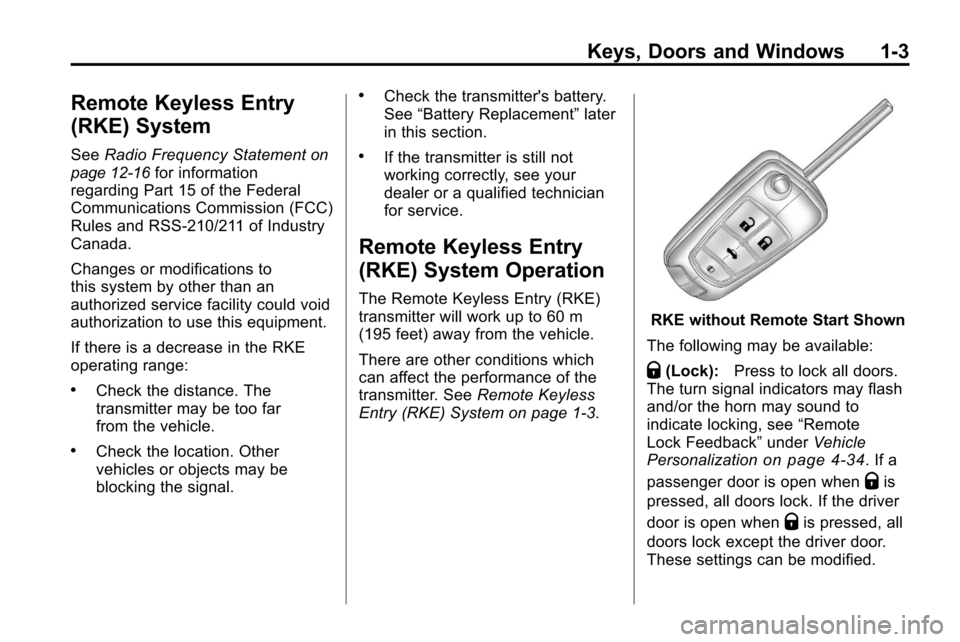
RKE without Remote Start Shown
The following may be available:
Q(Lock): Press to lock all doors.
The turn signal indicators may flash
and/or the horn may sound to
indicate locking, see “Remote
Lock Feedback” underVehicle
Personalization
on page 4‑34. If a
passenger door is open when
Qis
pressed, all doors lock. If the driver
door is open when
Qis pressed, all
doors lock except the driver door.
These settings can be modified.
Page 10 of 394
1-4 Keys, Doors and Windows
See“Unlocked Door Anti Lock Out”
under Vehicle Personalizationon
page 4‑34.
Pressing
Qmay also arm the
theft-deterrent system. See
Anti-Theft Alarm System
on
page 1‑12.
K(Unlock): Press to unlock the
driver door or all doors, see
“Remote Door Unlock” under
Vehicle Personalization
on
page 4‑34. The turn signal
indicators flash to indicate unlocking
has occurred. For more information
see “Remote Unlock Light
Feedback” underVehicle
Personalization
on page 4‑34.
Pressing
Kmay also disarm the
theft-deterrent system. See
Anti-Theft Alarm System
on
page 1‑12.
V(Remote Liftgate Release):
First press
K, then press and hold
Vto unlock the liftgate. For
vehicles with the power liftgate,
press and hold
Vuntil the liftgate
begins to move to open the liftgate.
7(Vehicle Locator/Panic
Alarm): Press and release one
time to locate the vehicle. The
exterior lamps flash and the horn
chirps. Press and hold
7for at least
two seconds to sound the panic
alarm. The horn sounds and the
turn signals flash until
7is pressed
again or the key is placed in the
ignition and turned to ON/RUN.
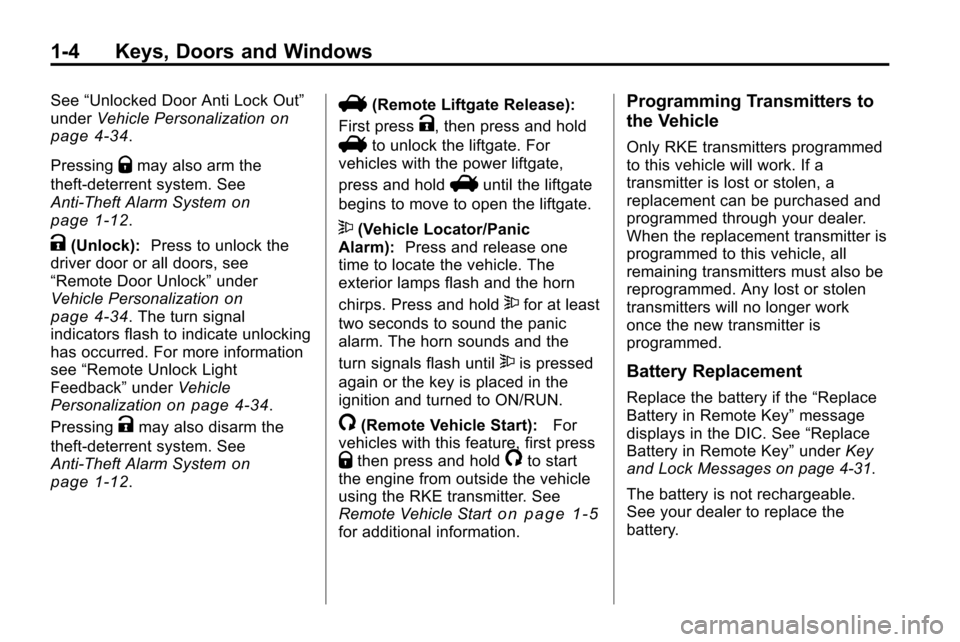
/(Remote Vehicle Start): For
vehicles with this feature, first press
Qthen press and hold/to start
the engine from outside the vehicle
using the RKE transmitter. See
Remote Vehicle Start
on page 1‑5for additional information.
Programming Transmitters to
the Vehicle
Only RKE transmitters programmed
to this vehicle will work. If a
transmitter is lost or stolen, a
replacement can be purchased and
programmed through your dealer.
When the replacement transmitter is
programmed to this vehicle, all
remaining transmitters must also be
reprogrammed. Any lost or stolen
transmitters will no longer work
once the new transmitter is
programmed.
Battery Replacement
Replace the battery if the “Replace
Battery in Remote Key” message
displays in the DIC. See “Replace
Battery in Remote Key” underKey
and Lock Messages on page 4‑31.
The battery is not rechargeable.
See your dealer to replace the
battery.
Page 16 of 394
1-10 Keys, Doors and Windows
mounted cargo during power
operation. The liftgate can still be
fully opened manually.
OFF:The liftgate only operates
manually in this position.
Manual operation of a liftgate that
also has power operation requires
more effort than with a standard
manual liftgate.
In either the MAX or the 3/4 mode,
the liftgate can be power opened
and closed by:
.First pressingKand then
pressing and holding
Von the
Remote Keyless Entry (RKE)
transmitter until the liftgate starts
moving. See Remote Keyless
Entry (RKE) System Operation
on page 1‑3.
.Pressing the power liftgate
button on the center of the mode
switch, located on the overhead
console.
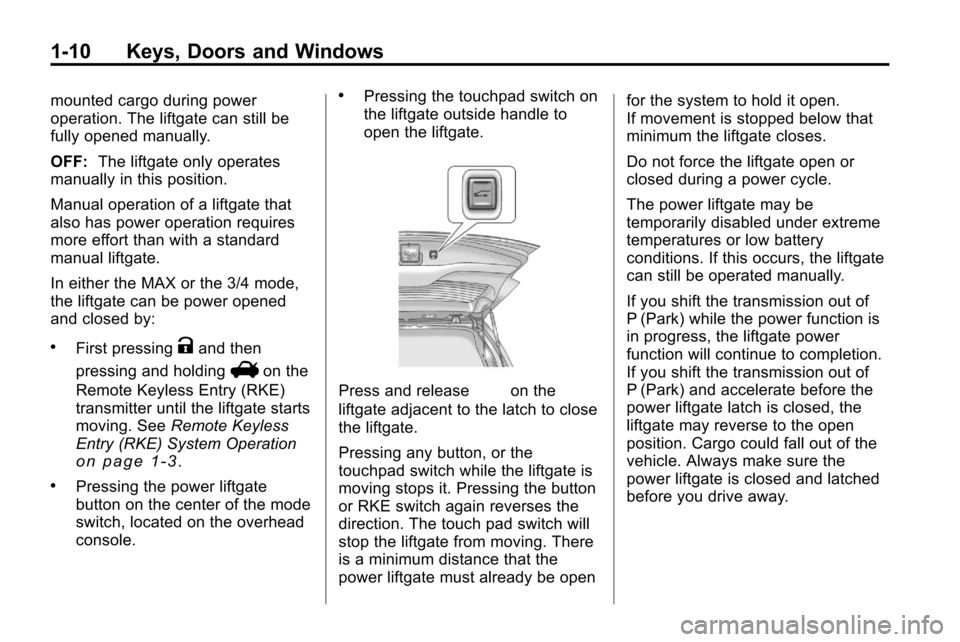
.Pressing the touchpad switch on
the liftgate outside handle to
open the liftgate.
Press and release&on the
liftgate adjacent to the latch to close
the liftgate.
Pressing any button, or the
touchpad switch while the liftgate is
moving stops it. Pressing the button
or RKE switch again reverses the
direction. The touch pad switch will
stop the liftgate from moving. There
is a minimum distance that the
power liftgate must already be open for the system to hold it open.
If movement is stopped below that
minimum the liftgate closes.
Do not force the liftgate open or
closed during a power cycle.
The power liftgate may be
temporarily disabled under extreme
temperatures or low battery
conditions. If this occurs, the liftgate
can still be operated manually.
If you shift the transmission out of
P (Park) while the power function is
in progress, the liftgate power
function will continue to completion.
If you shift the transmission out of
P (Park) and accelerate before the
power liftgate latch is closed, the
liftgate may reverse to the open
position. Cargo could fall out of the
vehicle. Always make sure the
power liftgate is closed and latched
before you drive away.
Page 18 of 394
1-12 Keys, Doors and Windows
disabled the liftgate electric latch will
still power latch once contact is
made with the striker. Always close
the liftgate before driving.
If the RKE button is pressed while
power operation is disabled, the turn
signals flash and the liftgate will
not move.
The liftgate has an electric latch.
If the battery is disconnected or has
low voltage, the liftgate will not
open. The liftgate will resume
operation when the battery is
reconnected and charged.Vehicle Security
Vehicle theft is big business,
especially in some cities. This
vehicle has theft-deterrent features,
however, they do not make it
impossible to steal.
Anti-Theft Alarm System
This vehicle has an anti-theft alarm
system.
Arming the System
To arm the system, either:
.PressQon the RKE transmitter.
.Or, lock the vehicle using the
key in the driver door.
The alarm automatically arms after
about 30 seconds. The security
light, located on the instrument
panel, flashes.
Press
Von the RKE transmitter to
open the liftgate without setting off
the alarm. The system rearms when
the liftgate is closed.
Disarming the System
To disarm the system, do one of the
following:
.PressKon the RKE transmitter.
.Turn the ignition to ON/RUN.
.Allow the alarm to time out after
about 30 seconds and reset
itself.
The alarm automatically disarms.
If the system is armed and any door
is unlocked without pressing
Kon
the RKE transmitter the alarm
sounds.
How to Detect a Tamper
Condition
IfKis pressed and the horn
sounds, an attempted break-in has
occurred while the system was
armed.
Page 23 of 394
Keys, Doors and Windows 1-17
WARNING (Continued)
if caught in the path of a closing
window. Do not leave keys in a
vehicle with children.
When there are children in the
rear seat use the window lockout
button to prevent unintentional
operation of the windows.
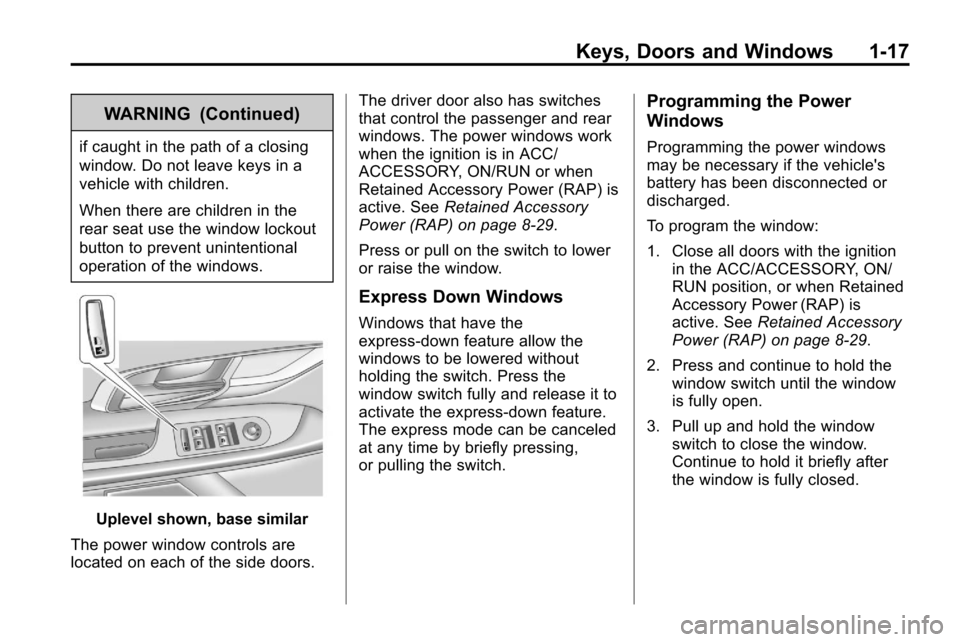
Uplevel shown, base similar
The power window controls are
located on each of the side doors. The driver door also has switches
that control the passenger and rear
windows. The power windows work
when the ignition is in ACC/
ACCESSORY, ON/RUN or when
Retained Accessory Power (RAP) is
active. See
Retained Accessory
Power (RAP) on page 8‑29.
Press or pull on the switch to lower
or raise the window.
Express Down Windows
Windows that have the
express‐down feature allow the
windows to be lowered without
holding the switch. Press the
window switch fully and release it to
activate the express‐down feature.
The express mode can be canceled
at any time by briefly pressing,
or pulling the switch.
Programming the Power
Windows
Programming the power windows
may be necessary if the vehicle's
battery has been disconnected or
discharged.
To program the window:
1. Close all doors with the ignition in the ACC/ACCESSORY, ON/
RUN position, or when Retained
Accessory Power (RAP) is
active. See Retained Accessory
Power (RAP) on page 8‑29.
2. Press and continue to hold the window switch until the window
is fully open.
3. Pull up and hold the window switch to close the window.
Continue to hold it briefly after
the window is fully closed.
Page 60 of 394
2-34 Seats and Restraints
A wet seat can affect the
performance of the passenger
sensing system. Here is how:
.The passenger sensing system
may turn off the passenger
airbag when liquid is soaked
into the seat. If this happens, the
off indicator will be lit, and the
airbag readiness light on the
instrument panel will also be lit.
.Liquid pooled on the seat that
has not soaked in may make it
more likely that the passenger
sensing system will enable (turn
on) the passenger airbag while a
child restraint or child occupant
is on the seat. If the passenger
airbag is turned on, the on
indicator will be lit.
If the passenger seat gets wet, dry
the seat immediately. If the airbag
readiness light is lit, do not install a
child restraint or allow anyone to
occupy the seat. See Airbag
Readiness Light
on page 4‑15for
important safety information. The on indicator may be lit if an
object, such as a briefcase,
handbag, grocery bag, laptop or
other electronic device, is put on
an unoccupied seat. If this is not
desired remove the object from
the seat.
{WARNING
Stowing of articles under the
passenger seat or between the
passenger seat cushion and
seatback may interfere with the
proper operation of the passenger
sensing system.
Servicing the
Airbag-Equipped Vehicle
Airbags affect how the vehicle
should be serviced. There are parts
of the airbag system in several
places around the vehicle. Your
dealer and the service manual have
information about servicing the
vehicle and the airbag system.To purchase a service manual, see
Service Publications Ordering
Information on page 12‑12.
{WARNING
For up to 10 seconds after the
ignition is turned off and the
battery is disconnected, an airbag
can still inflate during improper
service. You can be injured if you
are close to an airbag when it
inflates. Avoid yellow connectors.
They are probably part of the
airbag system. Be sure to follow
proper service procedures, and
make sure the person performing
work for you is qualified to do so.
Page 88 of 394
4-2 Instruments and Controls
Vehicle Messages
Vehicle Messages . . . . . . . . . . . 4-27
Battery Voltage and ChargingMessages . . . . . . . . . . . . . . . . . . 4-28
Brake System Messages . . . . 4-28
Compass Messages . . . . . . . . . 4-28
Cruise Control Messages . . . . 4-28
Door Ajar Messages . . . . . . . . . 4-29
Engine Cooling System Messages . . . . . . . . . . . . . . . . . . 4-29
Engine Oil Messages . . . . . . . . 4-30
Engine Power Messages . . . . 4-30
Fuel System Messages . . . . . . 4-30
Key and Lock Messages . . . . . 4-31 Object Detection System
Messages . . . . . . . . . . . . . . . . . . 4-31
Ride Control System Messages . . . . . . . . . . . . . . . . . . 4-31
Airbag System Messages . . . . 4-32
Safety Belt Messages . . . . . . . 4-32
Anti-Theft Alarm System
Messages . . . . . . . . . . . . . . . . . . 4-32
Service Vehicle Messages . . . 4-32
Tire Messages . . . . . . . . . . . . . . . 4-33
Transmission Messages . . . . . 4-33
Vehicle Reminder Messages . . . . . . . . . . . . . . . . . . 4-34
Vehicle Personalization
Vehicle Personalization . . . . . . 4-34
OnStar®System
OnStar®System . . . . . . . . . . . . . 4-39
Page 96 of 394
4-10 Instruments and Controls
Clock (Without Date
Display)
The infotainment system controls,
located on the instrument panel, are
used to access the time and date
settings through the menu system.
SeeOperation
on page 6‑7for
information about how to use the
menu system.
Setting the Time
1. Turn the infotainment system ON.
2. Press the CONFIG button and select Time Settings, or press
the
Hbutton.
3. Select Set Time.
4. Turn the MENU/SEL knob to adjust the highlighted value.
5. Press the MENU/SEL knob to select the next value. 6. To save the time and return to
the Time Settings menu, press
the
0BACK button at any time
or press the SELECT button
after adjusting the minutes.
Setting the 12/24 Hour Format
1. Turn the infotainment system ON.
2. Press the CONFIG button and select Time Settings, or press
the
Hbutton.
3. Highlight 12/24 Hour Format.
4. Press the MENU/SEL knob to select the 12 hour or 24 hour
display format.
Power Outlets
The accessory power outlets can
be used to connect electrical
equipment, such as a cellular
phone.
There are four accessory power
outlets in the following locations,
below the CD slot, inside the center console storage, on the rear of the
center console storage, and in the
rear cargo compartment.
To use the outlets, remove the
cover. Close the outlet cover, when
not in use.
Notice:
If electrical devices are
left plugged into a power outlet,
the battery may drain causing the
vehicle not to start or damage to
the battery. This would not be
covered by the vehicle warranty.
Always unplug all electrical
devices when turning off the
vehicle.
Certain electrical accessories
may not be compatible with the
accessory power outlets and could
result in blown vehicle or adapter
fuses. If you experience a problem,
see your dealer for additional
information on the accessory power
outlet.