2010 CHEVROLET EQUINOX ignition
[x] Cancel search: ignitionPage 23 of 394
Keys, Doors and Windows 1-17
WARNING (Continued)
if caught in the path of a closing
window. Do not leave keys in a
vehicle with children.
When there are children in the
rear seat use the window lockout
button to prevent unintentional
operation of the windows.
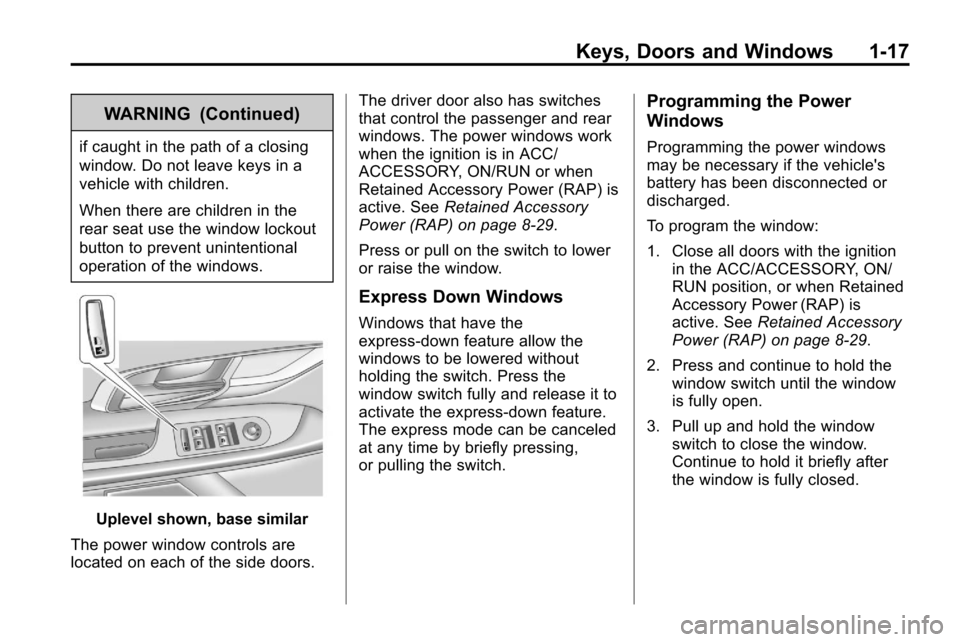
Uplevel shown, base similar
The power window controls are
located on each of the side doors. The driver door also has switches
that control the passenger and rear
windows. The power windows work
when the ignition is in ACC/
ACCESSORY, ON/RUN or when
Retained Accessory Power (RAP) is
active. See
Retained Accessory
Power (RAP) on page 8‑29.
Press or pull on the switch to lower
or raise the window.
Express Down Windows
Windows that have the
express‐down feature allow the
windows to be lowered without
holding the switch. Press the
window switch fully and release it to
activate the express‐down feature.
The express mode can be canceled
at any time by briefly pressing,
or pulling the switch.
Programming the Power
Windows
Programming the power windows
may be necessary if the vehicle's
battery has been disconnected or
discharged.
To program the window:
1. Close all doors with the ignition in the ACC/ACCESSORY, ON/
RUN position, or when Retained
Accessory Power (RAP) is
active. See Retained Accessory
Power (RAP) on page 8‑29.
2. Press and continue to hold the window switch until the window
is fully open.
3. Pull up and hold the window switch to close the window.
Continue to hold it briefly after
the window is fully closed.
Page 24 of 394
1-18 Keys, Doors and Windows
Window Lockout
o(Window Lockout): The window
lockout switch is located on the
driver door. This feature prevents
the rear passenger windows from
operating, except from the driver
position. Press the switch to turn
the lockout feature on or off. An
indicator light shows the feature
is on.
Sun Visors
Pull the sun visor down to block
glare. Detach the sun visor from the
center mount and slide it along the
rod from side-to-side to cover the
driver or passenger side of the front
window. Swing the sun visor to the
side to cover the side window. It can
be moved along the rod from
side-to-side in this position also.
Roof
Sunroof
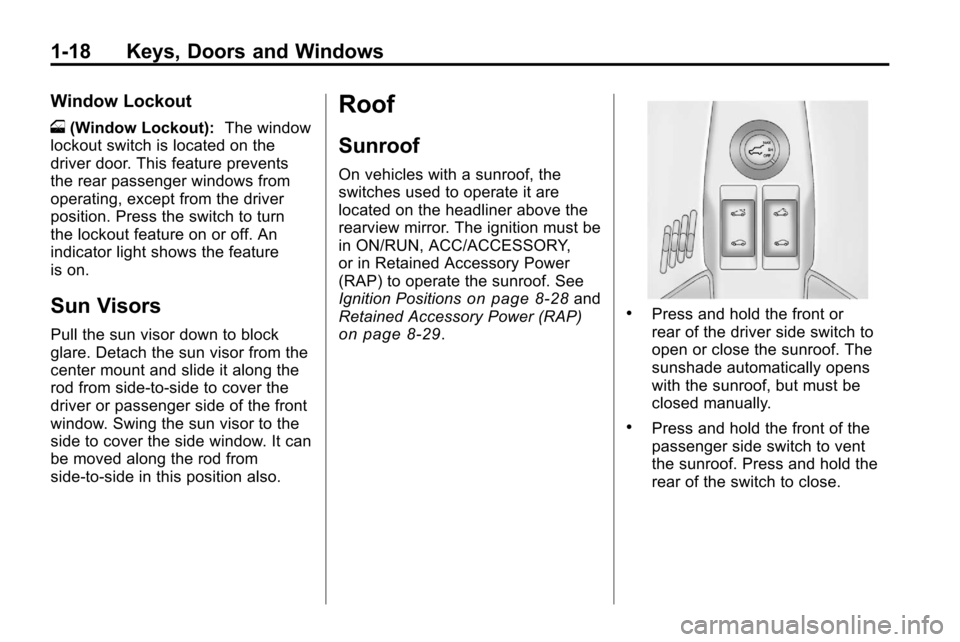
On vehicles with a sunroof, the
switches used to operate it are
located on the headliner above the
rearview mirror. The ignition must be
in ON/RUN, ACC/ACCESSORY,
or in Retained Accessory Power
(RAP) to operate the sunroof. See
Ignition Positions
on page 8‑28and
Retained Accessory Power (RAP)
on page 8‑29.
.Press and hold the front or
rear of the driver side switch to
open or close the sunroof. The
sunshade automatically opens
with the sunroof, but must be
closed manually.
.Press and hold the front of the
passenger side switch to vent
the sunroof. Press and hold the
rear of the switch to close.
Page 30 of 394
2-4 Seats and Restraints
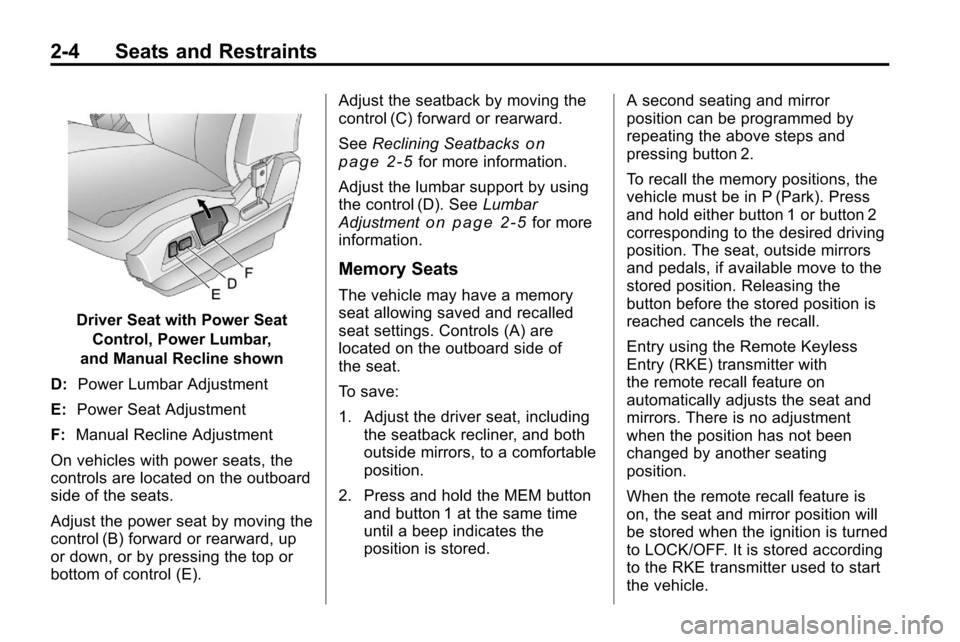
Driver Seat with Power SeatControl, Power Lumbar,
and Manual Recline shown
D: Power Lumbar Adjustment
E: Power Seat Adjustment
F: Manual Recline Adjustment
On vehicles with power seats, the
controls are located on the outboard
side of the seats.
Adjust the power seat by moving the
control (B) forward or rearward, up
or down, or by pressing the top or
bottom of control (E). Adjust the seatback by moving the
control (C) forward or rearward.
See
Reclining Seatbacks
on
page 2‑5for more information.
Adjust the lumbar support by using
the control (D). See Lumbar
Adjustment
on page 2‑5for more
information.
Memory Seats
The vehicle may have a memory
seat allowing saved and recalled
seat settings. Controls (A) are
located on the outboard side of
the seat.
To save:
1. Adjust the driver seat, including the seatback recliner, and both
outside mirrors, to a comfortable
position.
2. Press and hold the MEM button and button 1 at the same time
until a beep indicates the
position is stored. A second seating and mirror
position can be programmed by
repeating the above steps and
pressing button 2.
To recall the memory positions, the
vehicle must be in P (Park). Press
and hold either button 1 or button 2
corresponding to the desired driving
position. The seat, outside mirrors
and pedals, if available move to the
stored position. Releasing the
button before the stored position is
reached cancels the recall.
Entry using the Remote Keyless
Entry (RKE) transmitter with
the remote recall feature on
automatically adjusts the seat and
mirrors. There is no adjustment
when the position has not been
changed by another seating
position.
When the remote recall feature is
on, the seat and mirror position will
be stored when the ignition is turned
to LOCK/OFF. It is stored according
to the RKE transmitter used to start
the vehicle.
Page 31 of 394
Seats and Restraints 2-5
To stop recall movement of the RKE
remote recall feature, press one of
the power seat controls, memory
buttons, or power mirror buttons.
Memory Seat recall may stop if
the seat is blocked. Remove the
obstruction and then press the
memory button again. If the memory
function does not work properly, see
your dealer for service.
Easy Exit Seat
If the easy exit seat feature is on in
the Driver Information Center (DIC),
automatic adjustment occurs when
the ignition is turned to LOCK/OFF
and the driver door is opened. The
driver seat moves back.
SeeVehicle Personalization
on
page 4‑34for more information.
Lumbar Adjustment
Power Lumbar
Seats with power lumbar have
controls located on the outboard
side of the seat. See Power Seat
Adjustment
on page 2‑3for more
information.
Adjust lumbar support by using the
rocker switch (D) on the outboard
side of the driver seat.
Release the switch when the
seatback reaches the desired level
of lumbar support.
Reclining Seatbacks
Manual Reclining Seatbacks
{WARNING
You can lose control of the
vehicle if you try to adjust a
manual driver's seat while the
vehicle is moving. The sudden
(Continued)
WARNING (Continued)
movement could startle and
confuse you, or make you push a
pedal when you do not want to.
Adjust the driver's seat only when
the vehicle is not moving.
{WARNING
If either seatback is not locked, it
could move forward in a sudden
stop or crash. That could cause
injury to the person sitting there.
Always push and pull on the
seatbacks to be sure they are
locked.
Vehicles with manual reclining
seatbacks have a lever on the
outboard side of the seat. Lift the
lever and move the seatback to the
desired position, then release the
lever. The seatback should not
move when pushed or pulled.
Page 33 of 394
Seats and Restraints 2-7
Heated Front Seats
{WARNING
If you cannot feel temperature
change or pain to the skin, the
seat heater may cause burns
even at low temperatures. To
reduce the risk of burns, people
with such a condition should use
care when using the seat heater,
especially for long periods of
time. Do not place anything on
the seat that insulates against
heat, such as a blanket, cushion,
cover or similar item. This may
cause the seat heater to
overheat. An overheated seat
heater may cause a burn or may
damage the seat.
On vehicles with heated front seats,
the controls are located near the
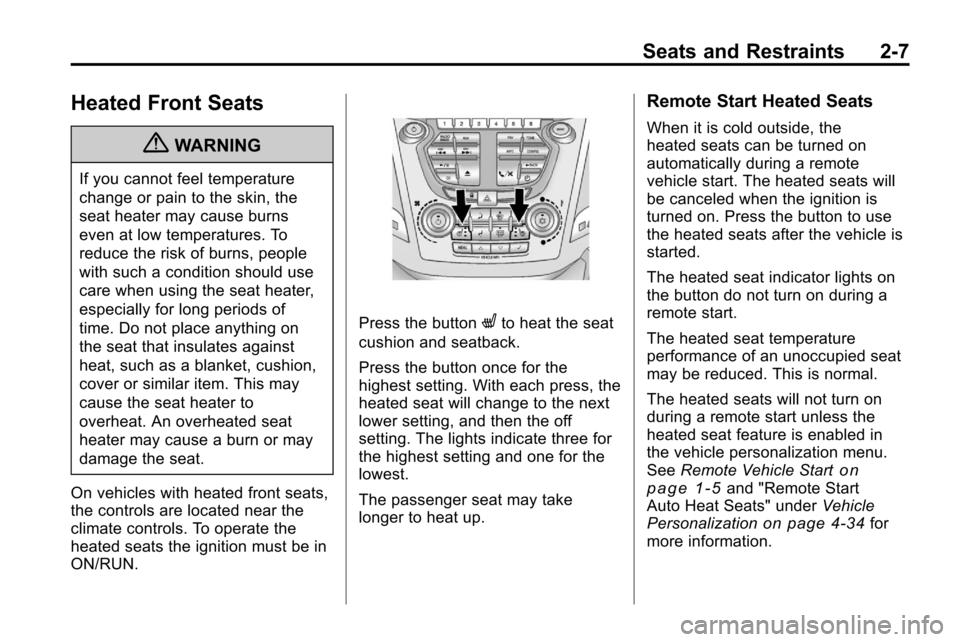
climate controls. To operate the
heated seats the ignition must be in
ON/RUN.
Press the buttonLto heat the seat
cushion and seatback.
Press the button once for the
highest setting. With each press, the
heated seat will change to the next
lower setting, and then the off
setting. The lights indicate three for
the highest setting and one for the
lowest.
The passenger seat may take
longer to heat up.
Remote Start Heated Seats
When it is cold outside, the
heated seats can be turned on
automatically during a remote
vehicle start. The heated seats will
be canceled when the ignition is
turned on. Press the button to use
the heated seats after the vehicle is
started.
The heated seat indicator lights on
the button do not turn on during a
remote start.
The heated seat temperature
performance of an unoccupied seat
may be reduced. This is normal.
The heated seats will not turn on
during a remote start unless the
heated seat feature is enabled in
the vehicle personalization menu.
See Remote Vehicle Start
on
page 1‑5and "Remote Start
Auto Heat Seats" under Vehicle
Personalization
on page 4‑34for
more information.
Page 60 of 394
2-34 Seats and Restraints
A wet seat can affect the
performance of the passenger
sensing system. Here is how:
.The passenger sensing system
may turn off the passenger
airbag when liquid is soaked
into the seat. If this happens, the
off indicator will be lit, and the
airbag readiness light on the
instrument panel will also be lit.
.Liquid pooled on the seat that
has not soaked in may make it
more likely that the passenger
sensing system will enable (turn
on) the passenger airbag while a
child restraint or child occupant
is on the seat. If the passenger
airbag is turned on, the on
indicator will be lit.
If the passenger seat gets wet, dry
the seat immediately. If the airbag
readiness light is lit, do not install a
child restraint or allow anyone to
occupy the seat. See Airbag
Readiness Light
on page 4‑15for
important safety information. The on indicator may be lit if an
object, such as a briefcase,
handbag, grocery bag, laptop or
other electronic device, is put on
an unoccupied seat. If this is not
desired remove the object from
the seat.
{WARNING
Stowing of articles under the
passenger seat or between the
passenger seat cushion and
seatback may interfere with the
proper operation of the passenger
sensing system.
Servicing the
Airbag-Equipped Vehicle
Airbags affect how the vehicle
should be serviced. There are parts
of the airbag system in several
places around the vehicle. Your
dealer and the service manual have
information about servicing the
vehicle and the airbag system.To purchase a service manual, see
Service Publications Ordering
Information on page 12‑12.
{WARNING
For up to 10 seconds after the
ignition is turned off and the
battery is disconnected, an airbag
can still inflate during improper
service. You can be injured if you
are close to an airbag when it
inflates. Avoid yellow connectors.
They are probably part of the
airbag system. Be sure to follow
proper service procedures, and
make sure the person performing
work for you is qualified to do so.
Page 91 of 394

Instruments and Controls 4-5
A.Air Vents on page 7‑6.
B. Turn and Lane-Change Signals
on page 5‑3.Exterior Lamp
Controlson page 5‑1. Fog
Lampson page 5‑3(If
Equipped).
C. Instrument Cluster
on
page 4‑12.
D. Windshield Wiper/Washer
on
page 4‑7. Rear Window
Wiper/Washer on page 4‑8.
E. Power Door Locks
on
page 1‑7.
F. Instrument Panel Storage
on
page 3‑1.
G. Safety Locks on page 1‑7. H.
AM-FM Radio
on page 6‑11.
Navigation System (If
Equipped). See Navigation
System Manual.
I. Cruise Control
on page 8‑44.
J. Instrument Panel Illumination
Control
on page 5‑4.
K. Steering Wheel Adjustment
on
page 4‑6.
L. Horn on page 4‑7.
M. Steering Wheel Controls
on
page 4‑6.
N. Ignition Positions on page 8‑28.
O. Climate Control Systems
on
page 7‑1or Automatic Climate
Control System on page 7‑3. P. Shift Lever. See
Shifting Into
Park on page 8‑32.
Q. Fuel Economy Mode
on
page 8‑37(If Equipped).
R. StabiliTrak System
on
page 8‑43.
S. Cupholders on page 3‑1.
T. Power Outlets on page 4‑10.
U. CD Player on page 6‑19.
V. Driver Information Center Buttons. See Driver Information
Center (DIC) on page 4‑24.
W. Hazard Warning Flashers
on
page 5‑2.
X. Glove Box on page 3‑1.
Page 99 of 394
Instruments and Controls 4-13
Speedometer
The vehicle's speed can be selected
to display on the Driver Information
Center (DIC) and the speedometer
in either kilometers per hour (km/h)
or miles per hour (mph). Telltales on
the speedometer indicate whether
kilometers or miles were chosen.
The DIC will show the vehicles
speed after the limit on the
speedometer has been reached.
Odometer
The odometer shows how far the
vehicle has been driven, in either
kilometers or miles.
This vehicle has a tamper-resistant
odometer. If the vehicle needs a
new odometer installed, the new
one is set to the mileage of the old
odometer. If this is not possible, it is
set at zero and a label is put on the
driver's door to show the old
mileage reading.
Tachometer
The tachometer displays the engine
speed in revolutions per
minute (rpm).
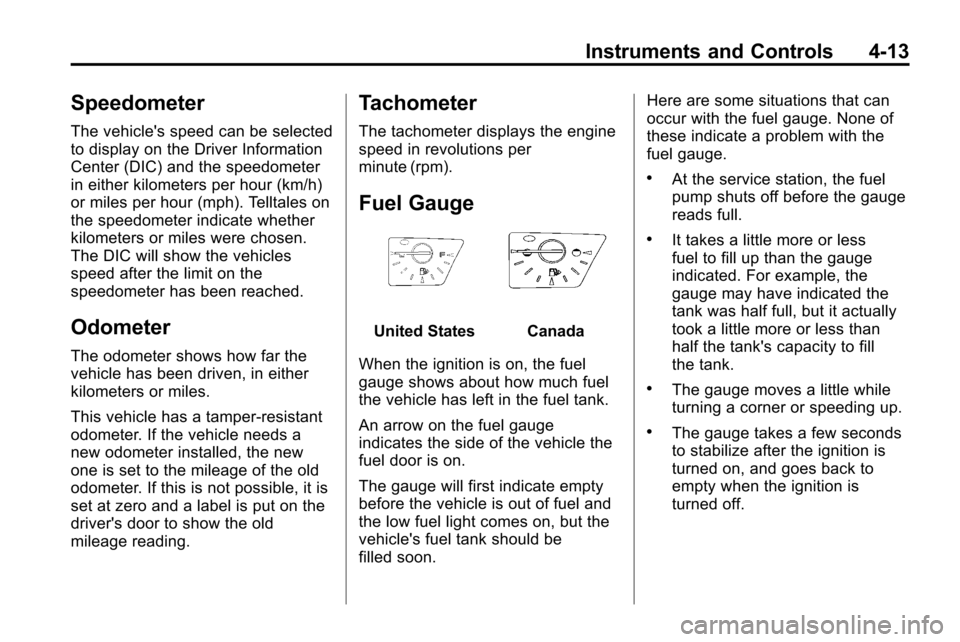
Fuel Gauge
United StatesCanada
When the ignition is on, the fuel
gauge shows about how much fuel
the vehicle has left in the fuel tank.
An arrow on the fuel gauge
indicates the side of the vehicle the
fuel door is on.
The gauge will first indicate empty
before the vehicle is out of fuel and
the low fuel light comes on, but the
vehicle's fuel tank should be
filled soon. Here are some situations that can
occur with the fuel gauge. None of
these indicate a problem with the
fuel gauge.
.At the service station, the fuel
pump shuts off before the gauge
reads full.
.It takes a little more or less
fuel to fill up than the gauge
indicated. For example, the
gauge may have indicated the
tank was half full, but it actually
took a little more or less than
half the tank's capacity to fill
the tank.
.The gauge moves a little while
turning a corner or speeding up.
.The gauge takes a few seconds
to stabilize after the ignition is
turned on, and goes back to
empty when the ignition is
turned off.