2010 CHEVROLET EQUINOX automatic transmission
[x] Cancel search: automatic transmissionPage 269 of 394
Vehicle Care 9-1
Vehicle Care
General Information
General Information . . . . . . . . . . . 9-3
California Proposition65 Warning . . . . . . . . . . . . . . . . . . 9-3
California Perchlorate Materials Requirements . . . . . . . . . . . . . . . 9-3
Accessories and Modifications . . . . . . . . . . . . . . . . 9-4
Vehicle Checks
Doing Your OwnService Work . . . . . . . . . . . . . . . . 9-4
Hood . . . . . . . . . . . . . . . . . . . . . . . . . . 9-5
Engine Compartment Overview . . . . . . . . . . . . . . . . . . . . 9-6
Engine Cover . . . . . . . . . . . . . . . . . 9-9
Engine Oil . . . . . . . . . . . . . . . . . . . 9-10
Engine Oil Life System . . . . . . . 9-11
Automatic Transmission Fluid . . . . . . . . . . . . . . . . . . . . . . . 9-12 Engine Air Cleaner/Filter . . . . . 9-13
Cooling System . . . . . . . . . . . . . . 9-14
Engine Coolant . . . . . . . . . . . . . . 9-15
Engine Overheating . . . . . . . . . 9-18
Power Steering Fluid (2.4L
L4 Engine) . . . . . . . . . . . . . . . . . 9-20
Power Steering Fluid (3.0L V6 Engine) . . . . . . . . . . . . . . . . . 9-20
Washer Fluid . . . . . . . . . . . . . . . . 9-21
Brakes . . . . . . . . . . . . . . . . . . . . . . . 9-21
Brake Fluid . . . . . . . . . . . . . . . . . . 9-22
Battery . . . . . . . . . . . . . . . . . . . . . . . 9-24
All-Wheel Drive . . . . . . . . . . . . . . 9-24
Starter Switch Check . . . . . . . . 9-25
Automatic Transmission Shift Lock Control System
Check . . . . . . . . . . . . . . . . . . . . . . 9-25
Ignition Transmission Lock Check . . . . . . . . . . . . . . . . . . . . . . 9-25
Park Brake and P (Park) Mechanism Check . . . . . . . . . 9-26
Wiper Blade Replacement . . . 9-26
Headlamp Aiming
Headlamp Aiming . . . . . . . . . . . . 9-27
Bulb Replacement
Bulb Replacement . . . . . . . . . . . 9-30
Headlamps, Front Turn Signal, Sidemarker, and Parking
Lamps . . . . . . . . . . . . . . . . . . . . . . 9-30
Fog Lamps . . . . . . . . . . . . . . . . . . 9-31
Taillamps, Turn Signal, Sidemarker, Stoplamps,
and Back-Up Lamps . . . . . . . 9-32
License Plate Lamp . . . . . . . . . . 9-33
Replacement Bulbs . . . . . . . . . . 9-34
Electrical System
Fuses . . . . . . . . . . . . . . . . . . . . . . . . 9-34
Engine Compartment Fuse Block . . . . . . . . . . . . . . . . . . . . . . . 9-34
Instrument Panel Fuse Block . . . . . . . . . . . . . . . . . . . . . . . 9-37
Page 280 of 394
9-12 Vehicle Care
once a year and at this time the
system must be reset. Your dealer
has trained service people who will
perform this work using genuine
parts and reset the system. It is also
important to check the oil regularly
and keep it at the proper level.
If the system is ever reset
accidentally, the oil must be
changed at 5 000 km (3,000 miles)
since the last oil change.
Remember to reset the oil life
system whenever the oil is changed.
How to Reset the Engine Oil
Life System
Reset the system whenever the
engine oil is changed so that the
system can calculate the next
engine oil change. To reset the
system:
1. Turn the ignition to ON/RUN withthe engine off.
2. Fully press and release the accelerator pedal three times
within five seconds. If the vehicle has Driver Information
Center (DIC) buttons:
1. Turn the ignition to ON/RUN,
with the engine off.
2. Press the DIC menu button until “Remaining Oil Life” displays.
3. Press and hold the set/clear button until “100%”is displayed.
4. Turn the key to LOCK/OFF.
The system is reset when the
“Change Engine Oil Soon” message
goes off.
What to Do with Used Oil
Used engine oil contains elements
that can be unhealthy for your skin
and could even cause cancer. Do
not let used oil stay on your skin.
Clean your skin and nails with soap
and water, or a good hand cleaner.
Wash or properly dispose of clothing
or rags. See the manufacturer's
warnings about the use and
disposal of oil products. Used oil can be a threat to the
environment. If you change your
own oil, be sure to drain all the oil
from the filter before disposal. Never
dispose of oil by putting it in the
trash, pouring it on the ground, into
sewers, or into streams or bodies of
water. Recycle it by taking it to a
place that collects used oil.
Automatic Transmission
Fluid
How to Check Automatic
Transmission Fluid
It is not necessary to check the
transmission fluid level.
A transmission fluid leak is the only
reason for fluid loss. If a leak
occurs, take the vehicle to your
dealer service department and have
it repaired as soon as possible.
Page 293 of 394
Vehicle Care 9-25
What to Use
Refer to the Maintenance Schedule
to determine what kind of lubricant
to use. SeeRecommended Fluids
and Lubricants on page 10‑7.
Starter Switch Check
{WARNING
When you are doing this
inspection, the vehicle could
move suddenly. If the vehicle
moves, you or others could be
injured.
1. Before starting this check, be sure there is enough room
around the vehicle.
2. Firmly apply both the parking brake and the regular brake.
See Parking Brake
on
page 8‑40.
Do not use the accelerator
pedal, and be ready to turn off
the engine immediately if it
starts. 3. Try to start the engine in each
gear. The vehicle should start
only in P (Park) or N (Neutral).
If the vehicle starts in any other
position, contact your dealer for
service.
Automatic Transmission
Shift Lock Control
System Check
{WARNING
When you are doing this
inspection, the vehicle could
move suddenly. If the vehicle
moves, you or others could be
injured.
1. Before starting this check, be sure there is enough room
around the vehicle. It should be
parked on a level surface.
2. Firmly apply the parking brake. See Parking Brake
on
page 8‑40. Be ready to apply the regular
brake immediately if the vehicle
begins to move.
3. With the engine off, turn the ignition to ON/RUN, but do not
start the engine. Without
applying the regular brake, try to
move the shift lever out of
P (Park) with normal effort. If the
shift lever moves out of P (Park),
contact your dealer for service.
Ignition Transmission
Lock Check
While parked, and with the parking
brake set, try to turn the ignition to
LOCK/OFF in each shift lever
position.
.The ignition should turn to
LOCK/OFF only when the shift
lever is in P (Park).
.The ignition key should come
out only in LOCK/OFF.
Contact your dealer if service is
required.
Page 311 of 394
Vehicle Care 9-43
(C) Aspect Ratio:A two‐digit
number that indicates the tire
height‐to‐width measurements.
For example, if the tire size
aspect ratio is 60, as shown in
item C of the illustration, it would
mean that the tire's sidewall is
60 percent as high as it is wide.
(D) Construction Code
:A
letter code is used to indicate
the type of ply construction in
the tire. The letter R means
radial ply construction; the
letter D means diagonal or bias
ply construction; and the letter B
means belted‐bias ply
construction.
(E) Rim Diameter
:Diameter of
the wheel in inches.
(F) Service Description
:These
characters represent the load
index and speed rating of the
tire. The load index represents
the load carry capacity a tire is certified to carry. The speed
rating is the maximum speed a
tire is certified to carry a load.
Tire Terminology and
Definitions
Air Pressure:The amount of
air inside the tire pressing
outward on each square inch of
the tire. Air pressure is
expressed in psi (pounds per
square inch) or kPa (kilopascal).
Accessory Weight
:This
means the combined weight of
optional accessories. Some
examples of optional
accessories are, automatic
transmission, power steering,
power brakes, power windows,
power seats, and air
conditioning.
Aspect Ratio
:The relationship
of a tire's height to its width. Belt
:A rubber coated layer of
cords that is located between
the plies and the tread. Cords
may be made from steel or other
reinforcing materials.
Bead
:The tire bead contains
steel wires wrapped by steel
cords that hold the tire onto
the rim.
Bias Ply Tire
:A pneumatic tire
in which the plies are laid at
alternate angles less than
90 degrees to the centerline of
the tread.
Cold Tire Pressure
:The
amount of air pressure in a tire,
measured in psi (pounds per
square inch) or kPa (kilopascal)
before a tire has built up heat
from driving. See Tire Pressure
on page 9‑46.
Page 328 of 394
9-60 Vehicle Care
If a tire goes flat, avoid further tire
and wheel damage by driving slowly
to a level place. Turn on the hazard
warning flashers. SeeHazard
Warning Flashers on page 5‑2.
{WARNING
Changing a tire can be
dangerous. The vehicle can slip
off the jack and roll over or fall on
you or other people. You and they
could be badly injured or even
killed. Find a level place to
change your tire. To help prevent
the vehicle from moving:
1. Set the parking brake firmly.
2. Put an automatic transmission shift lever in
P (Park), or shift a manual
transmission to 1 (First) or
R (Reverse).
(Continued)
WARNING (Continued)
3. Turn off the engine and donot restart while the vehicle
is raised.
4. Do not allow passengers to remain in the vehicle.
To be certain the vehicle will not
move, put blocks at the front and
rear of the tire farthest away from
the one being changed. That
would be the tire on the other
side, at the opposite end of the
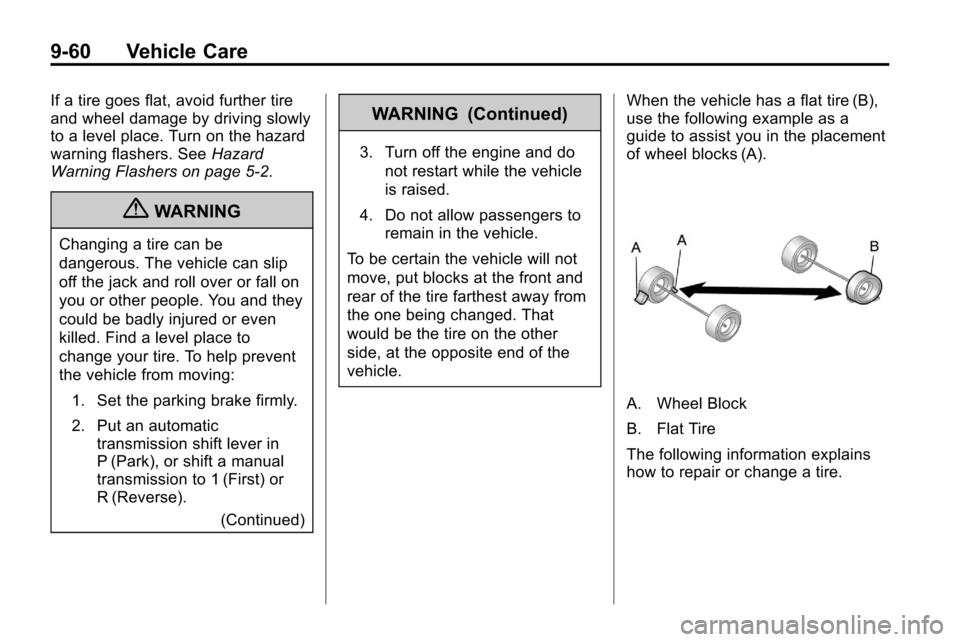
vehicle. When the vehicle has a flat tire (B),
use the following example as a
guide to assist you in the placement
of wheel blocks (A).
A. Wheel Block
B. Flat Tire
The following information explains
how to repair or change a tire.
Page 341 of 394
Vehicle Care 9-73
.Is the vehicle ready to be
towed? Just as preparing the
vehicle for a long trip, make sure
the vehicle is prepared to be
towed.
Dinghy Towing
Front-wheel‐drive and
all-wheel-drive vehicles may be
dinghy towed from the front. These
vehicles can also be towed by
placing them on a platform trailer
with all four wheels off of the
ground. For other towing options,
see“Dolly Towing” following in this
section.
For vehicles being dinghy towed,
the vehicle should be run at the
beginning of each day and at each
RV fuel stop for about five minutes.
This will ensure proper lubrication of
transmission components.
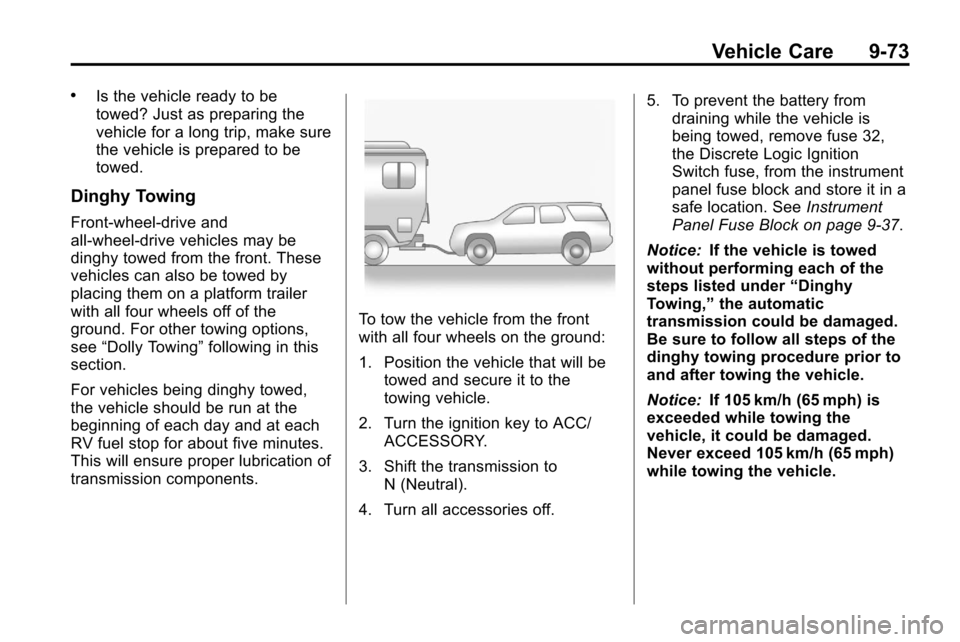
To tow the vehicle from the front
with all four wheels on the ground:
1. Position the vehicle that will be towed and secure it to the
towing vehicle.
2. Turn the ignition key to ACC/ ACCESSORY.
3. Shift the transmission to N (Neutral).
4. Turn all accessories off. 5. To prevent the battery from
draining while the vehicle is
being towed, remove fuse 32,
the Discrete Logic Ignition
Switch fuse, from the instrument
panel fuse block and store it in a
safe location. See Instrument
Panel Fuse Block on page 9‑37.
Notice: If the vehicle is towed
without performing each of the
steps listed under “Dinghy
Towing,” the automatic
transmission could be damaged.
Be sure to follow all steps of the
dinghy towing procedure prior to
and after towing the vehicle.
Notice: If 105 km/h (65 mph) is
exceeded while towing the
vehicle, it could be damaged.
Never exceed 105 km/h (65 mph)
while towing the vehicle.
Page 354 of 394
10-4 Service and Maintenance
.Body hinges and latches, key
lock cylinders, folding seat
hardware, and sunroof (if
equipped) lubrication. See
Recommended Fluids and
Lubricants
on page 10‑7. More
frequent lubrication may be
required when vehicle is
exposed to a corrosive
environment. Applying silicone
grease on weatherstrips with a
clean cloth makes them last
longer, seal better, and not stick
or squeak.
.Restraint system component
check. See Safety System
Check on page 2‑21.
.Automatic transmission fluid
level check and adding fluid,
if needed. See Automatic
Transmission Fluid
on
page 9‑12.
.Engine air cleaner filter
inspection. See Engine Air
Cleaner/Filter on page 9‑13.
.Passenger compartment air
filter replacement (or every
12 months, whichever comes
first). More frequent replacement
may be required if vehicle is
driven regularly under dusty
conditions.
Additional Required Services
At Each Fuel Stop
.Engine oil level check. See
Engine Oil on page 9‑10.
.Engine coolant level check. See
Engine Coolant on page 9‑15.
.Windshield washer fluid level
check. See Washer Fluidon
page 9‑21.
Once a Month
.Tire inflation check. See Tire
Pressure on page 9‑46.
.Tire wear inspection. See Tire
Inspection on page 9‑52. Once a Year
.See
Starter Switch Checkon
page 9‑25.
.See Automatic Transmission
Shift Lock Control System
Check on page 9‑25.
.See Ignition Transmission Lock
Check on page 9‑25.
.See Park Brake and P (Park)
Mechanism Checkon
page 9‑26.
.Engine cooling system and
pressure cap pressure check.
Radiator and air conditioning
condenser outside cleaning. See
Cooling System on page 9‑14.
.Exhaust system and nearby heat
shields inspection for loose or
damaged components.
.Accelerator pedal check for
damage, high effort, or binding.
Replace if needed.
Page 355 of 394
Service and Maintenance 10-5
First Engine Oil Change After
Every 40 000 km/25,000 Miles
.Fuel system inspection for
damage or leaks.
First Engine Oil Change After
Every 80 000 km/50,000 Miles
.Engine air cleaner filter
replacement. See Engine Air
Cleaner/Filter on page 9‑13.
.Automatic transmission fluid
change (severe service) for
vehicles mainly driven in heavy
city traffic in hot weather, in hilly
or mountainous terrain, when
frequently towing a trailer,
or used for taxi, police,
or delivery service. See
Automatic Transmission
Fluid on page 9‑12.
.Transfer case fluid change
(severe service) for vehicles
mainly driven in hilly or
mountainous terrain, when
frequently towing a trailer,
or used for taxi, police,
or delivery service.
First Engine Oil Change After
Every 160 000 km/100,000 Miles
.Automatic transmission fluid
change (normal service). See
Automatic Transmission Fluid
on
page 9‑12.
.Transfer case fluid change
(normal service).
.Spark plug replacement. An
Emission Control Service. First Engine Oil Change After
Every 240 000 km/150,000 Miles
.Engine cooling system drain,
flush, and refill, cooling system
and cap pressure check, and
cleaning of outside of radiator
and air conditioning condenser
(or every 5 years, whichever
occurs first). See
Cooling
System
on page 9‑14. An
Emission Control Service.
.Engine accessory drive belt
inspection for fraying, excessive
cracks, or obvious damage and
replacement, if needed. An
Emission Control Service.