2010 CHEVROLET EQUINOX ECU
[x] Cancel search: ECUPage 1 of 394

2010 Chevrolet Equinox Owner ManualM
Keys, Doors and Windows. . . 1-1
Keys and Locks . . . . . . . . . . . . . . . 1-2
Doors . . . . . . . . . . . . . . . . . . . . . . . . . . 1-8
Vehicle Security . . . . . . . . . . . . . . 1-12
Exterior Mirrors . . . . . . . . . . . . . . . 1-14
Interior Mirrors . . . . . . . . . . . . . . . . 1-15
Windows . . . . . . . . . . . . . . . . . . . . . 1-16
Roof . . . . . . . . . . . . . . . . . . . . . . . . . . 1-18
Seats and Restraints . . . . . . . . . 2-1
Head Restraints . . . . . . . . . . . . . . . 2-2
Front Seats . . . . . . . . . . . . . . . . . . . . 2-3
Rear Seats . . . . . . . . . . . . . . . . . . . . 2-8
Safety Belts . . . . . . . . . . . . . . . . . . . . 2-9
Airbag System . . . . . . . . . . . . . . . . 2-22
Child Restraints . . . . . . . . . . . . . . 2-37 Storage
. . . . . . . . . . . . . . . . . . . . . . . 3-1
Storage Compartments . . . . . . . . 3-1
Additional Storage Features . . . 3-1
Roof Rack System . . . . . . . . . . . . . 3-2
Instruments and Controls . . . . 4-1
Instrument Panel Overview . . . . 4-4
Controls . . . . . . . . . . . . . . . . . . . . . . . 4-6
Warning Lights, Gauges, and Indicators . . . . . . . . . . . . . . . . . . . 4-11
Information Displays . . . . . . . . . . 4-24
Vehicle Messages . . . . . . . . . . . . 4-27
Vehicle Personalization . . . . . . . 4-34
OnStar
®System . . . . . . . . . . . . . . 4-39 Lighting
. . . . . . . . . . . . . . . . . . . . . . . 5-1
Exterior Lighting . . . . . . . . . . . . . . . 5-1
Interior Lighting . . . . . . . . . . . . . . . . 5-4
Lighting Features . . . . . . . . . . . . . . 5-4
Infotainment System . . . . . . . . . 6-1
Introduction . . . . . . . . . . . . . . . . . . . . 6-1
Radio . . . . . . . . . . . . . . . . . . . . . . . . . 6-11
Audio Players . . . . . . . . . . . . . . . . 6-19
Rear Seat Infotainment . . . . . . . 6-33
Phone . . . . . . . . . . . . . . . . . . . . . . . . 6-42
Climate Controls . . . . . . . . . . . . . 7-1
Climate Control Systems . . . . . . 7-1
Air Vents . . . . . . . . . . . . . . . . . . . . . . . 7-6
Maintenance . . . . . . . . . . . . . . . . . . . 7-6
Page 7 of 394
Keys, Doors and Windows 1-1
Keys, Doors and
Windows
Keys and Locks
Keys . . . . . . . . . . . . . . . . . . . . . . . . . . 1-2
Remote Keyless Entry (RKE)System . . . . . . . . . . . . . . . . . . . . . . 1-3
Remote Keyless Entry (RKE) System Operation . . . . . . . . . . . 1-3
Remote Vehicle Start . . . . . . . . . 1-5
Door Locks . . . . . . . . . . . . . . . . . . . 1-6
Power Door Locks . . . . . . . . . . . . 1-7
Safety Locks . . . . . . . . . . . . . . . . . . 1-7
Doors
Liftgate (Manual) . . . . . . . . . . . . . . 1-8
Liftgate (Power) . . . . . . . . . . . . . . . 1-8
Vehicle Security
Vehicle Security . . . . . . . . . . . . . . 1-12
Anti-Theft Alarm System . . . . . 1-12
Immobilizer . . . . . . . . . . . . . . . . . . 1-13
Immobilizer Operation . . . . . . . 1-13
Exterior Mirrors
Convex Mirrors . . . . . . . . . . . . . . 1-14
Power Mirrors . . . . . . . . . . . . . . . . 1-14
Heated Mirrors . . . . . . . . . . . . . . . 1-14
Park Tilt Mirrors . . . . . . . . . . . . . . 1-15
Interior Mirrors
Manual Rearview Mirror . . . . . . 1-15
Automatic Dimming Rearview Mirror . . . . . . . . . . . . . . . . . . . . . . . 1-15
Windows
Windows . . . . . . . . . . . . . . . . . . . . . 1-16
Power Windows . . . . . . . . . . . . . 1-16
Sun Visors . . . . . . . . . . . . . . . . . . . 1-18
Roof
Sunroof . . . . . . . . . . . . . . . . . . . . . . 1-18
Page 13 of 394
Keys, Doors and Windows 1-7
Power Door Locks
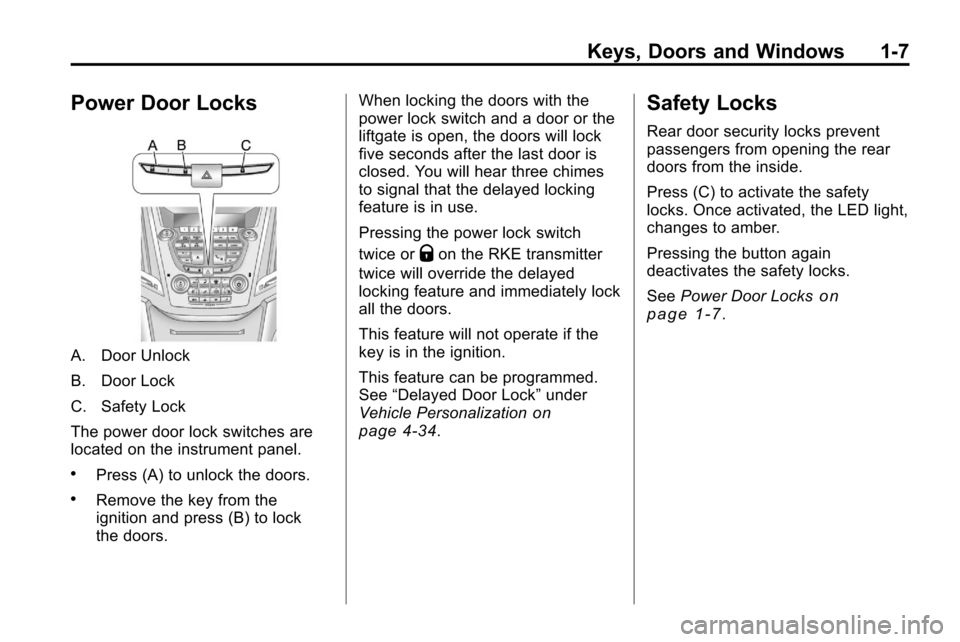
A. Door Unlock
B. Door Lock
C. Safety Lock
The power door lock switches are
located on the instrument panel.
.Press (A) to unlock the doors.
.Remove the key from the
ignition and press (B) to lock
the doors.When locking the doors with the
power lock switch and a door or the
liftgate is open, the doors will lock
five seconds after the last door is
closed. You will hear three chimes
to signal that the delayed locking
feature is in use.
Pressing the power lock switch
twice or
Qon the RKE transmitter
twice will override the delayed
locking feature and immediately lock
all the doors.
This feature will not operate if the
key is in the ignition.
This feature can be programmed.
See “Delayed Door Lock” under
Vehicle Personalization
on
page 4‑34.
Safety Locks
Rear door security locks prevent
passengers from opening the rear
doors from the inside.
Press (C) to activate the safety
locks. Once activated, the LED light,
changes to amber.
Pressing the button again
deactivates the safety locks.
See Power Door Locks
on
page 1‑7.
Page 18 of 394
1-12 Keys, Doors and Windows
disabled the liftgate electric latch will
still power latch once contact is
made with the striker. Always close
the liftgate before driving.
If the RKE button is pressed while
power operation is disabled, the turn
signals flash and the liftgate will
not move.
The liftgate has an electric latch.
If the battery is disconnected or has
low voltage, the liftgate will not
open. The liftgate will resume
operation when the battery is
reconnected and charged.Vehicle Security
Vehicle theft is big business,
especially in some cities. This
vehicle has theft-deterrent features,
however, they do not make it
impossible to steal.
Anti-Theft Alarm System
This vehicle has an anti-theft alarm
system.
Arming the System
To arm the system, either:
.PressQon the RKE transmitter.
.Or, lock the vehicle using the
key in the driver door.
The alarm automatically arms after
about 30 seconds. The security
light, located on the instrument
panel, flashes.
Press
Von the RKE transmitter to
open the liftgate without setting off
the alarm. The system rearms when
the liftgate is closed.
Disarming the System
To disarm the system, do one of the
following:
.PressKon the RKE transmitter.
.Turn the ignition to ON/RUN.
.Allow the alarm to time out after
about 30 seconds and reset
itself.
The alarm automatically disarms.
If the system is armed and any door
is unlocked without pressing
Kon
the RKE transmitter the alarm
sounds.
How to Detect a Tamper
Condition
IfKis pressed and the horn
sounds, an attempted break-in has
occurred while the system was
armed.
Page 19 of 394
Keys, Doors and Windows 1-13
If the alarm has been activated, the
“Theft Attempted”message will
appear on the DIC. See Key and
Lock Messages
on page 4‑31for
additional information.
Immobilizer
See Radio Frequency Statementon
page 12‑16for information
regarding Part 15 of the Federal
Communications Commission (FCC)
Rules and RSS-210/211 of Industry
Canada.
Immobilizer Operation
This vehicle has a passive
theft-deterrent system.
The system does not have to be
manually armed or disarmed.
The vehicle is automatically
immobilized when the key is
removed from the ignition. The system is automatically
disarmed when the vehicle is
started with the correct key. The key
uses a transponder that matches
an immobilizer control unit in the
vehicle and automatically disarms
the system. Only the correct key
starts the vehicle. The vehicle may
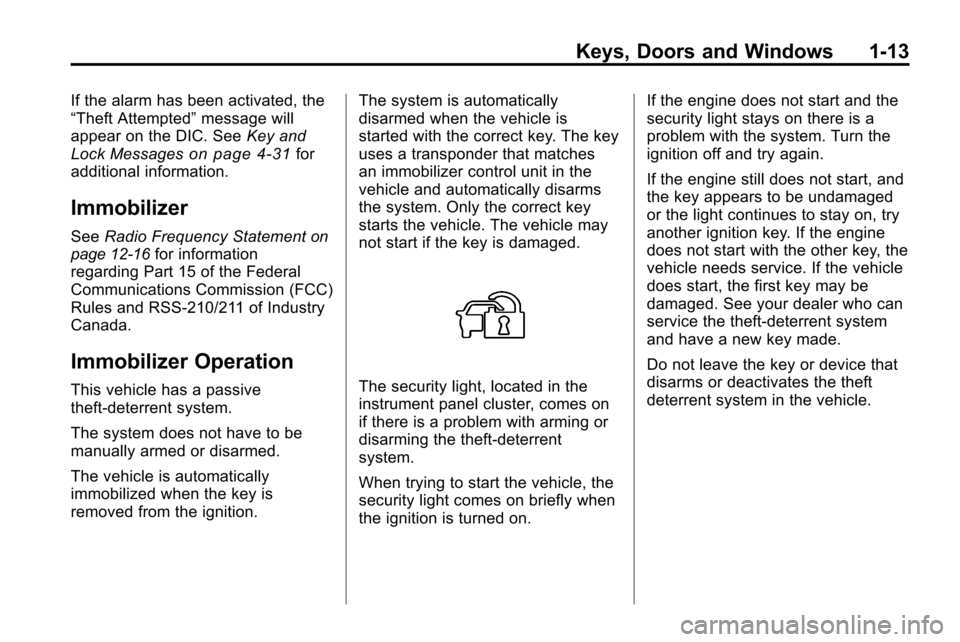
not start if the key is damaged.The security light, located in the
instrument panel cluster, comes on
if there is a problem with arming or
disarming the theft-deterrent
system.
When trying to start the vehicle, the
security light comes on briefly when
the ignition is turned on.If the engine does not start and the
security light stays on there is a
problem with the system. Turn the
ignition off and try again.
If the engine still does not start, and
the key appears to be undamaged
or the light continues to stay on, try
another ignition key. If the engine
does not start with the other key, the
vehicle needs service. If the vehicle
does start, the first key may be
damaged. See your dealer who can
service the theft-deterrent system
and have a new key made.
Do not leave the key or device that
disarms or deactivates the theft
deterrent system in the vehicle.
Page 27 of 394
Seats and Restraints 2-1
Seats and
Restraints
Head Restraints
Head Restraints . . . . . . . . . . . . . . . 2-2
Front Seats
Seat Adjustment . . . . . . . . . . . . . . 2-3
Power Seat Adjustment . . . . . . . 2-3
Lumbar Adjustment . . . . . . . . . . . 2-5
Reclining Seatbacks . . . . . . . . . . 2-5
Heated Front Seats . . . . . . . . . . . 2-7
Rear Seats
Rear Seats . . . . . . . . . . . . . . . . . . . . 2-8
Safety Belts
Safety Belts . . . . . . . . . . . . . . . . . . . 2-9
How to Wear Safety BeltsProperly . . . . . . . . . . . . . . . . . . . . 2-12
Lap-Shoulder Belt . . . . . . . . . . . 2-17
Safety Belt Use During Pregnancy . . . . . . . . . . . . . . . . . . 2-21 Safety Belt Extender . . . . . . . . . 2-21
Safety System Check . . . . . . . . 2-21
Safety Belt Care . . . . . . . . . . . . . 2-22
Replacing Safety Belt System
Parts After a Crash . . . . . . . . . 2-22
Airbag System
Airbag System . . . . . . . . . . . . . . . 2-22
Where Are the Airbags? . . . . . 2-25
When Should an Airbag
Inflate? . . . . . . . . . . . . . . . . . . . . . 2-26
What Makes an Airbag Inflate? . . . . . . . . . . . . . . . . . . . . . 2-28
How Does an Airbag Restrain? . . . . . . . . . . . . . . . . . . . 2-28
What Will You See After an Airbag Inflates? . . . . . . . . . . . . 2-28
Passenger Sensing System . . . . . . . . . . . . . . . . . . . . . 2-30
Servicing the Airbag-Equipped Vehicle . . . . . . . . . . . . . . . . . . . . . 2-34
Adding Equipment to the Airbag-Equipped Vehicle . . . 2-35 Airbag System Check . . . . . . . . 2-36
Replacing Airbag System
Parts After a Crash . . . . . . . . . 2-36
Child Restraints
Older Children . . . . . . . . . . . . . . . 2-37
Infants and YoungChildren . . . . . . . . . . . . . . . . . . . . 2-39
Child Restraint Systems . . . . . 2-41
Where to Put the Restraint . . . . . . . . . . . . . . . . . . . 2-43
Lower Anchors and Tethers for Children (LATCH
System) . . . . . . . . . . . . . . . . . . . . 2-45
Replacing LATCH System Parts After a Crash . . . . . . . . . 2-51
Securing Child Restraints
(Rear Seat ) . . . . . . . . . . . . . . . . 2-51
Securing Child Restraints (Front Passenger Seat) . . . . 2-54
Page 43 of 394
Seats and Restraints 2-17
Lap-Shoulder Belt
All seating positions in the vehicle
have a lap-shoulder belt.
The following instructions explain
how to wear a lap-shoulder belt
properly.
1. Adjust the seat, if the seat isadjustable, so you can sit up
straight. To see how, see “Seats”
in the Index.
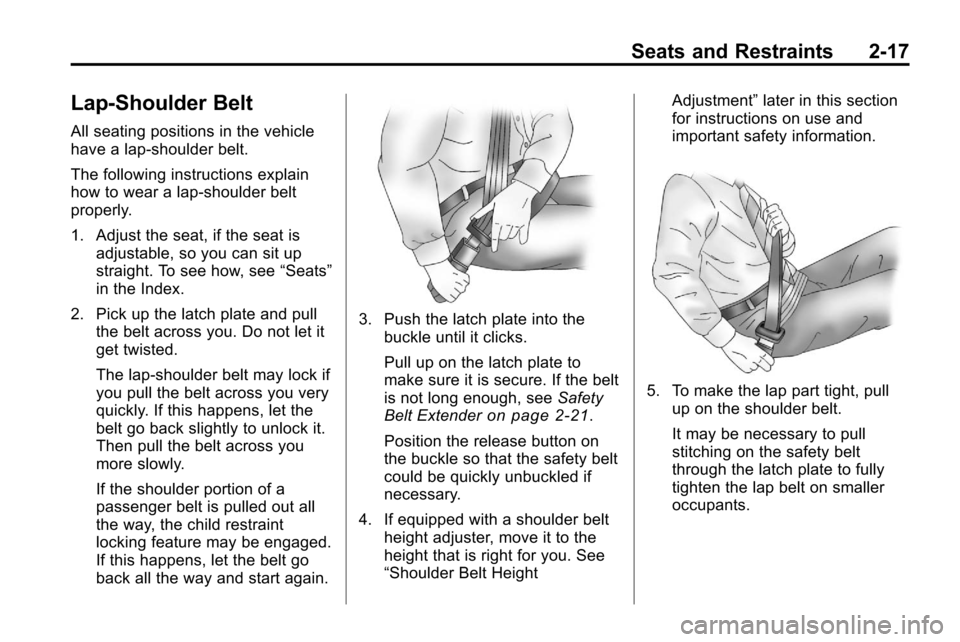
2. Pick up the latch plate and pull the belt across you. Do not let it
get twisted.
The lap-shoulder belt may lock if
you pull the belt across you very
quickly. If this happens, let the
belt go back slightly to unlock it.
Then pull the belt across you
more slowly.
If the shoulder portion of a
passenger belt is pulled out all
the way, the child restraint
locking feature may be engaged.
If this happens, let the belt go
back all the way and start again.
3. Push the latch plate into the
buckle until it clicks.
Pull up on the latch plate to
make sure it is secure. If the belt
is not long enough, see Safety
Belt Extender
on page 2‑21.
Position the release button on
the buckle so that the safety belt
could be quickly unbuckled if
necessary.
4. If equipped with a shoulder belt height adjuster, move it to the
height that is right for you. See
“Shoulder Belt Height Adjustment”
later in this section
for instructions on use and
important safety information.
5. To make the lap part tight, pull
up on the shoulder belt.
It may be necessary to pull
stitching on the safety belt
through the latch plate to fully
tighten the lap belt on smaller
occupants.
Page 47 of 394
Seats and Restraints 2-21
Safety Belt Use During
Pregnancy
Safety belts work for everyone,
including pregnant women. Like all
occupants, they are more likely to
be seriously injured if they do not
wear safety belts.
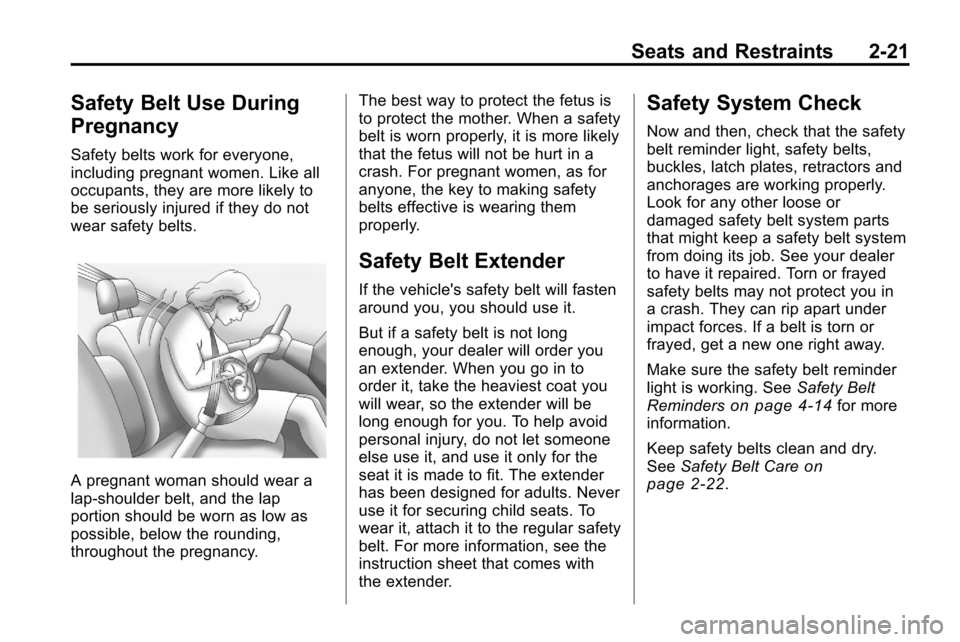
A pregnant woman should wear a
lap-shoulder belt, and the lap
portion should be worn as low as
possible, below the rounding,
throughout the pregnancy.The best way to protect the fetus is
to protect the mother. When a safety
belt is worn properly, it is more likely
that the fetus will not be hurt in a
crash. For pregnant women, as for
anyone, the key to making safety
belts effective is wearing them
properly.
Safety Belt Extender
If the vehicle's safety belt will fasten
around you, you should use it.
But if a safety belt is not long
enough, your dealer will order you
an extender. When you go in to
order it, take the heaviest coat you
will wear, so the extender will be
long enough for you. To help avoid
personal injury, do not let someone
else use it, and use it only for the
seat it is made to fit. The extender
has been designed for adults. Never
use it for securing child seats. To
wear it, attach it to the regular safety
belt. For more information, see the
instruction sheet that comes with
the extender.
Safety System Check
Now and then, check that the safety
belt reminder light, safety belts,
buckles, latch plates, retractors and
anchorages are working properly.
Look for any other loose or
damaged safety belt system parts
that might keep a safety belt system
from doing its job. See your dealer
to have it repaired. Torn or frayed
safety belts may not protect you in
a crash. They can rip apart under
impact forces. If a belt is torn or
frayed, get a new one right away.
Make sure the safety belt reminder
light is working. See
Safety Belt
Reminders
on page 4‑14for more
information.
Keep safety belts clean and dry.
See Safety Belt Care
on
page 2‑22.