2010 CHEVROLET EQUINOX battery replacement
[x] Cancel search: battery replacementPage 9 of 394
Keys, Doors and Windows 1-3
Remote Keyless Entry
(RKE) System
SeeRadio Frequency Statementon
page 12‑16for information
regarding Part 15 of the Federal
Communications Commission (FCC)
Rules and RSS-210/211 of Industry
Canada.
Changes or modifications to
this system by other than an
authorized service facility could void
authorization to use this equipment.
If there is a decrease in the RKE
operating range:
.Check the distance. The
transmitter may be too far
from the vehicle.
.Check the location. Other
vehicles or objects may be
blocking the signal.
.Check the transmitter's battery.
See “Battery Replacement” later
in this section.
.If the transmitter is still not
working correctly, see your
dealer or a qualified technician
for service.
Remote Keyless Entry
(RKE) System Operation
The Remote Keyless Entry (RKE)
transmitter will work up to 60 m
(195 feet) away from the vehicle.
There are other conditions which
can affect the performance of the
transmitter. See Remote Keyless
Entry (RKE) System on page 1‑3.
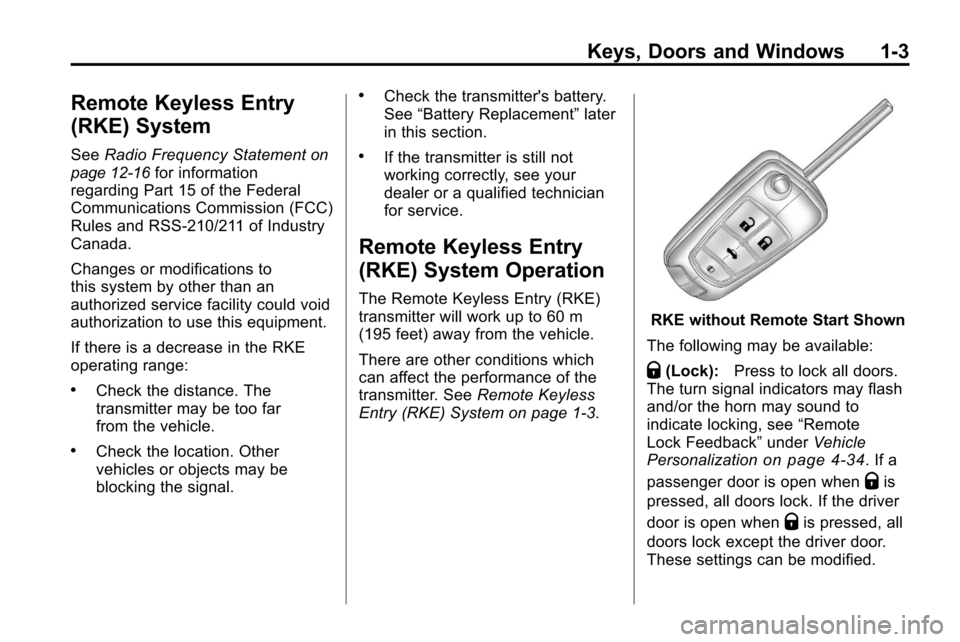
RKE without Remote Start Shown
The following may be available:
Q(Lock): Press to lock all doors.
The turn signal indicators may flash
and/or the horn may sound to
indicate locking, see “Remote
Lock Feedback” underVehicle
Personalization
on page 4‑34. If a
passenger door is open when
Qis
pressed, all doors lock. If the driver
door is open when
Qis pressed, all
doors lock except the driver door.
These settings can be modified.
Page 10 of 394
1-4 Keys, Doors and Windows
See“Unlocked Door Anti Lock Out”
under Vehicle Personalizationon
page 4‑34.
Pressing
Qmay also arm the
theft-deterrent system. See
Anti-Theft Alarm System
on
page 1‑12.
K(Unlock): Press to unlock the
driver door or all doors, see
“Remote Door Unlock” under
Vehicle Personalization
on
page 4‑34. The turn signal
indicators flash to indicate unlocking
has occurred. For more information
see “Remote Unlock Light
Feedback” underVehicle
Personalization
on page 4‑34.
Pressing
Kmay also disarm the
theft-deterrent system. See
Anti-Theft Alarm System
on
page 1‑12.
V(Remote Liftgate Release):
First press
K, then press and hold
Vto unlock the liftgate. For
vehicles with the power liftgate,
press and hold
Vuntil the liftgate
begins to move to open the liftgate.
7(Vehicle Locator/Panic
Alarm): Press and release one
time to locate the vehicle. The
exterior lamps flash and the horn
chirps. Press and hold
7for at least
two seconds to sound the panic
alarm. The horn sounds and the
turn signals flash until
7is pressed
again or the key is placed in the
ignition and turned to ON/RUN.
/(Remote Vehicle Start): For
vehicles with this feature, first press
Qthen press and hold/to start
the engine from outside the vehicle
using the RKE transmitter. See
Remote Vehicle Start
on page 1‑5for additional information.
Programming Transmitters to
the Vehicle
Only RKE transmitters programmed
to this vehicle will work. If a
transmitter is lost or stolen, a
replacement can be purchased and
programmed through your dealer.
When the replacement transmitter is
programmed to this vehicle, all
remaining transmitters must also be
reprogrammed. Any lost or stolen
transmitters will no longer work
once the new transmitter is
programmed.
Battery Replacement
Replace the battery if the “Replace
Battery in Remote Key” message
displays in the DIC. See “Replace
Battery in Remote Key” underKey
and Lock Messages on page 4‑31.
The battery is not rechargeable.
See your dealer to replace the
battery.
Page 164 of 394
6-34 Infotainment System
Before Driving
The RSE is for rear seat
passengers only. The driver cannot
safely view the video screen while
driving.
In severe or extreme weather
conditions, the RSE system may not
work until the temperature is within
the operating range. The operating
range is above−20°C (−4°F)
and below 60°C (140°F). If the
temperature is outside of this range,
heat or cool the vehicle until it is
within the operating range.
Global Off
Depending on the infotainment
system, the RSE system may
have a Global Off feature. The
Global Off feature disables all RSE
system features. Press and hold
the radio power button for more
than three seconds for Global Off
to disable the RSE features. On some infotainment systems, the
Global Off feature can be turned off
by performing one of the following:
.Press and hold the radio power
button for more than
three seconds.
.Insert or eject any disc.
.Insert a DVD video disc.
.Press the Remote Control power
button.
.Press the MEM/DVD/AUX button
or the
kbutton when a DVD
video disc is in the player.
.Press the SRC button on the
steering wheel when a DVD
video disc is in the player.
.Cycle the ignition.
Headphones
RSE includes two 2-channel
wireless headphones. Channel 1 is
dedicated to the DVD player, and
Channel 2 is dedicated to any
external auxiliary device connected
to the A/V jacks. The headphones
are used to listen to various
multi‐media. The wireless
headphones have an On/Off button,
channel 1/2 switch, and a volume
control. Turn the headphones off
when not in use.
Push the On/Off button to turn on
the headphones. A light on the
headphones comes on. If the light
does not come on, check the
batteries. Intermittent sound or static
can also indicate weak batteries.
See “Battery Replacement” later in
this section for more information.
Page 165 of 394
Infotainment System 6-35
Infrared transmitters are on the top
of the left seatback video screen.
The headphones shut off
automatically to save the battery
power if the RSE system is shut
off or if the headphones are out of
range of the transmitters for more
than three minutes. Moving too far
forward or stepping out of the
vehicle, can cause the headphones
to lose the signal or have static.
The headphones may automatically
turn off after four hours of
continuous use.
To adjust the volume on the
headphones, use the volume
control.
For best audio performance, the
headphones must be worn correctly,
with the headband over the top of
the head. L (Left) and R (Right)
are above the ear pads and are
indicators as to how the
headphones should be placed
on the head.Notice:
Do not store the
headphones in heat or direct
sunlight. This could damage the
headphones and repairs will not
be covered by the warranty.
Storage in extreme cold can
weaken the batteries. Keep the
headphones stored in a cool, dry
place.
If the foam ear pads become worn
or damaged, they can be replaced
separately from the headphones.
See your dealer for more
information.
Battery Replacement
To change the batteries:
1. Loosen the screw to the battery door located on the left side of
the headphones.
2. Slide the battery door open.
3. Replace the two AAA batteries.
4. Replace the battery door and tighten the screw. Remove the batteries if the
headphones are not going to be
used for a long period of time.
Audio/Video (A/V) Jacks
If available, the A/V jacks are
located on the rear of the floor
console. They allow audio or video
cables to be connected from an
auxiliary device such as a
camcorder or a video game system.
The A/V jacks are color coded:
.Yellow for video input.
.White for left audio input.
.Red for right audio input.
Power for auxiliary devices is not
supplied by the radio system.
To use the auxiliary inputs of the
RSE system:
1. Connect the auxiliary device cables to the A/V jacks.
2. Power on both the auxiliary device and the RSE video
screen.
Page 167 of 394
Infotainment System 6-37
Video Screens
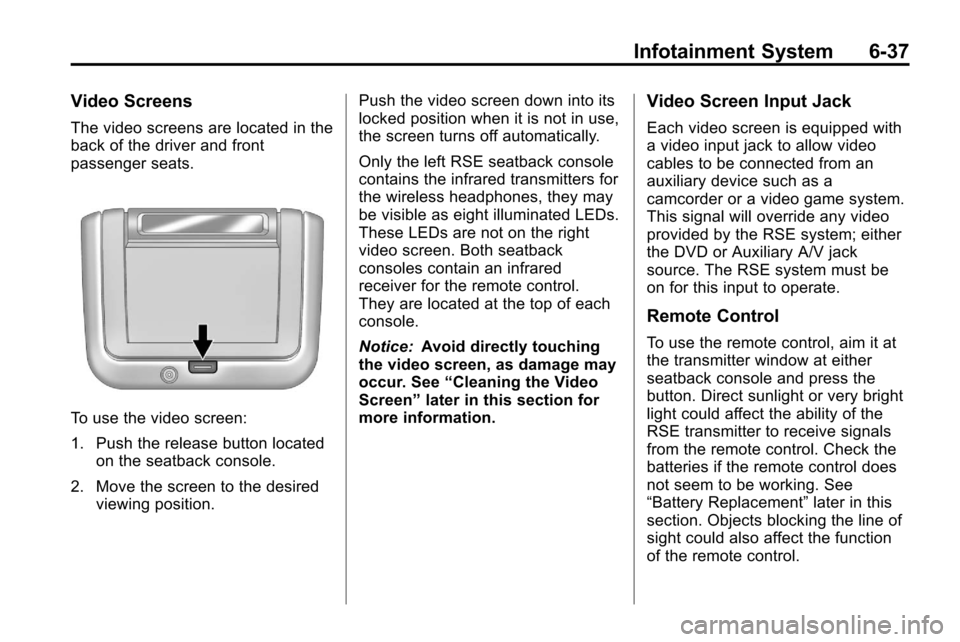
The video screens are located in the
back of the driver and front
passenger seats.
To use the video screen:
1. Push the release button locatedon the seatback console.
2. Move the screen to the desired viewing position. Push the video screen down into its
locked position when it is not in use,
the screen turns off automatically.
Only the left RSE seatback console
contains the infrared transmitters for
the wireless headphones, they may
be visible as eight illuminated LEDs.
These LEDs are not on the right
video screen. Both seatback
consoles contain an infrared
receiver for the remote control.
They are located at the top of each
console.
Notice:
Avoid directly touching
the video screen, as damage may
occur. See “Cleaning the Video
Screen” later in this section for
more information.
Video Screen Input Jack
Each video screen is equipped with
a video input jack to allow video
cables to be connected from an
auxiliary device such as a
camcorder or a video game system.
This signal will override any video
provided by the RSE system; either
the DVD or Auxiliary A/V jack
source. The RSE system must be
on for this input to operate.
Remote Control
To use the remote control, aim it at
the transmitter window at either
seatback console and press the
button. Direct sunlight or very bright
light could affect the ability of the
RSE transmitter to receive signals
from the remote control. Check the
batteries if the remote control does
not seem to be working. See
“Battery Replacement” later in this
section. Objects blocking the line of
sight could also affect the function
of the remote control.
Page 170 of 394
6-40 Infotainment System
Battery Replacement
To change the remote control
batteries:
1. Slide back the rear cover on theremote control.
2. Replace the two batteries in the compartment.
3. Replace the battery cover.
Remove the batteries from the
remote control if unused for an
extended period of time.Tips and Troubleshooting Chart
Problem Recommended Action
No power. The ignition might not be turned to
ON/RUN or in ACC/ACCESSORY.
The picture does not fill the screen.
There are black borders on the top
and bottom or on both sides or it
looks stretched out. Check the display mode settings in
the setup menu by pressing the
display menu button on the remote
control.
In auxiliary mode, the picture moves
or scrolls. Check the auxiliary input
connections at both devices.
The remote control does not work. Check to make sure there is no obstruction between the remote
control and the transmitter window.
Check the batteries to make sure
they are not dead or installed
incorrectly.
After stopping the player, I push
Play but sometimes the DVD starts
where I left off and sometimes at the
beginning. If the stop button was pressed one
time, the DVD player resumes
playing where the DVD was
stopped. If the stop button was
pressed two times the DVD player
begins to play from the beginning of
the DVD.
Page 269 of 394
Vehicle Care 9-1
Vehicle Care
General Information
General Information . . . . . . . . . . . 9-3
California Proposition65 Warning . . . . . . . . . . . . . . . . . . 9-3
California Perchlorate Materials Requirements . . . . . . . . . . . . . . . 9-3
Accessories and Modifications . . . . . . . . . . . . . . . . 9-4
Vehicle Checks
Doing Your OwnService Work . . . . . . . . . . . . . . . . 9-4
Hood . . . . . . . . . . . . . . . . . . . . . . . . . . 9-5
Engine Compartment Overview . . . . . . . . . . . . . . . . . . . . 9-6
Engine Cover . . . . . . . . . . . . . . . . . 9-9
Engine Oil . . . . . . . . . . . . . . . . . . . 9-10
Engine Oil Life System . . . . . . . 9-11
Automatic Transmission Fluid . . . . . . . . . . . . . . . . . . . . . . . 9-12 Engine Air Cleaner/Filter . . . . . 9-13
Cooling System . . . . . . . . . . . . . . 9-14
Engine Coolant . . . . . . . . . . . . . . 9-15
Engine Overheating . . . . . . . . . 9-18
Power Steering Fluid (2.4L
L4 Engine) . . . . . . . . . . . . . . . . . 9-20
Power Steering Fluid (3.0L V6 Engine) . . . . . . . . . . . . . . . . . 9-20
Washer Fluid . . . . . . . . . . . . . . . . 9-21
Brakes . . . . . . . . . . . . . . . . . . . . . . . 9-21
Brake Fluid . . . . . . . . . . . . . . . . . . 9-22
Battery . . . . . . . . . . . . . . . . . . . . . . . 9-24
All-Wheel Drive . . . . . . . . . . . . . . 9-24
Starter Switch Check . . . . . . . . 9-25
Automatic Transmission Shift Lock Control System
Check . . . . . . . . . . . . . . . . . . . . . . 9-25
Ignition Transmission Lock Check . . . . . . . . . . . . . . . . . . . . . . 9-25
Park Brake and P (Park) Mechanism Check . . . . . . . . . 9-26
Wiper Blade Replacement . . . 9-26
Headlamp Aiming
Headlamp Aiming . . . . . . . . . . . . 9-27
Bulb Replacement
Bulb Replacement . . . . . . . . . . . 9-30
Headlamps, Front Turn Signal, Sidemarker, and Parking
Lamps . . . . . . . . . . . . . . . . . . . . . . 9-30
Fog Lamps . . . . . . . . . . . . . . . . . . 9-31
Taillamps, Turn Signal, Sidemarker, Stoplamps,
and Back-Up Lamps . . . . . . . 9-32
License Plate Lamp . . . . . . . . . . 9-33
Replacement Bulbs . . . . . . . . . . 9-34
Electrical System
Fuses . . . . . . . . . . . . . . . . . . . . . . . . 9-34
Engine Compartment Fuse Block . . . . . . . . . . . . . . . . . . . . . . . 9-34
Instrument Panel Fuse Block . . . . . . . . . . . . . . . . . . . . . . . 9-37
Page 292 of 394
9-24 Vehicle Care
Battery
Refer to the replacement number on
the original battery label when a
new battery is needed.
{DANGER
Battery posts, terminals, and
related accessories contain lead
and lead compounds, chemicals
known to the State of California to
cause cancer and reproductive
harm. Wash hands after handling.
Vehicle Storage
{WARNING
Batteries have acid that can burn
you and gas that can explode.
You can be badly hurt if you are
not careful. SeeJump Starting
on
page 9‑69
for tips on working
around a battery without
getting hurt. Infrequent Usage: Remove the
black, negative (−) cable from the
battery to keep the battery from
running down.
Extended Storage: Remove the
black, negative (−) cable from the
battery or use a battery trickle
charger.
All-Wheel Drive
Transfer Case
When to Check and Change
Lubricant
Refer to the Maintenance Schedule
to determine how often to check the
lubricant and when to change it.
See
Scheduled Maintenance
on
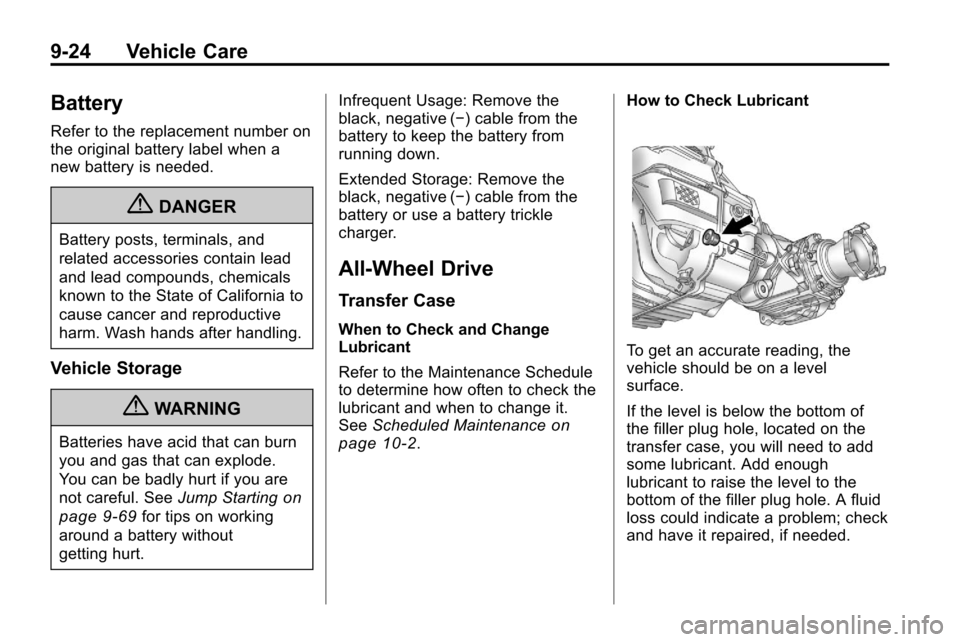
page 10‑2. How to Check Lubricant
To get an accurate reading, the
vehicle should be on a level
surface.
If the level is below the bottom of
the filler plug hole, located on the
transfer case, you will need to add
some lubricant. Add enough
lubricant to raise the level to the
bottom of the filler plug hole. A fluid
loss could indicate a problem; check
and have it repaired, if needed.