Page 324 of 472
Filling a Portable Fuel Container
{WARNING:
Never fill a portable fuel container while it is in
the vehicle. Static electricity discharge from the
container can ignite the fuel vapor. You can be
badly burned and the vehicle damaged if this
occurs. To help avoid injury to you and others:
.Dispense fuel only into approved containers.
.Do not fill a container while it is inside a
vehicle, in a vehicle's trunk, pickup bed,
or on any surface other than the ground.
.Bring the fill nozzle in contact with the inside
of the fill opening before operating the nozzle.
Contact should be maintained until the filling is
complete.
.Do not smoke while pumping fuel.
.Do not use a cellular phone while
pumping fuel.
Checking Things Under
the Hood
{WARNING:
An electric fan under the hood can start up and
injure you even when the engine is not running.
Keep hands, clothing, and tools away from any
underhood electric fan.
{WARNING:
Things that burn can get on hot engine parts and
start a fire. These include liquids like fuel, oil,
coolant, brake fluid, windshield washer and other
fluids, and plastic or rubber. You or others could
be burned. Be careful not to drop or spill things
that will burn onto a hot engine.
6-12
Page 327 of 472
A. Clutch Master Cylinder Reservoir (If Equipped). See Hydraulic Clutch on page 6‑31.
B. Windshield Washer Fluid Reservoir. See “Adding
Washer Fluid” underWindshield Washer Fluid
on
page 6‑42.
C. Brake Fluid Reservoir. See “Brake Fluid”under
Brakes on page 6‑43.
D. Coolant Surge Tank and Pressure Cap. See Engine Coolant on page 6‑34.
E. Engine Air Cleaner/Filter on page 6‑27.
F. Power Steering Fluid Reservoir. See Power
Steering Fluid on page 6‑41. G. Engine Oil Fill Cap. See
“When to Add Engine Oil”
under Engine Oil on page 6‑19.
H. Engine Oil Dipstick. See “Checking Engine Oil”
under Engine Oil on page 6‑19.
I. Engine Compartment Fuse Block on page 6‑104.
J. Passenger Compartment Air Filter (Out of View). See Passenger Compartment Air Filter
on
page 4‑28.
K. Battery on page 6‑49.
6-15
Page 329 of 472
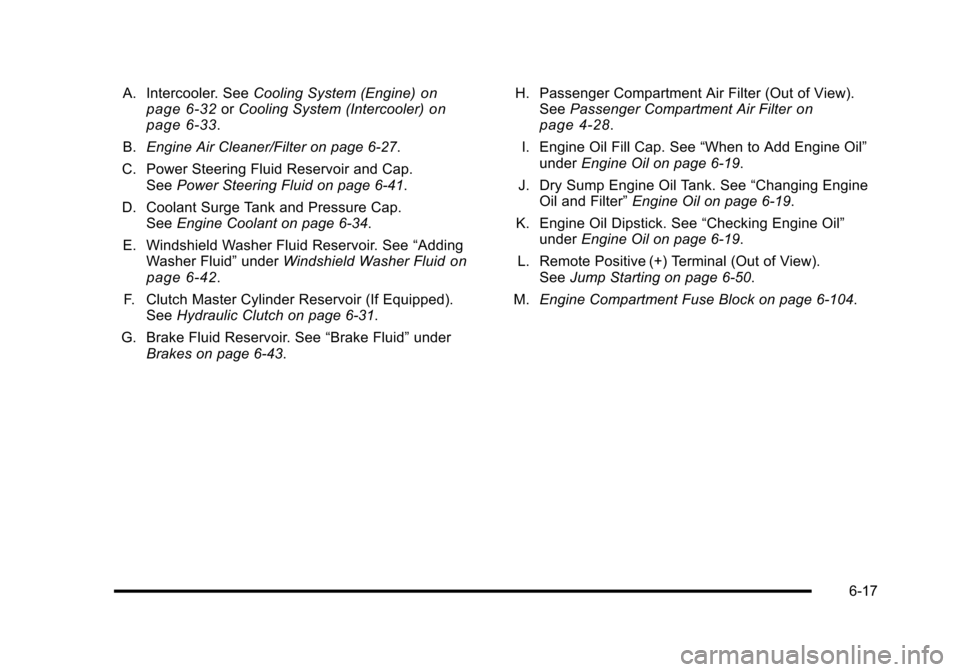
A. Intercooler. SeeCooling System (Engine)on
page 6‑32or Cooling System (Intercooler)on
page 6‑33.
B. Engine Air Cleaner/Filter on page 6‑27.
C. Power Steering Fluid Reservoir and Cap. See Power Steering Fluid on page 6‑41.
D. Coolant Surge Tank and Pressure Cap. See Engine Coolant on page 6‑34.
E. Windshield Washer Fluid Reservoir. See “Adding
Washer Fluid” underWindshield Washer Fluid
on
page 6‑42.
F. Clutch Master Cylinder Reservoir (If Equipped). See Hydraulic Clutch on page 6‑31.
G. Brake Fluid Reservoir. See “Brake Fluid”under
Brakes on page 6‑43. H. Passenger Compartment Air Filter (Out of View).
See Passenger Compartment Air Filter
on
page 4‑28.
I. Engine Oil Fill Cap. See “When to Add Engine Oil”
under Engine Oil on page 6‑19.
J. Dry Sump Engine Oil Tank. See “Changing Engine
Oil and Filter” Engine Oil on page 6‑19.
K. Engine Oil Dipstick. See “Checking Engine Oil”
under Engine Oil on page 6‑19.
L. Remote Positive (+) Terminal (Out of View). See Jump Starting on page 6‑50.
M. Engine Compartment Fuse Block on page 6‑104.
6-17
Page 331 of 472
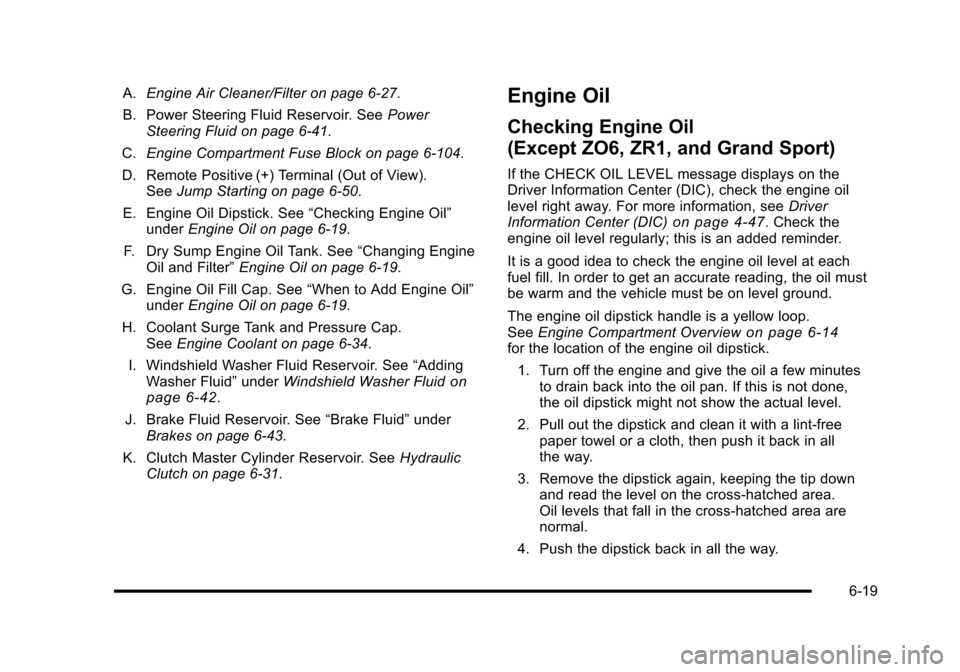
A.Engine Air Cleaner/Filter on page 6‑27.
B. Power Steering Fluid Reservoir. See Power
Steering Fluid on page 6‑41.
C. Engine Compartment Fuse Block on page 6‑104.
D. Remote Positive (+) Terminal (Out of View). See Jump Starting on page 6‑50.
E. Engine Oil Dipstick. See “Checking Engine Oil”
under Engine Oil on page 6‑19.
F. Dry Sump Engine Oil Tank. See “Changing Engine
Oil and Filter” Engine Oil on page 6‑19.
G. Engine Oil Fill Cap. See “When to Add Engine Oil”
under Engine Oil on page 6‑19.
H. Coolant Surge Tank and Pressure Cap. See Engine Coolant on page 6‑34.
I. Windshield Washer Fluid Reservoir. See “Adding
Washer Fluid” underWindshield Washer Fluid
on
page 6‑42.
J. Brake Fluid Reservoir. See “Brake Fluid”under
Brakes on page 6‑43.
K. Clutch Master Cylinder Reservoir. See Hydraulic
Clutch on page 6‑31.
Engine Oil
Checking Engine Oil
(Except ZO6, ZR1, and Grand Sport)
If the CHECK OIL LEVEL message displays on the
Driver Information Center (DIC), check the engine oil
level right away. For more information, see Driver
Information Center (DIC)
on page 4‑47. Check the
engine oil level regularly; this is an added reminder.
It is a good idea to check the engine oil level at each
fuel fill. In order to get an accurate reading, the oil must
be warm and the vehicle must be on level ground.
The engine oil dipstick handle is a yellow loop.
See Engine Compartment Overview
on page 6‑14for the location of the engine oil dipstick.
1. Turn off the engine and give the oil a few minutes to drain back into the oil pan. If this is not done,
the oil dipstick might not show the actual level.
2. Pull out the dipstick and clean it with a lint‐free paper towel or a cloth, then push it back in all
the way.
3. Remove the dipstick again, keeping the tip down and read the level on the cross‐hatched area.
Oil levels that fall in the cross‐hatched area are
normal.
4. Push the dipstick back in all the way.
6-19
Page 355 of 472
Adding Washer Fluid
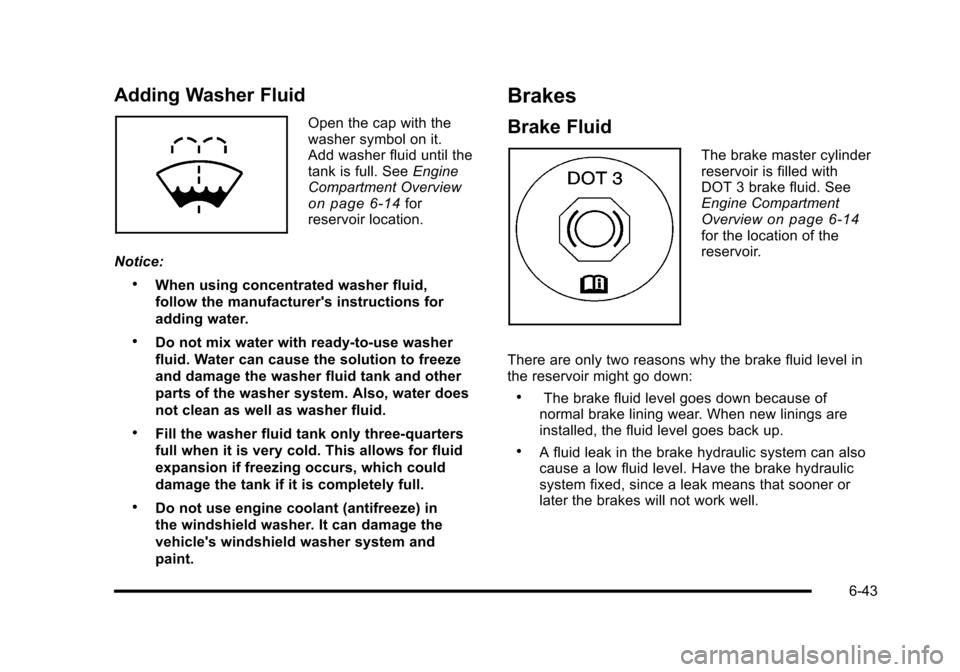
Open the cap with the
washer symbol on it.
Add washer fluid until the
tank is full. See Engine
Compartment Overview
on page 6‑14for
reservoir location.
Notice:
.When using concentrated washer fluid,
follow the manufacturer's instructions for
adding water.
.Do not mix water with ready-to-use washer
fluid. Water can cause the solution to freeze
and damage the washer fluid tank and other
parts of the washer system. Also, water does
not clean as well as washer fluid.
.Fill the washer fluid tank only three-quarters
full when it is very cold. This allows for fluid
expansion if freezing occurs, which could
damage the tank if it is completely full.
.Do not use engine coolant (antifreeze) in
the windshield washer. It can damage the
vehicle's windshield washer system and
paint.
Brakes
Brake Fluid
The brake master cylinder
reservoir is filled with
DOT 3 brake fluid. See
Engine Compartment
Overview
on page 6‑14for the location of the
reservoir.
There are only two reasons why the brake fluid level in
the reservoir might go down:
.The brake fluid level goes down because of
normal brake lining wear. When new linings are
installed, the fluid level goes back up.
.A fluid leak in the brake hydraulic system can also
cause a low fluid level. Have the brake hydraulic
system fixed, since a leak means that sooner or
later the brakes will not work well.
6-43
Page 356 of 472
Do not top off the brake fluid. Adding fluid does not
correct a leak. If fluid is added when the linings are
worn, there will be too much fluid when new brake
linings are installed. Add or remove brake fluid, as
necessary, only when work is done on the brake
hydraulic system.
{WARNING:
If too much brake fluid is added, it can spill on
the engine and burn, if the engine is hot enough.
You or others could be burned, and the vehicle
could be damaged. Add brake fluid only when
work is done on the brake hydraulic system.
See “Checking Brake Fluid” in this section.
Refer to the Maintenance Schedule to determine when
to check the brake fluid. See Scheduled Maintenance
on page 7‑3.
Checking Brake Fluid
Check brake fluid by looking at the brake fluid reservoir.
See Engine Compartment Overview on page 6‑14.
The fluid level should be above the MIN mark on the
reservoir. If it is not, have the brake hydraulic system
checked to see if there is a leak.
After work is done on the brake hydraulic system, make
sure the level is between the MIN and MAX marks.
What to Add
Use only new DOT 3 brake fluid from a sealed
container. See Recommended Fluids and Lubricantson
page 7‑10.
Always clean the brake fluid reservoir cap and the area
around the cap before removing it. This helps keep dirt
from entering the reservoir.
{WARNING:
With the wrong kind of fluid in the brake hydraulic
system, the brakes might not work well. This could
cause a crash. Always use the proper brake fluid.
6-44
Page 357 of 472
Notice:
.Using the wrong fluid can badly damage
brake hydraulic system parts. For example,
just a few drops of mineral-based oil, such
as engine oil, in the brake hydraulic system
can damage brake hydraulic system parts
so badly that they will have to be replaced.
Do not let someone put in the wrong kind
of fluid.
.If brake fluid is spilled on the vehicle's
painted surfaces, the paint finish can be
damaged. Be careful not to spill brake
fluid on the vehicle. If you do, wash it off
immediately. See Washing Your Vehicle
on
page 6‑94
.
Brake Wear (Except ZR1)
This vehicle has disc brakes. Disc brake pads have
built-in wear indicators that make a high-pitched
warning sound when the brake pads are worn and new
pads are needed. The sound can come and go or be
heard all the time the vehicle is moving, except when
applying the brake pedal firmly.
{WARNING:
The brake wear warning sound means that soon
the brakes will not work well. That could lead to
an accident. When the brake wear warning sound
is heard, have the vehicle serviced.
Notice: Continuing to drive with worn-out brake
pads could result in costly brake repair.
Some driving conditions or climates can cause a brake
squeal when the brakes are first applied or lightly
applied. This does not mean something is wrong
with the brakes.
Brake linings should always be replaced as complete
axle sets.
6-45
Page 358 of 472
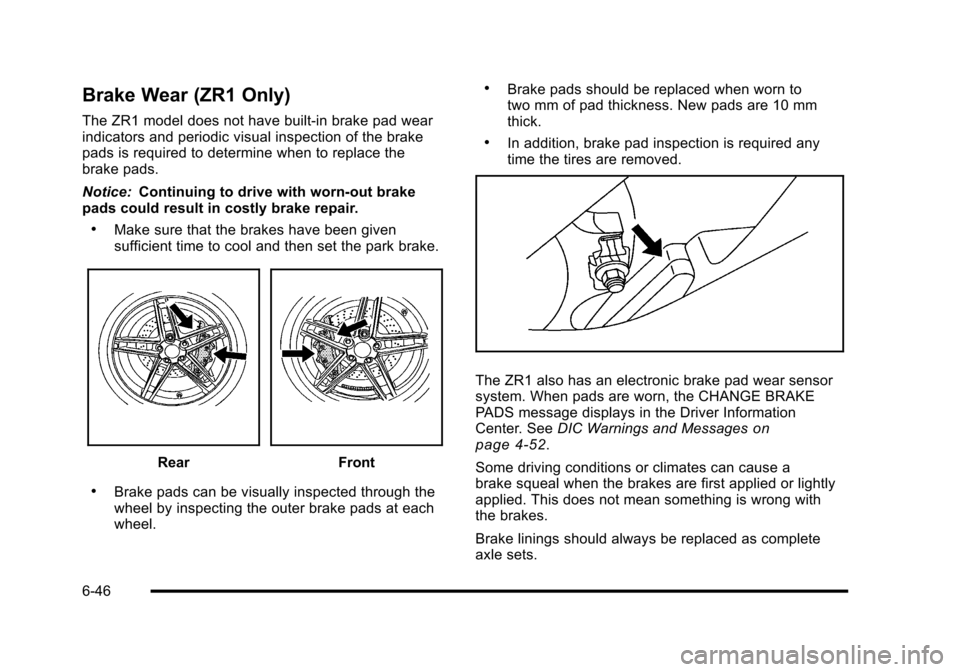
Brake Wear (ZR1 Only)
The ZR1 model does not have built-in brake pad wear
indicators and periodic visual inspection of the brake
pads is required to determine when to replace the
brake pads.
Notice: Continuing to drive with worn-out brake
pads could result in costly brake repair.
.Make sure that the brakes have been given
sufficient time to cool and then set the park brake.
RearFront
.Brake pads can be visually inspected through the
wheel by inspecting the outer brake pads at each
wheel.
.Brake pads should be replaced when worn to
two mm of pad thickness. New pads are 10 mm
thick.
.In addition, brake pad inspection is required any
time the tires are removed.
The ZR1 also has an electronic brake pad wear sensor
system. When pads are worn, the CHANGE BRAKE
PADS message displays in the Driver Information
Center. See DIC Warnings and Messages
on
page 4‑52.
Some driving conditions or climates can cause a
brake squeal when the brakes are first applied or lightly
applied. This does not mean something is wrong with
the brakes.
Brake linings should always be replaced as complete
axle sets.
6-46