2010 CHEVROLET CORVETTE brake
[x] Cancel search: brakePage 359 of 472
Brake Rotor Wear
ZR1 models have ceramic brake rotors. Rotors should
be visually inspected whenever the brake pads are
replaced. Rotors also need to be weighed before brake
pads are replaced to confirm that the rotor mass is
greater than the wear‐out mass printed on the rotor.
The rotor can be reused if the weight of the rotor is
above the mass limit. Rotor inspection and weighing
methods can be found in the service manual. See
Service Publications Ordering Information
on
page 8‑16.
Brake Rotor Protector
{WARNING:
Ceramic rotors will be very hot after operation and
touching them may cause burns. Be sure brake
system is completely cool prior to installation of
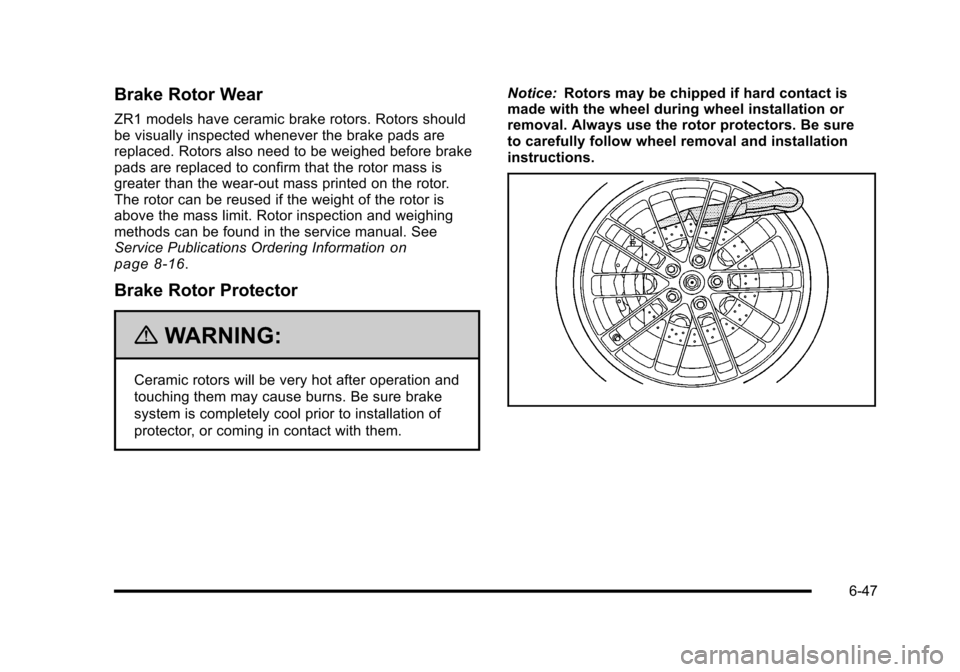
protector, or coming in contact with them. Notice:
Rotors may be chipped if hard contact is
made with the wheel during wheel installation or
removal. Always use the rotor protectors. Be sure
to carefully follow wheel removal and installation
instructions.
6-47
Page 360 of 472
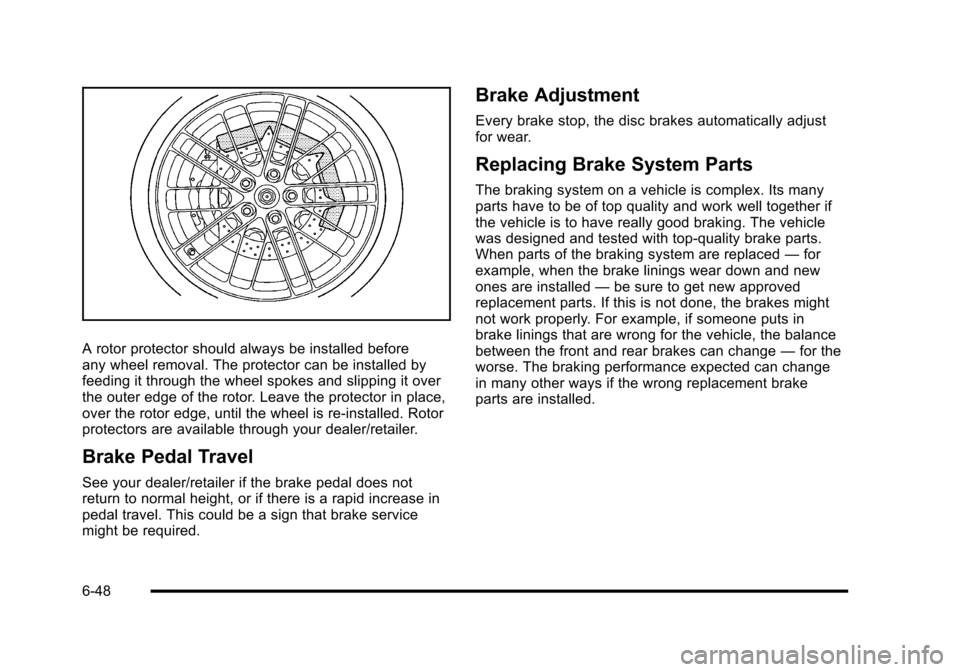
A rotor protector should always be installed before
any wheel removal. The protector can be installed by
feeding it through the wheel spokes and slipping it over
the outer edge of the rotor. Leave the protector in place,
over the rotor edge, until the wheel is re‐installed. Rotor
protectors are available through your dealer/retailer.
Brake Pedal Travel
See your dealer/retailer if the brake pedal does not
return to normal height, or if there is a rapid increase in
pedal travel. This could be a sign that brake service
might be required.
Brake Adjustment
Every brake stop, the disc brakes automatically adjust
for wear.
Replacing Brake System Parts
The braking system on a vehicle is complex. Its many
parts have to be of top quality and work well together if
the vehicle is to have really good braking. The vehicle
was designed and tested with top-quality brake parts.
When parts of the braking system are replaced —for
example, when the brake linings wear down and new
ones are installed —be sure to get new approved
replacement parts. If this is not done, the brakes might
not work properly. For example, if someone puts in
brake linings that are wrong for the vehicle, the balance
between the front and rear brakes can change —for the
worse. The braking performance expected can change
in many other ways if the wrong replacement brake
parts are installed.
6-48
Page 362 of 472
Jump Starting
If your battery has run down, you may want to use
another vehicle and some jumper cables to start your
vehicle. Be sure to use the following steps to do it
safely.
{WARNING:
Batteries can hurt you. They can be dangerous
because:
.They contain acid that can burn you.
.They contain gas that can explode or ignite.
.They contain enough electricity to burn you.
If you do not follow these steps exactly, some or
all of these things can hurt you.
Notice: If you try to start your vehicle by pushing or
pulling it, you could damage your vehicle. Do not
push or pull your vehicle to start it; instead, use the
jump starting procedure in this manual to start your
vehicle when the battery has run down.
1. Check the other vehicle. It must have a 12-volt battery with a negative ground system. Notice:
If the other vehicle's system is not a 12-volt
system with a negative ground, both vehicles can
be damaged. Only use vehicles with 12-volt systems
with negative grounds to jump start your vehicle.
2. Get the vehicles close enough so the jumper cables can reach, but be sure the vehicles are not
touching each other. If they are, it could cause a
ground connection you do not want. You would
not be able to start your vehicle, and the bad
grounding could damage the electrical systems.
To avoid the possibility of the vehicles rolling, set
the parking brake firmly on both vehicles involved
in the jump start procedure. Put an automatic
transmission in P (Park) or a manual transmission
in Neutral before setting the parking brakes.
Notice: If you leave the radio or other accessories
on during the jump starting procedure, they could
be damaged. The repairs would not be covered by
the warranty. Always turn off the radio and other
accessories when jump starting the vehicle.
3. Turn off the ignition on both vehicles. Unplug unnecessary accessories plugged into the
cigarette lighter or the accessory power outlet.
Turn off the radio and all lamps that are not
needed. This will avoid sparks and help save
both batteries. And it could save the radio!
6-50
Page 378 of 472

Tire Terminology and Definitions
Air Pressure:The amount of air inside the tire
pressing outward on each square inch of the tire.
Air pressure is expressed in pounds per square
inch (psi) or kilopascal (kPa).
Accessory Weight
:This means the combined
weight of optional accessories. Some examples of
optional accessories are, automatic transmission,
power steering, power brakes, power windows,
power seats, and air conditioning.
Aspect Ratio
:The relationship of a tire's height
to its width.
Belt
:A rubber coated layer of cords that is
located between the plies and the tread. Cords
may be made from steel or other reinforcing
materials.
Bead
:The tire bead contains steel wires wrapped
by steel cords that hold the tire onto the rim.
Bias Ply Tire
:A pneumatic tire in which the plies
are laid at alternate angles less than 90 degrees
to the centerline of the tread. Cold Tire Pressure
:The amount of air pressure
in a tire, measured in pounds per square inch (psi)
or kilopascals (kPa) before a tire has built up heat
from driving. See Inflation - Tire Pressure
on
page 6‑70
.
Curb Weight
:The weight of a motor vehicle with
standard and optional equipment including the
maximum capacity of fuel, oil, and coolant, but
without passengers and cargo.
DOT Markings
:A code molded into the sidewall
of a tire signifying that the tire is in compliance
with the U.S. Department of Transportation (DOT)
motor vehicle safety standards. The DOT code
includes the Tire Identification Number (TIN), an
alphanumeric designator which can also identify
the tire manufacturer, production plant, brand, and
date of production.
GVWR
:Gross Vehicle Weight Rating.
See Loading the Vehicle
on page 5‑28.
GAWR FRT
:Gross Axle Weight Rating for the
front axle. See Loading the Vehicle
on page 5‑28.
GAWR RR
:Gross Axle Weight Rating for the rear
axle. See Loading the Vehicle
on page 5‑28.
6-66
Page 389 of 472
You need a new tire if any of the following statements
are true:
.You can see the indicators at three or more places
around the tire.
.You can see cord or fabric showing through the
tire's rubber.
.The tread or sidewall is cracked, cut or snagged
deep enough to show cord or fabric.
.The tire has a bump, bulge or split.
.The tire has a puncture, cut or other damage that
cannot be repaired well because of the size or
location of the damage.
The rubber in tires degrades over time, even if they
are not being used. This is also true for the spare tire,
if your vehicle has one. Multiple conditions affect how
fast this aging takes place, including temperatures,
loading conditions, and inflation pressure maintenance.
With proper care and maintenance tires will typically
wear out before they degrade due to age. If you are
unsure about the need to replace your tires as they get
older, consult the tire manufacturer for more information.
Buying New Tires
GM has developed and matched specific tires for your
vehicle. The original equipment tires installed on your
vehicle, when it was new, were designed to meet
General Motors Tire Performance Criteria Specification
(TPC Spec) system rating. If you need replacement
tires, GM strongly recommends that you get tires with
the same TPC Spec rating. This way, your vehicle will
continue to have tires that are designed to give the
same performance and vehicle safety, during normal
use, as the original tires.
GM's exclusive TPC Spec system considers over a
dozen critical specifications that impact the overall
performance of your vehicle, including brake system
performance, ride and handling, traction control, and
tire pressure monitoring performance. GM's TPC Spec
number is molded onto the tire's sidewall near the tire
size. If the tires have an all‐season tread design, the
TPC Spec number will be followed by an MS for mud
and snow. See Tire Sidewall Labeling
on page 6‑64,
for additional information.
6-77
Page 391 of 472
Different Size Tires and Wheels
If you add wheels or tires that are a different size than
your original equipment wheels and tires, this may
affect the way your vehicle performs, including its
braking, ride and handling characteristics, stability,
and resistance to rollover . Additionally, if your vehicle
has electronic systems such as, antilock brakes,
traction control, and electronic stability control, the
performance of these systems can be affected.
{WARNING:
If you add different sized wheels, your vehicle
may not provide an acceptable level of
performance and safety if tires not recommended
for those wheels are selected. You may increase
the chance that you will crash and suffer serious
injury. Only use GM specific wheel and tire
systems developed for your vehicle, and have
them properly installed by a GM certified
technician.
See Buying New Tires
on page 6‑77andAccessories
and Modificationson page 6‑3for additional
information.
Uniform Tire Quality Grading
Quality grades can be found where applicable
on the tire sidewall between tread shoulder and
maximum section width. For example:
Treadwear 200 Traction AA
Temperature A
The following information relates to the system
developed by the United States National
Highway Traffic Safety Administration (NHTSA),
which grades tires by treadwear, traction, and
temperature performance. This applies only to
vehicles sold in the United States. The grades
are molded on the sidewalls of most passenger
car tires. The Uniform Tire Quality Grading
(UTQG) system does not apply to deep tread,
winter-type snow tires, space-saver, or temporary
use spare tires, tires with nominal rim diameters
of 10 to 12 inches (25 to 30 cm), or to some
limited-production tires.
6-79
Page 394 of 472
If you need to replace any of your wheels, wheel bolts
or wheel nuts, replace them only with new GM original
equipment parts. This way, you will be sure to have
the right wheel, wheel bolts, and wheel nuts for your
vehicle.
{WARNING:
Using the wrong replacement wheels, wheel bolts,
or wheel nuts on your vehicle can be dangerous.
It could affect the braking and handling of your
vehicle, make your tires lose air and make you
lose control. You could have a collision in which
you or others could be injured. Always use the
correct wheel, wheel bolts, and wheel nuts for
replacement.
{WARNING:
Putting a used wheel on the vehicle is dangerous.
You cannot know how it has been used or how
far it has been driven. It could fail suddenly and
cause a crash. If you have to replace a wheel,
use a new GM original equipment wheel. Notice:
The wrong wheel can also cause problems
with bearing life, brake cooling, speedometer or
odometer calibration, headlamp aim, bumper height,
vehicle ground clearance, and tire clearance to the
body and chassis.
{WARNING:
Rust or dirt on a wheel, or on the parts to
which it is fastened, can make wheel nuts
become loose after a time. The wheel could
come off and cause a crash. When you
change a wheel, remove any rust or dirt from
places where the wheel attaches to the
vehicle. In an emergency, you can use a
cloth or a paper towel to do this; but be sure
to use a scraper or wire brush later, if you
need to, to get all the rust or dirt off.
6-82
Page 395 of 472
Tightening Wheel Lug Nuts
{WARNING:
Never use oil or grease on studs or the threads of
the wheel nuts. If you do, the wheel nuts might
come loose and the wheel could fall off, causing
a crash.
{WARNING:
Incorrect wheel nuts or improperly tightened wheel
nuts can cause the wheel to become loose and
even come off. This could lead to a crash. Be sure
to use the correct wheel nuts. If you have to
replace them, be sure to get new GM original
equipment wheel nuts. Notice:
Improperly tightened wheel nuts can lead
to brake pulsation and rotor damage. To avoid
expensive brake repairs, evenly tighten the wheel
nuts in the proper sequence and to the proper
torque specification.
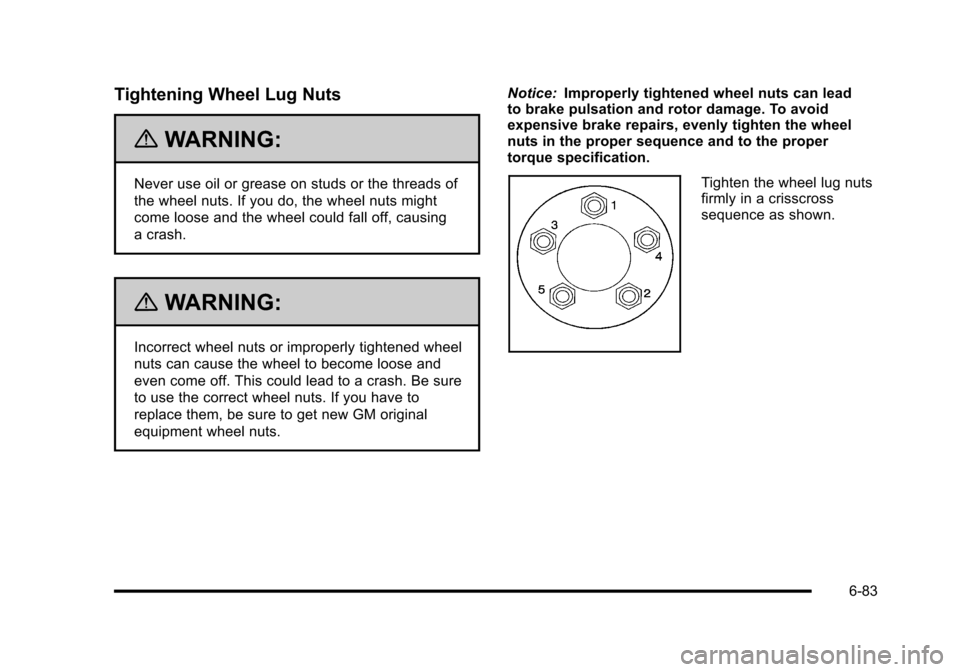
Tighten the wheel lug nuts
firmly in a crisscross
sequence as shown.
6-83