2010 CHEVROLET CORVETTE wipers
[x] Cancel search: wipersPage 9 of 472

A.Outlet Adjustment on page 4‑27.
B. Head-Up Display (HUD)
on page 4‑16(If Equipped).
C. Turn Signal/Multifunction Lever
on page 4‑4.
Cruise Controlon page 4‑7. Fog Lampson
page 4‑13. Exterior Lamps on page 4‑11.
D. Manual Shift Paddles (If Equipped). See Automatic
Transmission Operation on page 3‑26.
E. Driver Information Center (DIC) on page 4‑47.
F. Instrument Panel Cluster on page 4‑30.
G. Windshield Wipers
on page 4‑6and Windshield
Washer on page 4‑6.
H. DIC Operation and Displays on page 4‑47.
I. Hazard Warning Flashers on page 4‑3.
J. Audio System(s) on page 4‑80.
K. Dual Automatic Climate Control System
on
page 4‑22.
L. Fuel Door Release Button. See Filling the
Tank
on page 6‑9. Hatch/Trunk Release Button.
See “Hatch/Trunk Lid Release” underHatchon
page 3‑14.
M. Instrument Panel Brightness on page 4‑15.
N. Power Folding Top Switch (If Equipped). See Convertible Top (Manual)
on page 3‑59orConvertible Top (Power) on page 3‑66. O.
Bluetooth
®on page 4‑96(If Equipped).
Audio Steering Wheel Controlson page 4‑107(If Equipped).
P. Tilt Wheel on page 4‑3.
Q. Horn on page 4‑3.
R. Telescopic Wheel Button (If Equipped). See Tilt Wheel on page 4‑3.
S. Ignition Positions on page 3‑23.
T. Heated Seats
on page 2‑4(If Equipped).
U. Shift Lever (Automatic Shown). See Automatic
Transmission Operation
on page 3‑26or Manual
Transmission Operation on page 3‑32.
V. Active Handling System on page 5‑8.
W. Accessory Power Outlet(s) on page 4‑20.
X. Selective Ride Control on page 5‑14.
Y. Cupholders on page 3‑50.
Z. Ashtray(s) and Cigarette Lighter on page 4‑21.
AA. Parking Brake on page 3‑34.
AB. Glove Box on page 3‑50.
AC. Instrument Panel Fuse Block on page 6‑101.
1-3
Page 20 of 472

;:Manual operation of the parking lamps and other
exterior lamps.
5 :Manual operation of the headlamps and other
exterior lamps.
Turn and Lane-Change Signal
The turn signal lever has two upward and downward
positions to signal a lane change or a turn.
.For a lane change, raise or lower the lever.
The signal automatically flashes three times.
.For a turn, raise or lower the lever all of the way up
or down. The turn signal will stop flashing when the
turn is completed.
For more information, see:
.Exterior Lamps on page 4‑11.
.Turn and Lane-Change Signals (Auto Signal)on
page 4‑5.
Windshield Wiper/Washer
The windshield wiper lever is located on the right side of
the steering column.
1 :Fast wipes.
6 :Slow wipes.
& :Use to set a delay between wipes.
x :Use for a delayed wiping cycle. Turn the
intermittent adjust band down for a longer delay
or up for a shorter delay.
9 :Turns off the windshield wipers.
8 :Use for a for a single wiping cycle. For more wipes,
hold the band longer.
Windshield Washer : Press the button at the end of the
lever until the washers begin.
See Windshield Wipers
on page 4‑6andWindshield
Washer on page 4‑6.
1-14
Page 119 of 472

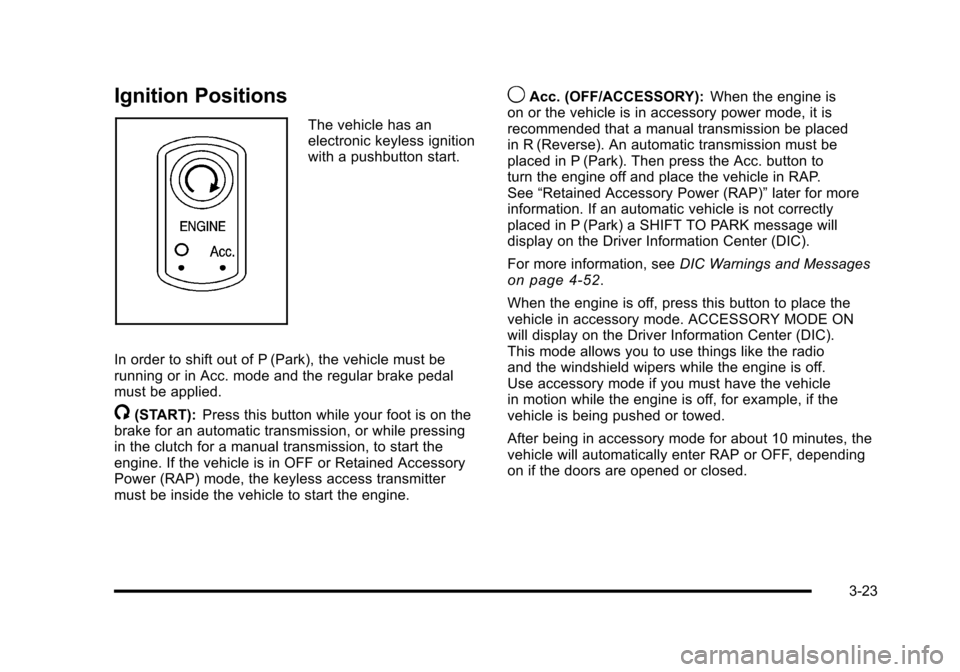
Ignition Positions
The vehicle has an
electronic keyless ignition
with a pushbutton start.
In order to shift out of P (Park), the vehicle must be
running or in Acc. mode and the regular brake pedal
must be applied.
/(START): Press this button while your foot is on the
brake for an automatic transmission, or while pressing
in the clutch for a manual transmission, to start the
engine. If the vehicle is in OFF or Retained Accessory
Power (RAP) mode, the keyless access transmitter
must be inside the vehicle to start the engine.
9Acc. (OFF/ACCESSORY): When the engine is
on or the vehicle is in accessory power mode, it is
recommended that a manual transmission be placed
in R (Reverse). An automatic transmission must be
placed in P (Park). Then press the Acc. button to
turn the engine off and place the vehicle in RAP.
See “Retained Accessory Power (RAP)” later for more
information. If an automatic vehicle is not correctly
placed in P (Park) a SHIFT TO PARK message will
display on the Driver Information Center (DIC).
For more information, see DIC Warnings and Messages
on page 4‑52.
When the engine is off, press this button to place the
vehicle in accessory mode. ACCESSORY MODE ON
will display on the Driver Information Center (DIC).
This mode allows you to use things like the radio
and the windshield wipers while the engine is off.
Use accessory mode if you must have the vehicle
in motion while the engine is off, for example, if the
vehicle is being pushed or towed.
After being in accessory mode for about 10 minutes, the
vehicle will automatically enter RAP or OFF, depending
on if the doors are opened or closed.
3-23
Page 169 of 472

Section 4 Instrument Panel
Instrument Panel Overview. . . . . . . . . . . . . . . . . . . . . . . . 4-3
Hazard Warning Flashers . . . . . . . . . . . . . . . . . . . . . . . 4-3
Horn . . . . . . . . . . . . . . . . . . . . . . . . . . . . . . . . . . . . . . . . . . . . 4-3
Tilt Wheel . . . . . . . . . . . . . . . . . . . . . . . . . . . . . . . . . . . . . . . 4-3
Turn Signal/Multifunction Lever . . . . . . . . . . . . . . . . . . 4-4
Turn and Lane-Change Signals (Auto Signal) . . . 4-5
Headlamp High/Low-Beam Changer . . . . . . . . . . . . 4-5
Flash-to-Pass . . . . . . . . . . . . . . . . . . . . . . . . . . . . . . . . . . . 4-5
Windshield Wipers . . . . . . . . . . . . . . . . . . . . . . . . . . . . . . 4-6
Windshield Washer . . . . . . . . . . . . . . . . . . . . . . . . . . . . . 4-6
Cruise Control . . . . . . . . . . . . . . . . . . . . . . . . . . . . . . . . . . 4-7
Exterior Lamps . . . . . . . . . . . . . . . . . . . . . . . . . . . . . . . . . 4-11
Wiper Activated Headlamps . . . . . . . . . . . . . . . . . . . 4-12
Headlamps on Reminder . . . . . . . . . . . . . . . . . . . . . . 4-12
Daytime Running Lamps (DRL) . . . . . . . . . . . . . . . . 4-12
Fog Lamps . . . . . . . . . . . . . . . . . . . . . . . . . . . . . . . . . . . . 4-13
Twilight Sentinel
®. . . . . . . . . . . . . . . . . . . . . . . . . . . . . . 4-14
Exterior Lighting Battery Saver . . . . . . . . . . . . . . . . . 4-15
Instrument Panel Brightness . . . . . . . . . . . . . . . . . . . 4-15
Courtesy Lamps . . . . . . . . . . . . . . . . . . . . . . . . . . . . . . . 4-15
Entry/Exit Lighting . . . . . . . . . . . . . . . . . . . . . . . . . . . . . 4-15
Reading Lamps . . . . . . . . . . . . . . . . . . . . . . . . . . . . . . . . 4-15
Battery Run-Down Protection . . . . . . . . . . . . . . . . . . 4-16
Head-Up Display (HUD) . . . . . . . . . . . . . . . . . . . . . . . 4-16
Accessory Power Outlet(s) . . . . . . . . . . . . . . . . . . . . . 4-20
Ashtray(s) and Cigarette Lighter . . . . . . . . . . . . . . . 4-21 Climate Controls
. . . . . . . . . . . . . . . . . . . . . . . . . . . . . . . . . . 4-22
Dual Automatic Climate Control System . . . . . . . 4-22
Outlet Adjustment . . . . . . . . . . . . . . . . . . . . . . . . . . . . . . 4-27
Passenger Compartment Air Filter . . . . . . . . . . . . . 4-28
Warning Lights, Gauges, and Indicators . . . . . . . . 4-29
Instrument Panel Cluster . . . . . . . . . . . . . . . . . . . . . . . 4-30
Speedometer and Odometer . . . . . . . . . . . . . . . . . . . 4-32
Tachometer . . . . . . . . . . . . . . . . . . . . . . . . . . . . . . . . . . . . 4-32
Safety Belt Reminders . . . . . . . . . . . . . . . . . . . . . . . . . 4-32
Airbag Readiness Light . . . . . . . . . . . . . . . . . . . . . . . . 4-33
Passenger Airbag Status Indicator . . . . . . . . . . . . . 4-34
Voltmeter Gauge . . . . . . . . . . . . . . . . . . . . . . . . . . . . . . . 4-35
One-to-Four Shift Light (Manual Transmission) . . . . . . . . . . . . . . . . . . . . . . . . . . . . . . . 4-36
Brake System Warning Light . . . . . . . . . . . . . . . . . . . 4-36
Antilock Brake System (ABS) Warning Light . . . . . . . . . . . . . . . . . . . . . . . . . . . . . . . 4-37
Traction Control System (TCS) Warning Light . . . . . . . . . . . . . . . . . . . . . . . . . . . . . . . . 4-38
Active Handling System Light . . . . . . . . . . . . . . . . . . 4-39
Engine Coolant Temperature Gauge . . . . . . . . . . . 4-40
Tire Pressure Light . . . . . . . . . . . . . . . . . . . . . . . . . . . . 4-40
Malfunction Indicator Lamp . . . . . . . . . . . . . . . . . . . . 4-41
Engine Oil Pressure Gauge . . . . . . . . . . . . . . . . . . . . 4-44
Security Light . . . . . . . . . . . . . . . . . . . . . . . . . . . . . . . . . . 4-45
4-1
Page 174 of 472

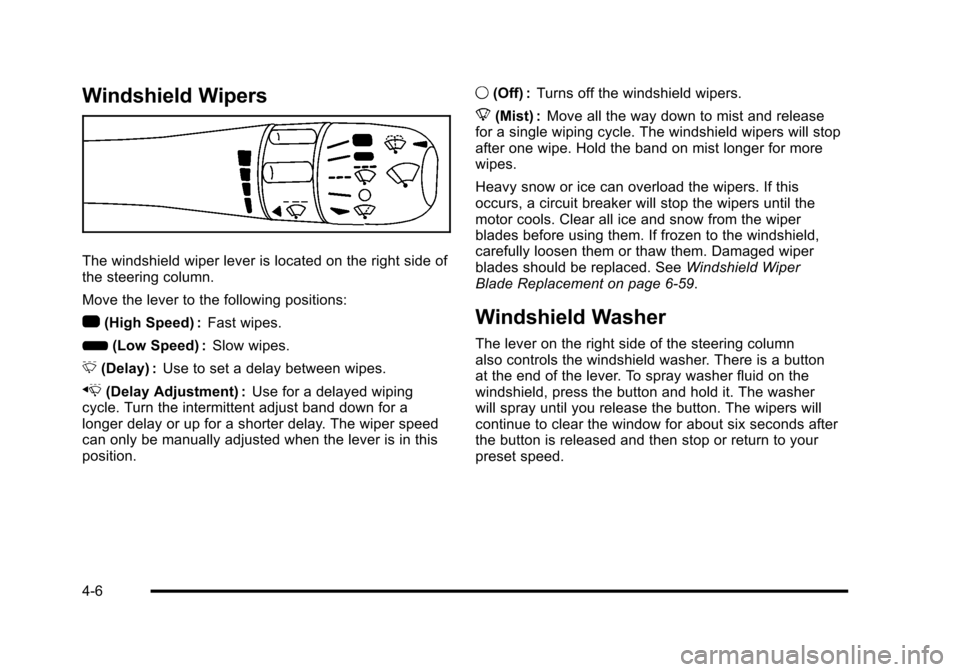
Windshield Wipers
The windshield wiper lever is located on the right side of
the steering column.
Move the lever to the following positions:
1 (High Speed) : Fast wipes.
6 (Low Speed) : Slow wipes.
& (Delay) : Use to set a delay between wipes.
x (Delay Adjustment) : Use for a delayed wiping
cycle. Turn the intermittent adjust band down for a
longer delay or up for a shorter delay. The wiper speed
can only be manually adjusted when the lever is in this
position. 9
(Off) : Turns off the windshield wipers.
8 (Mist) : Move all the way down to mist and release
for a single wiping cycle. The windshield wipers will stop
after one wipe. Hold the band on mist longer for more
wipes.
Heavy snow or ice can overload the wipers. If this
occurs, a circuit breaker will stop the wipers until the
motor cools. Clear all ice and snow from the wiper
blades before using them. If frozen to the windshield,
carefully loosen them or thaw them. Damaged wiper
blades should be replaced. See Windshield Wiper
Blade Replacement on page 6‑59.
Windshield Washer
The lever on the right side of the steering column
also controls the windshield washer. There is a button
at the end of the lever. To spray washer fluid on the
windshield, press the button and hold it. The washer
will spray until you release the button. The wipers will
continue to clear the window for about six seconds after
the button is released and then stop or return to your
preset speed.
4-6
Page 180 of 472

Wiper Activated Headlamps
This feature activates the headlamps and parking
lamps after the windshield wipers have been in use for
approximately 15 seconds and deactivates and returns
to ambient lighting conditions 15 seconds after the
wipers are turned off.
If the exterior lamp control has been turned off or is in
the parking lamp position while the wiper control is
active in any position, the HEADLAMPS SUGGESTED
message appears on the Driver Information Center
(DIC). See DIC Warnings and Messages on page 4‑52.
When the ignition is turned off, the wiper-activated
headlamps will immediately turn off.
Headlamps on Reminder
A warning chime will sound if the exterior lamp control
is left on in either the headlamp or parking lamp position
and the driver's door is opened with the ignition off.
Daytime Running Lamps (DRL)
Daytime Running Lamps (DRL) can make it easier for
others to see the front of your vehicle during the day.
Fully functional daytime running lamps are required on
all vehicles first sold in Canada.
The DRL system makes the front turn signal lamps
come on when the following conditions are met:
.It is still daylight and the ignition is on.
.The exterior lamp control is in the AUTO position.
.The transmission is not in P (Park) or the parking
brake is off.
.The parking brake is off or the vehicle speed is
greater than 8 mph (13 km/h).
When DRL are on, only the front turn signal lamps will
be on. The parking lamps, taillamps, instrument panel
lights, or other exterior lamps will not be on when the
DRL are being used.
When it is dark enough outside, the front turn signal
lamps turn off and the normal low-beam headlamps
turn on.
4-12
Page 371 of 472

Windshield Replacement
The windshield is part of the Head-Up Display (HUD)
system. If you ever have to get the windshield replaced,
get one that is designed for HUD or the HUD image
may look out of focus.
Windshield Wiper Blade
Replacement
Windshield wiper blades should be inspected for wear
and cracking. See Scheduled Maintenanceon
page 7‑3for more information.
Replacement blades come in different types and are
removed in different ways. For the proper type and
length, see Maintenance Replacement Parts
on
page 7‑12. It is a good idea to clean or replace the wiper blade
assembly every six months. Allowing the wiper blade
arm to touch the windshield when no wiper blade is
installed could damage the windshield. Any damage
that occurs would not be covered by the vehicle's
warranty. Do not allow the wiper blade arm to touch
the windshield.
To remove the wiper blade assembly:
1. Open the hood to gain access to the windshield wipers.
2. Lift the wiper arm away from the windshield.
6-59
Page 408 of 472

Windshield and Wiper Blades
Clean the outside of the windshield with glass cleaner.
Clean the rubber blades using a lint free cloth or paper
towel soaked with windshield washer fluid or a mild
detergent. Wash the windshield thoroughly when
cleaning the blades. Bugs, road grime, sap, and a
buildup of vehicle wash/wax treatments may cause
wiper streaking. Replace the wiper blades if they are
worn or damaged.
Wipers can be damaged by:
.Extreme dusty conditions
.Sand and salt
.Heat and sun
.Snow and ice, without proper removal
Removable Roof Panel
Notice: If you use a glass treatment and/or
conditioner that contains ethyl alcohol or ethyl
sulfate on the roof panel, you could damage the
panel. The repairs would not be covered by your
warranty. Only use a GM-approved glass cleaner
on the roof panel.
Special care is necessary when cleaning, removing,
and/or storing the roof panel.
.Flush with water to remove dust and dirt, then dry
the panel.
.Clean a transparent roof panel with GM Glass
Cleaner. Leave the cleaner on the panel for
one minute, then wipe the panel with a soft,
lint-free cloth. Do not use glass cleaner on a
painted roof panel.
.Do not use abrasive cleaning materials on either
type of panel.
If water drops are frequently allowed to dry on the roof
panel, impurities in the water will adhere to the top.
These impurities may etch or mar the finish. When the
panel gets wet, dry it off.
6-96