Page 18 of 136
Handlebar fitting, left
1Headlight flasher
2High-beam headlight(31)
3Horn
4Switch for turn indicators(31)
2
16
zGeneral views
Page 22 of 136
Status indicators
Telltale lights
1Turn indicators
2High-beam headlight
3Idle
Standard warnings
Mode of presentation
Warnings are indicated by warn-ing lights1.
The possible warnings are listedon the next page.
3
20
zStatus indicators
Page 33 of 136
Low-beam headlight
The low-beam headlight switcheson automatically when the igni-tion is switched on.
The low-beam headlightplaces a strain on the bat-tery. Do not switch the ignitionon for longer than absolutelynecessary.
High-beam headlight
Press front section of switch1to switch on the high-beamheadlight.
Press rear section of switch1to switch off the high-beamheadlight.
Headlight flasher
Press button1to operate theheadlight flasher.
Turn indicators
Operating flashing turn
indicators
Switch on the ignition.
Push button1to the left toswitch on the left flashing turnindicators.
Push button1to the right toswitch on the right flashing turnindicators.
Centre button1to cancel theflashing turn indicators.
Hazard warning
flashers
Operating hazard warning
flashers
Switch on the ignition.
4
31
zOperation
Page 39 of 136

Rebound stage, basicsetting, rear
turn the bottom adjustingscrew as far as it will go inthe clockwise direction andthen back it off half a turn(Full load of fuel, with rider85 kg)
Tyres
Checking tyre pressure
Incorrect tyre pressures im-pair the motorcycle's hand-ling characteristics and increasethe rate of tyre wear.
Always check that the tyre pres-sures are correct.
At high road speeds, tyrevalves installed perpen-dicular to the wheel rim have atendency to open as a result ofcentrifugal force.
In order to avoid a sudden loss oftyre pressure, fit a valve cap with
rubber sealing ring to the reartyre and make sure that the capis screwed on firmly.
Make sure the ground is leveland firm and place the motor-cycle on its stand.
Check tyre pressures againstthe data below.
Tyre pressure, front
1.9 bar (one-up, at tyre tem-perature 20 °C)
2.1 bar (two-up and/or withluggage, at tyre temperature20 °C)
Tyre pressure, rear
2.1 bar (one-up, at tyre tem-perature 20 °C)
2.3 bar (two-up and/or withluggage, at tyre temperature20 °C)
If tyre pressure is too low:
Correct tyre pressure.
Headlight
Adjusting headlight for
driving on right/driving on
left
If the motorcycle is ridden in acountry where the opposite ruleof the road applies, its asymmet-ric low-beam headlight will tendto dazzle oncoming traffic.
Have the headlight set accord-ingly by a specialist workshop,preferably an authorised BMWMotorrad dealer.
Headlight beam throw and
spring preload
Headlight beam throw is gener-ally kept constant when springpreload is adjusted to suit load.
Spring preload adjustment mightnot suffice only if the motorcycleis very heavily loaded. Under
4
37
zOperation
Page 87 of 136

nical data". The figures in thegraphic correspond to the fusenumbers.
Close the fuse cover.
The latch engages with anaudible click.
Installing seat (39).
Bulbs
Notes
A defective bulb placesyour safety at risk becauseit is easier for other users tooversee the motorcycle.
Replace defective bulbs assoon as possible; always carry acomplete set of spare bulbs ifpossible.
The bulb is pressurised andcan cause injury if dam-aged.
Wear protective goggles andgloves when changing bulbs.
The types of bulb fitted toyour motorcycle are listedin the section entitled "Technicaldata".
Do not touch the glass ofnew bulbs with your fingers.Use a clean, dry cloth to holdthe bulbs when handling them.Dirt deposits, in particular oil andgrease, interfere with heat radi-ation from the bulb. This leadsto overheating and shortens thebulb's operating life.
Replacing low-beam and
high-beam headlight bulb
If it is not standing firmly,the motorcycle could topplein the course of the operationsdescribed below.
Always make sure that themotorcycle is stable and firmlysupported.
Make sure the ground is leveland firm and place the motor-cycle on its stand.
Switch off the ignition.
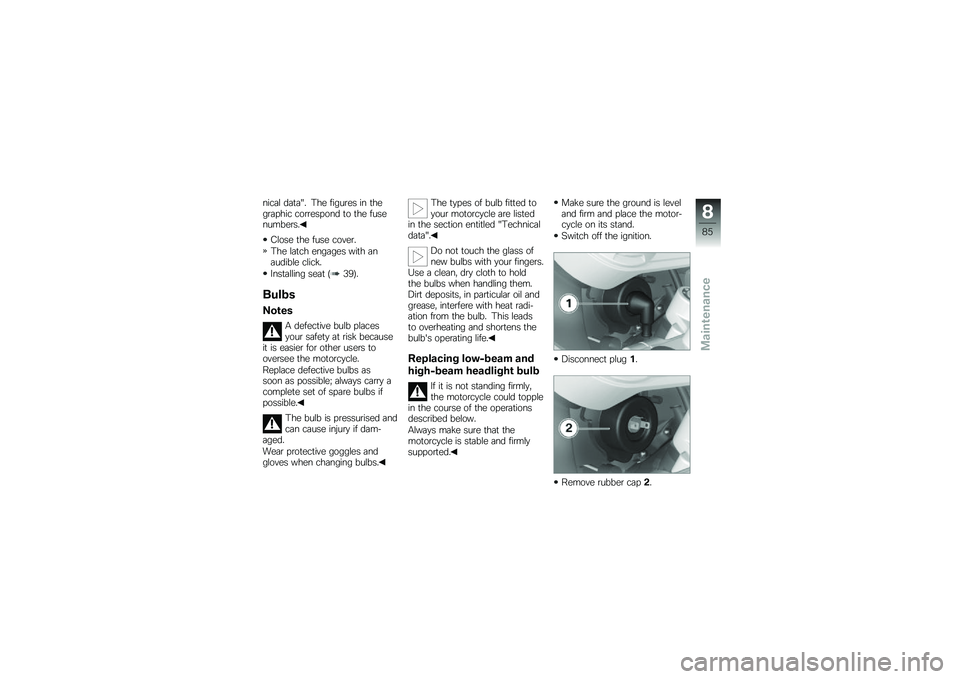
Disconnect plug1.
Remove rubber cap2.
8
85
zMaintenance
Page 88 of 136
The rubber cap enclosesand forms a seal aroundthe wiring for the parking light.Consequently, the rubber capcannot be removed.
Turn retaining ring3counter-clockwise to release and re-move the ring.
Remove bulb4.
Replace the defective bulb.
Bulb for low-beam andhigh-beam headlight
H4 / 12 V / 55 W / 60 W
Install bulb4, making sure thattab5is correctly positioned.
Hold retaining ring3in positionand turn it clockwise to secure.
Install rubber cap2.
Connect plug1.
8
86
zMaintenance
Page 117 of 136
Lighting
Bulb for low-beam and high-beam headlightH4 / 12 V / 55 W / 60 W
Bulb for parking lightW5W / 12 V / 5 W
Bulb for tail light/brake lightP21/5W / 12 V / 5 W / 21 W
Bulbs for flashing turn indicators, frontR10W / 12 V / 10 W
Bulbs for flashing turn indicators, rearR10W / 12 V / 10 W
Fuses
Current rating of fuse 1 (for engine electronics)15 A
Current rating of fuse 2 (for instrument panel, haz-ard warning flashers, on-board socket, optionalaccessories and diagnosis plug)
10 A
Current rating of fuse 3 (for horn and headlightflasher)7.5 A
Current rating of fuse 4 (for low-beam headlight)7.5 A
10
115
zTechnical data
Page 118 of 136
Current rating of fuse 5 (for high-beam headlight)7.5 A
Current rating of fuse 6 (for instrument panel,flashing turn indicators, hazard warning flashers,brake light and optional accessories)
7.5 A
Current rating of fuse 7 (for rear light and parkinglight)4 A
Current rating of fuse 8 (for heated handlebargrips)4 A
Frame
Frame typeBridge-type steel frame with bottom truss andbolt-on rear frame
Type plate locationMain frame, top right on steering head
VIN locationSteering head, right
10
116
zTechnical data