Page 145 of 196

Reference
At a glance
Controls
Driving tips
Mobility
143
Care
Care products
Regular cleaning and care contributes signifi-
cantly to the value retention of your BMW.
BMW recommends cleaning and caring for your
vehicle with products that are approved by
BMW for this purpose.
Your BMW center will be happy to advise you on
the products and services available for cleaning
and caring for your BMW.
Original BMW Care Products have been
material tested, laboratory checked and
proven in the field, and offer optimal care and
protection for your vehicle.<
Do not use cleaners that contain alcohol
or solvents as these may result in dam-
age.<
Cleaning agents can contain substances
that are dangerous or hazardous to your
health. Therefore, follow the warning and safety
instructions on the packaging. When cleaning
inside the vehicle, always open the doors or
windows of the vehicle. In enclosed areas, pro-
vide for sufficient ventilation. Only use products
designed for cleaning vehicles.<
Exterior care
Washing the vehicle
Especially during the winter months,
ensure that the vehicle is washed more
frequently. Heavy soiling and road salt can lead
to vehicle damage.<
After washing the vehicle, apply the
brakes briefly to dry them; otherwise,
water can reduce braking efficiency over the
short term and the brake discs can corrode.<
Automatic car washes
Preference should be given to cloth car washes.
Before driving into a car wash, ensure that it is
suitable for your BMW. Check the following:>Dimensions of your vehicle, refer to
page175.
>If necessary: fold in the exterior mirrors,
refer to page39.
>Maximum permissible tire width.
Avoid car washes with guide rail heights
over 4 in/10 cm; otherwise, there is the
danger of damaging chassis parts.<
Preparations before driving into an automatic
car wash:
>Unscrew the rod antenna
*.
>Deactivate the rain sensor
* to prevent unin-
tentional wiping.
>Sports Wagon: deactivate the rear window
wiper and protect it against damage. If nec-
essary, ask the operator of the car wash
about protective measures you should take.
>Remove additional add-on parts, e.g. spoil-
ers or phone antennas, if they could be
damaged.
Automatic transmission
Before driving into an automatic car wash, per-
form the following steps to ensure that the vehi-
cle can roll:
1.Insert the remote control into the ignition
lock, even with Comfort Access.
2.Move the selector lever to position N.
3.Release the parking brake.
4.Switch off the engine.
5.Leave the remote control in the ignition lock
so that the vehicle can roll.
Steam jets/high-pressure washers
When using steam jets or high-pressure
washers, ensure that you maintain suffi-
cient clearance to the vehicle and do not exceed
a temperature of 1407/606.
Insufficient clearance or excessive pressure or
temperature can lead to component damage or
Page 146 of 196

Care
144 water penetration. Follow the operating instruc-
tions of the high-pressure washer.<
When using high-pressure washers, do
not spray against the sensors and cam-
eras, e.g. of the Park Distance Control or Rear
View Camera, for an extended period and main-
tain a distance of at least 1 ft/30 cm.<
Manual car wash
When washing the vehicle by hand, use large
quantities of water and car shampoo if neces-
sary. Clean the vehicle with a sponge or wash-
ing brush, applying light pressure only.
Before cleaning the windshield, deacti-
vate the rain sensor or switch off the igni-
tion to prevent unintentional activation of the
wipers.<
Observe local regulations pertaining to
washing vehicles by hand.<
Headlamps
Do not rub them dry and do not use abrasive or
corrosive cleaning agents.
Loosen dirt, e.g. insects, with shampoo or
insect remover and wash away with copious
quantities of water.
Thaw ice with a windshield deicer and do not
use an ice scraper.
Windows
Clean the inside and outside surfaces of the
windows and the mirrors with window cleaner.
Do not clean the mirrors with cleaners
containing quartz.<
Paintwork care
Regular care contributes to value retention and
protects the paintwork against the long-term
effects of damaging substances.
Region-specific environmental influences can
damage the vehicle paintwork. Therefore, it is
important to adapt the frequency and scope of
car care accordingly.
Immediately remove aggressive materials such
as spilled fuel, oil, grease, brake fluid, tree sap or bird droppings to prevent damage to the paint-
work.
Repairing paintwork damage
Immediately repair scratches or similar
damage, such as that caused by stones
hitting the vehicle, where necessary to prevent
rusting.<
BMW recommends having paintwork damage
repaired by a professional paint repair work-
shop according to BMW specifications using
original BMW paint materials.
Preservation
A preservation treatment is necessary when
water no longer beads off the clean paintwork
surface. Only use products for paintwork pres-
ervation that contain carnauba or synthetic
waxes.
Rubber seals
Treat only with water or rubber care products.
Do not use silicon-containing care prod-
ucts on rubber seals; otherwise, noise
and damage could occur.<
Chrome parts
Carefully clean vehicle parts such as the radia-
tor grill, door handles or window frames with
copious quantities of water and a shampoo
additive, especially when roads are treated with
deicing salt. For additional treatment, use a
chrome polish.
Light-alloy wheels
For technical reasons, dust is generated during
braking that is deposited on the light-alloy
wheels. Remove the dust regularly using acid-
free rim cleaner.
Do not use aggressive, acidic, strongly
alkaline and abrasive cleaning agents or
steam jets over 1407/606; otherwise, dam-
age may occur.<
Page 147 of 196

Reference
At a glance
Controls
Driving tips
Mobility
145
Outside sensors/cameras
Keep the sensors and cameras on the
outside of the vehicle, e.g. those for Park
Distance Control, clean and free of ice to ensure
that they remain fully functional.<
Interior care
Upholstery fabrics/cloth trims/
Alcantara fabrics
Vacuum regularly with a vacuum cleaner to
remove superficial dirt.
To remove severe spots such as stains from
beverages, use a soft sponge or lint-free
microfiber cloth and suitable interior cleaners.
Follow the instructions on the packaging.
Clean the upholstery down to the seams
using a sweeping motion. Avoid strong
rubbing.<
Opened Velcro fasteners on pants or
other articles of clothing can damage the
seat covers. Ensure that Velcro fasteners are
closed.<
Leather/leather trim
The leather used by BMW is a high quality
natural product. Slight irregularities in the
leather are a typical characteristic of natural
leather.<
Dust and road grit in the pores and folds of the
leather have an abrasive effect, leading to
increased wear and causing the leather surface
to become brittle prematurely. Therefore, fre-
quently clean the leather of dust using a cloth or
vacuum cleaner.
Clean light-colored leather more frequently as
dust and dirt are more noticeable.
Treat the leather at least once every two
months using a leather lotion as dirt and grease
will gradually attack the leather's protective
layer.
Carpets/cargo area
You can vacuum the carpets and floor mats or
clean them with interior cleaner if heavily soiled.The floor mats can be removed for cleaning.
When replacing the mats, ensure that the seat
rails do not extend over the floor mats, as this
may damage the mats.
Lint on the floor mats occurs for technical rea-
sons and can be removed by vacuuming
repeatedly.
Interior plastic parts
>Imitation leather surfaces
>Lamp glasses
>Display pane of instrument cluster
>Matte parts
Clean with water and solvent-free plastic
cleaner if necessary.
Fine wood parts
Clean fine wood trim and fine wood parts with a
damp cloth. Wipe dry with a soft cloth.
Safety belts
Dirty belt straps impede the reeling action and
thus have a negative impact on safety.
Do not clean chemically, as this may
destroy the webbing.<
Interior sensors/cameras
To clean interior sensors and cameras, use a
lint-free cloth moistened with glass cleaner.
Displays
To clean displays, e.g. of the radio or instrument
cluster, use a cleaning cloth for displays or a
soft, non-abrasive, lint-free cloth.
Avoid applying excessive pressure when
cleaning the displays; otherwise, damage
may occur.<
Do not use chemical or abrasive house-
hold cleaning agents. Keep all types of
fluid away from the device. Otherwise, surfaces
or electrical components may be corroded or
damaged.<
Page 148 of 196
Care
146
CD/DVD drives
Do not use a cleaning CD, as it may dam-
age parts of the drive.<
Vehicle storage
If your vehicle is to be decommissioned for
longer than three months, your BMW center or
a workshop that operates according to BMW
specifications will be glad to advise you.
Page 149 of 196

Reference
At a glance
Controls
Driving tips
Mobility
147
Replacing components
Onboard vehicle tool kit
The onboard vehicle tool kit is stored in a com-
partment on the right-hand side of the cargo
area. Remove the cover.
Sports Wagon
The onboard vehicle tool kit is stored in a com-
partment on the left-hand side underneath the
cargo area floor panel.
Wiper blades
1.Fold out the wiper arm and hold it.
2.Press together the locking spring, arrows1,
and fold out the wiper blade, arrow2.
3.Take the wiper blade out of the catch mech-
anism, pulling the blade toward the front.
To avoid damage, make sure that the
wiper arms are against the windshield
before you open the engine compartment.<
Sports Wagon: changing rear wiper
blade
1.Fold up the wiper arm.
2.Pull off the wiper blade, see arrow.
3.Insert the new wiper blade and press it on
until it audibly engages.
Lamps and bulbs
Lamps and bulbs make an essential contribu-
tion to vehicle safety. They should, therefore,
be handled carefully. BMW recommends hav-
ing your BMW center perform any work that you
do not feel competent to perform yourself or
that is not described here.
Never touch the glass of new bulbs with
your bare fingers, as even minute
amounts of contamination will burn into the
bulb's surface and reduce its service life. Use a
clean tissue, cloth or something similar, or hold
the bulb by its base.<
You can obtain a selection of replacement bulbs
at your BMW center.
Only change bulbs while they are cool to
the touch; otherwise, you could suffer
burns.<
When working on electrical systems,
always begin by switching off the con-
sumer in question; otherwise, short-circuits
could result. To avoid possible injury or equip-
ment damage when replacing bulbs, observe
any instructions provided by the bulb manufac-
turer.<
Page 150 of 196

Replacing components
148 For care of the headlamps, please follow the
instructions in the chapter entitled 'Care'.
If the routine for changing a particular
bulb is not described here, please contact
your BMW center or a workshop that works
according to BMW repair procedures with cor-
respondingly trained personnel.<
Light-emitting diodes LED
Light-emitting diodes installed behind translu-
cent lenses serve as the light source for many of
the controls and displays in your vehicle. These
light-emitting diodes, which operate using a
concept similar to that applied in conventional
lasers, are officially designated as Class 1 light-
emitting diodes.
Do not remove the covers or expose the
eyes directly to the unfiltered light source
for several hours; otherwise, this could cause
irritation of the retina.<
Xenon lamps
These bulbs have a very long service life and are
highly unlikely to fail. If a xenon lamp fails never-
theless, switch on the fog lamps and continue
the journey with great care, provided that local
legislation does not prohibit this.
Have any work on the xenon lamp system,
including bulb replacements, performed
o n ly b y a BM W c e n t e r o r a w o r k s h o p t h a t w o r k s
according to BMW repair procedures with cor-
respondingly trained personnel. Otherwise, if
such work is carried out improperly, the high
voltage in the system presents the danger of
fatal injuries.<
Replacing parking lamps, roadside
parking lamps, and daytime running
lights
H8 bulb, 35 watts1.Switch off the lamps and take the remote
control out of the ignition lock.
2.Turn the cover to the left, see arrow, and
remove it.
3.Turn the bulb approx. 90°, see arrow, and
take it out.
4.Disconnect the plug, change the bulb and
reconnect the plug.
5.Insert the bulb and turn it until it stops.
6.Reattach the cover.
Replacing the corner-illuminating
lamp*
H3 bulb, 55 watts
1.Switch off the lamps and take the remote
control out of the ignition lock.
2.Remove the upper cover from the head-
lamp. To do so, pull the rubber seal up and
off and unscrew the cover using the screw-
Page 151 of 196

Reference
At a glance
Controls
Driving tips
Mobility
149
driver from the onboard vehicle tool kit, see
arrow.
3.Release the wire bracket from the anchor,
see arrow, and fold it up.
4.Disconnect the plug, change the bulb and
reconnect the plug.
5.Insert the bulb.
6.Fold the wire bracket down and engage it.
7.Reattach the cover.
Be careful when installing the cover; oth-
erwise, leaks could occur and cause dam-
age to the headlamp system.<
Halogen lamps
H7 bulb, 55 watts
Always wear gloves and eye protection;
the atmosphere within the H7 bulb is
pressurized. Otherwise, there is a risk of injury if
the bulb is damaged.<
There are separate headlamp covers for low-
beam headlamps and high-beam headlamps.
Be careful when installing the covers; oth-
erwise, leaks could occur and cause dam-
age to the headlamp system.<
For checking and adjusting headlamp
aim, please contact your BMW center.<
Access to the lamps
The high-beam headlamp can be accessed
from the engine compartment, whereas the
low-beam headlamp is accessed through a flap
in the wheel well.
1Cover for high-beam headlamp
2Cover for low-beam headlamp
3Turn signal bulb socket
To remove the covers:
1.Fold the respective wire bracket to the side,
see arrows.
2.Flip open the cover and take it out of the
guide.
Follow the same steps in reverse order to reat-
tach the covers.
Access through the wheel well
Only for low-beam headlamps and turn signals:
1.Turn the wheel inwards.
2.Open the flap in the wheel well. To do so,
turn the fastener counterclockwise using a
coin, for example.
Page 152 of 196

Replacing components
150
Changing low-beam and high-beam
bulbs
1.Remove the relevant cover for the head-
lamp.
2.Disconnect the plug from the lamp.
3.Push the wire bracket to the side out of the
mounting, arrow1, and fold it down,
arrow2.
4.Remove the bulb.
5.Insert new bulb as shown in the detail of the
illustration above.
6.Fold up the wire bracket and engage it.
7.Connect the plug.
8.Reattach the cover.
Parking lamps, roadside parking lamps
W5W bulb, 5 watts
1.Remove the cover for the high-beam head-
lamp.
2.Pull out the bulb socket, see arrow.
3.Remove and replace the bulb.
4.Insert bulb socket.
5.Reattach the cover.
Turn signals, front
PY24W bulb, 24 watts
1.Open the flap in the wheel well, refer to
Access through the wheel well on
page149.
2.Rotate turn signal bulb socket 1 to the left
and remove.
3.Apply gentle pressure to the bulb while
turning it to the left for removal and replace-
ment.
4.Insert turn signal bulb socket 1.
5.Attach the flap to the wheel well.
Tail lamps
Sedan
>Brake lamp in the trunk lid:
H21W bulb, 21 watts
>Backup lamp:
W16W bulb, 16 watts
>Other lamps:
P21W bulb, 21 watts
The tail lamps are divided in two parts. One part
is in the trunk lid, the other is in the fender.
1Brake lamp
2Roadside parking lamp/tail lamp, LED
 1
1 2
2 3
3 4
4 5
5 6
6 7
7 8
8 9
9 10
10 11
11 12
12 13
13 14
14 15
15 16
16 17
17 18
18 19
19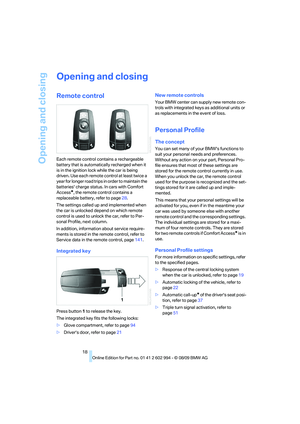 20
20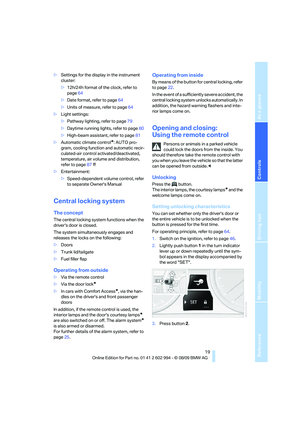 21
21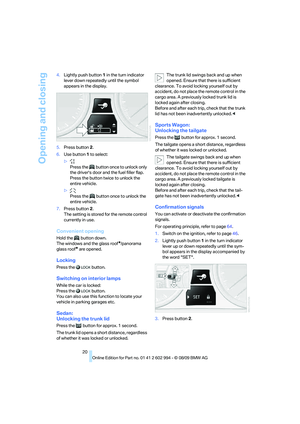 22
22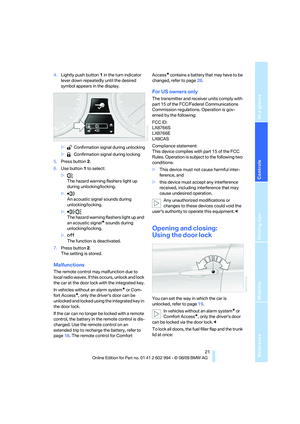 23
23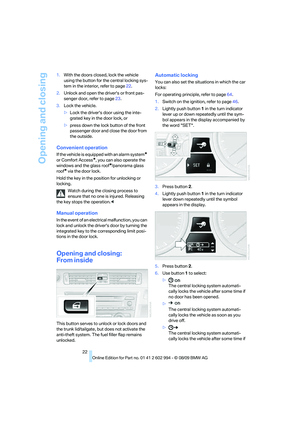 24
24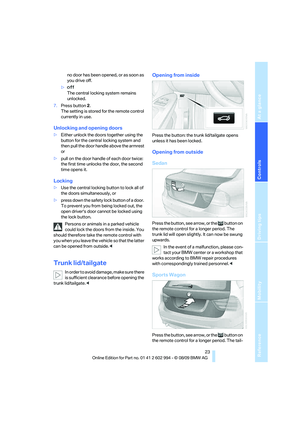 25
25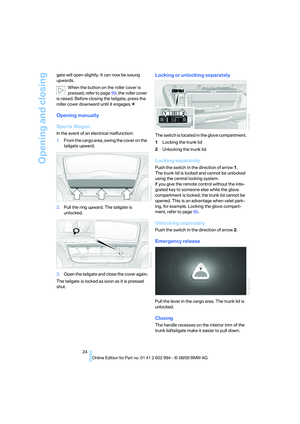 26
26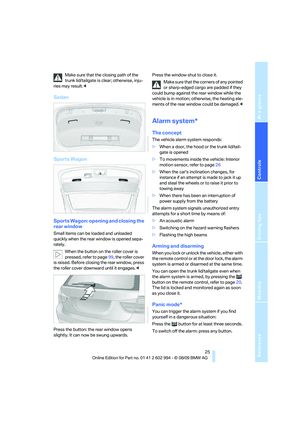 27
27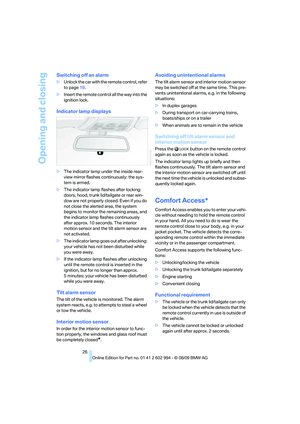 28
28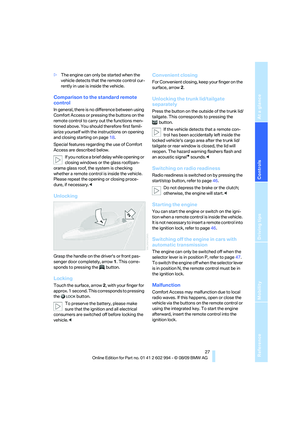 29
29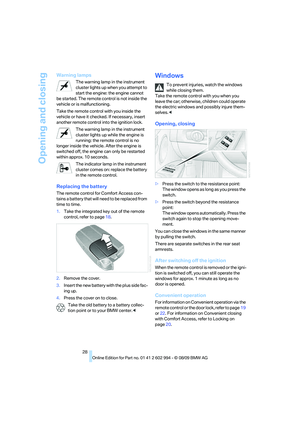 30
30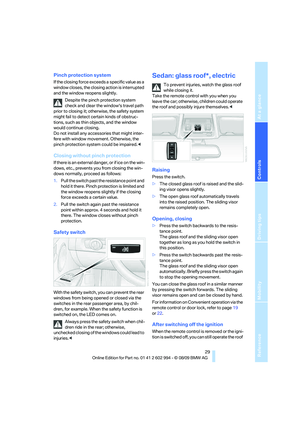 31
31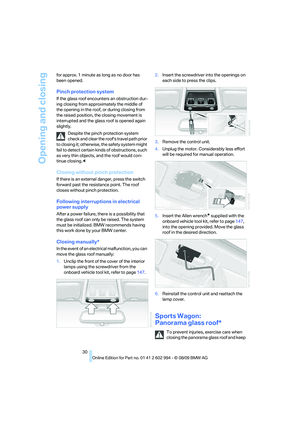 32
32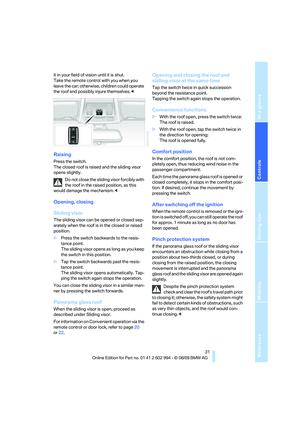 33
33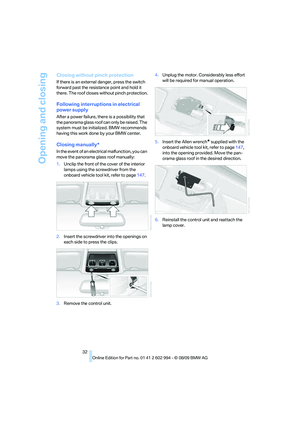 34
34 35
35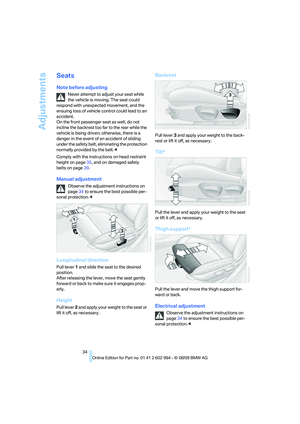 36
36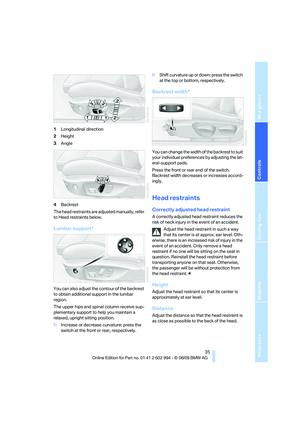 37
37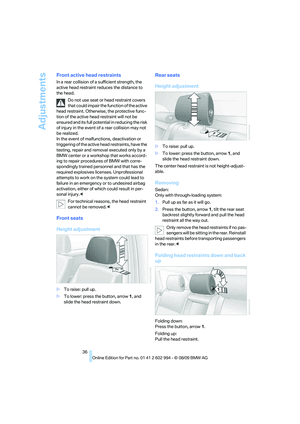 38
38 39
39 40
40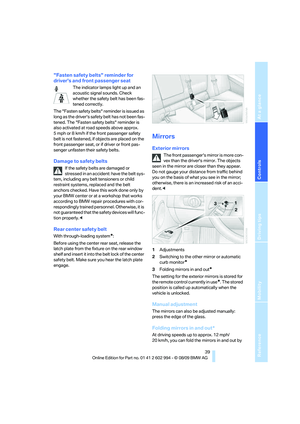 41
41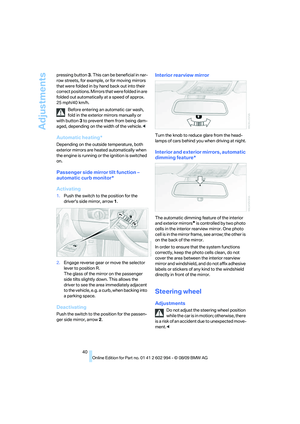 42
42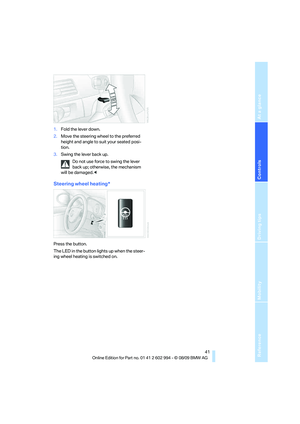 43
43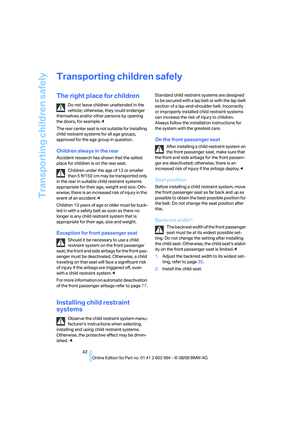 44
44 45
45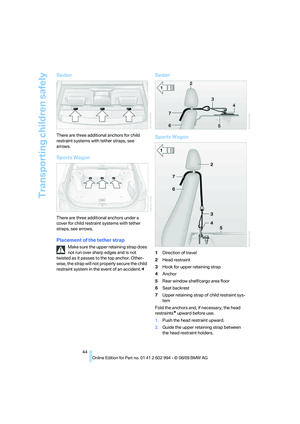 46
46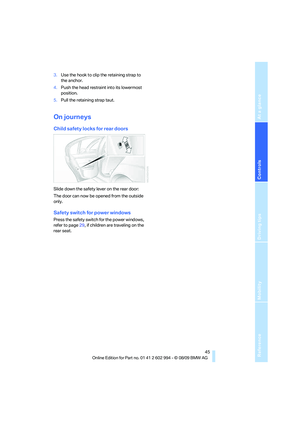 47
47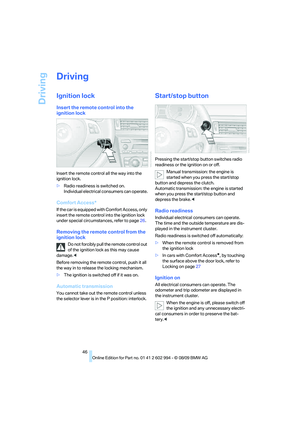 48
48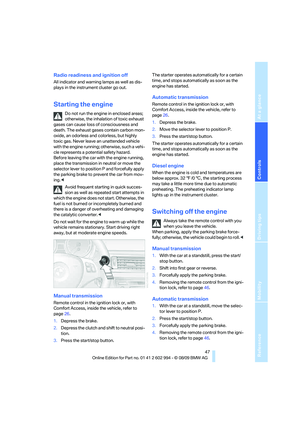 49
49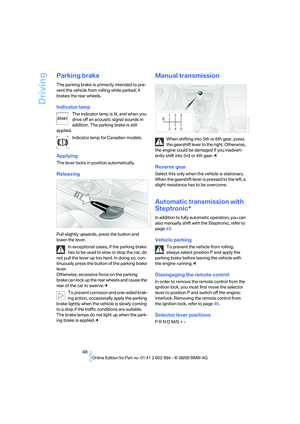 50
50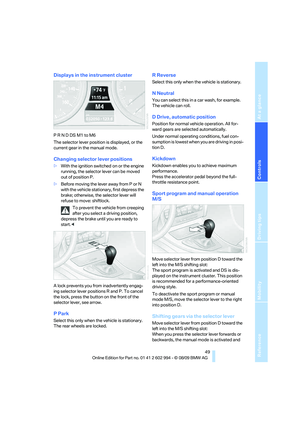 51
51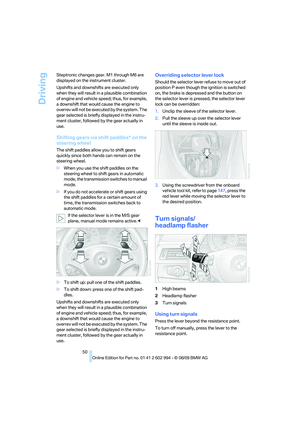 52
52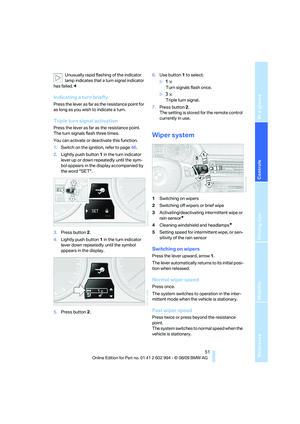 53
53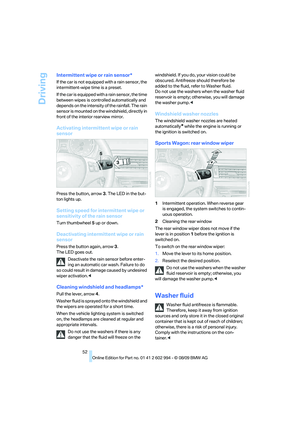 54
54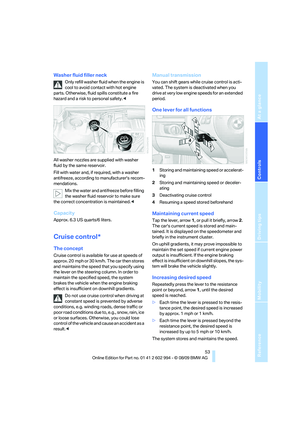 55
55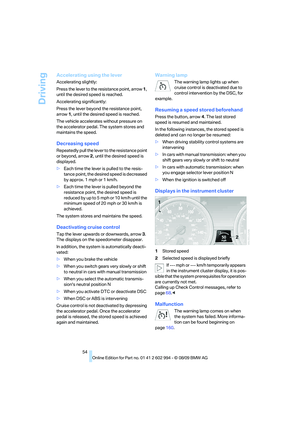 56
56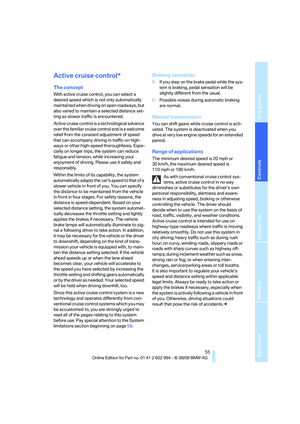 57
57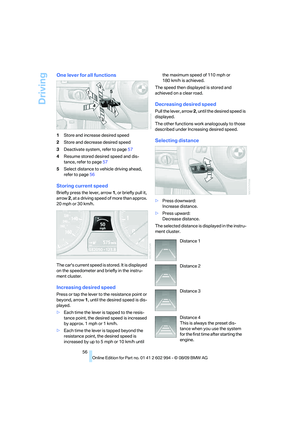 58
58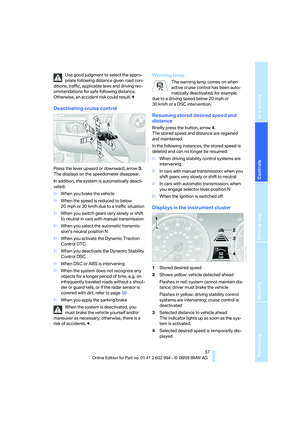 59
59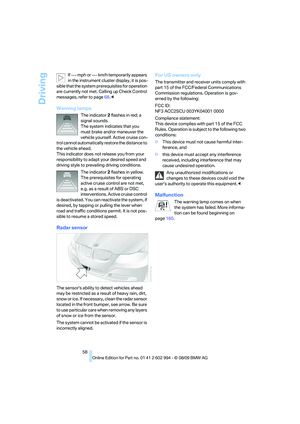 60
60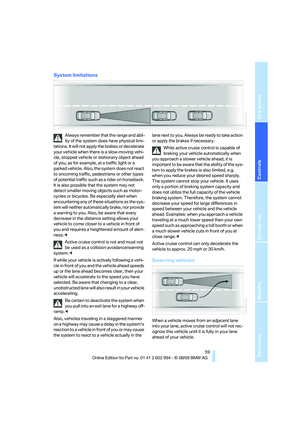 61
61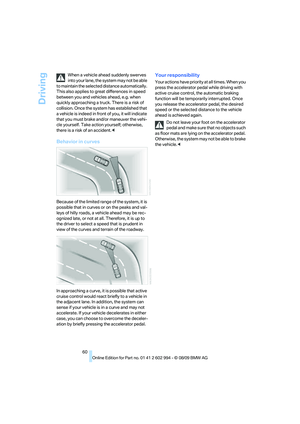 62
62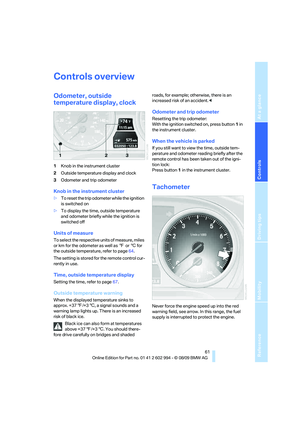 63
63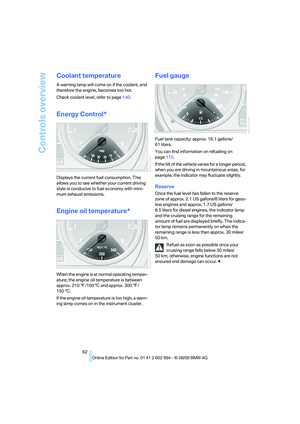 64
64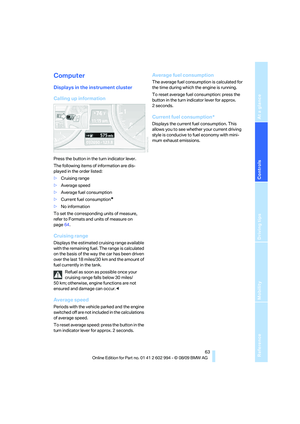 65
65 66
66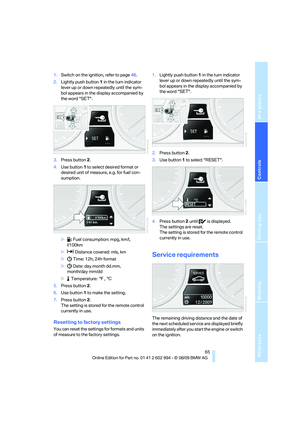 67
67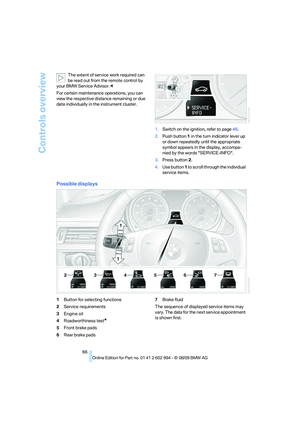 68
68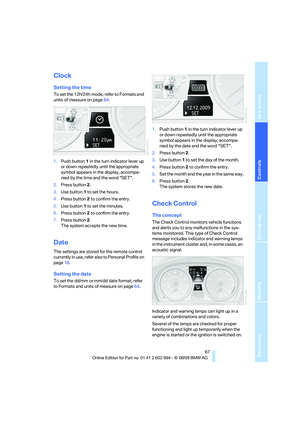 69
69 70
70 71
71 72
72 73
73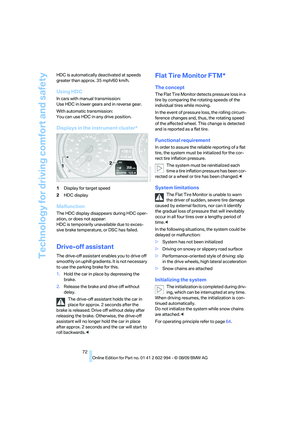 74
74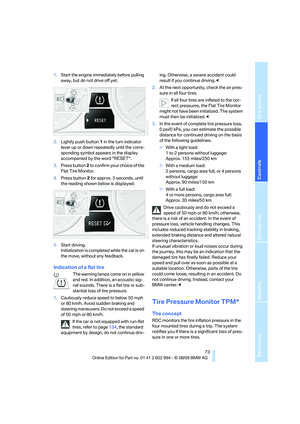 75
75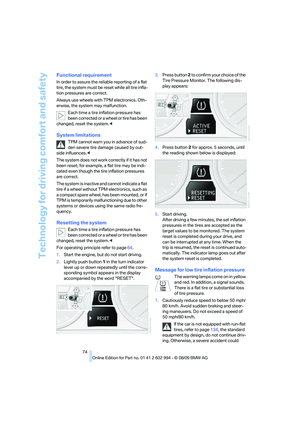 76
76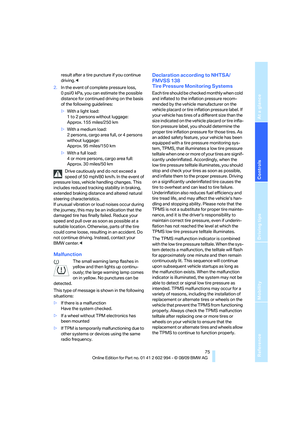 77
77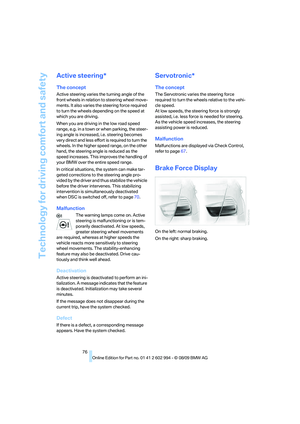 78
78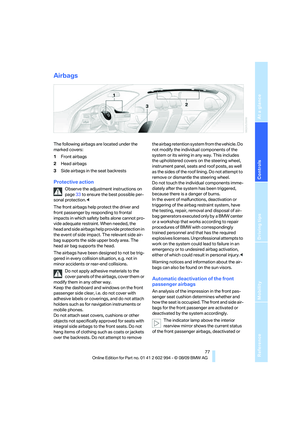 79
79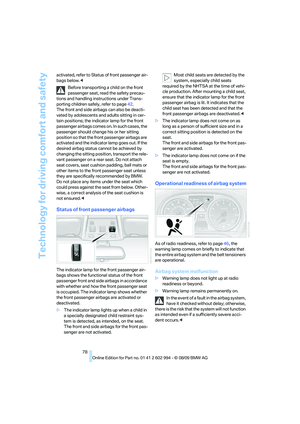 80
80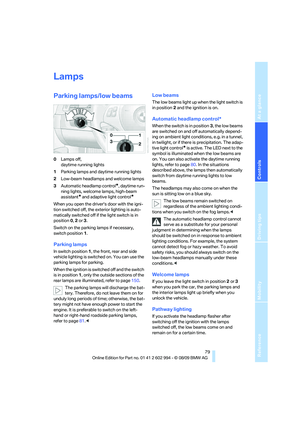 81
81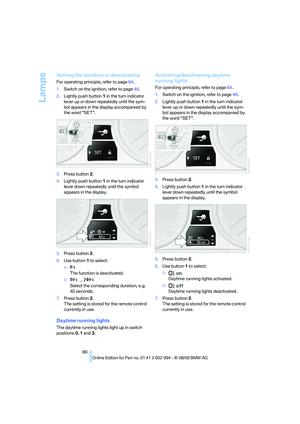 82
82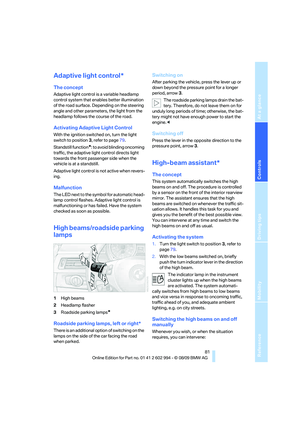 83
83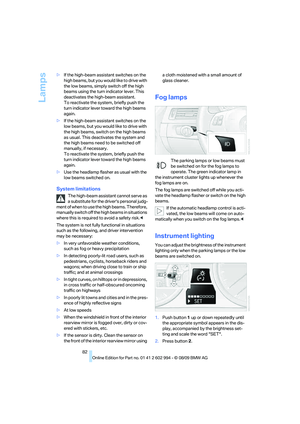 84
84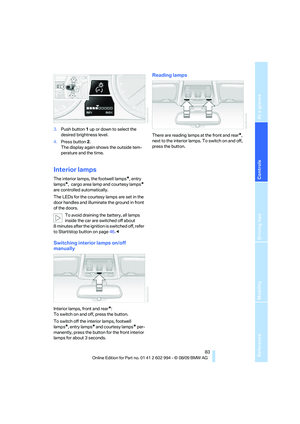 85
85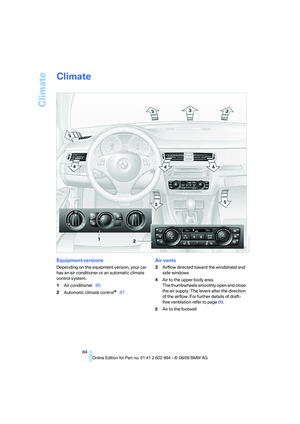 86
86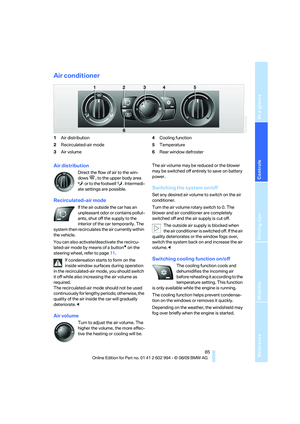 87
87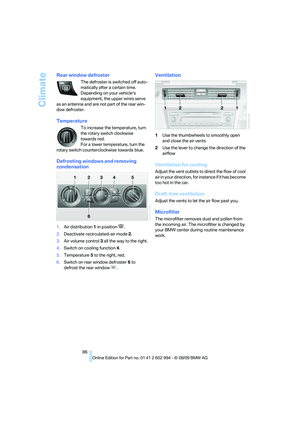 88
88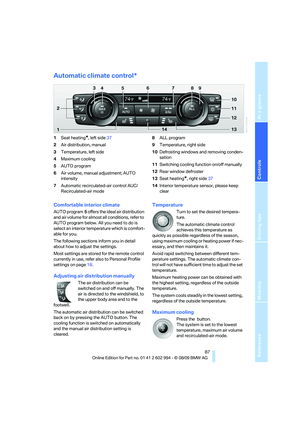 89
89 90
90 91
91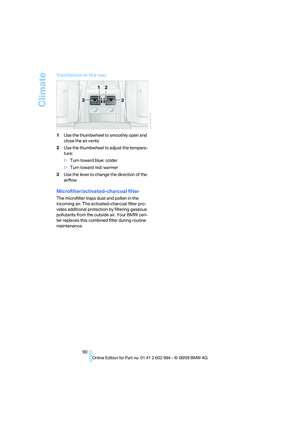 92
92 93
93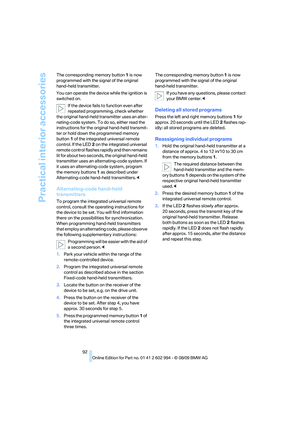 94
94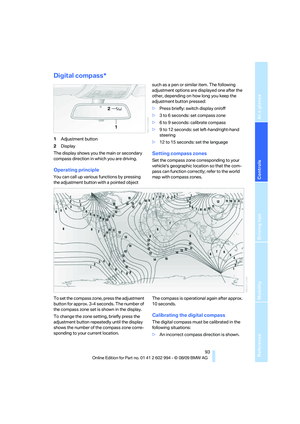 95
95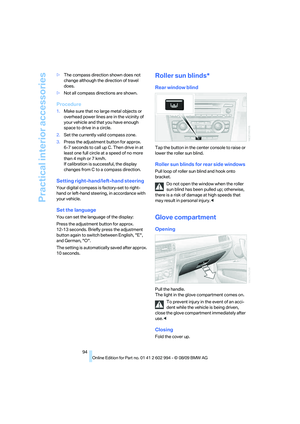 96
96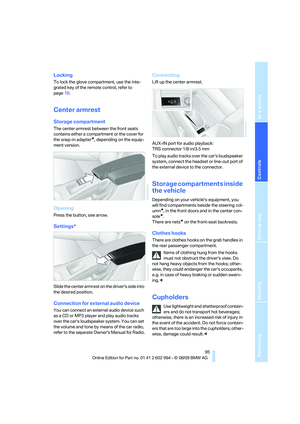 97
97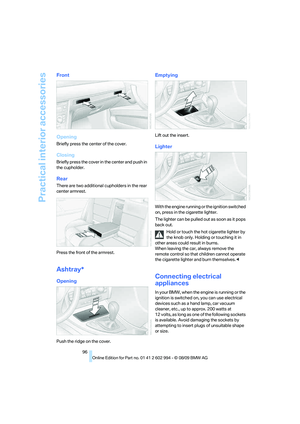 98
98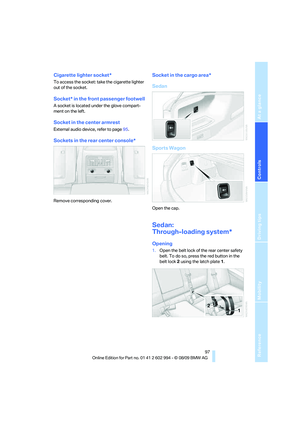 99
99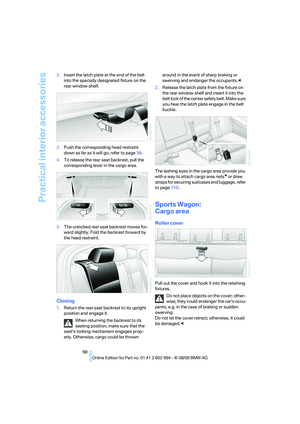 100
100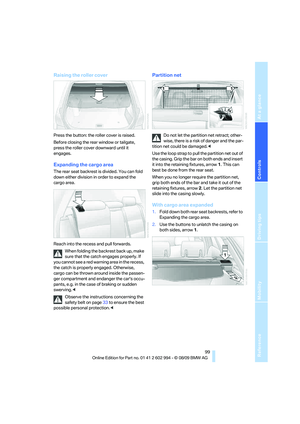 101
101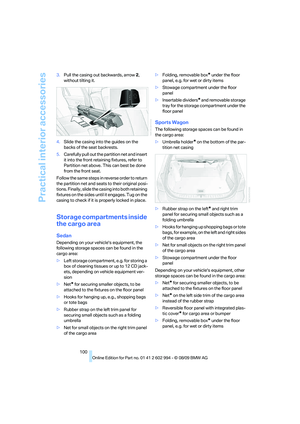 102
102 103
103 104
104 105
105 106
106 107
107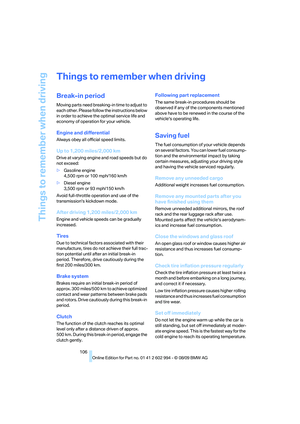 108
108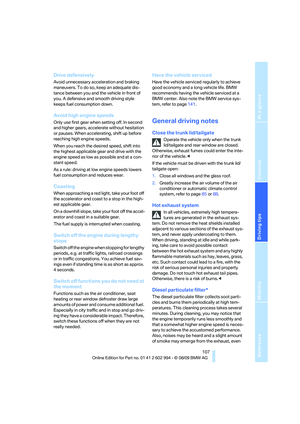 109
109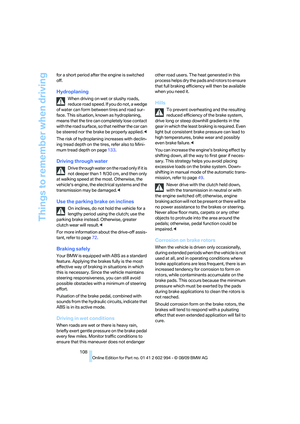 110
110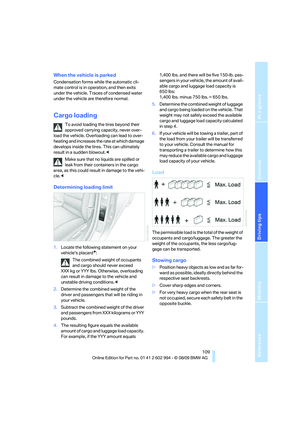 111
111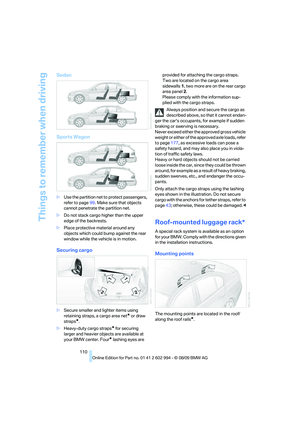 112
112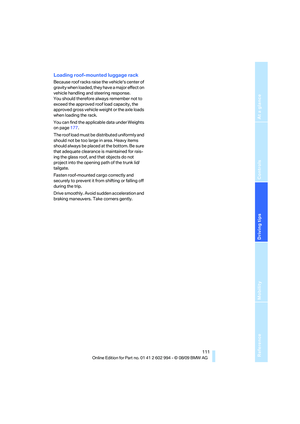 113
113 114
114 115
115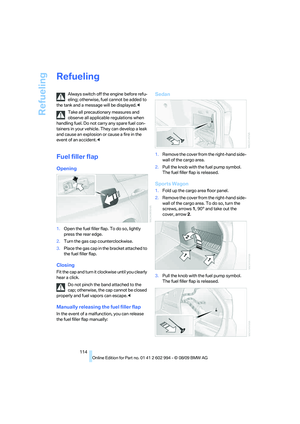 116
116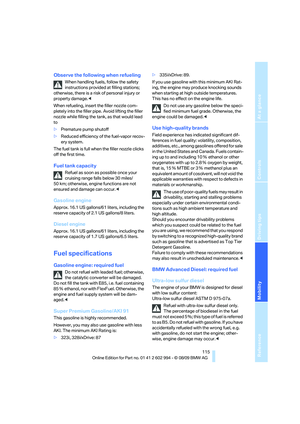 117
117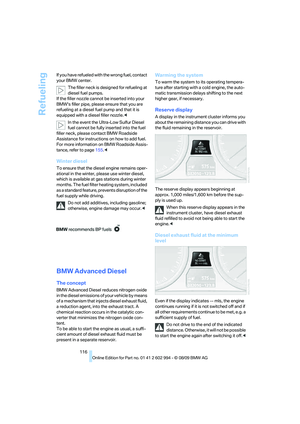 118
118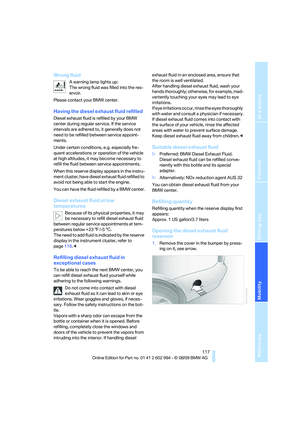 119
119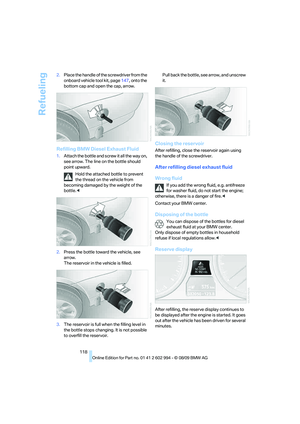 120
120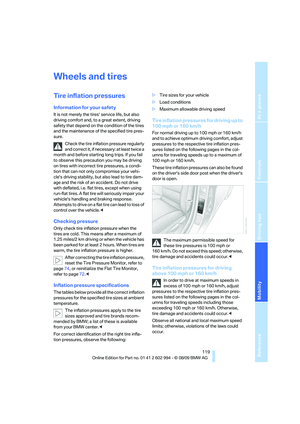 121
121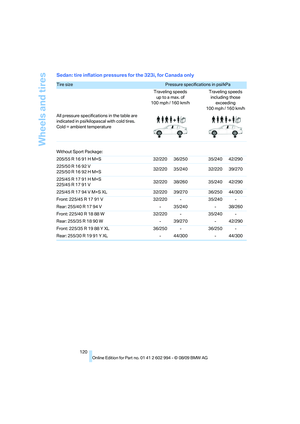 122
122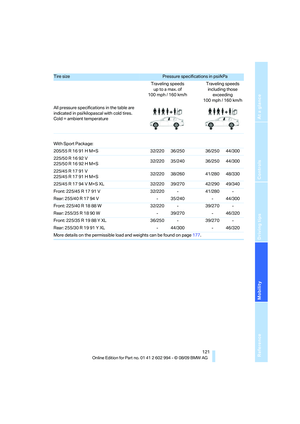 123
123 124
124 125
125 126
126 127
127 128
128 129
129 130
130 131
131 132
132 133
133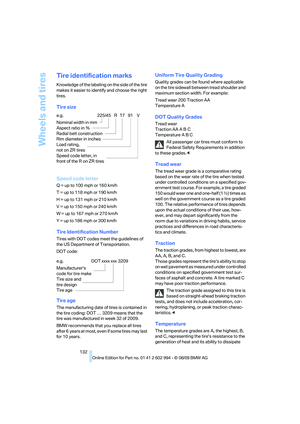 134
134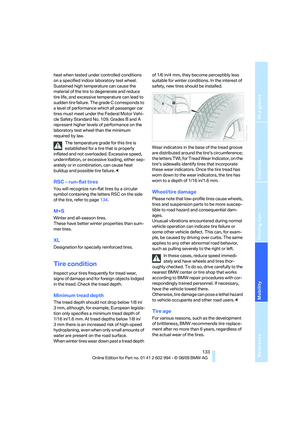 135
135 136
136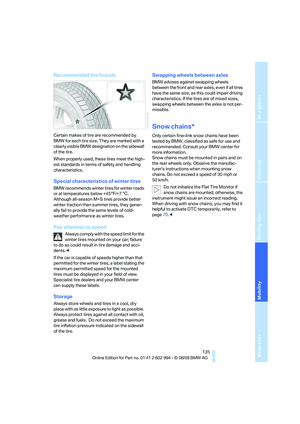 137
137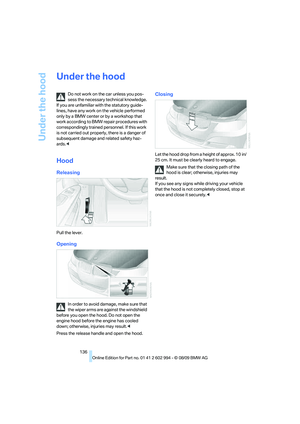 138
138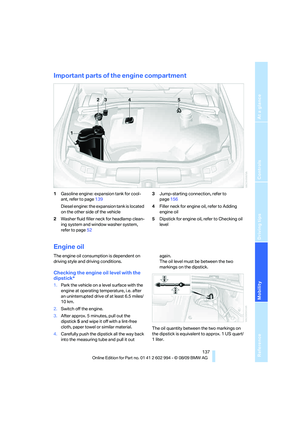 139
139 140
140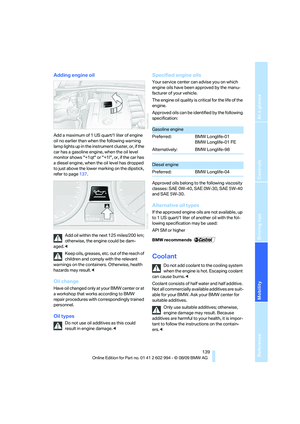 141
141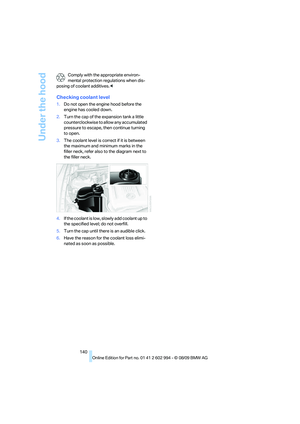 142
142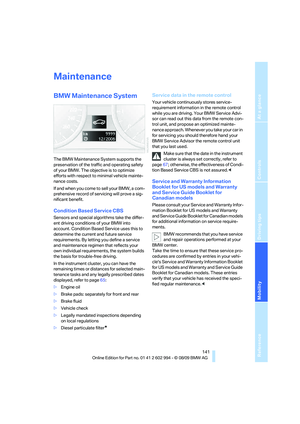 143
143 144
144 145
145 146
146 147
147 148
148 149
149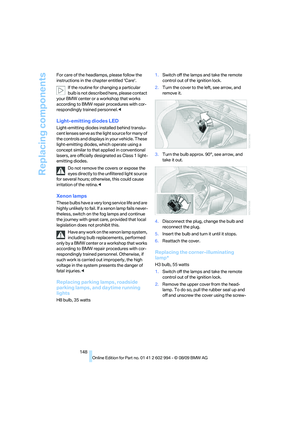 150
150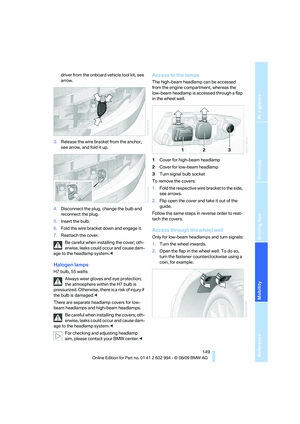 151
151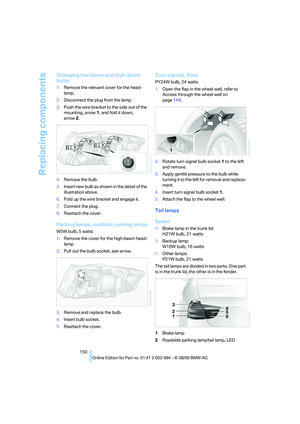 152
152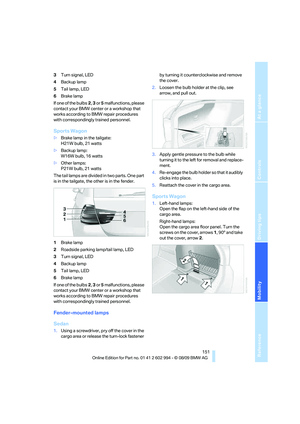 153
153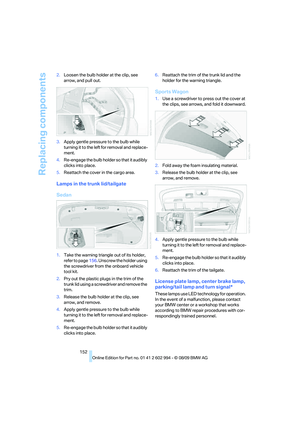 154
154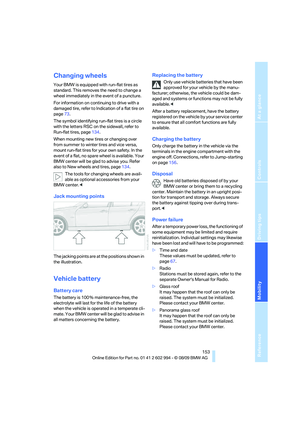 155
155 156
156 157
157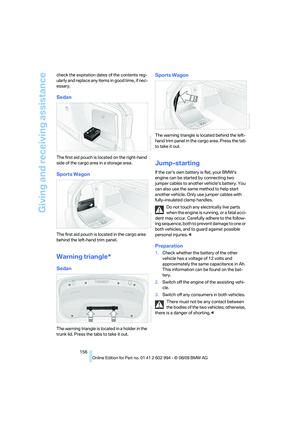 158
158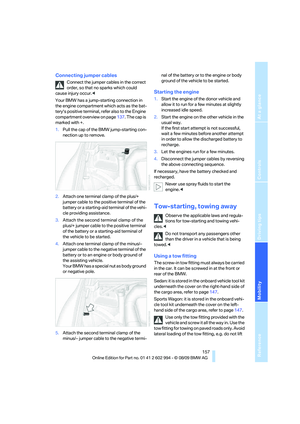 159
159 160
160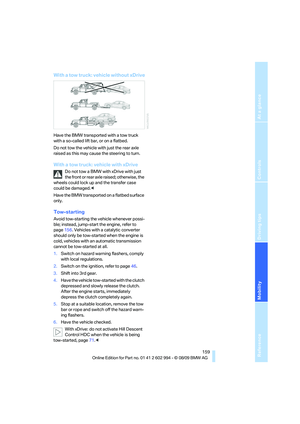 161
161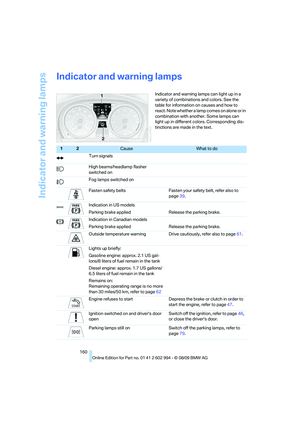 162
162 163
163 164
164 165
165 166
166 167
167 168
168 169
169 170
170 171
171 172
172 173
173 174
174 175
175 176
176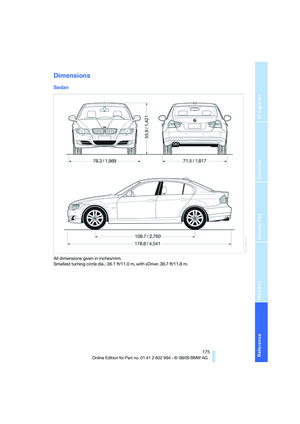 177
177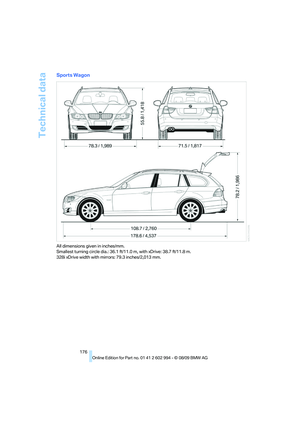 178
178 179
179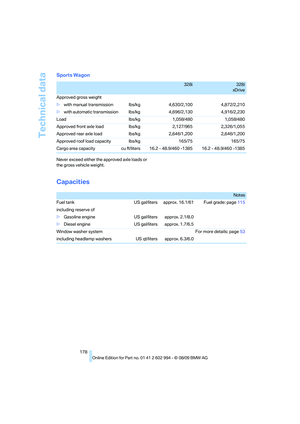 180
180 181
181 182
182 183
183 184
184 185
185 186
186 187
187 188
188 189
189 190
190 191
191 192
192 193
193 194
194 195
195