2010 BMW M3 warning
[x] Cancel search: warningPage 5 of 196

Reference
At a glance
Controls
Driving tips
Mobility
Contents
The fastest way to find information on a partic-
ular topic or item is by using the index, refer to
page180.
Using this Owner's Manual
4Notes
6Reporting safety defects
At a glance
10Cockpit
Controls
18Opening and closing
33Adjustments
42Transporting children safely
46Driving
61Controls overview
69Technology for driving comfort and
safety
79Lamps
84Climate
91Practical interior accessories
Driving tips
106Things to remember when driving
Mobility
114Refueling
119Wheels and tires
136Under the hood
141Maintenance
143Care
147Replacing components
155Giving and receiving assistance
160Indicator and warning lamps
Reference
174Technical data
180Everything from A to Z
Page 7 of 196

Reference
At a glance
Controls
Driving tips
Mobility
5
The individual vehicle
When you ordered your BMW, you chose vari-
ous items of equipment. This Owner's Manual
describes the entire array of options and equip-
ment available with a specific BMW model.
Please bear in mind that the manual may con-
tain information on accessories and equipment
that you have not specified for your own vehicle.
Sections describing options and special equip-
ment are marked by asterisks
* to assist you in
identifying possible differences between the
descriptions in this manual and your own vehi-
cle's equipment.
If equipment in your BMW is not described in
this Owner's Manual, please refer to the accom-
panying Supplementary Owner's Manuals.
Editorial notice
BMW pursues a policy of continuous, ongoing
development that is conceived to ensure that
our vehicles continue to embody the highest
quality and safety standards combined with
advanced, state-of-the-art technology. For this
reason, it is possible in exceptional cases that
features described in this Owner's Manual
could differ from those on your vehicle.
For your own safety
Maintenance and repair
Advanced technology, e.g. the use of
modern materials and powerful electron-
ics, requires specially adapted maintenance
and repair methods. You should therefore have
the corresponding work on your vehicle per-
formed only by your BMW center or at a work-
shop that works according to BMW repair pro-
cedures with correspondingly trained
personnel. If this work is not carried out prop-
erly, there is a danger of subsequent damage
and related safety hazards.<
Parts and accessories
For your own safety, use genuine parts
and accessories approved by BMW.
When you purchase accessories tested and
approved by BMW and Original BMW Parts, you
simultaneously acquire the assurance that they
have been thoroughly tested by BMW to ensure
optimum performance when installed on your
vehicle.
BMW warrants these parts to be free from
defects in material and workmanship.
BMW will not accept any liability for damage
resulting from installation of parts and accesso-
ries not approved by BMW.
BMW cannot test every product made by other
manufacturers to verify if it can be used on a
BMW safely and without risk to either the vehi-
cle, its operation, or its occupants.
Original BMW Parts, BMW Accessories and
other products approved by BMW, together
with professional advice on using these items,
are available from all BMW centers.
Installation and operation of accessories not
approved by BMW, such as alarms, radios,
amplifiers, radar detectors, wheels, suspension
components, brake dust shields, telephones,
including operation of any mobile phone from
within the vehicle without using an externally
mounted antenna, or transceiver equipment, for
instance, CBs, walkie-talkies, ham radio or sim-
ilar accessories, may cause extensive damage
to the vehicle, compromise its safety, interfere
with the vehicle's electrical system or affect the
validity of the BMW Limited Warranty. See your
BMW center for additional information.<
Maintenance, replacement, or repair of
the emission control devices and sys-
tems may be performed by any automotive
repair establishment or individual using any cer-
tified automotive part.<
California Proposition 65 warning
California law requires us to issue the following
warning:
Engine exhaust and a wide variety of
automobile components and parts,
Page 14 of 196

Cockpit
12
Instrument cluster
1Speedometer
2Indicator lamps for turn signals
3Indicator and warning lamps13
4Displays for active cruise control
*55
5Tachometer61
6Engine oil temperature
*62
Energy Control
*62
7Display for
>Clock61
>Outside temperature61
>Indicator and warning lamps678Display for
>Position of automatic transmission
*48
>Computer63
>Date of next scheduled service, and
remaining distance to be driven65
>Odometer and trip odometer61
>High-beam assistant
*81
>Initializing the Flat Tire Monitor
*72
>Resetting the Tire Pressure
Monitor
*74
>Checking engine oil level
*137
>Settings and information64
>There is a Check Control
message67
9Fuel gauge62
10Resetting the trip odometer61
Page 15 of 196

At a glance
Controls
Driving tips
Mobility Reference
13
Indicator and warning lamps
The concept
Indicator and warning lamps can light up in a
variety of combinations and colors.
Several of the lamps are checked for proper
functioning and light up temporarily when the
engine is started or the ignition is switched on.
What to do in case of a malfunction
A list of all indicator and warning lamps, as well
as notes on possible causes of malfunctions
and on how to respond, can be found starting
on page160.
Page 17 of 196

At a glance
Controls
Driving tips
Mobility Reference
15
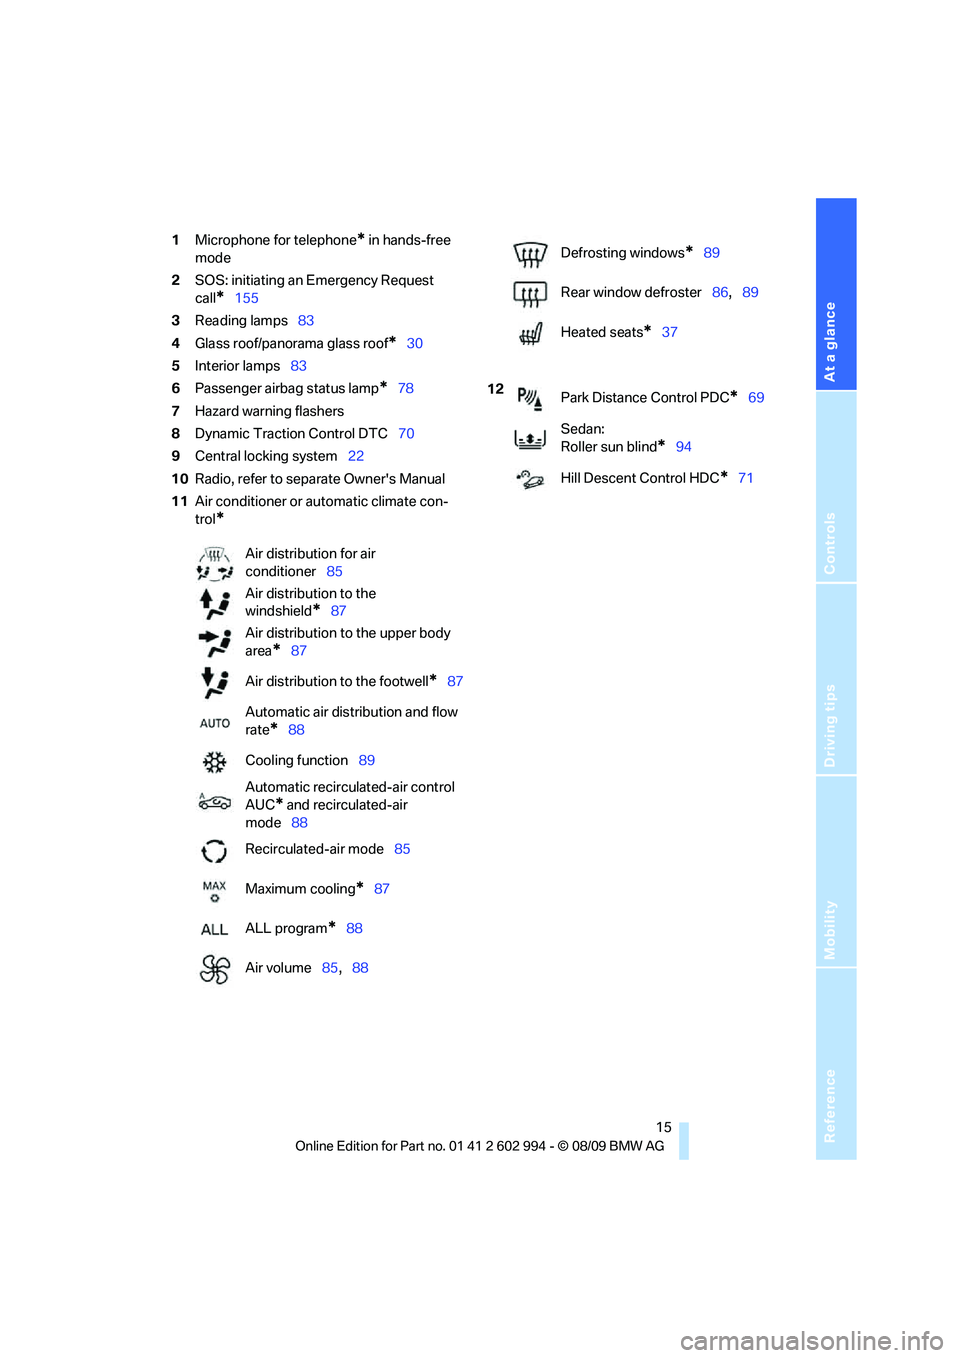
1Microphone for telephone* in hands-free
mode
2SOS: initiating an Emergency Request
call
*155
3Reading lamps83
4Glass roof/panorama glass roof
*30
5Interior lamps83
6Passenger airbag status lamp
*78
7Hazard warning flashers
8Dynamic Traction Control DTC70
9Central locking system22
10Radio, refer to separate Owner's Manual
11Air conditioner or automatic climate con-
trol
*
Air distribution for air
conditioner85
Air distribution to the
windshield
*87
Air distribution to the upper body
area
*87
Air distribution to the footwell
*87
Automatic air distribution and flow
rate
*88
Cooling function89
Automatic recirculated-air control
AUC
* and recirculated-air
mode88
Recirculated-air mode85
Maximum cooling
*87
ALL program
*88
Air volume85,88
Defrosting windows*89
Rear window defroster86,89
Heated seats
*37
12
Park Distance Control PDC
*69
Sedan:
Roller sun blind
*94
Hill Descent Control HDC
*71
Page 21 of 196

Reference
At a glance
Controls
Driving tips
Mobility
19
>Settings for the display in the instrument
cluster:
>12h/24h format of the clock, refer to
page64
>Date format, refer to page64
>Units of measure, refer to page64
>Light settings:
>Pathway lighting, refer to page79
>Daytime running lights, refer to page80
>High-beam assistant, refer to page81
>Automatic climate control
*: AUTO pro-
gram, cooling function and automatic recir-
culated-air control activated/deactivated,
temperature, air volume and distribution,
refer to page87 ff
>Entertainment:
>Speed-dependent volume control, refer
to separate Owner's Manual
Central locking system
The concept
The central locking system functions when the
driver's door is closed.
The system simultaneously engages and
releases the locks on the following:
>Doors
>Trunk lid/tailgate
>Fuel filler flap
Operating from outside
>Via the remote control
>Via the door lock
*
>In cars with Comfort Access*, via the han-
dles on the driver's and front passenger
doors
In addition, if the remote control is used, the
interior lamps and the door's courtesy lamps
*
are also switched on or off. The alarm system*
is also armed or disarmed.
For further details of the alarm system,
refer to
page25.
Operating from inside
By means of the button for central locking, refer
to page22.
In the event of a sufficiently severe accident, the
central locking system unlocks automatically. In
addition, the hazard warning flashers and inte-
rior lamps come on.
Opening and closing:
Using the remote control
Persons or animals in a parked vehicle
could lock the doors from the inside. You
should therefore take the remote control with
you when you leave the vehicle so that the latter
can be opened from outside.<
Unlocking
Press the button.
The interior lamps, the courtesy lamps
* and the
welcome lamps come on.
Setting unlocking characteristics
You can set whether only the driver's door or
the entire vehicle is to be unlocked when the
button is pressed for the first time.
For operating principle, refer to page64.
1.Switch on the ignition, refer to page46.
2.Lightly push button1 in the turn indicator
lever up or down repeatedly until the sym-
bol appears in the display accompanied by
the word "SET".
3.Press button 2.
Page 23 of 196

Reference
At a glance
Controls
Driving tips
Mobility
21
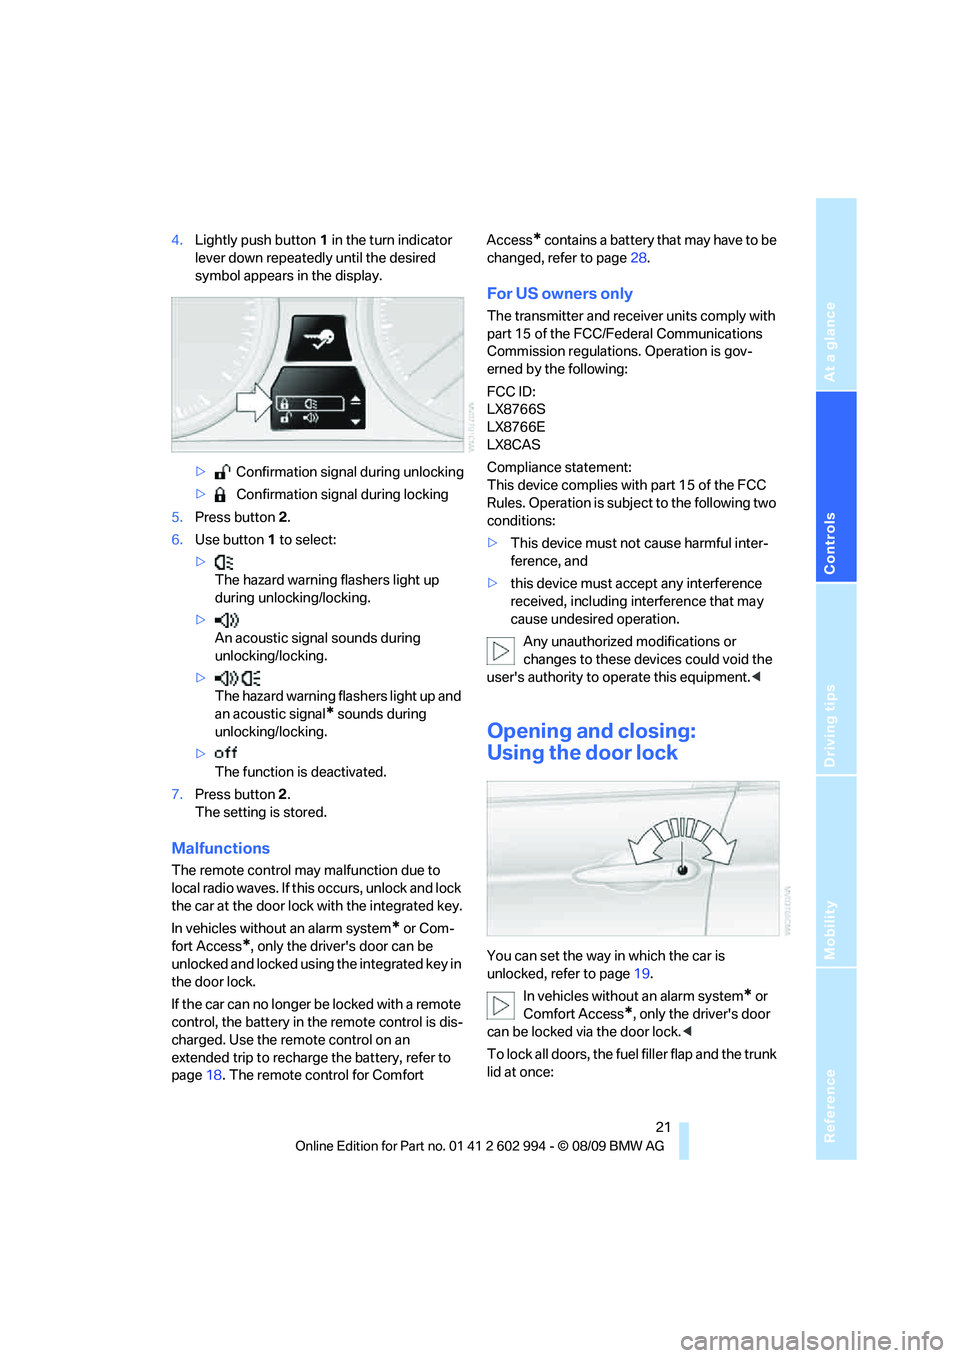
4.Lightly push button1 in the turn indicator
lever down repeatedly until the desired
symbol appears in the display.
> Confirmation signal during unlocking
> Confirmation signal during locking
5.Press button 2.
6.Use button 1 to select:
>
The hazard warning flashers light up
during unlocking/locking.
>
An acoustic signal sounds during
unlocking/locking.
>
The hazard warning flashers light up and
an acoustic signal
* sounds during
unlocking/locking.
>
The function is deactivated.
7.Press button 2.
The setting is stored.
Malfunctions
The remote control may malfunction due to
local radio waves. If this occurs, unlock and lock
the car at the door lock with the integrated key.
In vehicles without an alarm system
* or Com-
fort Access
*, only the driver's door can be
unlocked and locked using the integrated key in
the door lock.
If the car can no longer be locked with a remote
control, the battery in the remote control is dis-
charged. Use the remote control on an
extended trip to recharge the battery, refer to
page18. The remote control for Comfort Access
* contains a battery that may have to be
changed, refer to page28.
For US owners only
The transmitter and receiver units comply with
part 15 of the FCC/Federal Communications
Commission regulations. Operation is gov-
erned by the following:
FCC ID:
LX8766S
LX8766E
LX8CAS
Compliance statement:
This device complies with part 15 of the FCC
Rules. Operation is subject to the following two
conditions:
>This device must not cause harmful inter-
ference, and
>this device must accept any interference
received, including interference that may
cause undesired operation.
Any unauthorized modifications or
changes to these devices could void the
user's authority to operate this equipment.<
Opening and closing:
Using the door lock
You can set the way in which the car is
unlocked, refer to page19.
In vehicles without an alarm system
* or
Comfort Access
*, only the driver's door
can be locked via the door lock.<
To lock all doors, the fuel filler flap and the trunk
lid at once:
Page 27 of 196

Reference
At a glance
Controls
Driving tips
Mobility
25
Make sure that the closing path of the
trunk lid/tailgate is clear; otherwise, inju-
ries may result.<
Sedan
Sports Wagon
Sports Wagon: opening and closing the
rear window
Small items can be loaded and unloaded
quickly when the rear window is opened sepa-
rately.
When the button on the roller cover is
pressed, refer to page99, the roller cover
is raised. Before closing the rear window, press
the roller cover downward until it engages.<
Press the button: the rear window opens
slightly. It can now be swung upwards.Press the window shut to close it.
Make sure that the corners of any pointed
or sharp-edged cargo are padded if they
could bump against the rear window while the
vehicle is in motion; otherwise, the heating ele-
ments of the rear window could be damaged.<
Alarm system*
The concept
The vehicle alarm system responds:
>When a door, the hood or the trunk lid/tail-
gate is opened
>To movements inside the vehicle: Interior
motion sensor, refer to page26
>When the car's inclination changes, for
instance if an attempt is made to jack it up
and steal the wheels or to raise it prior to
towing away
>When there has been an interruption of
power supply from the battery
The alarm system signals unauthorized entry
attempts for a short time by means of:
>An acoustic alarm
>Switching on the hazard warning flashers
>Flashing the high beams
Arming and disarming
When you lock or unlock the vehicle, either with
the remote control or at the door lock, the alarm
system is armed or disarmed at the same time.
You can open the trunk lid/tailgate even when
the alarm system is armed, by pressing the
button on the remote control, refer to page20.
The lid is locked and monitored again as soon
as you close it.
Panic mode*
You can trigger the alarm system if you find
yourself in a dangerous situation:
Press the button for at least three seconds.
To switch off the alarm: press any button.